The best patio sub-base for most projects is compacted crushed stone, specifically a dense-graded 3/4 minus (also called processed gravel or crusher run), laid in compacted lifts of no more than 4 inches at a time, finished with a 1-inch bedding layer of coarse sand or stone dust.
Best Patio Sub Base: Choose, Install, and Fix Issues

Nolan Ellison
29 Apr 2026
If you're mainly focused on pavers and want a quick decision point, this dense-graded 3/4 minus crusher run approach is also a strong candidate for the best base for patio stones. For slab and heavy patio installations, a dense-graded 3/4 minus crushed-stone sub-base is often the best base for patio slabs. That combination gives you load distribution, drainage, and a screeded surface ready to receive virtually any patio material.
The exact depth, gradation, and whether you need a geotextile or a stabilizing additive depends on your soil type, climate, and what you're laying on top, and getting those details right is the difference between a patio that lasts 20 years and one that starts rocking and sinking within two. For a blue stone patio, that same dense-graded, compacted crushed-stone base is often the best foundation to keep the slabs stable best base for bluestone patio.
What a patio sub-base actually does
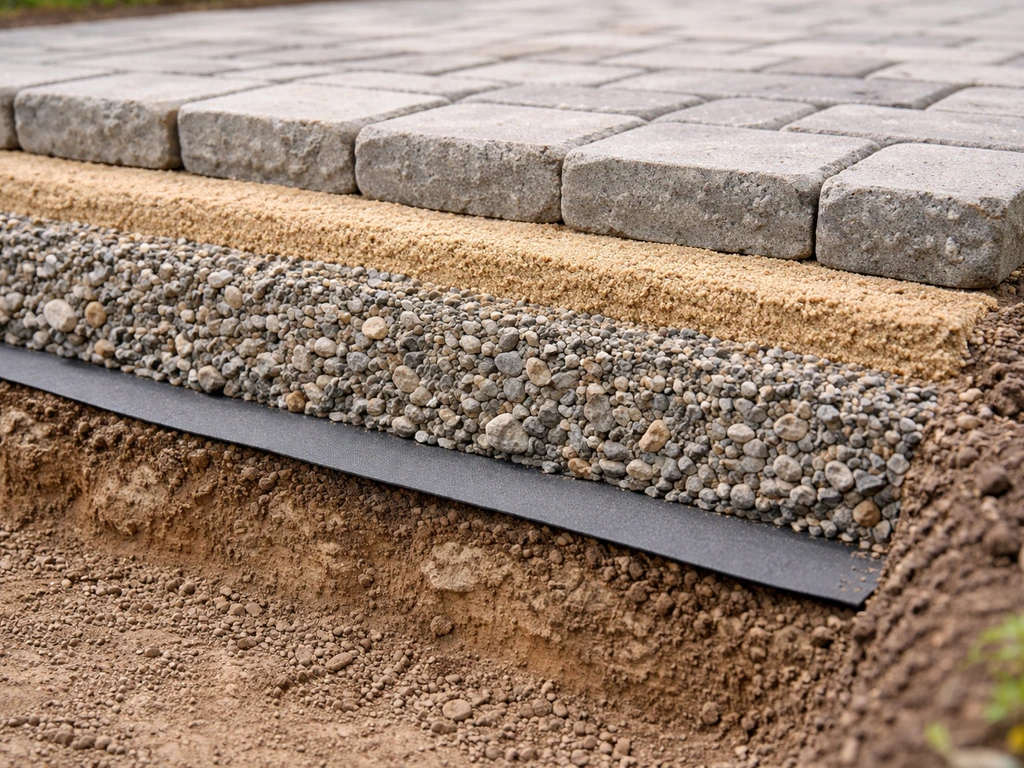
The sub-base is the engineered layer between your native soil and the patio surface. It does four things: it spreads the load from foot traffic (and the weight of furniture, grills, or the occasional vehicle) so the ground underneath doesn't deform; it provides a stable, compactable platform so the surface layer can be set level and stays level; it manages water by allowing it to drain away rather than pool under the surface; and it buffers the effects of freeze-thaw cycles so frost doesn't push your pavers or slabs out of plane.
Skip or shortcut any one of those functions and you'll see it in the surface. Inadequate support causes pavers to sink or become uneven over time. Poor drainage lets water accumulate under the surface, which turns into frost heaving in cold climates and progressive base softening everywhere else. Standing water is one of the most reliable predictors of long-term patio failure, puddles that linger after rain are almost always pointing at a drainage or base problem. Without proper leveling capacity in the sub-base, no amount of care setting the top surface will keep it flat.
Choosing the right sub-base for your patio type and thickness
Different patio surfaces have different tolerance for movement and different requirements for bedding precision. Interlocking concrete pavers and brick are forgiving of small base variations because they're small units with joints, but they need a rigid, well-compacted base because there's no mortar holding them. Interlocking concrete pavers and brick are forgiving of small base variations because they're small units with joints, but they need a rigid, well-compacted base, which is why many people choose the best base for brick patio methods discussed earlier. Large-format flagstone and porcelain tile are less forgiving of differential movement, any soft spots translate directly into cracked or rocking slabs. Here's how sub-base depth and build method should change based on what you're installing.
| Patio Surface | Recommended Sub-base Depth | Bedding Layer | Geotextile Needed? |
|---|---|---|---|
| Interlocking pavers / brick | 4–6 in compacted crushed stone (6–8 in on soft soil) | 1 in coarse sand or ASTM No. 8 stone | Yes, on soft or clay subgrade |
| Flagstone (dry-lay) | 4–6 in compacted gravel + crushed stone | 2 in stone dust or coarse sand | Yes, recommended |
| Flagstone (mortar-set) | 4–6 in compacted crushed stone + 2–3 in concrete base | Mortar bed | Yes, under gravel layer |
| Porcelain tile / natural stone tile | 4–6 in compacted crushed stone + concrete slab | Tile mortar / adhesive | Yes, under gravel layer |
| Concrete patio (poured) | 4–6 in compacted gravel sub-base | None (forms direct contact) | Optional, helpful on clay |
| Gravel / loose stone surface | 2–4 in compacted gravel base | Top-dress with decorative stone | Strongly recommended |
In freeze-thaw climates (anything that regularly dips below 20°F), add 2 inches to every base depth recommendation above. Frozen ground heaves; a deeper base means the frost line is less likely to reach the transition between compacted aggregate and native soil. On particularly soft, wet, or clay-heavy ground, the sub-base can go as deep as 12 inches, and you may need to consider chemical stabilization of the subgrade itself (more on that below) before you even start building up aggregate layers.
If you're working with an uneven yard, getting the sub-base right becomes even more critical, building up a leveled, compacted base is the primary way to create a flat surface over irregular terrain, rather than trying to compensate with thicker or thinner setting beds at the top.
Sub-base material options and when to use each
Not all gravel is the same, and the wrong gradation in the wrong role will cost you. Not all gravel is the same, and for many builds the best material for patio sub base is still compacted 3/4 minus crushed stone, so start there before you choose a different option. Here's how the main options compare and where each one belongs in a properly built system.
Dense-graded crushed stone (3/4 minus / crusher run)
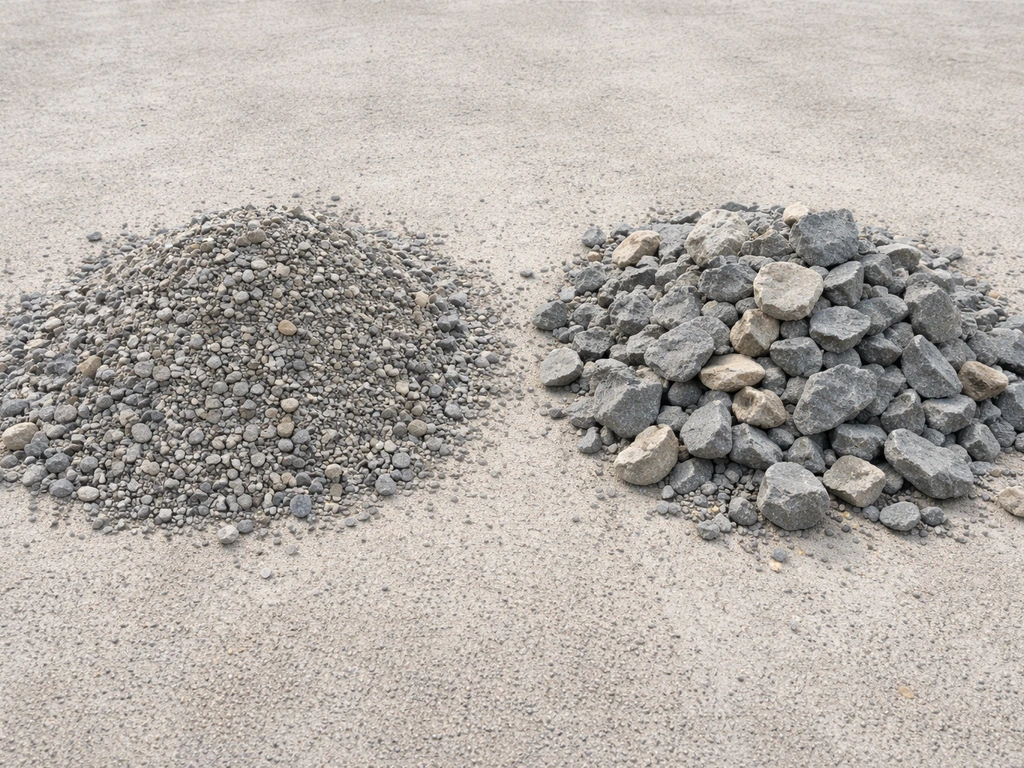
This is your workhorse sub-base material. Dense-graded aggregate (also sold as 3/4 minus, crusher run, or processed gravel depending on your region) contains a blend of angular crushed stone from 3/4 inch down to fine dust. For a bluestone patio, the best base usually starts with a dense-graded crushed stone lift like 3/4 minus, then you add the right bedding layer for stone seating Dense-graded crushed stone (3/4 minus / crusher run).
The mix of sizes is what makes it compact so well, fines fill the voids between larger pieces and the angular edges lock together under compaction to create a dense, stable layer. This is the right material for the main structural lift of virtually any residential patio sub-base. It's inexpensive, widely available, and compacts reliably with a plate compactor.
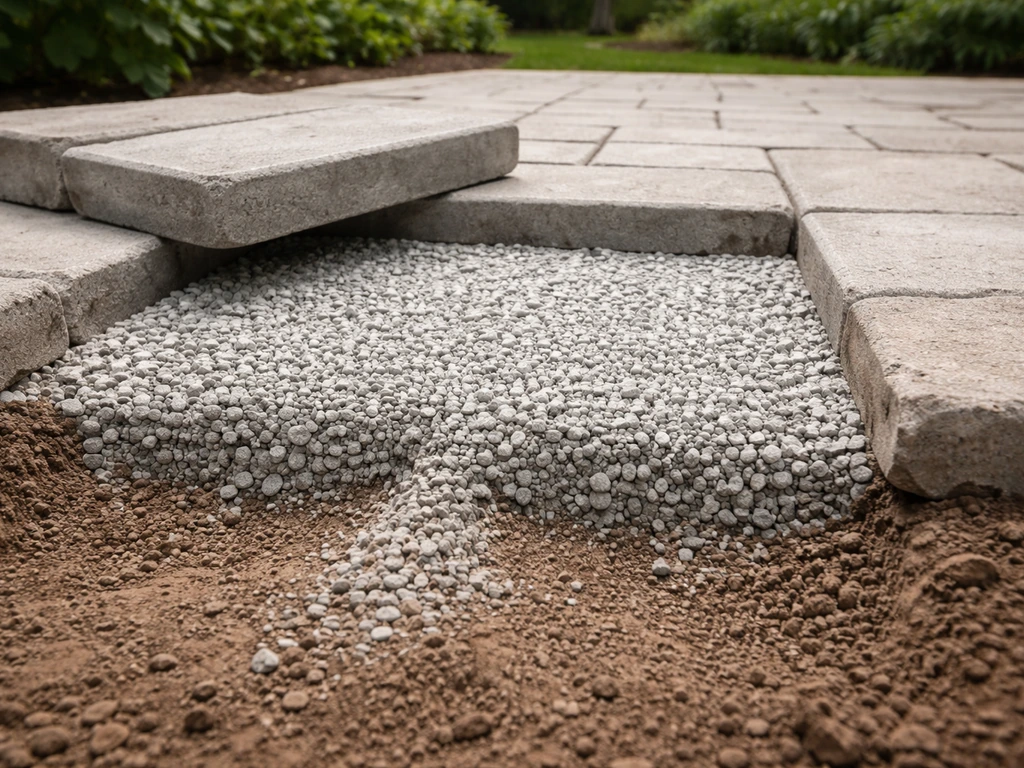
Open-graded crushed stone (ASTM No. 57 or No. 2)
Open-graded stone has had the fines washed out. ASTM No. 57 stone (roughly 3/4 inch to 3/8 inch) and No. 2 stone (roughly 1.
5 inch to 3/4 inch) are clean, uniform aggregates with lots of interconnected void space between the particles. That void space is the point: water moves through it freely. Open-graded stone is the right choice for the sub-base in permeable paver systems, in areas with chronic drainage problems, and anywhere you need to manage water movement under the surface.
The trade-off is that it doesn't compact to the same dense, rigid matrix as 3/4 minus, it stays somewhat loose, which is fine for permeable systems designed around that behavior, but isn't appropriate as the primary sub-base under mortar-set or rigid patio systems. Always pair open-graded stone with a geotextile underneath to prevent fine soil particles from migrating up and clogging the voids.
Stone dust and bedding sand
Stone dust (also called crusher fines or quarry dust) and coarse bedding sand are not sub-base materials, they're bedding and screeding materials used in the final inch or two above the compacted base. Stone dust is often used under flagstone because it's forgiving for leveling irregular stones and sets semi-firm when wet and compacted.
Coarse washed sand (similar to concrete sand) is the standard bedding layer for interlocking pavers per ICPI-style installations, typically screeded to a maximum of 1 inch (25 mm) using screed rails. CMHA Tech Note guidance for interlocking concrete paver systems uses a [nominal 1 in. (25 mm) bedding sand layer thickness](https://www. cmha.
org/resource/pav-tec-002/). Keep the bedding layer thin, a thick sand or stone dust layer under pavers acts as a cushion that shifts over time. The compacted sub-base below should be doing the structural work.
Geotextile separation fabric
Geotextile isn't a sub-base material, but it belongs in almost every sub-base system. A non-woven geotextile laid between native soil and your aggregate sub-base prevents fine soil particles from migrating upward into the gravel (a process called pumping or fines migration). Without it, clay and silt slowly work their way into the base over months and years, the aggregate loses its drainage and load-spreading properties, and you end up with a compromised base that looks fine until the patio starts sinking. Use it on clay soils, soft or wet subgrades, and under any permeable system. It's cheap insurance relative to the cost of ripping up a finished patio.
Chemical and mechanical stabilization
For soft, expansive clay subgrades or areas with a serious frost heave history, aggregate alone sometimes isn't enough. Lime or Portland cement can be mixed into the native soil before you build up the sub-base. Lime is particularly effective on expansive clays, it reacts chemically with clay minerals to reduce swelling potential and improve bearing strength. Cement stabilization works more broadly and gives faster strength gain.
These aren't DIY-standard methods, but they're worth knowing about if you have genuinely problematic soil. A geotechnical or paving contractor can test and treat the subgrade before you invest in a full base build. On less extreme soft soils, simply adding a geotextile and deepening the compacted aggregate layer provides meaningful mechanical stabilization and prevents aggregate-subgrade mixing.
Step-by-step sub-base installation
Step 1: Excavation
Mark out the patio perimeter and excavate to the depth needed for your base, bedding layer, and surface material combined. For a standard paver patio with a 6-inch base, 1-inch bedding sand, and a 2.375-inch paver, you're excavating about 9.5 to 10 inches below the target finished surface elevation. Always dig a little extra at the edges, undermined edges are a major cause of sinking corners. Use a level or laser level to check the bottom of the excavation and remove any high spots.
Step 2: Grade for drainage
The bottom of the excavation and every subsequent layer needs to slope away from the house and toward a drainage outlet. The target slope is at least 1/8 inch per foot (roughly 1%), and 1/4 inch per foot is better in wet climates. This slope carries through all the way to the finished surface. A flat sub-base guarantees puddles at the surface level. Use a long level or a laser transit to verify grade as you go.
Step 3: Lay geotextile (when needed)
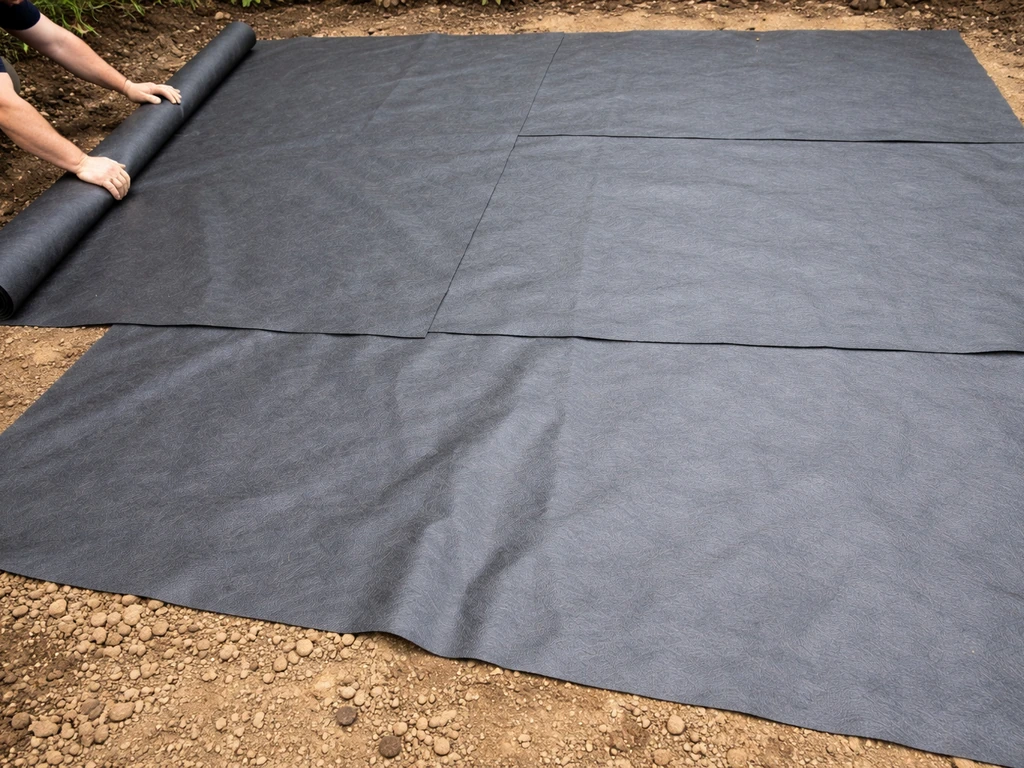
If you're working with clay, soft soil, or a permeable paver system, roll out your non-woven geotextile over the prepared subgrade before adding any aggregate. Overlap seams by at least 12 inches. Fold the edges up the sides of the excavation so they can be folded back over the top of the completed base, creating a wrap that prevents aggregate from spilling sideways into native soil.
Step 4: Build the sub-base in lifts
Never dump all your aggregate in at once and compact it once. FHWA’s federal lands road construction specifications also describe compacting aggregate in horizontal lifts and outline compaction testing methods to verify lift-by-lift requirements [Never dump all your aggregate in at once and compact it once. ](https://highways. dot.
gov/sites/fhwa. dot. gov/files/docs/federal-lands/specs/archives/37486/fp-24. pdf).
Aggregate compacts effectively in lifts of no more than 4 inches. Add a 4-inch layer of 3/4 minus crushed stone, compact it thoroughly with a plate compactor (make at least two to three passes in perpendicular directions), then add the next 4-inch lift and repeat. You know a lift is fully compacted when the surface shows no visible movement or deflection under the compactor.
Rushing compaction is the single most common cause of patio failure, the base looks solid until you put weight on it.
Step 5: Screed the bedding layer
Once the compacted sub-base is at the correct elevation and grade, add the bedding layer. Set screed rails or pipes at the correct height (1 inch for sand bedding, up to 2 inches for stone dust under flagstone), spread the material, and pull a straight board across the rails to create a uniform, flat surface. Do not compact the screeded bedding layer, it needs to remain loose enough for the surface units to seat into and for you to level individual pieces. Once screeded, don't walk on it; set your first paver at the edge and work forward off the laid surface.
Common mistakes that cause sinking, heaving, and puddling
- Under-excavating: The most frequent mistake. If you don't dig deep enough, the total base thickness is reduced, the structure is weaker, and the finished surface sits too high relative to adjacent grades, which also creates drainage problems. Always calculate total excavation depth before you start digging.
- Single-lift compaction: Dumping 8 or 10 inches of gravel and running a plate compactor over it once leaves the bottom half essentially uncompacted. That loose lower material compresses under load over time, and the patio sinks unevenly.
- Skipping geotextile on clay or soft soil: Without separation, clay fines migrate into the aggregate base within a few years. The base loses its properties, you get rocking and sinking, and the only real fix is to tear the patio out and redo it.
- Using the wrong stone: Dense-graded (3/4 minus) and open-graded (No. 57) stone are not interchangeable. Using washed open-graded stone as a structural sub-base under non-permeable pavers gives you an unstable layer that shifts. Using fines-rich material in a permeable system clogs it almost immediately.
- Too-thick bedding layer: A 3-inch layer of bedding sand under pavers is not a structural upgrade — it's a liability. Thick sand beds shift laterally under load, causing pavers to creep and edges to sink. Keep bedding layers at 1 to 2 inches maximum.
- No slope for drainage: A perfectly flat sub-base is a water-collection feature. Frost heaving and base softening both start with water that can't escape. Build the slope in from the first excavation cut.
- Compacting in wet conditions: Compacting saturated aggregate can pump fines to the surface and destroy the structure you're trying to build. If the base material is muddy or slurry-like, wait for it to dry before compacting.
- Missing edge restraints: Even a perfectly built base will let pavers migrate outward over time without edge restraints locking the perimeter. Edge failure almost always starts at the corners.
I've seen all of these in person, but the one I see most is under-excavation. Homeowners measure for the surface material and the bedding layer, forget to account for base depth, and end up with 2 inches of gravel where there should be 6. Three years later the patio looks like it's melting into the ground.
Maintenance, repairs, and when it's time to redo the sub-base
Routine maintenance
A well-built sub-base needs almost no direct maintenance, it's sealed under your patio surface. What you're doing at the surface level is protecting it indirectly. Keep joints filled with polymeric sand or joint fines: depleted joints let surface water infiltrate more aggressively and accelerate base erosion in non-permeable systems. Top up joint material annually if you notice it washing out or compacting down. Keep drainage paths around the patio clear so water leaving the surface can get away from the edge.
Minor settlement
If you have one or two rocking or slightly sunken pavers within a year or two of installation, it's often a bedding-layer issue rather than a sub-base failure. Pull the affected pavers, add a small amount of bedding sand to the low spots, re-screed, and relay the pavers. Check that the surrounding pavers aren't creeping, if they are, check your edge restraints.
Significant settling or widespread movement
If a whole section of the patio has dropped, if you have multiple pavers rocking across a broad area, or if you're seeing surface heaving in a pattern that follows the frost line, the sub-base itself is the problem. Topping up joint sand won't fix it. The correct repair is to pull the affected section of pavers, remove the bedding layer, assess the condition of the compacted base, add material if depth has been lost, recompact, relay the bedding layer, and relay the surface. If the sub-base has been contaminated by fines migration (it looks silty or muddy when you dig into it), you may need to remove it entirely, install or replace the geotextile, and rebuild from scratch.
When to redo the sub-base entirely
A full sub-base redo is worth it when: the original base was never compacted properly and settlement is widespread; when fines contamination has compromised the full depth of the aggregate; when the original installation had no geotextile on clay soil and the base is now mixing with the subgrade; or when drainage corrections require regrading the entire area. If you're already pulling up half the patio to fix one section, it's usually worth taking the whole surface up, reassessing what went wrong, and doing it right. Rebuilding over a bad sub-base just defers the same failure.
The good news is that a properly specified and compacted sub-base, the right stone gradation, right depth for your surface type and climate, geotextile where it belongs, and real compaction in lifts, is genuinely a one-time job. When the base is done right, you're maintaining a patio surface, not fighting the ground underneath it. Getting the sub-base right is the single highest-value investment you can make in any patio project.
FAQ
How do I decide between 3/4 minus crusher run and open-graded stone if I’m doing a permeable or non-permeable patio?
For non-permeable paver patios (standard pavers, mortar set, or rigid finishes), use dense-graded 3/4 minus as the structural layer. Choose open-graded stone only when the design intends to let water pass through the base system, usually paired with a geotextile and an appropriate drainage approach. If you are unsure about your permeability design, default to 3/4 minus plus good slope and controlled edge drainage, because open-graded stone does not compact into the same load-bearing matrix.
Do I need a geotextile under the sub-base if my soil is sandy?
Not always, but it often still helps. Sandy soils usually migrate fines more slowly than clay, but geotextile still reduces the chance of pumping when you have poor compaction at the interface, high groundwater, or seasonal wetting. If you see any signs of muddy fines working into the aggregate after heavy rain, that is a practical signal to use a non-woven geotextile and overlap seams properly.
What happens if I compact thicker than 4 inches per lift?
You can end up with a top layer that looks solid while the lower portion remains loose. That hidden under-compaction later causes settlement, especially under point loads like a grill, hot tub, or table legs. If you already poured an oversized lift, the safer fix is to rework it (remove and rebuild) rather than assuming it will “settle in” without future unevenness.
Can I use stone dust or sand as the structural sub-base if I don’t have enough 3/4 minus?
No. Stone dust and coarse sand are intended for bedding and screeding, not structural support. They can compact, but they lack the dense, interlocking gradation and drainage behavior of dense-graded crusher run. Using them as sub-base increases the risk of rutting, pumping, and uneven settling, particularly when the subgrade gets wet or freezes.
How do I verify that my compacted sub-base is at the right grade before adding bedding?
Use a laser level or long straightedge, then take measurements from a known fixed reference point (like a string line tied to stakes or a marked building datum). Don’t just check the visible surface, confirm grade at multiple points and corners. If you find high spots, remove aggregate and recompact, and if you find low spots, add aggregate and recompact, since patching after bedding is harder and can create localized rocking.
Is 1/8 inch per foot slope always enough for drainage away from the house?
It’s a common minimum for patios, but wet climates often perform better with closer to 1/4 inch per foot. Also consider site specifics like how quickly the ground can absorb water and whether you have a nearby drainage outlet. If puddles linger after rain or you notice water flowing toward the house, re-evaluate slope and outlet location rather than only adding more joint sand.
What’s the quickest way to diagnose whether the problem is bedding, base, or soil underneath?
A small number of rocking pavers within a limited area within the first couple of years often points to bedding or surface seating issues. Broad settlement, multiple pavers rocking across a wider section, or heaving patterns that seem to follow the frost line suggests the compacted base or subgrade condition is failing. If the base is contaminated (muddy/silty when exposed), you cannot reliably fix it by topping bedding only, you usually have to remove compromised material and rebuild the layer system.
My patio has a low corner, but the rest seems fine. Should I remove everything?
Not necessarily. If only corners or edge lines are failing, under-excavation at the perimeter, lack of proper edge restraint, or insufficient drainage at the edge are common causes. Before assuming full removal, check excavation depth and edge undermining, confirm slope toward the outlet, and verify restraint. If the surrounding area is stable and only the edge is sinking, you may be able to lift and rebuild just that zone with correct depth and recompact the base.
Do I need to adjust sub-base depth if I’m installing heavy items or an occasional vehicle on part of the patio?
Yes. Areas that receive concentrated loads need a thicker, well-compacted structural layer and often a more robust base build than a typical residential walkway. The article’s lift thickness and depth concept still apply, but the best next step is to treat those areas as a separate design zone, then confirm your excavation depth and compaction targets accordingly.
Can I fix small settling later by adding more joint sand or topping off polymeric sand?
Usually no for structural settlement. Joint sand helps reduce water infiltration through the joints, but it does not restore lost base depth or correct under-compaction. If you can rock pavers or the patio has dropped over a broad area, the effective repair is to lift the affected section, address the bedding and re-evaluate base depth and compaction, then relay and re-screed.
What’s a practical test for whether fines migration or geotextile failure is compromising my base?
When you lift pavers, check the condition of the aggregate after rain. If the material near the top of the sub-base appears silty, muddy, or has a “washed” look compared to clean crusher run below, that is a strong sign of fines pumping and clogged drainage pathways. In that case, plan for replacing compromised aggregate, ensuring proper geotextile coverage and overlap, and rebuilding from the point where contamination is occurring.