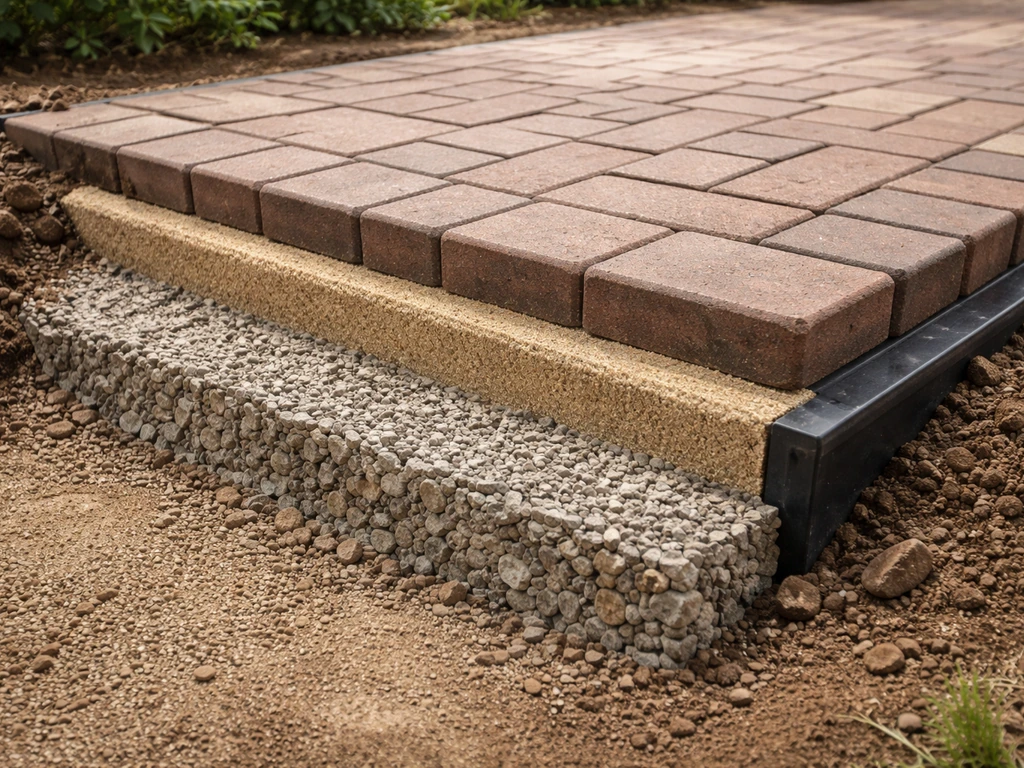
The best base for a brick patio is a compacted granular aggregate layer (crushed stone or gravel, 4–6 inches deep for residential use) topped with 1 inch of screeded bedding sand. That two-layer foundation, built on a properly compacted and graded soil subgrade, is what keeps bricks flat, stable, and draining correctly for decades. Skip either layer, or shortcut the compaction, and you will be resetting sunken or rocking bricks within a few seasons.
Best Base for Brick Patio: Gravel, Sand, and Setup Tips

Nolan Ellison
29 Apr 2026
The different base types you'll come across
There are a few approaches floating around online and in local contractor habits. Some work. Some don't, or at least don't hold up as well. Here's what you'll actually encounter:
- Compacted gravel base + bedding sand: the industry-standard system endorsed by the Concrete Masonry and Hardscapes Association (CMHA) and the Interlocking Concrete Pavement Institute (ICPI). Crushed stone is compacted in lifts, then a 1-inch sand layer is screeded smooth as the brick setting bed. This is the method this article focuses on because it outperforms everything else for residential patios.
- Sand-only base: some DIYers skip gravel entirely and dig down a few inches, fill with sand, and set bricks directly. It feels easy, and it works for a season or two on stable, well-draining soil. But sand alone shifts under load and rainfall, and you end up with a wavy surface fast.
- Crusher run or compactable paver base (processed gravel/dust mix): a bagged or bulk product sold at most big-box stores. Easier to compact than clean gravel, and it's a fine choice for small DIY jobs. It's essentially a shortcut version of the compacted aggregate base, and it performs reasonably well if you compact it thoroughly.
- Concrete slab base with mortar-set bricks: a rigid system sometimes used for high-load areas or very wet climates. It eliminates settling but cracks when the slab moves, and repairs are much harder. Most residential patio builders don't need it.
- Direct-set on native soil: bricks placed directly on tamped earth. Fine for a temporary garden path, not acceptable for a finished patio. The soil compresses unevenly, frost lifts bricks, and drainage is zero.
The compacted gravel-plus-sand system wins because it handles drainage, distributes load, tolerates minor frost movement, and allows individual bricks to be reset without tearing up the whole patio. It's the foundation every serious installation uses, and it's what I recommend unless you have a very specific reason to go rigid.
Soil prep and base depth: it depends on what you're digging into
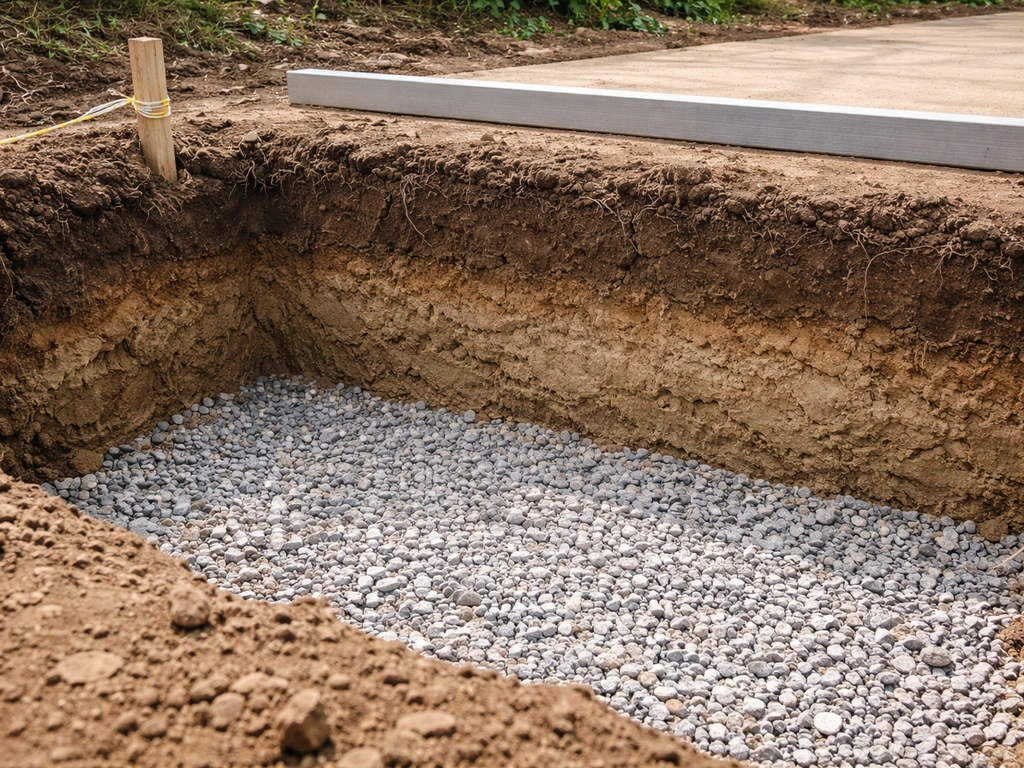
Before you order a single yard of gravel, you need to understand what's under your patio. The soil condition determines how deep to go and whether you need extra steps like a geotextile fabric. CMHA is clear that your soil subgrade should be moist but not saturated when you compact it. A good field test: grab a handful, squeeze it into a ball, then drop it. It should hold together when squeezed but break apart when dropped. Wet, muddy soil will compress unevenly. Dry, dusty soil won't compact properly either.
| Soil Type | Excavation Depth (base only) | Geotextile Needed? | Notes |
|---|---|---|---|
| Sandy, well-draining | 4–5 in (100–125 mm) | Usually not | Good bearing capacity; base goes down easier |
| Clay or silt | 5–6 in (125–150 mm) | Strongly recommended | Fines migrate up into base; fabric prevents contamination |
| Expansive clay or soft fill | 6+ in (150+ mm) | Yes | May need additional compacted select fill before base aggregate |
| Organic or topsoil layer present | Remove all organic material first, then excavate to depth | Yes | Never build on topsoil; it compresses and rots |
| Frost-prone region (freezing winters) | Add 2–4 in extra depth or use non-frost-susceptible base material well below frost line | Yes | FHWA guidance supports increasing base thickness to limit frost penetration into subgrade |
For a standard residential patio with outdoor furniture and foot traffic, a 4–6 inch compacted aggregate base is the CMHA minimum. Choosing the best material for patio sub base usually comes down to a compacted aggregate layer like crushed stone or gravel, sized and installed for your local conditions. For patio slabs, the best base is a properly compacted crushed-stone or gravel aggregate layer with correct depth and drainage so the surface stays level best base for patio slabs. If you're in a freeze-thaw climate (Zone 5 or colder), go to the deeper end or even 6–8 inches. The goal is to keep frost from penetrating into the subgrade soils beneath, because when that soil freezes and heaves, it pushes bricks up unevenly. Adding base thickness effectively insulates the subgrade from freeze cycles and keeps the whole system stable during spring thaw.
Geotextile fabric is listed as optional by CMHA, but on clay or silty soils I would not skip it. It separates the fine subgrade from your aggregate base so the fines don't pump up and contaminate your gravel over time. If you're choosing a fabric, look for one that meets AASHTO M-288, which defines performance requirements for separation and stabilization applications. You don't need a specialty product, just a woven or nonwoven geotextile rated for separation use.
Gravel vs sand bedding vs paver base: what each layer actually does
A lot of confusion comes from people calling the whole system 'the base' and mixing up the roles of each layer. They do very different jobs.
Compacted aggregate base (the main structural layer)
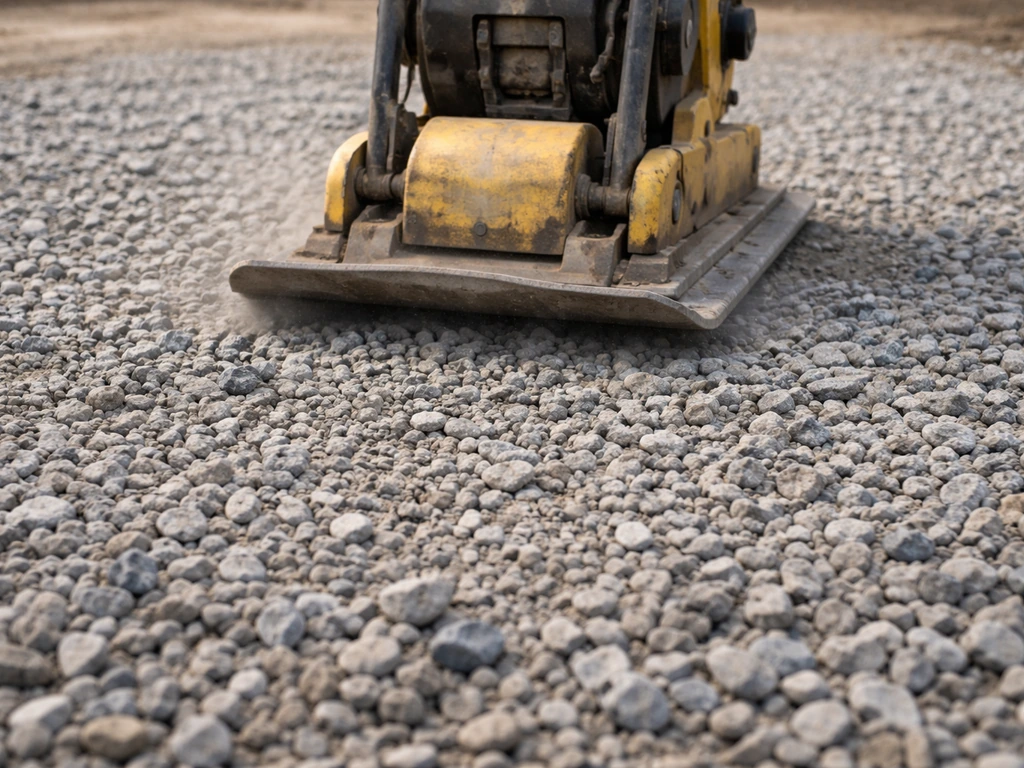
This is the crushed stone or processed gravel layer, typically 3/4-inch crushed stone, compacted gravel, or a crusher-run blend. Its job is to distribute the weight of bricks, furniture, and foot traffic across the subgrade without settling. It also handles the bulk of your drainage, since water percolates through the aggregate and moves away from under the patio. This layer needs to be compacted in 2–3 inch lifts with a plate compactor, not just dumped in and tamped by hand. Skipping proper compaction is the single most common reason a patio develops low spots in year two.
Bedding sand (the leveling layer)
The bedding sand layer sits on top of the compacted base and provides a fine, screeded surface that lets you set bricks to a precise level. CMHA and ICPI are both very specific here: this layer should be exactly 1 inch (25 mm) thick, no more. Use concrete sand that meets ASTM C33 gradation, which is a coarser, angular particle size that locks together rather than shifting. Avoid fine play sand or masonry sand. The angular particles in ASTM C33 concrete sand resist movement much better than rounded grains. You screed it flat using guide rails, and then you do not walk on it before placing bricks. Disturbed bedding sand is what causes rocking bricks.
Joint sand (the finishing layer)
Once bricks are placed, you sweep sand into the joints and then run the plate compactor over the surface again to vibrate joint sand down into every gap until the joints are fully filled. This is where you have a real choice between regular sand and polymeric sand. Regular concrete or joint sand works, but it washes out over time and weeds find it hospitable. Polymeric jointing sand contains polymer binders that harden when wet and cured, locking the joints and resisting both washout and weed germination. Products like QUIKRETE HardScapes Polymeric Jointing Sand handle joints up to 2 inches wide. One firm rule if you go polymeric: never install it during active rain, and keep it dry for the curing window the product specifies. Wet it too fast or in a downpour and the polymer binders wash out before they bond.
How to build the base correctly, start to finish
- Plan and layout: Mark the patio perimeter with stakes and string. Add 6 inches beyond the finished edge on each side to account for edge restraints. Confirm your slope direction (more on this below).
- Excavate to depth: Remove all organic material and topsoil first. Then excavate to your target depth: base thickness + 1 inch for bedding sand + brick thickness. A standard brick is about 2.25–2.5 inches thick, so for a 5-inch base you're digging roughly 8.5–9 inches total below finished grade.
- Compact the subgrade: Compact the native soil subgrade with a plate compactor before you add anything. This is the step most DIYers skip. Do it twice, in perpendicular passes.
- Lay geotextile (if using): Unroll over the compacted subgrade, overlapping seams by at least 12 inches. Fold it up the sides of the excavation temporarily so it wraps the base layer.
- Add and compact base aggregate: Add crushed stone in 2–3 inch lifts, compact each lift before adding the next. Never dump the full depth in at once. Compact each lift with perpendicular passes.
- Install edge restraints: Set plastic, metal, or concrete edge restraints before screeding sand. This is critical. They anchor the perimeter, prevent lateral creep during freeze-thaw, and keep your bedding layer from spreading out at the edges. Stake them firmly into the compacted base.
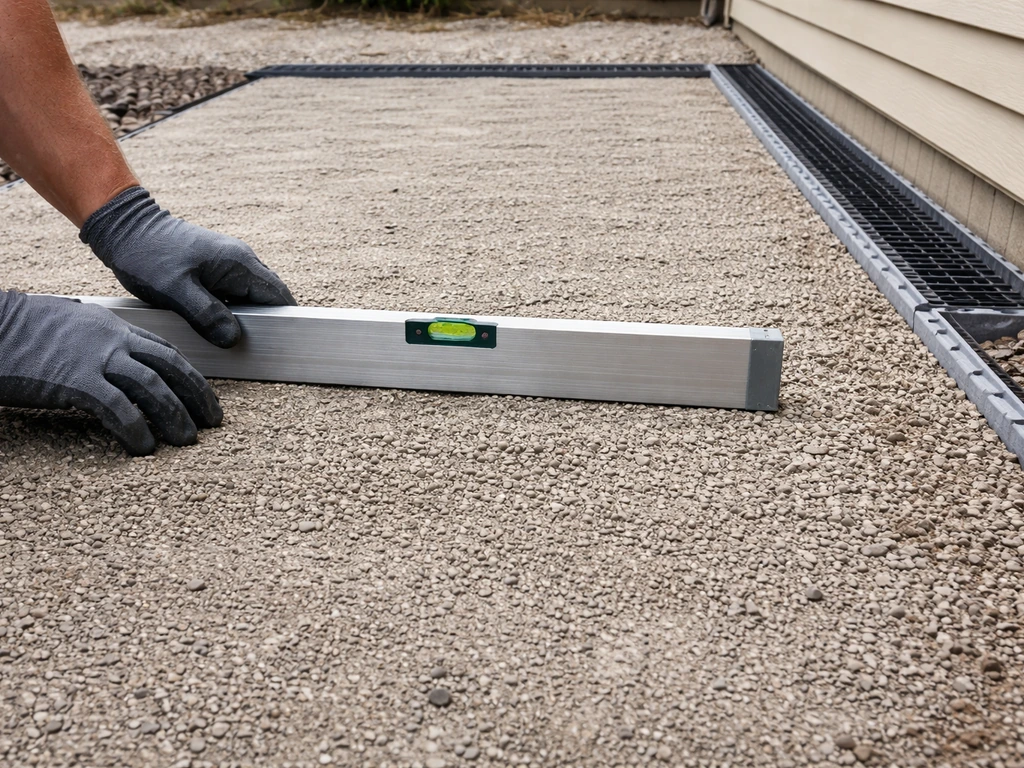
- Screed bedding sand: Set 1-inch diameter screed rails on the compacted base, pour ASTM C33 concrete sand, and screed to a perfectly flat 1-inch depth. Remove rails and fill the voids left behind before laying brick.
- Lay bricks: Work from one corner outward, avoiding stepping on freshly screeded sand. Maintain consistent joint spacing using spacers or your chosen pattern.
- Compact and joint: Run the plate compactor (with a rubber pad protector on the plate) over the finished surface to seat bricks into the bedding sand. Sweep joint sand into gaps, compact again, and repeat until joints are fully filled.
- Final cure: If using polymeric sand, mist the surface as directed and keep it dry for the curing period before exposing it to heavy rain or traffic.
Drainage, slope, and edge restraints done right
Poor drainage is the number one killer of patio bases over the long term. Water trapped under your patio saturates the bedding layer, weakens it under load, promotes frost heave, and causes efflorescence (the white salt deposits you see on older brick). None of that is fixable without tearing up the patio, so get the drainage right at the start.
Slope
Set your patio with a minimum 1/8-inch drop per foot of run (roughly 1%) away from the house or any structure. Some builders go 1/4 inch per foot (2%) for extra safety. This slope needs to be built into your excavation, base layer, and bedding sand, not just eyeballed at the surface. Check your slope with a 4-foot level and tape measure at every stage of the build, not just at the end.
Edge restraints
Edge restraints are non-negotiable. Without them, bricks at the perimeter slowly migrate outward from freeze-thaw cycling, foot traffic, and lawn equipment bumping them. CMHA classifies edge restraints as essential to performance and specifies they must remain stationary under impacts, vehicle loads, and freeze-thaw cycles. Plastic paver edging staked every 6–8 inches is adequate for most residential patios. Steel edging is more durable for high-traffic edges. For any areas near a gutter outlet or drainage channel, CMHA recommends embedding the edging material in fortified mortar or polymer adhesive for added stability.
Drainage pipes for problem areas
If you're building on a site that collects water, or if you're putting in a large patio on clay-heavy soil, consider adding a 4-inch perforated drainage pipe at the base of the aggregate layer. CMHA's permeable base system guidance calls for the pipe to be surrounded by at least 3 inches of open-graded stone and wrapped in geotextile to prevent silt intrusion. This is extra work, but it's the kind of step that makes a patio last 20-plus years instead of 7.
Picking the right materials for your climate and budget
The materials you choose for each layer matter almost as much as the layer depths. Here's how to match materials to your situation.
| Layer | Best Material Choice | Budget Option | Avoid |
|---|---|---|---|
| Aggregate base | 3/4-inch clean crushed stone or #57 stone | Crusher run / compactable paver base (bag or bulk) | Pea gravel, rounded river stone (doesn't compact) |
| Bedding sand | Concrete sand (ASTM C33 gradation) | Coarse washed sand | Play sand, fine masonry sand, stone dust alone |
| Joint sand | Polymeric jointing sand | Coarse concrete sand (ASTM C144) | Fine beach sand or play sand (washes out immediately) |
| Geotextile | Woven or nonwoven, AASHTO M-288 rated | Any rated landscape separation fabric | Cheap non-rated weed fabric (clogs, degrades fast) |
| Edge restraint | Heavy-gauge plastic paver edging or steel edging | Plastic snap-edge paver restraint | Wood edging (rots), no edging at all |
In cold climates (Zone 5 and colder), lean toward deeper base depths, use non-frost-susceptible aggregate (clean crushed stone over crusher run with a lot of fines), and always use geotextile separation fabric. The extra cost of clean stone over crusher run is worth it in freeze-thaw regions because fines in the base can hold water and freeze, causing heave from within the base itself, not just from the subgrade.
In hot, wet climates (Gulf Coast, Pacific Northwest), drainage is the bigger concern. A deeper aggregate base, a consistent 1% to 2% slope, and polymeric sand in joints will prevent the washout and weed problems that plague patios in high-rainfall areas. In dry climates, you have more flexibility with base depth, but don't shortcut compaction. Loose dry soil compresses dramatically under the first season of use.
Budget reality: the compacted aggregate base material itself is relatively cheap, usually $30–$60 per cubic yard for crushed stone. Skimping on depth or compaction equipment rental costs you more in repairs. The plate compactor rental is worth every dollar. The polymeric sand upgrade from regular joint sand adds maybe $50–$100 to a typical 300-square-foot patio and easily saves you three to five hours of re-sanding and weeding each year.
If you're comparing this system to what's used under other patio materials like bluestone, flagstone, or patio slabs, the core layering concept is the same across the board: compacted aggregate base, screeded bedding layer, proper edge restraint, and drainage slope. Choosing the best material for patio sub base starts with the right compacted aggregate and, where needed, clean stone or crusher-run that resists water and freeze-thaw damage. If you are comparing this brick approach to bluestone, the best base for bluestone patio still follows the same compacted aggregate base and drainage-first layering concept. The main differences come down to bedding layer thickness and whether you use a sand bed or a mortar bed, which matters more for thinner or irregularly thick materials than for standard brick.
Troubleshooting and maintenance: settling, weeds, washout, and rocking bricks
Even a well-built patio needs occasional attention. Here's what goes wrong, why it happens, and how to fix it without starting over.
Settled or sunken bricks
The most common cause is inadequate base compaction during installation. The aggregate base slowly compresses under traffic, creating low spots. To fix it, pull up the affected bricks (they lift out cleanly in a sand-set system), add sand or additional base material as needed, re-screed the bedding layer, reset the bricks, and compact. This is the main advantage of a sand-set system over mortar: repairs are straightforward. If you're seeing widespread settling across a large area, the problem is likely in the subgrade itself, which means you may have inadequate base depth for your soil type.
Rocking or unstable individual bricks
Rocking bricks almost always mean the bedding sand was disturbed before the brick was placed, was screeded unevenly, or was applied too thick. Pull the brick, check for a high spot or debris in the sand, re-screed, and reset. If the whole patio rocks slightly after installation, a pass with the plate compactor (with rubber pad) will usually seat the bricks properly.
Weed growth in joints
Weeds in joints are almost never growing from below. They're germinating from windblown seeds landing in the joint sand. The fix is to remove existing weeds, refill joints with polymeric sand, activate it with a mist of water, and let it cure. Polymeric sand's locked joint surface dramatically reduces weed germination compared to plain sand. If you want to avoid the problem entirely from day one, use polymeric sand on initial installation.
Joint sand washout
Heavy rain or pressure washing washes regular joint sand out, leaving open gaps that accelerate settling and weed growth. Sweep in new joint sand and compact it back in. If washout is a recurring problem, switching to polymeric sand is the permanent solution. Just remember: do not apply polymeric sand in the rain, and do not power-wash a polymeric sand joint surface (it breaks down the binder).
Frost heave and edge creep
If bricks are lifting in winter and not settling back flat in spring, you have frost heave, usually from water freezing in or beneath the base. For uneven ground, the right patio choice starts with a stable, compacted base and a well-built drainage and slope plan so bricks do not settle or rock. The fix is to pull up the affected area, improve drainage (add a perforated drain pipe if needed), increase base depth, and use cleaner aggregate with less fines. Proper edge restraints also matter here. Missing or failed edges let the whole patio rack outward over winter cycles. Inspect and re-stake edge restraints every couple of years.
A quick annual maintenance checklist
- Inspect joints in spring after first hard freeze-thaw season. Refill any gaps with joint sand.
- Check edge restraints for movement or pulled stakes. Re-stake as needed.
- Pull any weeds before they go to seed, then top up with polymeric sand.
- Verify drainage slope is still correct by watching where water pools after heavy rain. Adjust if needed.
- Avoid using a pressure washer at high pressure directly on joints (especially polymeric). A low-pressure rinse is fine.
FAQ
What’s the best base for a brick patio, gravel alone or sand alone?
For a brick patio, the aggregate base and bedding sand work together, so the “best base” isn’t one product. Use a compacted crushed stone or gravel layer (4 to 6 inches minimum for typical residential patios), then add exactly 1 inch of screeded, ASTM C33 concrete sand as the setting bed.
Can I skip the bedding sand layer and set the bricks directly on gravel or soil?
Don’t. If you use just gravel and no sand bed, bricks tend to sit on an uneven aggregate surface and will be harder to level. If you try to set bricks directly on compacted soil, the sand bed still matters because soil shifts and pumps fines upward over time.
How do I repair low spots without rebuilding the whole patio?
If you have to do partial repairs, lift only the affected bricks, remove and replace disturbed bedding sand, then add aggregate only if you confirm a low or hollow in the base. Re-screed to a true 1 inch bed thickness before resetting bricks, then re-compact the aggregate and re-vibrate joint sand.
Why do some bricks rock even when the patio looks level?
If bricks are rocking, assume the bedding sand was disturbed, screeded unevenly, or ended up too thick or too thin. Fix by pulling the bricks, clearing debris, re-screeding the bedding sand flat (aim for the full 1 inch thickness), then resetting and avoiding foot traffic on the sand before brick placement.
Will polymeric joint sand fix poor drainage or washout under the patio?
Polymeric sand is not a substitute for the right drainage and slope. It mainly helps stabilize joints by resisting washout and reducing weed growth from joint seeds, but if water is pooling under the patio you will still see movement and efflorescence.
When is the best time to install polymeric sand, and can I power wash it later?
For best results, apply and activate polymeric sand only when temperatures and weather allow curing as the product specifies. Avoid doing it during active rain or right before a downpour, and avoid power washing polymeric joints once cured because that can damage the binder.
What happens if I install edging loosely or skip edge restraints on a brick patio?
Edge restraints should be treated like structural components, not trim. Check that your edging is straight, securely staked, and does not flex or lift, especially at corners and along long runs. If edges have shifted, re-set them and re-stabilize the perimeter, otherwise bricks will gradually migrate outward.
Do I always need geotextile under the aggregate base?
Yes, but only if the subgrade and slope are handled correctly. Geotextile is for separation and stabilization, it does not replace compaction, and it does not stop water from pooling if grading is wrong. Use it when you have clay, silt, or fine soils that are prone to pumping into the aggregate layer.
Can I use the minimum base depth in a warm climate?
If you are not in a freeze-thaw region, you may not need deeper base solely for frost. But you still should avoid noncompacted or overly thin bases. In many climates, what matters most for longevity is adequate depth for your soil type plus proper compaction and slope.
How much slope should my brick patio have, and how do I measure it during construction?
Aim for 1/8 inch drop per foot as a practical baseline, many installers go to 1/4 inch per foot for extra insurance. The key is building the slope into excavation and base layers, then verifying with a straightedge or 4-foot level at multiple stages.
When should I add a perforated drainage pipe instead of relying on slope alone?
A few inches of open-graded stone does not automatically qualify as the right drainage system. If you add a perforated pipe, plan it below the aggregate base at the low side, wrap stone with geotextile to limit silt intrusion, and ensure the outlet has a safe discharge path so water actually leaves the site.
What causes efflorescence on a new brick patio and how do I prevent it?
If you see white salt deposits (efflorescence), it usually points to water moving through the system and carrying dissolved salts. First address drainage and slope and correct any pooling. Long term reduction typically comes from preventing water saturation, not from sealing alone.
Why do weeds keep coming back in the joints, even after I pull them?
Ongoing weeds in joints usually come from seeds that land in joints, not from growth under the patio. Remove weeds, refill joints, and if you want a lasting reduction, use polymeric jointing sand and keep it properly activated, then avoid power washing that breaks the joint binder.
What should I check if the entire patio sinks instead of only a few bricks?
If the whole patio settles, the root cause is often the subgrade or an under-depth base for the soil conditions. Before adding more sand, check base depth, compaction quality, and whether the aggregate layer was installed in lifts and compacted with a plate compactor.
If I need to raise the patio height, can I just add more bedding sand?
In general, thicker brick patios do not fix weak foundations. If you need extra height, do it by increasing aggregate base depth appropriately and keeping the bedding sand at 1 inch. Avoid “making up” height by adding extra bedding sand, it destabilizes the seating layer.