The best base for a bluestone patio is a compacted layer of 3/4-inch minus crushed stone (also called crusher run or road base) at 4 to 6 inches deep, topped with 1 inch of coarse bedding sand for a dry-set install, or a 1 to 2 inch semi-dry mortar bed (stone dust mixed with Portland cement) for a mortar-set install. With all that said, the best base for a patio usually starts with a properly compacted 3/4-inch minus crusher run layer. If you're deciding what to use under the pavers, the key question is which crushed-aggregate choice gives you the best patio sub base for your soil, drainage, and frost conditions best base for a patio. That layered system, properly sloped and compacted, is what keeps bluestone flat, stable, and crack-free for decades. Everything else, weed problems, rocking flags, water pooling, heaved joints after winter, traces back to skipping or shortcutting that foundation. If the patio site is uneven, start by stabilizing the base and building the proper slope so the pavers or flags sit flat and drain correctly rocking flags, water pooling, heaved joints after winter.
Best Base for Bluestone Patio: Layering, Drainage, Thickness

What a good bluestone base actually needs to do

Before picking materials, it helps to understand what the base is solving. Bluestone is a dense, relatively heavy natural stone. It doesn't flex, so any movement in the material underneath it shows up immediately as a rocking slab, a raised joint, or a crack. There are three main forces your base has to fight:
- Settling and shifting: Loose or poorly compacted base material compresses unevenly under foot traffic and furniture weight, causing individual flags to sink or tilt.
- Drainage and water pooling: Water that can't escape saturates the base, softens the subgrade, and undermines support. On a flat or poorly sloped surface, it just sits there.
- Freeze-thaw heaving: In cold climates, water trapped in the base or subgrade freezes, expands, and literally pushes the stone upward. Come spring, it doesn't always settle back to where it started. A few cycles of that and your patio looks like a rollercoaster.
Every decision below, material type, thickness, slope, geotextile, edging, maps back to solving one or more of those three problems. Keep that in mind and the 'why' behind each step makes a lot more sense.
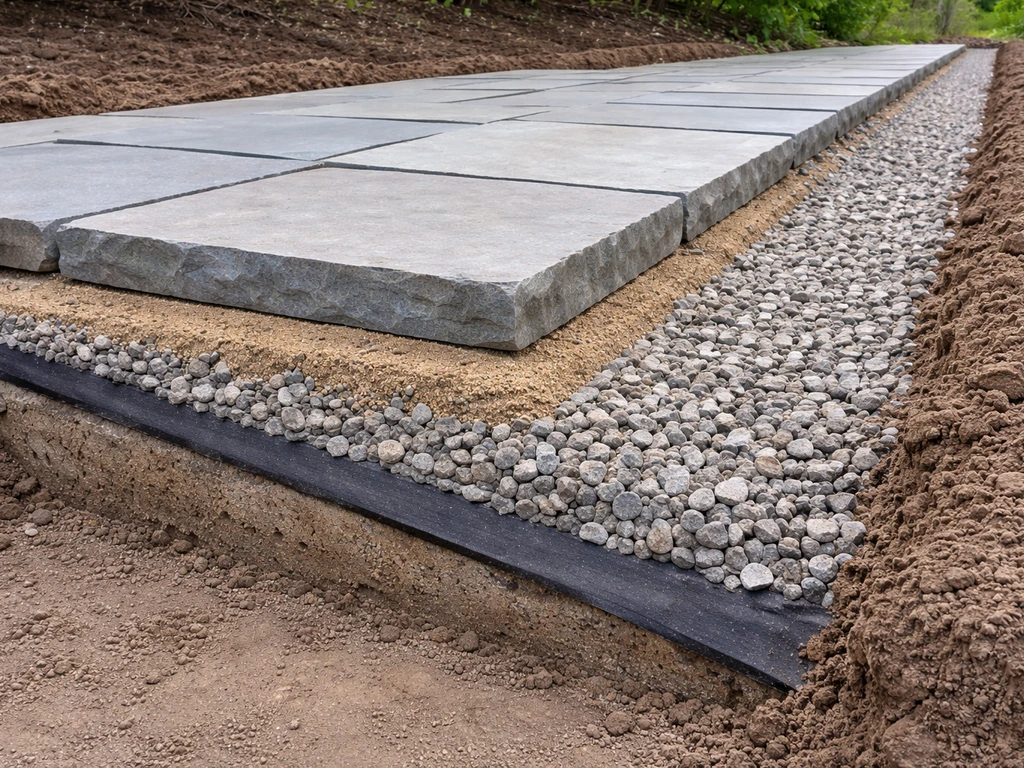
The layer build-up that actually works
A properly built bluestone patio base is a system of layers, not just a single material. Here's how those layers stack up from bottom to top, and what each one does.
Layer 1: The compacted subgrade
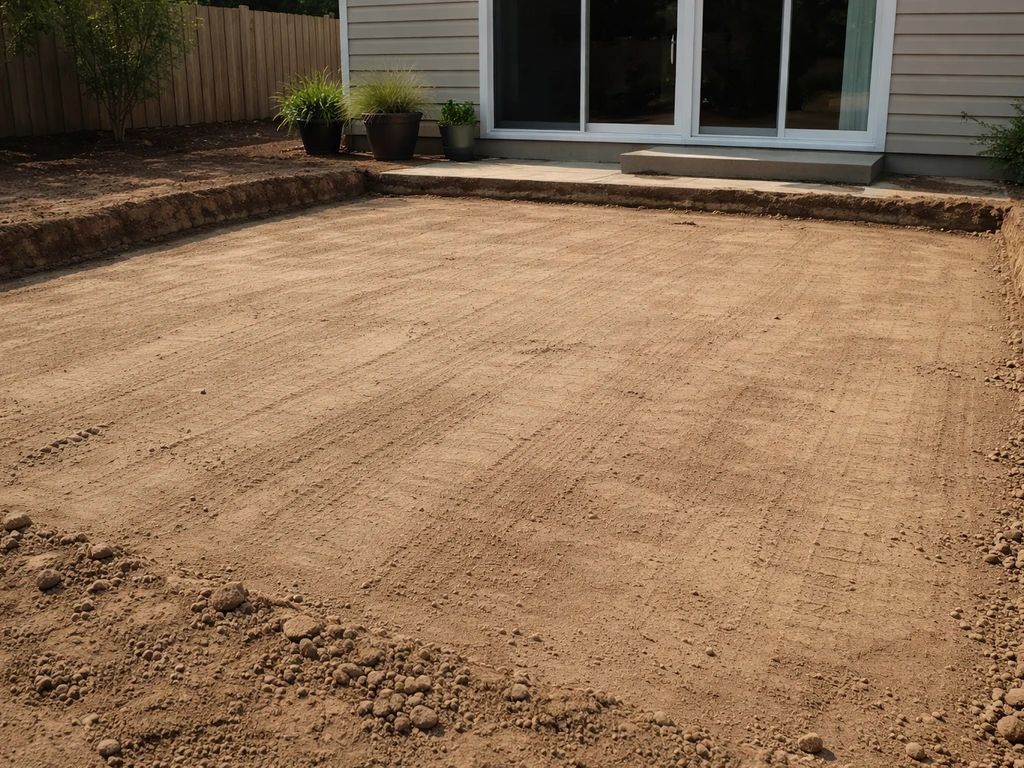
This is your native soil after excavation. It needs to be compacted before anything goes on top. The target is 95% Modified Proctor density (per ASTM D1557), which is an engineering standard for how tightly the soil particles are packed. In practical terms, it means running a plate compactor over the excavated base until the surface doesn't visibly deflect under the machine. Any soft or spongy spots need to be dug out and filled with aggregate before you move on.
Layer 2: Geotextile fabric (optional but worth it in many yards)
A geotextile separation fabric laid directly on the compacted subgrade keeps your crushed stone base from migrating down into soft or clay-heavy soil over time. ScienceDirect engineering research on separation geotextiles emphasizes that geotextile opening size should prevent subgrade fines from migrating into the base under both dry and wet conditions keeps your crushed stone base from migrating down into soft or clay-heavy soil. It's not always required on stable, well-draining soil, but on clay, wet ground, or anywhere with a frost depth to worry about, it's cheap insurance. You're looking at maybe $30 to $60 for a typical residential patio, don't skip it if your yard has drainage issues.
Layer 3: Crushed aggregate base
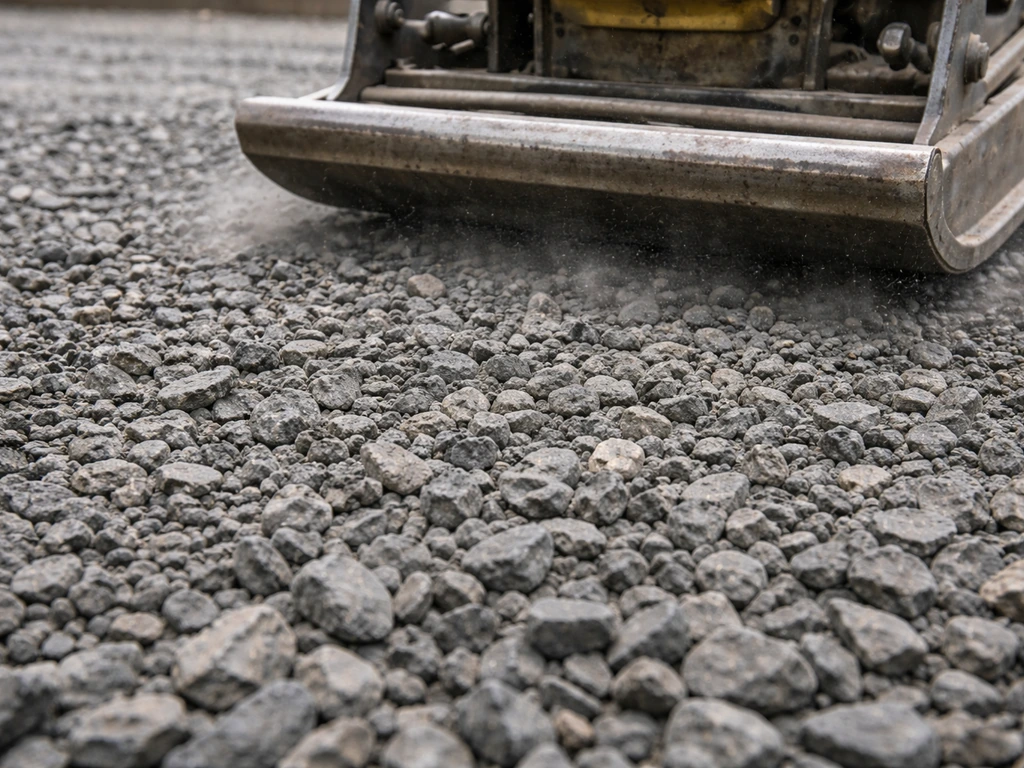
This is the structural heart of the system. Use 3/4-inch minus crushed stone, also called crusher run, road base, or compactable gravel. The angular crushed particles lock together when compacted in a way that rounded pea gravel or river rock never will. Place it in lifts no deeper than 4 inches and compact each lift with a vibratory plate compactor before adding the next. Trying to compact 8 inches all at once just compacts the top inch and leaves a soft layer underneath. For most residential patios, 4 to 6 inches of compacted aggregate base is the right range. More on how to size this for your specific soil and climate is below.
Layer 4: Bedding material
For a dry-set install, this is a 1-inch layer of coarse bedding sand (concrete sand or coarse washed sand) spread evenly across the compacted aggregate. For a mortar-set install, it's a 1 to 2 inch semi-dry mix of stone dust and Portland cement (typically 7 or 9 parts stone dust to 1 part Portland). The bedding layer is where fine-tuning happens: it lets you adjust the final elevation of each flag by adding or removing small amounts of material. Keep in mind that sand compresses slightly once you compact over the pavers, so the starting depth accounts for that.
Layer 5: The bluestone
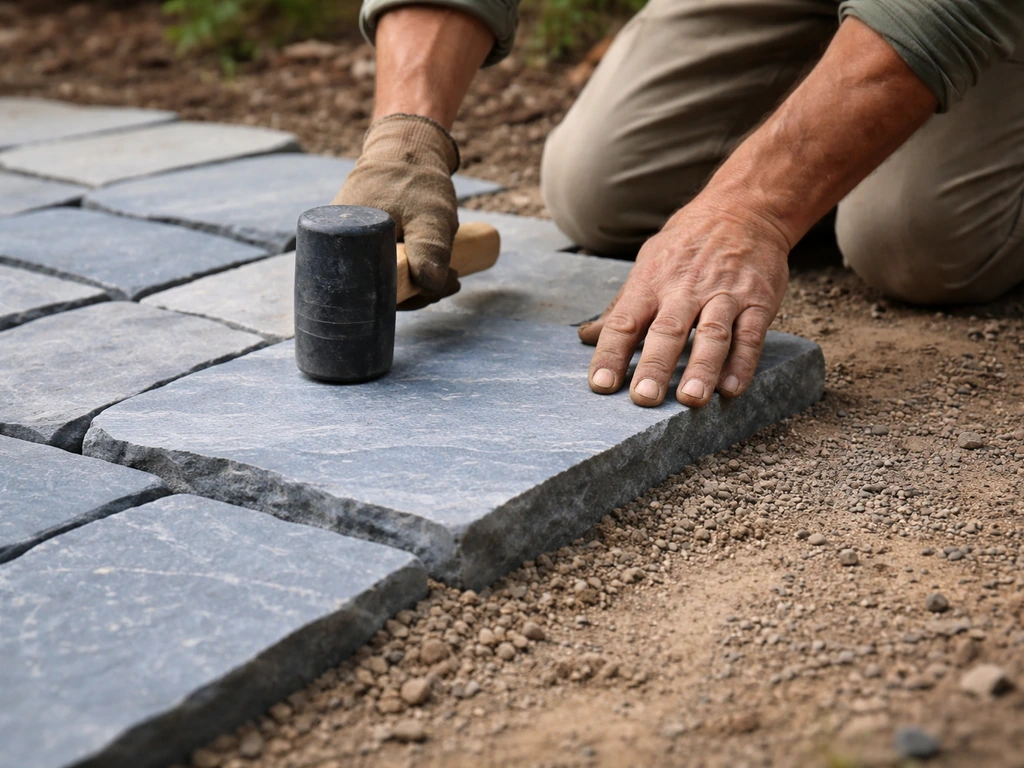
Bluestone flags or pavers go directly on the bedding layer, set to grade and slope. After placing, a rubber mallet seats each piece. For dry-set installs, a final pass with the plate compactor (with a protective pad or screed board over the stone) locks everything in.
Sand-set vs. mortar-set: how the base changes
These are two genuinely different systems, not just two different ways to do the same thing. Choosing between them affects what you put in the bedding layer, how rigid the whole system is, and how you handle repairs later.
| Factor | Dry-Set (Sand Bed) | Mortar/Thinset Set |
|---|---|---|
| Bedding material | 1" coarse sand | 1–2" stone dust + Portland cement mix |
| Base thickness needed | 4–6" crushed aggregate | 4–6" crushed aggregate (same or concrete slab) |
| Flexibility | Slight movement tolerated; flags can be reset | Rigid; cracks if base moves |
| Repair ease | Easy: lift, re-level, reset | Harder: must break mortar, re-bed |
| Freeze-thaw tolerance | Good if base drains well | More vulnerable to heave cracking |
| Best for | DIY, irregular flags, cold climates | Formal layouts, warm/stable climates, pros |
| Joint treatment | Polymeric sand or stone dust | Mortar joints (3/8" typical) |
For most homeowners in regions with actual winters, dry-set is the more forgiving choice. A freeze event that would crack a mortar-set joint just nudges a sand-set flag slightly, and you can reset it in an afternoon. Mortar-set installs look cleaner and are more rigid under heavy use, but they need either a very stable base or a concrete slab underneath to avoid cracking. If you're going mortar-set on a sand/aggregate base (not a slab), use a semi-dry stone dust and Portland mix rather than a wet mortar bed, which is more prone to washout.
Thickness, compaction, and slope: the numbers you need

Base thickness
- 4 inches compacted: minimum for light foot traffic on stable, well-draining soil with minimal frost
- 6 inches compacted: strongly recommended for most residential patios, especially in areas with frost depth, clay soil, or soft ground
- 8–12 inches compacted: needed if the patio will support heavy loads like vehicles, hot tubs, or very heavy furniture on weak subgrade
Compaction
Compact in lifts of no more than 4 inches. Each lift gets its own full compaction pass before the next layer goes down. Target 95% Modified Proctor density on both the subgrade and each base lift. With a rental plate compactor, that typically means multiple overlapping passes (aim for 2 to 4 inch overlap between passes) until the material stops visibly moving. Don't compact when the aggregate is soaking wet or bone dry: slightly damp compacts best.
Slope for drainage
Build a slope of at least 1/8 inch to 1/4 inch per foot away from the house, and don't exceed 1/2 inch per foot or the patio becomes uncomfortable to use. Commercial paver specs call for a minimum 2% slope (about 1/4 inch per foot) to direct water toward drainage features. That slope needs to be built into the base, not just the surface. If the base is flat and you're trying to fake a slope with extra sand in one spot, that thick sand area becomes a weak point.
Surface tolerance
After installation, the finished bluestone surface should be within plus or minus 3/8 inch over a 10-foot straightedge. Anything beyond that and you'll feel it underfoot, especially with irregular flagstone. Getting the base flat and properly sloped is how you hit that tolerance without fighting it during stone placement.
Matching the base to your soil and yard
The 4 to 6 inch crushed stone base is the standard starting point, but what's underneath it changes what you need to do first.
Clay soil
Clay holds water and can heave significantly in freeze-thaw cycles. On clay subgrade, always lay geotextile fabric before your aggregate base. Go with 6 inches of compacted crusher run, not 4. With the right approach, you can think of this as the best base for patio stones too, not just bluestone. Consider adding a perimeter French drain or channel drain if the yard slopes toward the patio, because clay won't let water pass downward quickly enough to prevent saturation. A gravel-filled perforated pipe wrapped in geotextile fabric along the patio perimeter can bleed off that standing water before it undermines your base.
Wet or low-lying yards
If water sits on your yard after rain, it'll sit under your patio too. You have a few options: build the patio grade up so it drains away naturally, install a perimeter or under-slab drainage system before laying the base, or increase base depth significantly (8 inches or more) with a highly permeable open-graded aggregate that lets water move through rather than get trapped. The last option works well for patios that need to stay permeable for stormwater management. Just note that an open-graded base uses different aggregate (clean crushed stone without fines) and requires a different joint treatment approach.
Sandy or well-draining soil
Sandy soil drains fast and compacts reasonably well, so it's the most forgiving subgrade. A 4-inch compacted base can be sufficient for foot-traffic areas on stable sandy soil, though 6 inches is still the safer choice. You're less likely to need geotextile on clean sand, but it doesn't hurt if the sand is fine-grained and likely to migrate up into your aggregate over time.
Expansive or organic soils
Expansive soils (certain clays that swell significantly when wet) and soils high in organic content are the hardest to work with. Organic material compresses over time as it decomposes. On either of these, seriously consider excavating deeper and replacing the problem soil with compacted granular fill before building your base layers. Trying to just build a thicker base on top of organic or expansive material is a gamble you'll lose over a few seasons.
Edge restraints, drainage details, and joint control
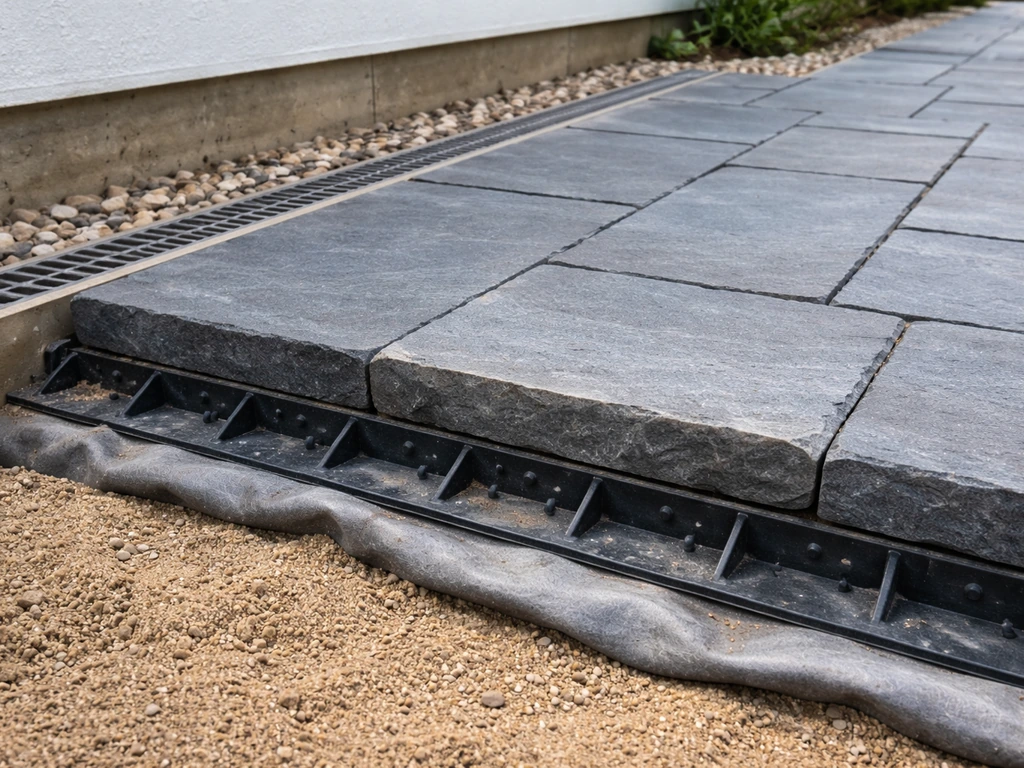
Edge restraints
Edge restraints are non-negotiable for a dry-set bluestone patio. Without them, the bedding sand migrates outward over time and the entire field slowly spreads, causing gaps and rocking at the edges first, then working inward. Use plastic paver edging (spiked into the base) or concrete curbs along all open edges. The restraint goes in after the base and before the bedding sand is placed, seated against the compacted aggregate and pinned every 12 inches or so.
Surface drainage
Build your slope into the base. Every point on the patio surface should drain toward one edge, a channel drain, or a permeable border. Avoid low spots at any cost: a depression as small as 1/4 inch can hold enough water to cause problems in a freeze-thaw climate. If the patio layout forces you toward a shape where directing all water to one edge isn't practical, a centrally located channel drain is a much better solution than trying to slope the whole thing two ways.
Joint filling and weed control
For dry-set installs, polymeric sand is the best joint filler for weed suppression and joint stability. Sweep it in dry, then compact lightly to settle it, then sweep again to fill gaps to about 1/8 inch below the top of each stone. Then mist the surface with a garden hose (not a hard stream) to activate the binding polymers. Make sure the surface is completely dry before applying and that no rain is expected for at least a few hours. For mortar-set, joints are packed with the same stone dust and Portland mix used for the setting bed, typically at a 3/8 inch joint width. This Old House's method of misting after setting the bed material applies here too: a light mist helps initiate curing without washing the joints.
Why bases fail and how to fix them
Most bluestone patio problems aren't stone problems. They're base problems that show up at the surface. Here are the most common ones and what's actually causing them.
| Symptom | Root Cause | Fix |
|---|---|---|
| Rocking or wobbling flag | Insufficient or uneven bedding sand; poor contact under stone | Lift flag, add/redistribute sand, reset and tamp |
| Sinking section | Under-compacted base or subgrade; organic material decomposing | Excavate, remove organic material, recompact base, reset |
| Raised flags after winter | Freeze-thaw heave; water trapped in base | Improve drainage slope; add perimeter drain; reset flags in spring |
| Water pooling on surface | Insufficient slope; low spot in base | Re-grade base layer, adjust slope to 1/4" per foot minimum |
| Weeds in joints | Organic material in joints; no polymeric sand used | Clean joints, re-apply polymeric sand; consider pre-emergent under base |
| Spreading gaps at edges | No edge restraint; sand migrating out | Install paver edging, sweep in new polymeric sand to refill joints |
| Cracked mortar joints | Base movement under rigid mortar bed; poor compaction | Remove cracked mortar, check and recompact base, re-mortar joints |
One thing I've seen repeatedly: homeowners blame their bluestone for cracking or heaving, but when you pull a flag up, the base is either under-compacted or visibly saturated. The stone is just reporting the problem underneath it. Investing time in the base prep is the one place in this project where cutting corners always catches up with you, usually within the first two winters in a cold climate.
Base material comparison: which to choose
There are a few different approaches to the base layer that come up in practice. Here's an honest comparison so you can pick the right one for your situation.
| Base Approach | Best For | Drawbacks | Cost Level |
|---|---|---|---|
| 3/4" minus crusher run (road base) | Most residential patios; best all-around | Needs proper compaction equipment | Low |
| Open-graded crushed stone (no fines) | Wet/low-drain yards; permeable patio design | Less stable without fines; needs different edge/joint system | Low-Medium |
| Concrete slab base | Mortar-set formal layouts; high-load areas | Expensive; permanent; cracks transfer to stone | High |
| Sand-only base | Very light, temporary setups | Unstable; migrates; not suitable for full patio | Low |
| Pea gravel or river rock | Decorative fill only | Won't compact; causes rocking and settling | Low |
For the vast majority of homeowner installs, dry-set flagstone patio, moderate foot traffic, four-season climate, 3/4-inch minus crusher run at 4 to 6 inches is the right answer. Choosing the best material for patio sub base is usually about using the right compactable crushed aggregate at the right thickness for your soil and drainage needs. For a brick patio, this same principle translates to using the right compactable crushed aggregate at the correct thickness for your soil and drainage needs best material for patio sub base. It's available at any landscape supply yard, it rents easily with a plate compactor, and it performs. Open-graded stone is worth considering if you have a chronic drainage problem and want a permeable system. A concrete slab only makes sense if you're going mortar-set and the patio will see very heavy use or you're in an area with deep frost and expansive clay where aggregate base movement is a real risk.
DIY checklist and when to call a pro
Materials to source before you start
- 3/4-inch minus crushed stone / crusher run (calculate volume: patio area in sq ft x base depth in feet = cubic feet, divide by 27 for cubic yards, then add 10% for compaction loss)
- Coarse bedding sand (concrete sand) for dry-set, or stone dust + Portland cement for mortar-set
- Geotextile landscape fabric (if on clay, wet ground, or frost-prone soil)
- Plastic paver edge restraint and spikes (enough for full perimeter)
- Polymeric sand for joints (dry-set) or mortar mix for joints (mortar-set)
- Rental: vibratory plate compactor, hand tamper for edges, screed boards
Step-by-step sequencing
- Mark patio perimeter and excavate to target depth (total depth = base thickness + 1" bedding sand + bluestone thickness + 1" extra, typically 9–13" total from finished grade)
- Compact the native subgrade with a plate compactor; address any soft spots
- Lay geotextile fabric if needed, overlapping seams by 12 inches
- Add first 4-inch lift of crusher run, spread evenly, compact fully
- Add second lift if needed (for 6"+ base), compact again
- Check grade and slope (1/4" per foot minimum away from house); adjust with base material, not just sand
- Install edge restraints along all open edges, spike into the compacted base
- Spread 1" of bedding sand or stone dust/Portland mix evenly; screed to level
- Set bluestone flags to grade; seat with rubber mallet; check with level and straightedge
- Compact over placed stone (use protective pad); check surface tolerance
- Sweep polymeric sand into joints; compact lightly; sweep again to top off; mist to activate
When to hire a pro instead
DIY is very doable for a dry-set bluestone patio if you're comfortable renting equipment, reading a grade, and working methodically. Where I'd strongly recommend hiring a pro: if your yard has serious drainage problems or expansive clay subgrade, if you're doing a mortar-set install larger than a small courtyard, if the patio is adjacent to a foundation and improper drainage could affect the house, or if you need permits (some jurisdictions require them for patios over a certain size). For a mortar-set or concrete-slab-based install, the base tolerances and setting bed consistency are harder to get right without experience, and mistakes are expensive to fix.
The base work on a typical 200 to 300 square foot DIY patio runs roughly a weekend if the materials are staged properly. Most of that time is in the compaction and grading steps, not the stone laying. Get those first two steps right and the rest of the project is much more forgiving. The base is the part of this project where speed is your enemy, take the extra time, compact properly, check your slope before you pour sand, and you won't be resetting flags three winters from now.
FAQ
Can I use something other than 3/4-inch minus crusher run for the base?
Yes, but only if you can still hit the compaction and thickness targets. If you use a different size (for example, 1-inch minus or 5/8-inch minus), you need a similar angular, crushed product and you should still compact in 4-inch lifts to reach the same density goal. Avoid rounded gravel, because it won’t lock together as well under vibration and tends to settle unevenly under bluestone’s rigidity.
When is geotextile truly necessary under a bluestone patio base?
Geotextile isn’t automatically required everywhere, but it becomes a must on clay, wet subgrade, and any area with documented frost heave. If your yard holds water after rain, don’t rely on “it seems firm,” use fabric to limit pumping and migration, especially when you’re building the standard 4-inch base. For very clean, well-draining sand, fabric may be optional, though it can still help if fines are moving upward.
What’s the right way to fix minor grade or slope mistakes before laying bluestone?
Don’t top up with extra sand to correct a slope after compacting. The patio slope must be formed in the crushed-aggregate base, because a sand-only correction creates a thin, weak layer that can compress and cause low joints over time. If you miss grade, scrape back and rebuild the aggregate lifts, then recheck slope before spreading bedding sand.
Should I run the plate compactor after setting dry-set bluestone?
For a dry-set install, lock down the base first, then use a protective approach to compaction after seating pavers. Plate-compacting directly on stone can chip edges or rock flags, so use a plywood or screed board/pad over the stone and run the compactor lightly enough to settle the stones, not “float” them. If you see sand and stones shifting, you’re overdoing it.
If I already have good slope on the patio surface, do I still need drainage systems?
Yes, but it depends on why the drainage problem exists. If the issue is surface water, building the correct slope and providing an outlet may be enough. If water saturates the subgrade (especially on clay), you typically need perimeter drainage such as a French drain or channel, because a deeper or more permeable base can still stay saturated if there is no path for water to go.
How do I know the base is properly compacted if I cannot test density?
A practical way to judge “enough” is based on soil behavior, not just a target number. If the plate compactor visibly sinks in, the base feels spongy, or you see aggregate indentations that remain after you pass, it isn’t ready. Conversely, if the surface doesn’t deflect noticeably and repeated passes stop changing the surface, you’re generally in the right zone. Still, the engineering density target is what you aim for if you can test.
Is polymeric sand okay for mortar-set bluestone joints?
Yes. Bluestone joints can trap weeds either way, but polymeric sand is best aligned with a dry-set system because it stays in the joints and stabilizes them under foot traffic. If you’re planning a mortar-set install, you should treat joints with the same setting-bed style mix rather than polymeric sand, because the curing and bond mechanism is different.
What happens if polymeric sand gets wet before it cures?
Not usually. Polymeric sand requires dry conditions to activate and cure properly. If you must work near rain, plan the sequencing so the joints are filled, compacted, and given time to set before precipitation, and avoid hosing with a hard stream that can wash fines away. If rain is likely to hit immediately after installation, wait or cover the area and complete activation later.
Can I correct a low spot by adding more bedding sand under the stones?
Yes, especially on uneven lots, because it can lead to thick sand pockets that become weak points after traffic and freeze-thaw. A better approach is to rebuild the base to create a consistent slope, then keep bedding sand thickness uniform. If you need to “feather” height, feather it in the bedding layer only within small, controlled adjustments, not as a substitute for base grading.
Why are edge restraints such a big deal for dry-set bluestone patios?
Edge restraints mainly prevent outward movement of the entire field. If edges are flexible or missing, the bedding sand migrates, and the first symptoms are usually rocking at the perimeter, then widening gaps and instability inward. If you have any exposed border, you should plan for edging plus a solid connection to the drainage outlet or drainage layer so water doesn’t wash sand from the edge.
What changes if my bluestone patio is near a foundation?
If the patio is adjacent to a foundation, drainage mistakes can cause more than just patio failure, they can contribute to foundation moisture issues. In that situation, plan the patio slope and subdrainage so water is directed away from the foundation and consider a site-specific drainage design rather than relying on “surface runoff will handle it.” A pro is often worth it because excavation and code requirements can affect both the patio and the home.
Can I switch to an open-graded base if I’m mainly trying to solve standing water?
Open-graded bases can work well for chronic drainage problems, but they change the system. They typically require clean crushed stone without fines, and the bedding and joint approach must be compatible so you don’t allow fines to clog voids or undermining to occur. If you choose the permeable option, treat it as a different design, not a swap of material with everything else staying the same.