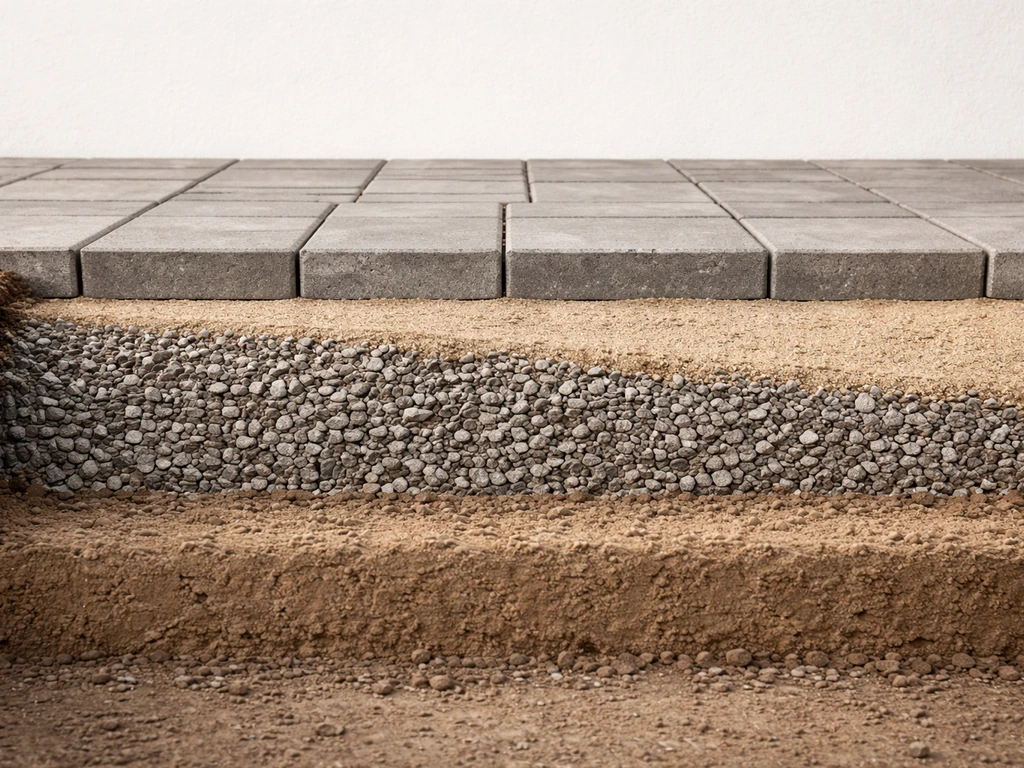
The best base for patio stones is a compacted layer of crushed stone (also called road base or Class II gravel) 4 to 6 inches thick, topped with a 1-inch screeded bedding layer of coarse concrete sand. That two-layer system handles drainage, gives you a level surface to work from, and locks everything in place so your stones don't shift or sink over time. If you're on clay soil, in a freeze-thaw climate, or expecting heavy foot traffic, push that base to the full 6 inches and add a geotextile fabric between the native soil and the gravel to keep the layers from mixing.
Best Base for Patio Stones: Materials, Thickness, and Steps

Nolan Ellison
29 Apr 2026
What a patio stone base actually does
A patio base isn't just filler between the dirt and your stones. It's doing four specific jobs at once: distributing load so individual stones don't punch down into soft soil, draining water away so it doesn't pool under the surface and erode the bedding layer, providing a stable, level platform so your finished surface stays flat over years of use, and acting as a barrier against weed roots pushing up through the joints. When any one of those functions fails, you see the result fast: a cracked flagstone, a sunken paver, persistent puddles, or a surface that looks fine in summer and tilts after the first hard frost.
The typical patio base system has three distinct layers, each with a specific role. First is the compacted subgrade, which is the native soil after excavation and grading. Second is the aggregate base, the crushed stone layer that carries the structural load and moves water. Third is the bedding course, a thin, screeded layer of sand that gives you fine-tune leveling right before the stones go down. Understanding those three layers helps you make smarter decisions at every step, including how deep to dig, what material to buy, and where you can cut costs without compromising performance.
Soil prep and grading before you lay a single stone
Everything above the soil is only as good as what you do with the soil itself. Before any gravel goes in, you need to excavate to the correct depth, which I'll cover in the thickness section below, and then grade the subgrade so it slopes away from the house at a rate of about 1 inch per 8 feet. That gentle slope carries water out from under the patio instead of letting it sit and saturate the base. If you skip this step and just level the bottom of the hole flat, water will find the low spots and you'll be dealing with washouts and sinking stones within a season or two.
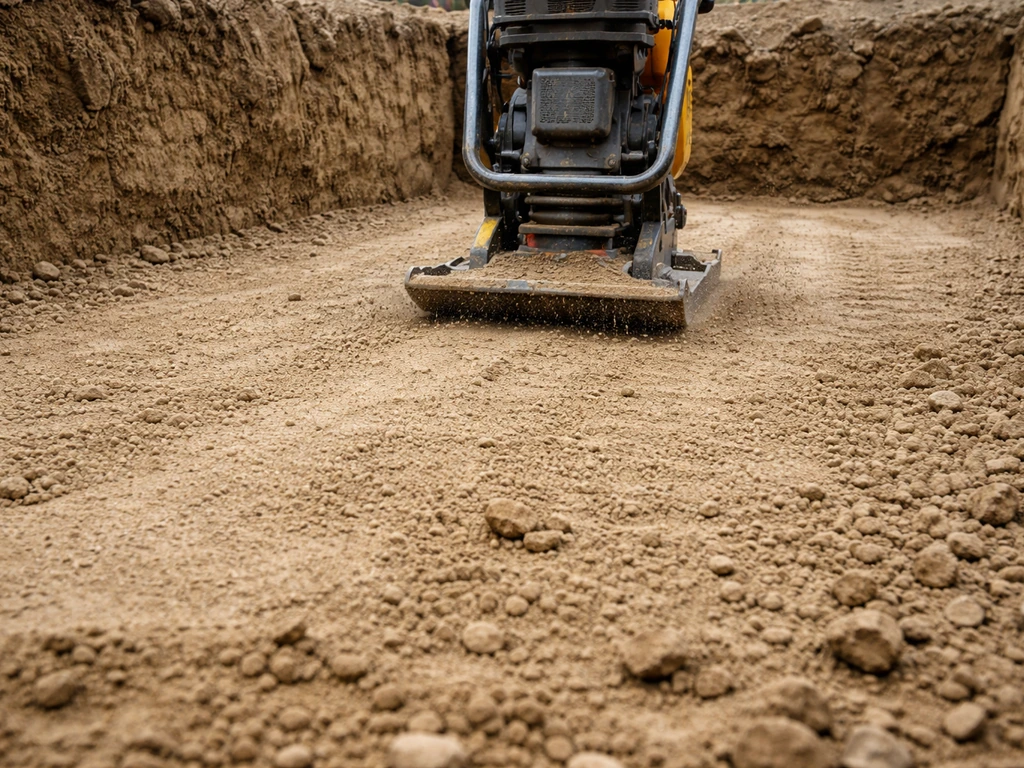
After excavating, compact the exposed subgrade with a plate compactor before any aggregate goes in. If the soil is loose, disturbed, or recently filled, it will continue to settle under load. If you're working in clay-heavy soil, it's worth doing this compaction pass twice. Clay holds moisture and is especially prone to movement during freeze-thaw cycles, so a well-compacted, stable subgrade is non-negotiable there. Sandy or well-draining soils are more forgiving, but compaction still matters.
This is also the right time to install a geotextile landscape fabric directly on the compacted subgrade before your gravel goes in. The fabric acts as a separator, preventing native soil from slowly migrating up into your aggregate base over time. Lightweight Separation Under Pavers (US Fabrics) recommends installing geotextile under pavers in clay soil to help prevent soil migration that can lead to paver system failure blank" rel="noopener noreferrer">geotextile fabric between the native soil and the gravel. An academic geosynthetics proceedings poster reports that using a blank" rel="noopener noreferrer">geotextile separator significantly reduced migration of subgrade soil particles into the subbase, with quantitative reductions observed in the study. Without it, fine soil particles work their way into the gravel through water movement and foot traffic vibration, gradually reducing the base's drainage capacity and load-bearing strength. The fabric does not stop weeds by itself at this layer, but it does preserve the integrity of the base system over the long term.
The best base materials: what to buy and why
For the aggregate base layer, crushed angular gravel is the right call. It goes by different regional names: road base, Class II base, crusher run, or processed gravel. What you're looking for is a mix of crushed stone that includes fine particles along with the coarser aggregate, because that blend compacts into a dense, interlocking mass that resists shifting. Rounded pea gravel or river gravel looks similar but does not compact the same way. Rounded stones roll against each other instead of locking together, so they make a poor base regardless of how long you compact them.
For the bedding course directly under the stones, use coarse concrete sand, sometimes labeled ASTM C33 or washed concrete sand at the supply yard. ASTM’s C33/C33M standard is the reference specification used to grade and set requirements for fine and coarse concrete aggregates, which is why “blank" rel="noopener noreferrer">ASTM C33 sand” is used when specifying bedding sand. It screeds smoothly, holds its shape after being set, and doesn't compact down excessively once the stones are laid on it. Avoid masonry sand, which is too fine and will shift. Avoid block sand, which is too coarse and makes it hard to get a consistent level. Concrete sand sits right in the middle and is what the industry specs (ICPI, CMHA) call for specifically. Some installers use a chip stone or HPB (high-performance bedding) material as an alternative, which also works well and is slightly less prone to washing out.
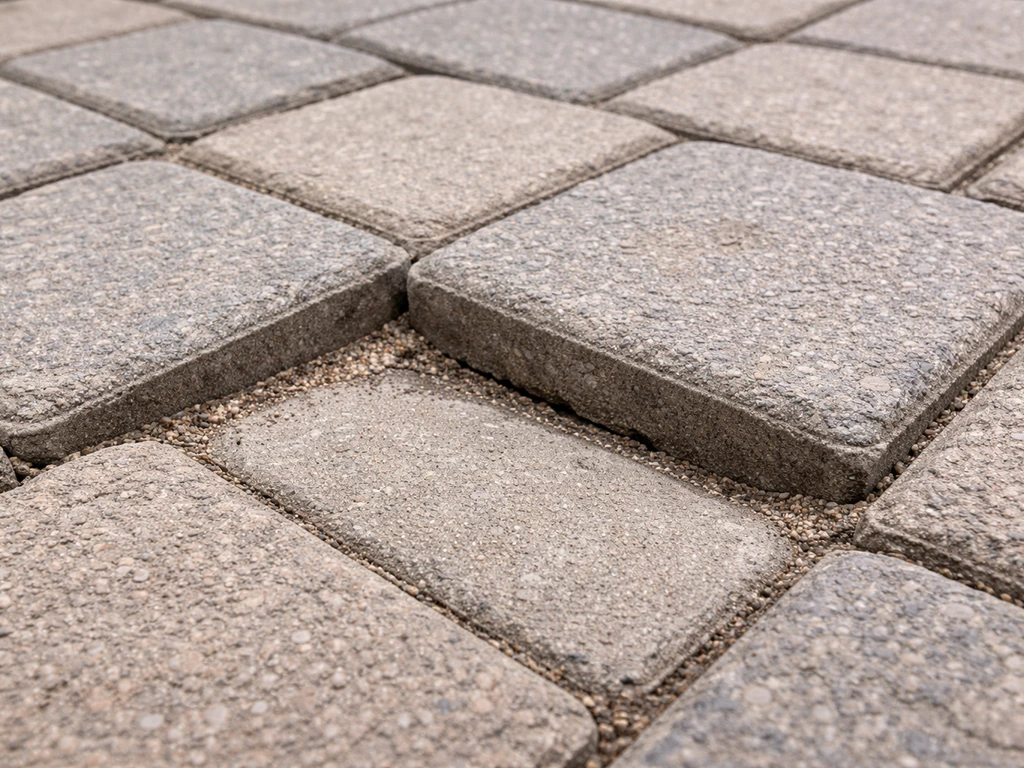
Polymeric sand is used for the joints between stones, not for the bedding layer. It's worth mentioning here because it's commonly confused with bedding sand. Polymeric sand contains a binder that activates with water, helping lock paver joints so they resist erosion, ants, and weed seeds finding a foothold. It goes in last, after all the stones are set and compacted.
| Material | Layer | Best For | Avoid If |
|---|---|---|---|
| Crushed angular gravel (road base) | Base layer | All patio types, all climates | You only have rounded pea gravel available |
| Coarse concrete sand (ASTM C33) | Bedding layer | Pavers, flagstone, natural stone | You need a thicker leveling layer (use more base instead) |
| HPB / chip stone bedding | Bedding layer | Freeze-thaw climates, high-drainage installs | Budget is tight and drainage is already good |
| Polymeric sand | Joints only | Keeping weeds and ants out of joints | Used as a bedding or base material |
| Pea gravel / river gravel | Neither | Decorative fill only | Any structural base application |
| Plain masonry sand | Avoid as bedding | Not recommended for base systems | All patio installations |
How thick the base should be, and how to compact it right
A residential foot-traffic patio on stable, well-draining soil needs a minimum of 4 inches of compacted crushed gravel base topped with 1 inch of bedding sand. That's the industry-standard starting point. Push it to 6 inches of base if you're on clay soil, in a northern climate with hard freeze-thaw cycles, or if the patio will see occasional vehicle access or heavy furniture. Total excavation depth equals your stone thickness plus 1 inch of bedding sand plus your base depth, so plan accordingly before you start digging.
The key rule for compaction is that a standard plate compactor can only effectively compact about 4 inches of material at a time. So if you need a 6-inch base, don't dump it all in and run the compactor over it once. Add the first 3-inch lift, compact it, then add the second 3-inch lift and compact again. Each pass should overlap the previous one, and you want to see the surface stop visibly moving under the plate. Skipping this lift-based approach is one of the most common mistakes on DIY patios, and it results in slow post-installation settling that's frustrating to fix later.
The bedding sand layer should be between 1/2 inch and 1 inch thick after screeding, never more than 1 inch. For example, a Reddit DIY discussion describes bedding sand under pavers as about 1 inch thick in common field practice when people discuss what to use if they cannot source the exact material bedding sand layer should be between 1/2 inch and 1 inch thick after screeding. Thicker sand beds compress unevenly under the weight of the stones and traffic, which causes the surface to become bumpy over time. If you need more height to reach your finished grade, add it in the gravel base layer, not in the sand.
| Stone Type / Condition | Base Thickness (compacted) | Bedding Layer | Notes |
|---|---|---|---|
| Concrete pavers, stable sandy soil | 4 inches | 1 inch concrete sand | Standard residential install |
| Flagstone / natural stone, stable soil | 4–6 inches | 1 inch concrete sand or HPB | Heavier stones need good sub-base compaction |
| Any stone, clay soil | 6 inches | 1 inch concrete sand | Add geotextile at subgrade level |
| Any stone, freeze-thaw climate | 6 inches | 1 inch HPB or concrete sand | Deeper base resists frost heave |
| Pavers or slabs, vehicle access | 8 inches | 1 inch concrete sand | Increase sub-base compaction effort |
| Bluestone or large-format natural stone | 4–6 inches | 1 inch concrete sand or dry mortar | Check slab thickness; larger stones need even sub-base |
Step-by-step: laying the base under your patio stones
- Mark the patio area and calculate total excavation depth: stone thickness + 1 inch bedding sand + base depth (4 to 6+ inches depending on conditions). Add an extra inch as a buffer if your soil is soft.
- Excavate to the target depth, keeping the bottom as level as possible while maintaining the 1-inch-per-8-foot slope away from the house.
- Compact the exposed subgrade with a plate compactor. Do two passes if the soil is clay-heavy or recently disturbed.
- Roll out a geotextile separator fabric over the compacted subgrade, overlapping seams by at least 6 inches. This keeps soil from migrating into your gravel base over time.
- Add the first lift of crushed angular gravel (about 3 inches loose depth). Rake it level, then compact with the plate compactor until the surface stops moving visibly. Maintain your drainage slope as you compact.
- Add additional gravel lifts in 3-inch layers, compacting each one before adding the next, until you reach your target base depth.
- Install edge restraints (plastic or metal paver edging, concrete curb, or similar) along the perimeter at this stage, before bedding sand goes down. Set the restraint so its top is at the correct elevation to guide screeding. Edge restraints should provide at least 1 inch of vertical contact against the side of the paver.
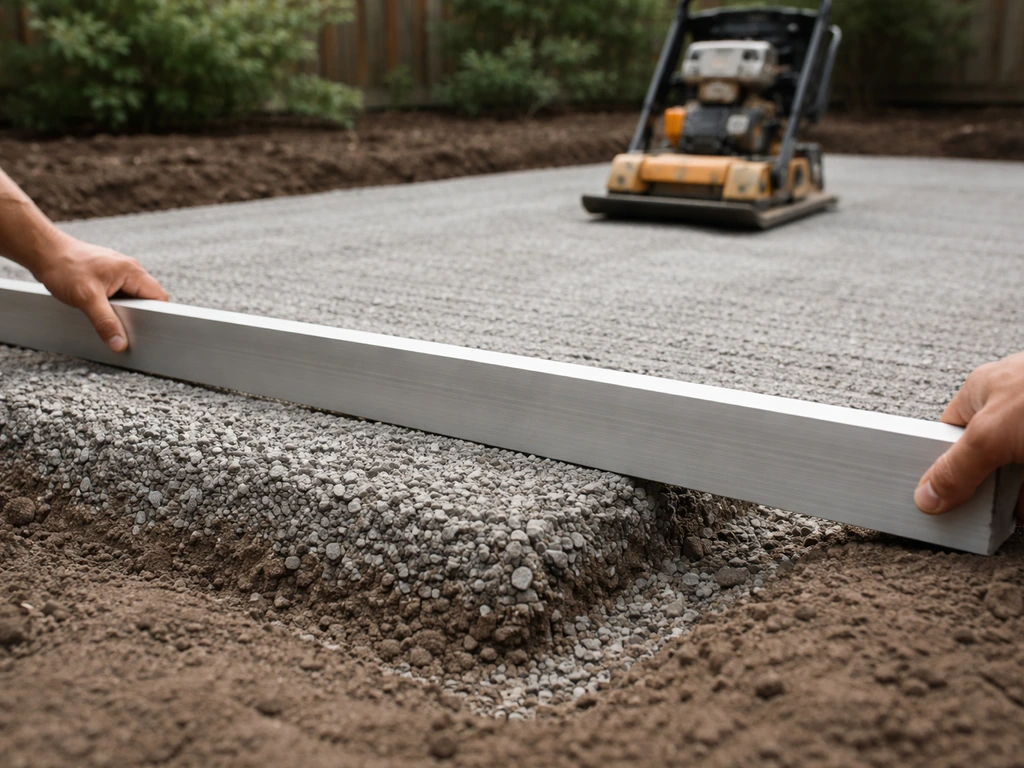
- Screed the bedding sand layer to a consistent depth of 1/2 to 1 inch using screed rails or pipes as guides. Do not walk on the screeded sand before laying stones.
- Lay your patio stones on the screeded sand bed, working from one corner outward. Do not drag or slide stones across the sand; set them straight down.
- After all stones are placed, run the plate compactor over the surface (use a protective rubber or foam pad on the plate to protect stone faces). This seats the stones firmly into the bedding layer.
- Sweep polymeric sand into the joints, then lightly mist with water to activate the binder. Follow the manufacturer's cure time before using the patio.
Common problems and how to fix them
Uneven settling or sunken stones
This almost always points to one of two causes: inadequate base compaction, or a bedding sand layer that was too thick and compressed over time. To fix individual sunken stones, pull them up, add a small amount of bedding sand or stone dust, re-level, and reset. If large sections are sinking, the base itself wasn't compacted properly and you'll need to pull those sections up, re-compact the base with additional gravel as needed, and relay. It's tedious, but there's no shortcut once the base has failed.
Water pooling on or under the surface
Pooling on top means the surface slope is wrong or the joints are sealed and not draining. Pooling underneath, which you'll notice by sand washing out from under the stones after rain, means either the base gravel isn't draining fast enough (often because it's a fine or rounded aggregate that has clogged) or there's no slope on the subgrade. A properly graded subgrade with angular, open-graded base aggregate drains quickly. If you're retrofitting drainage into an existing patio with persistent issues, a French drain or channel drain at the low edge of the patio can capture surface runoff before it migrates under the stones.
Weeds pushing through joints
Weeds don't usually grow up from the base. They grow from seeds blown into the joints from above and germinate in the sand. The fix is polymeric sand in the joints, which makes it physically harder for seeds to take root. A geotextile layer under the base adds another barrier, but its main job is soil separation, not weed control at the surface. If you have persistent weeds, check whether the joint sand has eroded or washed out, top it up with fresh polymeric sand, and activate with water.
Frost heave in cold climates
Frost heave happens when moisture in or below the base freezes and expands, pushing stones upward unevenly. The prevention is a thick enough base that extends below the frost line, or at minimum, a well-draining base that doesn't hold moisture for ice to form in. In northern climates with hard winters, a 6-inch compacted crushed gravel base, a geotextile separator, and good surface drainage as a combination goes a long way. Some contractors in the coldest zones use open-graded base aggregate (no fines) specifically because it drains almost instantly and leaves no water in the base to freeze.
Base washout at the edges
If gravel or sand is migrating out from under the patio edges, your edge restraints may not be tight enough or are placed too high. The restraint needs to create a solid barrier with at least 1 inch of vertical face against the side of the paver or stone. Gaps between concrete curb sections or loose plastic edging let both water and base material escape. Fix it by re-securing or replacing the edge restraint, then tamp fresh gravel back in from underneath before resetting edge stones.
Matching the base to your climate, budget, and traffic
The baseline 4-inch crushed gravel base with 1-inch concrete sand works well for most residential foot-traffic patios in temperate climates on decent soil. That's where the bulk of DIY homeowners fall, and it's also the most cost-effective setup. The material cost for crushed gravel is low, and renting a plate compactor for a weekend is very manageable. If you're in that situation, don't overthink it.
The variables that push you toward more are climate, soil, and load. Clay soil requires a thicker base and a geotextile separator because clay holds moisture and moves with temperature and moisture changes. Freeze-thaw climates (anything with hard winters north of roughly Zone 6) benefit from 6 inches of base specifically because the extra depth and drainage buffer reduces the impact of frost heave. Heavy traffic, including garden vehicles, delivery carts, or even riding lawn mowers crossing the patio, warrants an 8-inch base. These aren't upsells: they're engineering adjustments to real conditions.
Budget-wise, the base materials themselves aren't expensive. The bigger cost variable is labor and equipment time. If you're doing a large patio and need 6 inches of compacted base, ordering a load of road base gravel and having it delivered is almost always cheaper per cubic yard than buying bags. Do the volume math before you shop: length times width times depth (in feet) divided by 27 gives you cubic yards. Add 10 to 15 percent for compaction loss.
If you're deciding between paver types and wondering how base requirements shift, flagstone and large-format natural stone are heavier per piece, which actually helps them stay put on the bedding layer, but they demand a very even sub-base because you can't micro-adjust them the same way you can a small concrete paver. Bluestone in particular is unforgiving of an uneven base. Choosing the right base is especially important for a bluestone patio, since it needs extra uniform support to avoid shifting and uneven settling best base for bluestone patio. Choosing the best base for patio slabs helps ensure your stones stay level and resist shifting over time. The base principles are the same across stone types: crushed gravel base, concrete sand bedding, and good edge restraints. For a patio on uneven ground, make sure your base design accounts for extra leveling and support so stones stay flat over time best patio for uneven ground. The differences tend to be in how carefully you screed and how much you focus on sub-base uniformity.
Keeping the base performing over the long term
A well-built base essentially takes care of itself if the surface layer is maintained. The most important maintenance task is keeping the joints filled. When joint sand erodes, water gets deeper under the stones, the bedding layer becomes destabilized, and settling follows. Check your joints every spring and top up any low spots with fresh polymeric sand before the season starts. This takes maybe 20 minutes and prevents the kind of long-term base damage that requires pulling up sections to repair.
Also check your surface drainage annually. Walk the patio after a heavy rain and look for any areas where water pools for more than a few minutes. That's a sign that the slope has shifted slightly or a stone has settled. Catching it early and resetting a single stone or two is a simple fix. Ignoring it for a couple of seasons means water is regularly saturating that spot in the base, which accelerates settling and in cold climates creates a freeze-thaw cycle that worsens each year.
Edge restraints deserve a quick check each spring too, especially after a winter in a freeze-thaw climate. Look for sections that have shifted outward or are sitting high. Restraints that are no longer snug against the edge stones stop doing their job, and you'll start to see stones creep outward at the perimeter. Knock them back into position, add a stake if needed, and compact the surrounding area lightly to re-bed everything.
One thing I've seen trip up homeowners who built a solid patio is assuming the base is the only thing that matters for long-term performance. The base gets you 80 percent of the way there. The other 20 percent is surface maintenance: keeping joints filled, maintaining drainage, and catching small shifts before they become big ones. A properly built base system can realistically last 20 to 30 years without any structural intervention, but only if the surface above it is kept in good shape. If you're working with brick pavers, choosing the best base for brick patio comes down to using the right crushed gravel depth and a stable bedding layer.
FAQ
Do I need the subgrade to be perfectly level before adding gravel?
It usually does not need to be perfectly flat, but it does need to be evenly supported. For patio stones/pavers, aim for a consistent slope away from the house, and keep low spots from creating “rocking” by checking with a straightedge after you compact each layer. If you can rock a paver by hand before setting the rest, the sub-base or bedding is uneven.
Should I always install geotextile fabric under patio stone base?
Yes, but only on specific cases. If your subgrade is clay-heavy, holds water, or is likely to pump under load, use geotextile as a separator as described. If your soil is already open-draining sand and you have good slope and compaction, geotextile may offer minimal extra benefit, and the bigger payoff comes from correct base depth and lift-based compaction.
Can I use play sand or masonry sand as the bedding layer?
Avoid it in the bedding layer. Bedding sand compresses and shifts less when it is coarse and screeds well, but masonry/too-fine sand tends to wash or migrate, and that can cause uneven settling. If you end up with a stockpile of the wrong sand, use it only in joints (if appropriate) or remove it and replace with concrete sand or another HP bedding material.
Should I compact the bedding sand after screeding?
For pavers, compacting the aggregate base is typically the priority, then you screed the bedding to thickness and do not over-compact the sand. Overworking the bedding after screeding can cause it to compact unevenly, leaving hollows or bumps under the stones. A good workflow is compact base in lifts, lightly screed bedding to grade, then set stones and compact the surface with restraint.
What if my patio edge is next to soil or mulch?
Yes, and it prevents a common edge failure. If the patio is bordered by a lawn or planting bed, consider adding a small drainage gap at the perimeter (and keeping mulch away from the joints) so water does not stay saturated against the edge restraint. Also ensure your edge restraint has a vertical face that contacts the sides of the stones, not just the top surface.
What if my crushed stone base seems too “fine” or clogs after rain?
Not necessarily. Using crusher run that contains fines can work well for compaction, but if your aggregate is very fine or prone to plugging, drainage performance drops and you can get pooling. If you notice water standing under the patio after rain, the cure is usually fixing slope or upgrading to a more open, angular base gradation rather than just adding more sand.
How does the base change if I want to drive or park on the patio?
Yes, and it changes the base strategy. A patio that supports a vehicle needs more structural depth, often approaching the higher base depths you’d use for heavier loads, and you should plan for stronger edge restraint so the perimeter does not spread. If you expect regular tire load, confirm local requirements and consider professional design because settlement tolerances are tighter.
Why can’t I just dump all the gravel at once and compact until it feels solid?
Not when it comes from the thickness layer you plan to compact. The article’s method uses lift-based compaction because a plate compactor only effectively compacts a limited thickness per pass. If you skip lifts, the deeper portion can remain loose and will settle later, creating dips that are difficult to correct without lifting stone sections.
Can I use polymeric sand under the pavers as part of the leveling layers?
Use the joint material as your final sealing step, but do not treat it like structural bedding. Polymerick sand should be applied after stones are set, swept into joints, and activated per its instructions. If you apply it too early or in thick layers, it can alter joint behavior and make future joint maintenance harder.
How do I troubleshoot sinking stones without redoing the whole patio?
Check three things in order: surface slope, joint sand integrity, and sub-base drainage. If the stones settle in one spot, often the base was not compacted correctly or the area got washed out, and you may need to lift and rework that section. If you only see joint erosion and weeds come back, topping up polymeric sand and improving joint maintenance may solve it without major base demolition.
What should I do first if weeds keep coming back in the joints?
If weeds are coming up from the joints, start with cleaning and re-filling the joints, then activate polymeric sand with water so it bonds. If you still have weeds emerging from beneath, it can be from soil contact at edges or gaps where restraint fails, or from construction debris and seed sources. In that case, inspect edge restraint and joint erosion patterns along the route weeds are following.