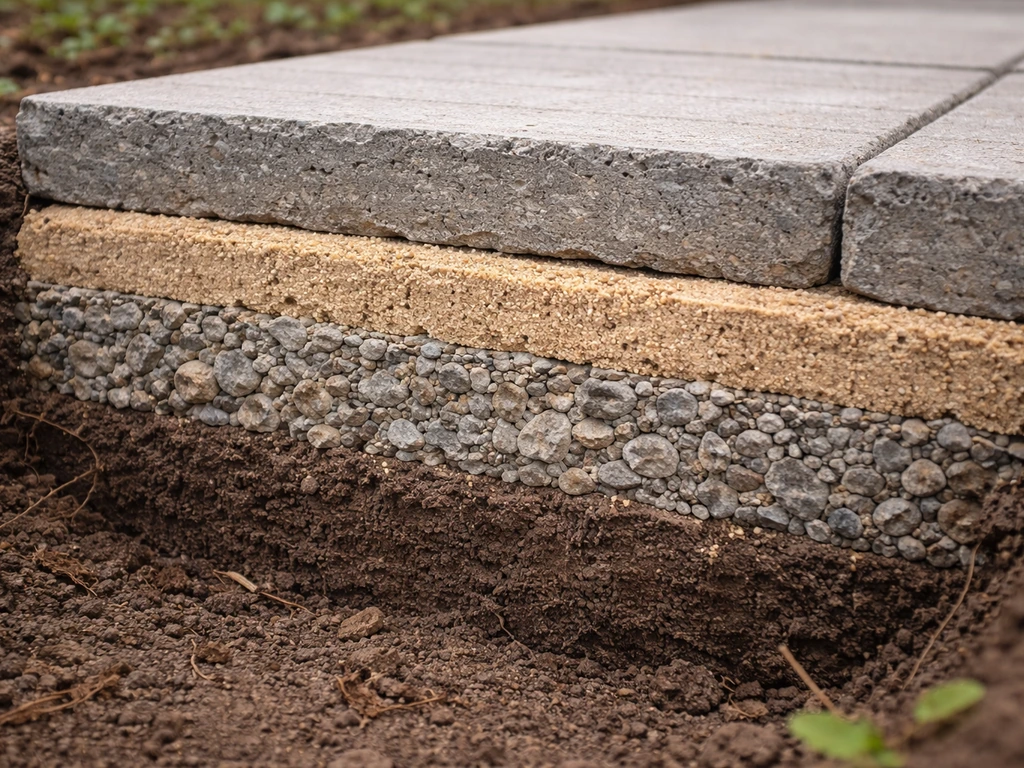
The best base for patio slabs in most residential situations is a compacted crushed stone subbase (typically 4 to 6 inches deep depending on your soil and climate) topped with a 1-inch bedding layer of coarse sharp sand. If you want the quickest, most reliable starting point, a compacted crushed-stone subbase is also widely considered the best base for patio stones best base for patio slabs. That combination handles drainage, resists frost heave, and gives you a level surface you can fine-tune before setting your slabs. If you want a deeper look at the recommended materials and thicknesses for a solid patio foundation, see our guide to the best patio sub base. That said, the right answer does shift depending on what slabs you're laying, how wet your soil is, and whether you're dealing with hard freeze-thaw winters. Mortar beds on a concrete slab base are better for porcelain tiles and large-format natural stone. Sand-set systems work well for concrete pavers and flagstone. Knowing which system suits your site before you dig is what separates a patio that lasts 20 years from one that rocks and sinks in three. Knowing which system suits your site before you dig is what separates a patio that lasts 20 years from one that rocks and sinks in three best base for brick patio.
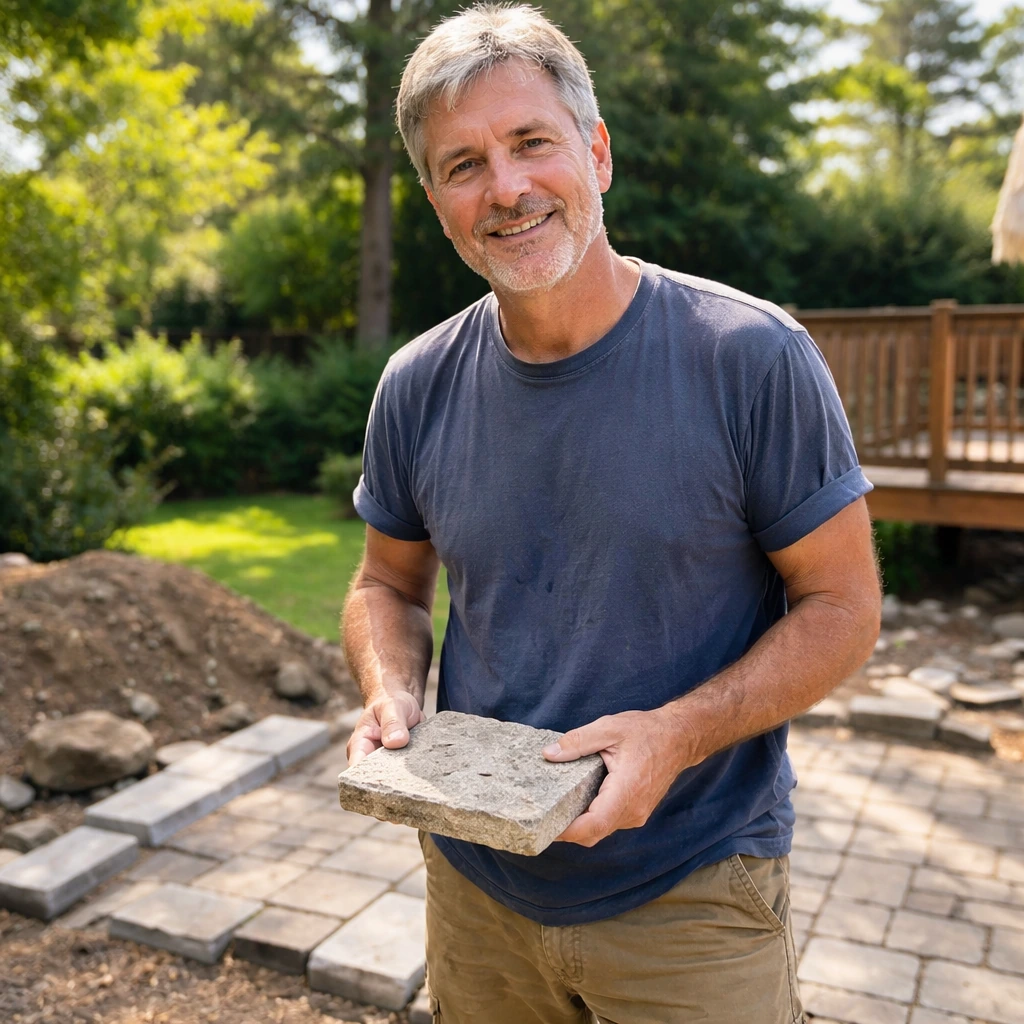
Best Base for Patio Slabs: Build-Up, Installation Guide

What 'base' actually means for patio slabs
A lot of homeowners think 'the base' just means throwing down some sand. It's actually a whole system with four distinct jobs, and if any one of them is done poorly, the whole patio pays for it eventually.
- Subgrade: the native soil or compacted earth at the bottom of your excavation. This is what everything else sits on. If it's soft, silty, or organic, you've got problems from the start.
- Subbase: the structural layer of compacted crushed stone or gravel that distributes weight evenly, handles drainage, and resists frost movement. This is the backbone of the whole system.
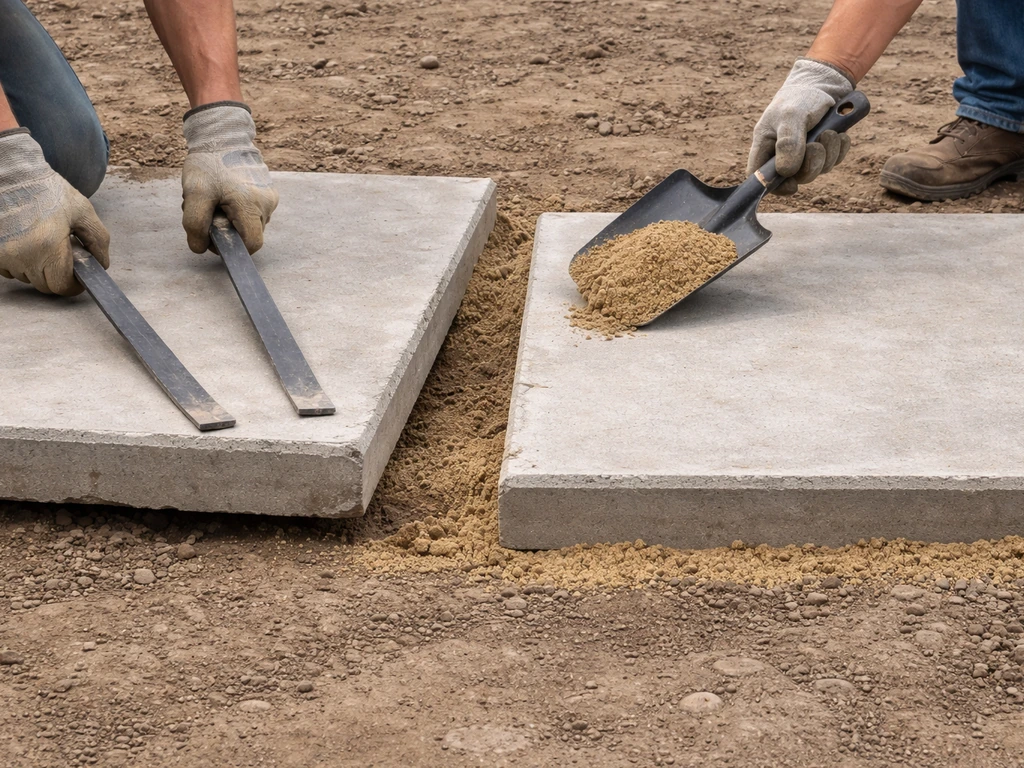
- Bedding layer: a thin, fine layer (usually 1 inch of coarse sand or a dry mortar mix) that lets you fine-tune the level and grade before setting slabs. It's not structural — it's a precision tool.
- Drainage: water needs to go somewhere. Good base design slopes away from structures at roughly 1 inch drop per 8 feet, and the crushed stone subbase creates void space so water drains through rather than pooling under your slabs.
Think of the base as a layered system rather than a single material. Each layer has a specific role, and swapping or skipping one causes specific, predictable failures. Skipping the compacted subbase causes settling. Using the wrong bedding material causes rocking. Poor drainage causes frost heave. Understanding each layer makes the whole thing a lot less mysterious.
Your main base material options
Here are the five base systems you'll realistically choose between, with honest pros and cons for each.
Compacted crushed stone (the most reliable all-rounder)
Crushed stone, sometimes called processed gravel or crusher run, is the go-to subbase for most patio projects. It's angular, which means the pieces lock together when compacted instead of rolling around like smooth pea gravel. A 4-inch compacted layer is standard for residential patios on stable soil; bump that to 6 inches on clay-heavy soil or in climates where the ground freezes more than 12 inches deep. On top of this, you add a 1-inch layer of coarse bedding sand to screed level before placing slabs. This system is what ICPI (the Interlocking Concrete Pavement Institute) recommends for concrete pavers and it works equally well under flagstone and brick.
Sand-only base (simple but limited)
Some older guides suggest laying slabs directly on a sand bed without a compacted stone subbase underneath. For small, light-use patios on sandy or well-draining soil, this can work short-term. But sand migrates under load, especially in wet conditions, and without the structural aggregate underneath, you'll get settling within a few seasons. I'd only recommend sand alone for temporary or very lightweight applications, or as that top 1-inch bedding layer sitting on top of properly compacted stone.
Mortar bed on a concrete slab

For porcelain outdoor tiles, large-format natural stone (bluestone, limestone, slate), and any situation where tight, consistent joints matter, a mortar bed on a reinforced concrete slab is the most stable system. For bluestone patios specifically, the most reliable base is a well-compacted crushed-stone subbase with a proper bedding layer for stable, well-drained support bluestone patio base. The concrete slab acts as the structural base and the mortar bed (typically 1 to 1.5 inches of a sand-cement mix or tile adhesive) bonds the slabs rigidly in place. This system doesn't allow for movement, which means it's fantastic on stable ground but it can crack on ground that shifts or heaves. The critical caveat here: once a mortar-bedded slab is rocking, it will keep rocking. Pavingexpert specifically flags this as a failure mode because a set mortar bed cannot accommodate minor movements, so prep has to be perfect before you lay a single slab.
Dry-mortar (semi-dry) bed
A semi-dry mortar mix (roughly 4 or 5 parts sharp sand to 1 part cement, mixed dry or just barely damp) is a popular middle ground for natural stone and concrete slabs. It acts like a firm bedding sand during installation, letting you tap slabs level, but it sets up over time from moisture in the ground and slabs. It's forgiving to work with and gives better long-term stability than pure sand. It's a solid choice for irregular flagstone and textured natural stone where a full mortar bond might trap air pockets.
Pedestals (for porcelain and raised patios)
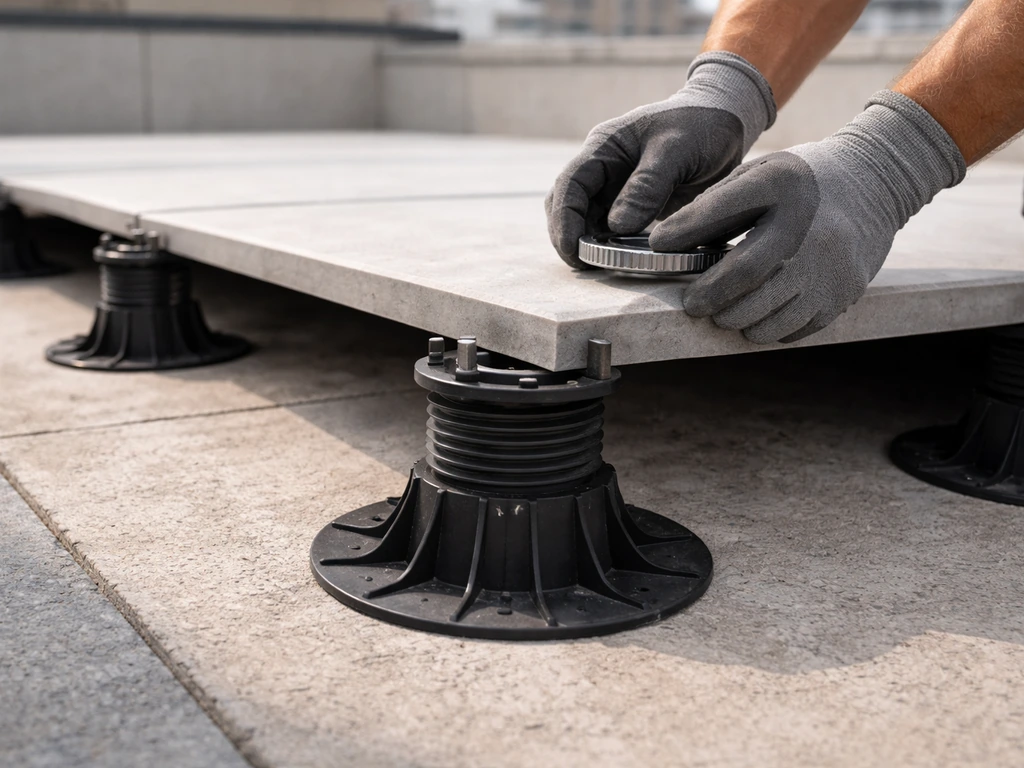
Adjustable pedestals are a modern system used predominantly with porcelain or large-format concrete slabs on rooftop terraces, balconies, or anywhere you need a perfectly level surface over an uneven structural base. The pedestals sit directly on the substrate (could be waterproof membrane, concrete, or decking), and the slabs rest on top with open joints for drainage. They're not a traditional ground-level base system, but they're worth knowing about if you're laying porcelain over an existing concrete surface or on a sloped deck.
Choosing the right base for your slab type and site
The slab material you're using and the conditions under your feet should drive this decision together. Here's how to think through both.
| Slab Type | Recommended Base System | Notes |
|---|---|---|
| Concrete pavers / paving slabs | Compacted crushed stone + 1" coarse sand bedding | Classic ICPI sand-set system; flexible, easy to repair |
| Flagstone (irregular natural stone) | Compacted crushed stone + dry-mortar or sand bedding | Dry-mortar bed handles uneven undersides better |
| Porcelain outdoor tiles | Reinforced concrete slab + full mortar bond | Rigid surface needs rigid base; pedestals work for raised installs |
| Large-format bluestone / limestone | Reinforced concrete slab + mortar bed | Heavy slabs need full support; sand-set risks cracking large formats |
| Brick pavers | Compacted crushed stone + 1" coarse sand bedding | Same system as concrete pavers; edge restraints critical |
| Reclaimed/irregular stone | Compacted crushed stone + dry-mortar bed | Irregular thickness needs adjustable bedding layer |
Soil type matters a lot
Sandy or gravelly soil drains naturally and provides decent structural support, so a 4-inch compacted crushed stone base is usually enough. Clay soil is the enemy of patios: it swells when wet, shrinks when dry, and heaves when it freezes. On clay, go deeper (6 inches minimum of compacted aggregate) and seriously consider a geotextile fabric between the native soil and your subbase to stop clay migration upward into the stone over time. Organic soil (topsoil, soil with root matter) should always be fully removed before you start, not just compacted.
Freeze-thaw climate rules
If you're in a zone where the ground freezes 6 inches or deeper in winter, your base depth needs to go below the frost line or be designed to flex. For most of the northern US and Canada, that means a 6-inch or even 8-inch compacted subbase. Sand-set systems (crushed stone + sand bedding) handle freeze-thaw better than rigid mortar systems because the whole patio can shift slightly and then settle back without cracking. If you're going mortar bed on concrete in a cold climate, make sure the concrete has proper expansion joints and you're using a flexible adhesive mortar rather than a standard cement-sand mix.
Step-by-step: building the base from the ground up
Here's the full installation sequence I'd follow for a standard sand-set patio using compacted crushed stone and a coarse sand bedding layer, which covers the majority of DIY patio projects.
- Mark out the area and calculate your total excavation depth. Add up: slab thickness + 1 inch bedding sand + compacted stone depth (4 to 6 inches) + 1 inch tolerance. A typical 2.5-inch concrete paver on 1 inch sand on 4 inches compacted stone needs roughly 7.5 inches total excavation below finished grade.
- Excavate and remove all topsoil and organic material. Don't try to compact topsoil — it compresses but then releases later. Get down to firm mineral soil.
- Check and address soft spots. Dig out any soft or wet areas and fill with compacted crushed stone. If you have widespread drainage issues, this is the time to lay perforated drain pipe at the base of the excavation.
- Lay geotextile fabric on clay or silty soils. This keeps fine particles from migrating up into your aggregate base over time. It's cheap insurance.
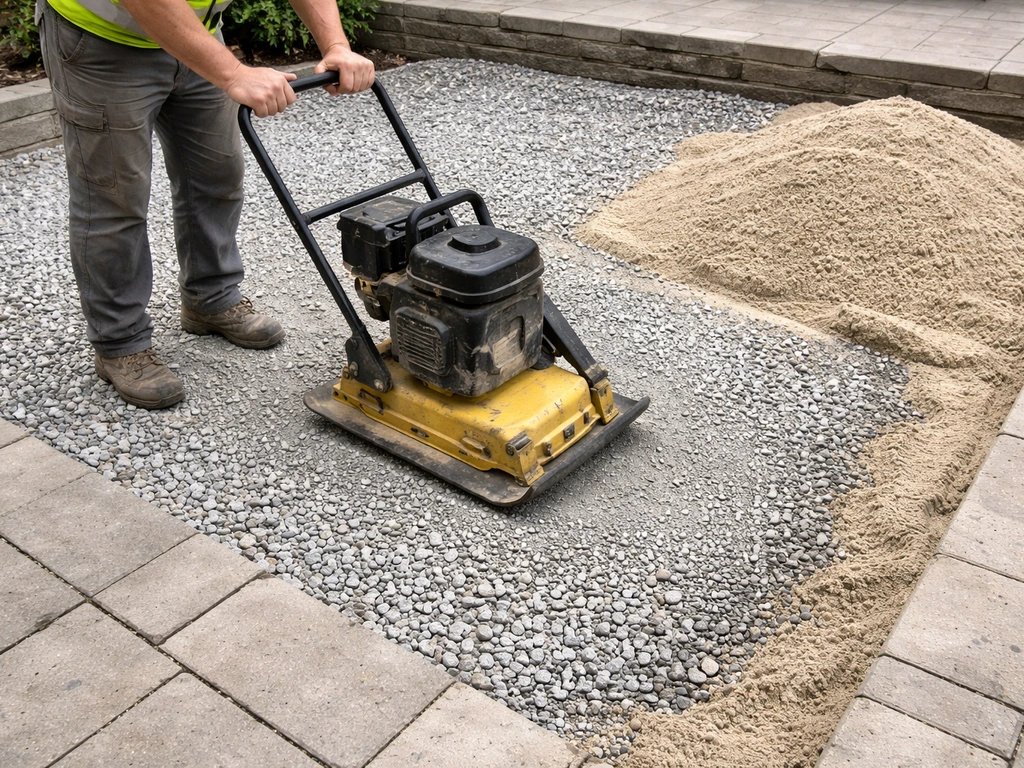
- Add crushed stone in 2 to 3 inch lifts and compact each lift with a plate compactor. Don't dump the full depth in at once — thinner lifts compact properly, thick ones don't. Aim for the top of the compacted base to sit about 3 inches below your intended finished slab level (for a 2-inch slab plus 1-inch bedding).
- Check your slope. The top of the compacted base should already slope away from the house at 1 inch per 8 feet. Use a long level or string lines to confirm this before adding bedding material.
- Install edge restraints. For sand-set systems, rigid plastic or metal edge restraints go in now, spiked into the compacted base at the perimeter. This locks the whole system laterally and prevents slabs from creeping outward over time.
- Screed the 1-inch bedding sand layer. Use two screed rails set to the right depth and drag a straight board across to create a flat, consistent surface. Do not walk on the screeded sand — work from the slabs you've already set.
- Set slabs from a corner or straight edge, working outward. Tap each slab gently with a rubber mallet to embed it fully in the sand. Check level and slope constantly — small errors compound quickly.
- Fill joints. For sand-set systems, sweep dry jointing sand (or polymeric sand for weed and ant resistance) into the joints, then compact the whole surface with a plate compactor with a rubber pad to bed everything in. Add more sand and repeat until joints are full to within about 1/8 inch of the surface.
For mortar-bed installations on a concrete slab, the sequence changes after step 3: you pour and cure a reinforced concrete slab (minimum 4 inches thick, with wire mesh or rebar), then apply mortar bed or tile adhesive and set slabs with full back-buttering to eliminate any air pockets underneath. Hollow spots under mortar-bedded slabs are a direct cause of cracking under foot traffic.
Drainage, freeze-thaw, and leveling tricks
Getting drainage right from the start
Water is the number one cause of patio failure. Slope matters more than most people realize: a minimum 1% grade (roughly 1 inch per 8 feet) away from the house keeps water moving. If your site is naturally flat or bowled inward, you need to either build up one side or install a channel drain at the low point before you lay a single slab. I've seen patios installed by otherwise careful builders that pool water against a foundation wall because someone decided the slope 'looked too obvious.' It's not obvious once it's full of furniture and plants, but the water damage is very obvious three winters later.
Fighting frost heave
Frost heave happens when water in the soil freezes, expands, and pushes your base upward. The solution is threefold: dig deep enough to get below the frost line (or close to it), use free-draining crushed stone that doesn't hold water, and keep water out of the base in the first place with good surface drainage. If you're in a climate with frost depths of 24 inches or more, a full sand-set flexible system is much more forgiving than a rigid mortar-on-concrete system because the individual slabs can lift slightly and resettle without cracking.
Leveling tricks that save time
- Use screed pipes or rails set to the exact height you need and pull a straight 2x4 across them to level the sand. Pull the pipes out and fill the channels with sand before you start setting slabs.
- For uneven or sloped sites, set string lines at finished height across the whole area before you start excavating. Everything references back to those lines.
- If a slab is too high after setting, lift it, remove a small amount of sand, and reset. If it's too low, lift it and add a little sand. Never try to tap a high slab down into already-compacted sand; you'll just crack it.
- For large-format slabs (anything over 24 inches), use a level across the surface and the joint to the next slab simultaneously. Lippage (one slab edge higher than the adjacent one) is the most common finish problem on large-format installs.
Common mistakes and how to fix them
Sinking slabs
Slabs sink when the base wasn't compacted enough, organic material was left in the subgrade, or the bedding layer was too thick. To fix a sunken slab, lift it using two flat pry bars or a suction lifter, add compacted stone to the low area first (if the subbase has settled), then add fresh bedding sand and reset. Don't just add more sand on top of old sand without addressing why it sank, or it'll sink again.
Rocking slabs
A rocking slab means the bedding isn't supporting all four corners evenly. On sand-set systems, lift the slab, add a small amount of sand to the low corner, and reset. On mortar-bedded systems this is a serious problem: as Pavingexpert notes, once a mortar bed has set with a void beneath a slab, it cannot flex to fill that gap. You have to lift the slab, chip off the old mortar, and re-bed it completely. This is why full back-buttering (coating the underside of the slab with mortar before setting) is non-negotiable on mortar installs.
Open or widening joints
Joints opening up on sand-set systems usually mean the edge restraints are failing or were never installed. Slabs are migrating outward under load. Fix: re-set slabs back to position, re-compact, and install or re-secure proper rigid edge restraints. Then refill joints with polymeric sand and compact again. On mortar-jointed systems, open joints mean the mortar has cracked, usually from movement. Re-point with a flexible exterior-grade mortar or jointing compound rather than standard cement mortar.
Water pooling on the surface
If water is pooling, either the slope is wrong or individual slabs have settled unevenly creating low spots. For patios on uneven ground, the base and leveling approach you choose makes the difference between settling and a surface that stays put best patio for uneven ground. For widespread pooling, the whole patio may need to be lifted and re-laid with corrected grade. For a single low slab, lift and re-bed it higher. This is a situation where getting the slope right during initial installation saves a huge amount of work later.
Cracked slabs
Cracks in individual slabs are usually caused by a void underneath, a large unsupported overhang at the slab edge, or a slab that's too thin for the load. Concrete pavers and slabs rarely crack if they're properly bedded. Thin natural stone (under 1.5 inches) is more vulnerable, especially on sand-set systems where a small void can develop. Replace cracked slabs and investigate the bedding beneath them before relaying.
Maintenance, re-leveling, and keeping it all together
Even well-built patios need some attention over time. The good news is that sand-set systems are very easy to maintain, which is one of the underrated reasons to prefer them for DIY projects.
Re-sanding joints (every 2 to 5 years)
Jointing sand washes out and compresses over time. Once joints start looking thin or you can see gaps, sweep in fresh jointing sand or polymeric sand, mist lightly with water to activate polymeric binders, and let it cure. Doing this before ants or weeds establish themselves in the joints makes the job much easier. Polymeric sand resists both better than standard sand and is worth the extra cost.
Re-leveling individual slabs
On sand-set systems, a sunken or proud slab can be lifted and reset in 15 minutes. This is the biggest practical advantage over mortar-on-concrete systems where re-leveling means grinding, chipping, and re-mortaring. Check your patio annually (spring is ideal, after winter frost activity) and reset any slabs that have moved before they become a trip hazard or cause drainage problems.
Keeping drainage clear
Debris, moss, and algae build up in joints and low spots, eventually trapping water against slab surfaces. Clean the patio surface annually with a brush or low-pressure wash. Avoid high-pressure washing sand-set patios, it blasts out the jointing sand. For mortar-jointed slabs, inspect re-pointing needs every 3 to 5 years, especially after harsh winters.
Sealing: when it helps and when it doesn't
Sealing is most beneficial for porous natural stone (limestone, sandstone, certain bluestone) and for concrete pavers where you want to lock in polymeric sand joints and resist staining. It doesn't add structural benefit to the base. For porcelain, sealing is generally unnecessary because porcelain is already non-porous. Apply sealer to clean, dry slabs and re-apply every 2 to 4 years depending on the product and traffic level. Sealing over damp or dirty slabs traps moisture and causes whitish haze or flaking, so patience here pays off.
| Base System | Maintenance Frequency | DIY Repair Ease | Longevity on Good Subbase |
|---|---|---|---|
| Compacted stone + sand bedding | Low (re-sand every 2 to 5 years) | Very easy — lift and reset | 20+ years with annual checks |
| Compacted stone + dry-mortar bedding | Low to medium | Moderate — re-point joints as needed | 15 to 25 years |
| Mortar bed on concrete slab | Medium (re-point every 3 to 5 years) | Harder — requires chipping and re-mortaring | 25+ years on stable ground |
| Pedestals on structural base | Low (clean drains, check pedestal height) | Easy — individual slabs lift out | 20+ years with quality pedestals |
The base you build today determines how much work you're doing five years from now. Get the subgrade prep right, compact your crushed stone properly, nail the slope, and install edge restraints on sand-set systems. Those four steps eliminate the majority of patio failures I've seen, and none of them require expensive equipment or specialist skills. Whether you go sand-set or mortar-on-concrete depends mostly on your slab type and climate, but both systems last for decades when the fundamentals are solid.
FAQ
Can I use pea gravel instead of crushed stone for the best base for patio slabs?
Usually no. Pea gravel is rounded, so when compacted it does not interlock well, which makes settling and pumping more likely under foot traffic. Use angular crushed stone (crusher run/processed gravel) and compact in lifts for a stable base.
Do I need geotextile fabric under the crushed stone base on every patio?
Not always. It is most valuable on clay-prone soils to limit clay migration into the aggregate. On sandy or well-draining soils, it can be skipped if you remove all organic material and compact properly, but if you see persistent clay, puddling, or fine soil working upward, add it.
How do I choose the right thickness if my patio size is large or the area gets heavy loads (hot tub, shed)?
Heavier loads need more base capacity, not just better leveling. Increase the compacted aggregate depth and ensure the bedding layer stays thin (about 1 inch for sand-set). For major point loads, consider consulting a local pavement designer, because slab thickness and reinforcement may also need to change.
What compaction method should I use, and how do I know the base is actually compacted?
A plate compactor is typically used for residential patio bases, compacting the stone in layers rather than one thick pour. Confirmation should be practical, not guesswork: after compaction, you should not see ruts with normal standing weight, and the surface should feel firm when walked on with boots.
Is a 1-inch bedding sand layer always correct for sand-set patio slabs?
It is a common target, but the key is keeping it thin enough to prevent slab sinking. If your bedding layer is too thick or you spread it unevenly, slabs can settle over time. Keep bedding level, screed it carefully, and place slabs promptly so the base does not get churned.
Can I install patio slabs directly on concrete or asphalt to avoid digging?
Sometimes, but only if the existing surface is sound, properly sloped, and structurally stable. For sand-set on top of an existing concrete slab, check that drainage is still correct and consider whether you can add edge restraints. For porcelain on uneven or sloped substrates, adjustable pedestals are often the safer approach than forcing a thicker sand bed.
How much slope should I really build, especially near doors or a garage?
Aim for at least about a 1% grade away from the house (roughly 1 inch per 8 feet). If your patio ties into steps, a door threshold, or a driveway approach, verify the surface transitions so water does not run toward the foundation at the edges.
What should I do at the patio edges so joints do not open and slabs migrate?
Edge restraints are critical. Without them, slabs shift outward and joints widen. Use rigid edging that locks into the base system, reset displaced slabs back into line, then re-compact and refill joints (often polymeric sand for long-term stability).
What causes polymeric joint sand to fail, even if the base was built correctly?
Common causes include joints that are not swept clean, joints filled with excess debris, insufficient water activation, or leaving the patio wet for too long before curing. Follow the product’s water and cure timing, and avoid high-traffic or heavy rinsing until it fully sets.
How do I prevent frost heave if I cannot dig deep enough to reach the frost line?
If you cannot get below the frost line, rely on improved drainage and a more flexible sand-set style system rather than rigid mortar-on-concrete. Ensure the base is free-draining crushed stone, maintain slope, and avoid trapping water in the base or at low spots, because freeze-expansion needs available water to push slabs upward.
Is mortar-on-concrete a bad choice for freeze-thaw climates?
It can work, but it is less forgiving than sand-set if the ground shifts. If you use mortar beds in cold regions, prioritize proper expansion joints in the concrete slab and use a flexible exterior adhesive or mortar system. Still, expect that once voids develop under a slab, cracks and continued rocking are harder to correct.
If a patio slab is rocking, can I just add more sand beneath it?
Usually not. For sand-set systems, you can lift the slab, correct the low area by adding a small amount of bedding sand, then reset. But if the issue is uneven subbase compaction or a drainage problem, adding sand alone can mask the symptom and lead to repeat sinking or rocking.
How often should I re-check and re-level patio slabs?
At minimum, inspect annually, spring is ideal after winter freeze-thaw activity. If you notice any rocking, trip edges, or recurring low spots where water pools, correct them early before jointing sand washes out and the problem spreads to neighboring slabs.
Should I seal my patio, and does sealing change anything about the base?
Sealing mainly affects surface protection and staining resistance, it does not strengthen the base. Seal porous natural stone and, in some cases, concrete pavers where joint polymeric sand performance matters. For porcelain, sealing is generally unnecessary. Make sure slabs are clean and fully dry before sealing to avoid trapped moisture and surface haze.