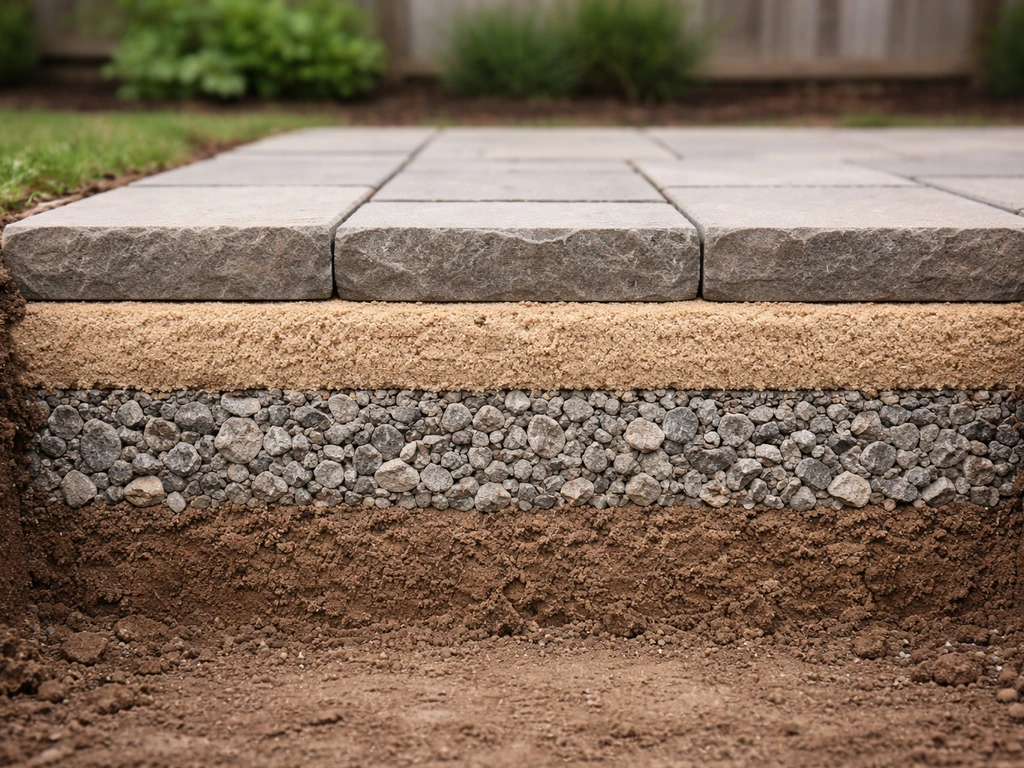
For most patios, the best base is a compacted layer of crushed stone aggregate (typically 4 to 6 inches deep for residential foot traffic) topped with a 1-inch screeded layer of coarse bedding sand. That combination handles drainage, resists frost heave, and gives you a stable, level surface to build on.
Best Base for a Patio: Choose and Build the Right Layers

Nolan Ellison
29 Apr 2026

The exact recipe shifts depending on your patio surface, your soil type, and your climate, but crushed stone plus sand is the right starting point for the vast majority of homeowners laying pavers, brick, flagstone, or natural stone. A lot of people also start by comparing this crushed stone-and-sand approach to the best patio sub base options for their specific soil and climate. If your base is uneven, fix the base best base for brick patio.
What a patio base actually includes
When people say 'patio base,' they're usually talking about everything that sits between the finished surface and the native ground. It's not one layer, it's a system, and each part does a specific job. Skipping or rushing any of them is how you end up with a sinking, shifting, or heaving patio two winters from now.
- Subgrade: The native soil at the bottom of your excavation. This gets compacted first before anything else goes in. Its load-bearing capacity and drainage behavior drive every decision above it.
- Sub-base (drainage layer): Coarse crushed stone or processed gravel, typically 4 to 6 inches thick for pedestrian patios. This layer distributes load, drains water away from underneath the surface, and resists frost movement.
- Base aggregate (structural layer): In some builds — especially for heavier loads, poor soils, or porcelain tile — a finer, well-compacted crushed stone base sits on top of the sub-base to create a firm, consistent platform.
- Bedding layer: A thin, screeded layer of coarse sand (typically 1 inch / 25 mm) or a dry mortar mix that the surface units sit on. This is a setting layer, not a leveling layer — it shouldn't be used to fix an uneven base beneath it.
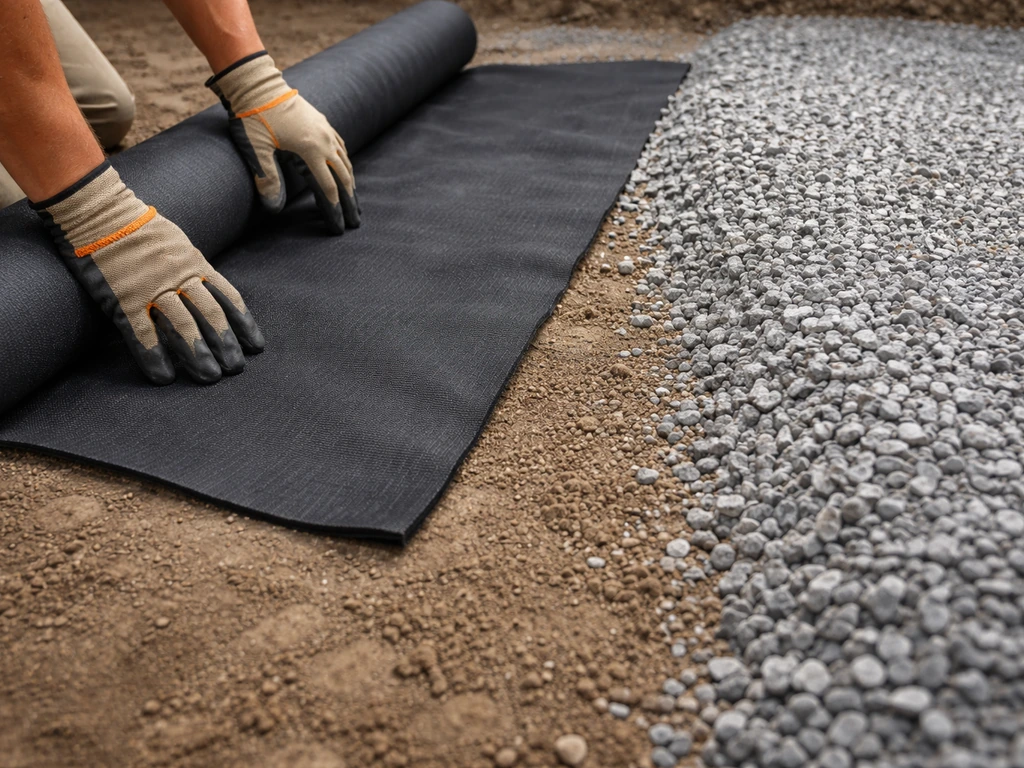
- Weed barrier: A permeable geotextile fabric placed between the subgrade and the aggregate layers to suppress weeds without trapping water.
- Edge restraints: Hidden plastic, aluminum, or concrete edging that locks the perimeter in place and prevents the whole base from spreading laterally over time.
A note on drainage that gets overlooked: the base needs a slope to shed water. A 1% to 2% grade (roughly 1/8 inch per foot) away from the house is the standard minimum. If you build a perfectly flat base, you're building a bathtub.
Best base by patio surface type
Different surface materials have very different tolerance for movement, moisture, and flex. A loose sand-set flagstone patio can handle a little seasonal shift without cracking; a porcelain tile patio absolutely cannot. Match the base to the surface or you're setting yourself up for failure.
| Patio Surface | Recommended Base System | Bedding Layer | Notes |
|---|---|---|---|
| Concrete pavers / brick | 4–6 in. compacted crushed stone sub-base | 1 in. coarse bedding sand (screeded) | ICPI standard; sand must be uniform, not used to compensate for uneven base |
| Flagstone / natural stone (dry-set) | 4–6 in. compacted crushed stone | 1 in. coarse sand or stone dust | Allows minor seasonal movement; gaps filled with stone dust or polymeric sand |
| Flagstone / natural stone (mortar-set) | 4 in. compacted gravel + 3–4 in. concrete slab | Mortar bed on slab | Rigid system; requires proper slab with control joints to prevent cracking |
| Porcelain tile | 4–6 in. compacted crushed stone + 3–4 in. concrete slab | Tile adhesive / polymer mortar bed | Zero tolerance for movement; concrete base is non-negotiable |
| Gravel patio | 3–4 in. compacted crushed stone or road base | No bedding layer | Top layer is decorative gravel 2–3 in. deep; permeable, lowest cost |
| Composite / wood decking | Frost footings or compacted gravel under frame posts/beams | Not applicable | Base requirement is about footing depth and drainage under frame, not a sand bed |
Pavers and brick
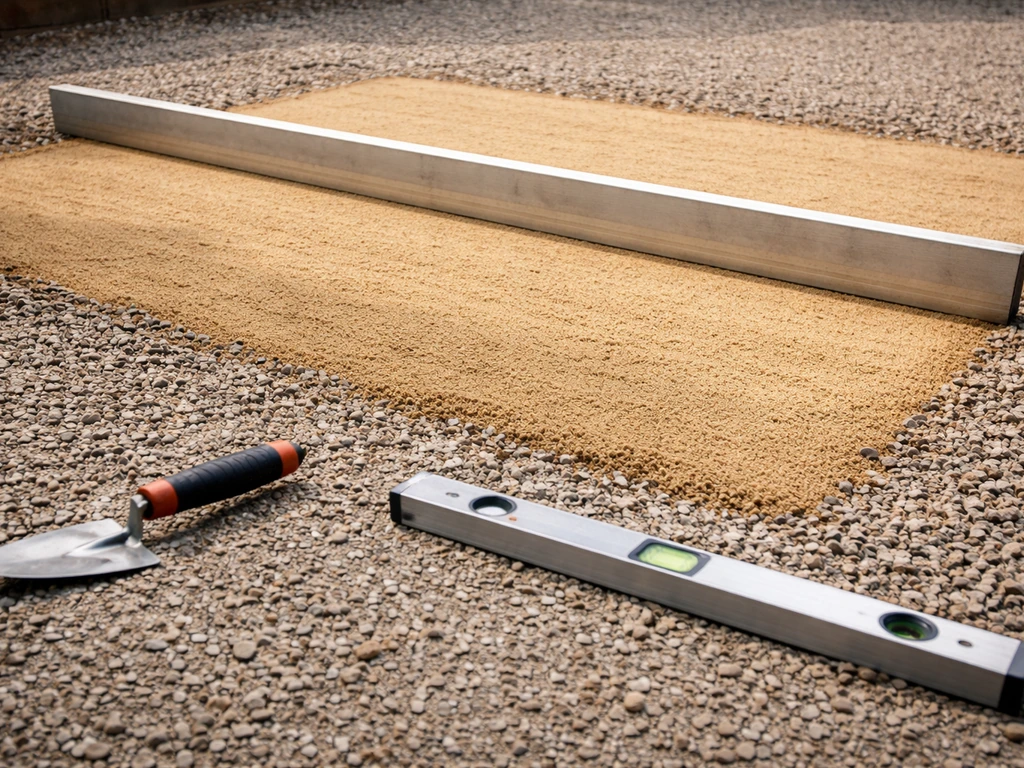
This is the most documented system in the industry. ICPI (Interlocking Concrete Pavement Institute) specifies blank" rel="noopener noreferrer">a maximum 1-inch bedding sand layer, screeded flat, over a compacted aggregate base. The sand must be coarse and well-graded, not play sand or mason's sand, which compact poorly and shift under load. CMHA echoes this: the bedding sand is not a leveling tool. If your base is uneven, fix the base. Don't pile extra sand in the low spots and think you've solved it. That's where sinking starts.
Flagstone and natural stone
Dry-set flagstone is forgiving. A compacted crushed stone base with a sand or stone dust bedding layer works well, and occasional minor heaving can be corrected by lifting and re-setting individual stones. If you want the best base for patio stones, match the base system to your stone type and climate so you get the right stability and drainage.
If you're trying to find the best base for patio slabs, focus on the same match between your stone type, soil, and drainage plan. Mortar-set flagstone is a different beast entirely, it needs a concrete slab underneath it, otherwise cracks appear within a season or two in freeze/thaw climates. If you're mortar-setting flagstone, treat the base like a tile installation.
The best base for a bluestone patio, for example, follows this same split depending on whether it's set dry or in mortar. The best base for a bluestone patio depends on whether you set it dry on bedding sand or mortar-set it over a more rigid foundation.
Porcelain tile
Porcelain is unforgiving. It's dense, it's brittle at the edges, and it will crack or pop if the base underneath it flexes even slightly. You need a reinforced concrete slab (minimum 3.5 inches thick, 3,000 PSI mix) over a compacted gravel sub-base. The concrete controls the rigidity; the gravel provides the drainage. Skipping the concrete to save money is the single most common and most expensive mistake I see on porcelain patio projects.
Gravel patios
A gravel patio is the simplest base system: excavate 4 to 5 inches, compact the subgrade, lay a geotextile, compact a 3-inch layer of road base or crushed stone, then top with 2 inches of decorative gravel. No sand, no bedding layer. The whole system is permeable, which makes it excellent for drainage-challenged sites. The trade-off is ongoing maintenance, raking, replenishing, and dealing with gravel migration.
How soil type, climate, and drainage change your base
The crushed stone plus sand recipe is a good default, but your local conditions can push you toward a thicker base, a different aggregate, or an entirely different system. The best material for patio sub base depends on drainage, soil, and freeze thaw conditions, but a well-compacted aggregate base is the common starting point crushed stone plus sand recipe. If you want the best material for patio sub base, start with angular, well-graded crushed stone that compacts tightly. Here's how to read your site.
Soil type
Sandy or gravelly native soil drains well and compacts predictably. You can often get away with a 4-inch aggregate base for a residential patio on this type of ground. Clay soil is the problem child, it holds water, swells when wet, and shrinks when dry. On clay, go deeper: 6 inches minimum, and consider a layer of coarse drainage gravel at the very bottom before your compacted base aggregate. Loamy soil falls in the middle, but always compact it thoroughly before building up layers.
Freeze/thaw climates
If you're in a climate with hard winters, USDA zones 6 and colder, roughly, frost heave is your main enemy. Water in soil expands about 9% when it freezes, and it will lift your patio from below if it gets trapped under the surface. The fix is a free-draining aggregate base deep enough to get below the frost line, or at least to prevent water accumulation. In northern climates, 6 to 8 inches of compacted crushed stone is not overkill. Make sure the aggregate is angular (crushed, not rounded river gravel), angular stone interlock-compacts tightly and drains vertically rather than trapping water in pockets.
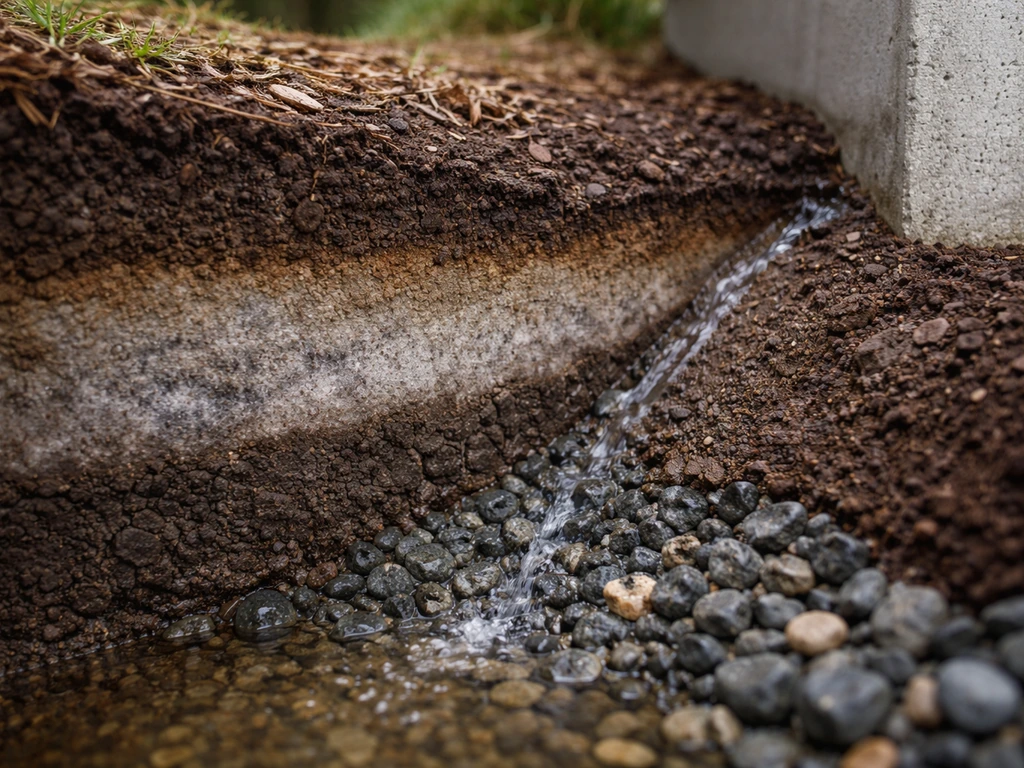
Drainage and slope
If your yard already drains poorly or you're building against a house foundation, you may need to add a perforated drainage pipe at the base of the aggregate layer, routing water to a daylight outlet or dry well. Build the 1 to 2% slope into every layer as you go, subgrade, aggregate base, and bedding layer, so they all reinforce each other. If you only slope the top surface and the base is flat, water will find its way into the base during rain events and cause problems underneath.
Load: foot traffic vs. vehicles
A pedestrian patio is a very different engineering problem from a driveway or a pad where vehicles park. For foot traffic, a 4 to 6 inch crushed stone base is standard. If you expect vehicles, even occasional lawn tractor or golf cart traffic, go to 8 inches minimum and use a well-graded base aggregate. True vehicular paving follows a formal pavement design process that's well beyond a typical patio build.
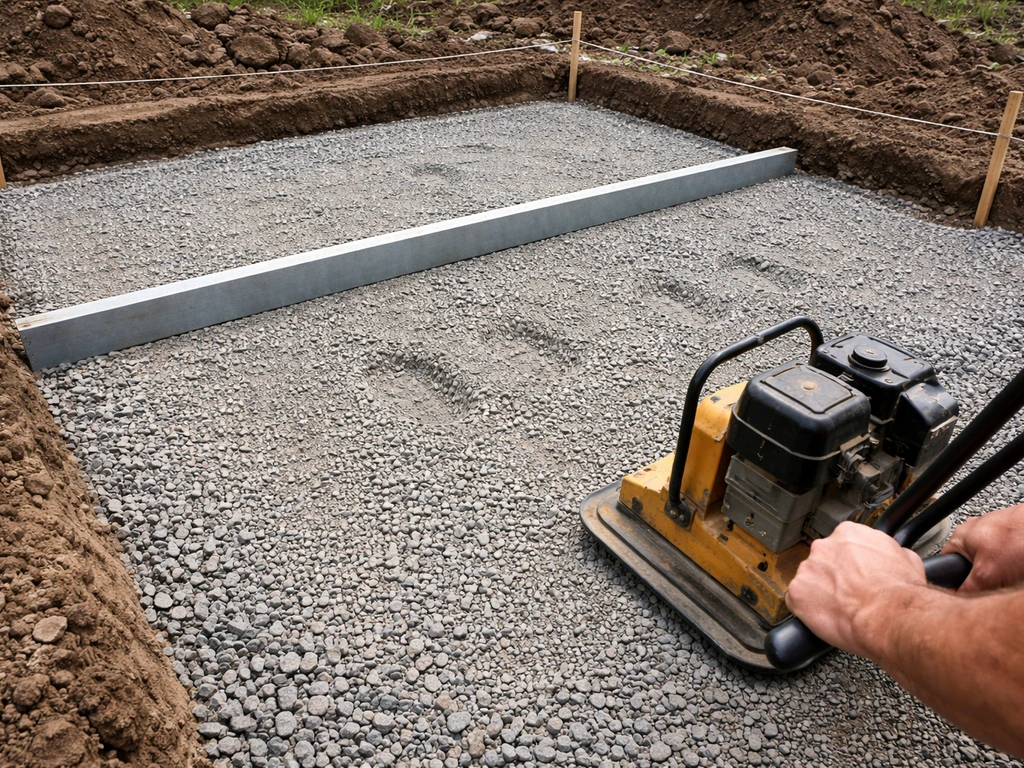
How to build the base: step by step
This is the part most DIY guides rush through or oversimplify. Getting the base right takes more time than laying the surface, probably 70% of the total project time. That's not a complaint, it's just the reality of how patios stay flat for decades instead of years.
- Mark and excavate: Define your patio perimeter with stakes and string. Excavate to a total depth that accounts for your aggregate base, bedding layer, and surface material thickness — typically 8 to 10 inches below finished grade for a standard paver patio. Slope the excavation floor at your target 1 to 2% grade away from the house.
- Compact the subgrade: Use a plate compactor (available at any equipment rental shop) to compact the native soil. Make at least two passes in perpendicular directions. If the soil is very dry, lightly moisten it first. If it's soft or spongy even after compaction, you may need to over-excavate and bring in engineered fill.
- Install the weed barrier: Lay a permeable geotextile fabric over the compacted subgrade, overlapping seams by at least 6 inches. Fold it up the sides of the excavation slightly so it sits behind your edge restraints.
- Spread and compact the base aggregate in lifts: Add crushed stone in 3-inch layers (lifts), not all at once. Compact each lift with the plate compactor before adding the next. Adding too much at once means the bottom of the layer never fully compacts. Check your slope with a level or string line after each lift.
- Install edge restraints: Set plastic or aluminum edging at the perimeter, staked into the compacted base at least every 12 inches. This step often gets skipped on DIY projects and is often why patios spread and sag at the edges within a few years.
- Screed the bedding layer: For sand-set systems, pour coarse bedding sand and screed it to a uniform 1-inch depth using screed rails or pipes as guides. Do not walk on the screeded sand before laying surface units. If you disturb it, re-screed that section.
- Lay surface units and compact: Place your pavers, flagstone, or brick and compact them into the bedding layer using a plate compactor with a rubber pad or a rubber mallet. This seats each unit firmly and levels minor high spots.
- Fill joints and final compact: For pavers and brick, sweep polymeric sand into joints and do a final compaction pass. Mist with water to activate the binder. For flagstone, fill gaps with stone dust or decomposed granite.
Weed barrier, edging, and keeping the base from shifting
These details feel like afterthoughts but they're what separates a patio that lasts 20 years from one that looks rough after 5. I've reset enough sunken patio edges to take them seriously.
Weed barrier: use it right or don't bother
A geotextile fabric placed at the bottom of the excavation (between soil and aggregate) is worthwhile. What doesn't work is laying fabric between the aggregate base and the bedding sand, that actually traps fine particles and can cause drainage problems over time. Use woven geotextile for stability, not the cheap non-woven landscape fabric from the garden center. The woven version lets water through while blocking root penetration and soil migration into your aggregate.
Edge restraints: the most skipped step
Without edge restraints, horizontal load from foot traffic slowly pushes the perimeter units outward. The joints open up, sand washes out, and the whole surface gradually fans apart. Snap Edge, Pave Tech, and similar plastic edging systems are inexpensive, easy to install, and genuinely effective. Stake them every 8 to 12 inches on straight runs and every 6 inches on curves. For heavy-use areas or raised patios, pour a narrow concrete haunch along the perimeter instead.
Buildup and settling prevention
Proper compaction of the aggregate base is the single most important factor in preventing settlement, this is consistently emphasized in professional paving standards and confirmed by anyone who's dug up a failed patio. Under-compaction in the base is the root cause of most sinking and rocking surface units. Renting a plate compactor for a half-day costs $50 to $100 and prevents a $3,000 patio reset. Don't try to compact gravel with a hand tamper for anything more than a small accent area.
Maintenance, troubleshooting, and common failures
A well-built base doesn't need much attention, but it does need occasional inspection, especially after the first couple of winters in a cold climate.
Sinking or rocking pavers/stones
This is almost always a base compaction issue or a drainage issue. Water got under the surface, saturated the sand or aggregate, and the units settled unevenly. The fix is to pull up the affected units, check whether the base aggregate has shifted or eroded, recompact or re-add material, re-screed the bedding sand, and re-lay the units. Don't just add sand under a sinking paver and call it done, you're masking the cause.
Frost heave
If sections of your patio pop up in winter and settle back in spring, you have a frost heave problem caused by moisture trapped in or under the base. This needs a drainage fix, not a surface fix. Add a perforated drain pipe at the base of the aggregate layer if you haven't already, and make sure your slope is routing water away effectively. In some cases, excavating deeper and adding more free-draining aggregate is the only long-term solution.
Weed breakthrough
Weeds growing through joints are usually wind-blown seeds germinating in joint sand, not roots pushing up from below. Polymeric sand in joints suppresses this significantly. For existing patios with weed problems, pull weeds, treat with a non-staining patio-safe herbicide, and re-sand joints with polymeric sand. The geotextile barrier at the bottom of the base prevents actual root infiltration from below.
Pooling water on the surface
Standing water after rain usually means the slope has been lost due to settling, or the slope was never adequate in the first place. Check your grade with a level. A 1% slope (1/8 inch per foot) is the practical minimum. If the patio has settled toward the house, this needs to be corrected by pulling up units and rebuilding the base with the correct grade, both for drainage and to protect the foundation.
What to buy: materials, specs, and quantities
Once you know your base system, sourcing the materials is straightforward. Most of what you need comes from a local landscape supply yard or building materials supplier. Big-box stores carry the basics but typically in smaller bags at higher per-unit cost. For any patio larger than about 100 square feet, order in bulk.
Base aggregate
Ask for 'crushed stone base,' 'processed gravel,' '3/4-inch crusher run,' or 'road base', the terminology varies by region but you're looking for angular crushed stone with fines included (not washed stone). The fines help it compact into a dense, interlocked mass. Specify that it should be suitable for a patio or driveway base. For a typical 200 sq ft patio with a 5-inch base, you'll need roughly 3 to 3.5 tons of aggregate. Your supplier can calculate this for you based on square footage and depth.
Bedding sand
Use coarse concrete sand or ASTM C33 sand, not play sand, not mason's sand. Both of those fine sands compact poorly and migrate out of place under load and water flow. A 1-inch bedding layer over 200 sq ft requires roughly 0.6 cubic yards or about half a ton. Most landscape suppliers sell it by the ton or cubic yard.
Polymeric joint sand
For paver and brick joints, polymeric sand (Techniseal, Alliance, and similar brands are widely available) hardens with water to lock joints and resist weeds and ants. Coverage varies by joint width, check the bag, but budget roughly one 50-lb bag per 25 to 40 sq ft of paver surface for standard joint widths.
Geotextile fabric
Buy woven geotextile (not landscape fabric) in rolls. A 3-oz or 4-oz woven polypropylene fabric is standard for base separation. Order slightly more than your patio square footage to account for overlaps and side folds. For geotextile separator installs, Geosynthetics Magazine suggests a typical overlap range of about 12, 18 inches for firm subgrade conditions geotextile overlaps. Typar, Mirafi, and similar products are available from landscape supply and contractor supply stores.
Edge restraints
Plastic snap-lock paver edging (like Snap Edge or EZ Edge) typically comes in 8-foot sections. Measure your perimeter and buy 10 to 15% extra. Make sure to buy the corresponding spikes (8-inch or 10-inch galvanized landscape spikes), they're sometimes sold separately.
| Material | What to Specify | Approx. Quantity (200 sq ft patio) | Where to Buy |
|---|---|---|---|
| Crushed stone base aggregate | 3/4-in. crusher run or road base, angular with fines | 3 to 3.5 tons (for 5-in. depth) | Landscape/masonry supply yard |
| Bedding sand | Coarse concrete sand, ASTM C33 | ~0.6 cu yd / 0.5 ton | Landscape/masonry supply yard |
| Polymeric joint sand | Any reputable brand (Techniseal, Alliance) | 5–8 bags (50 lb each) | Home center or masonry supplier |
| Geotextile fabric | Woven polypropylene, 3–4 oz/sq yd | ~220 sq ft (10% overage) | Landscape supply, contractor supply |
| Edge restraints | Plastic snap-lock paver edging + 10-in. spikes | Perimeter length + 15% | Home center or landscape supplier |
If you're building a mortar-set or tile patio over a concrete slab, you'll also need ready-mix concrete or bags of 3,000 PSI concrete mix, reinforcing wire mesh or rebar, and exterior tile adhesive or polymer mortar. Those quantities depend on your slab dimensions and thickness, a concrete calculator on any building supply website will give you bag counts in about 30 seconds.
The base is the part of a patio project that no one photographs for Instagram, but it's everything. Get the excavation depth right, compact every layer, build in your slope from the start, and use proper edge restraints. Do all that and your surface, whether it's pavers, flagstone, porcelain, or gravel, will perform the way it's supposed to for a very long time.
FAQ
Can I use gravel instead of crushed stone for the best base for a patio?
You can, but it usually performs worse for stability because many gravels are rounded and don’t interlock as tightly. If you go with gravel, choose angular processed gravel (similar to crusher run) and still compact in layers, then verify drainage and frost resistance for your climate. For hard-freeze areas, stick to crushed stone with fines included unless you’re sure the material interlocks.
What happens if I only slope the finished patio surface, not the layers underneath?
Water will still migrate into a flat base during rainfall, then saturate and weaken the bedding sand and aggregate. The fix is to build the 1% to 2% grade into the subgrade and aggregate layers as you construct them, not just on top. If you find standing water later, you often need to rebuild the base with the correct overall grade.
Do I really need to compact the sand or only the crushed stone base?
Both matter, but the sand needs gentler handling. The aggregate base should be compacted thoroughly in lifts, the bedding sand should be screeded flat without overworking or “packing” it like the base. Over-compacting or adding extra sand to correct low spots can cause settlement and uneven unit movement later.
How do I know if my base is uneven before laying pavers or stone?
Use a long straightedge and check multiple directions after compaction. Then re-check slope with a level or laser, measure with a tape at consistent points, and correct early by removing and re-compacting material, not by dumping extra bedding sand. If you’re off by more than a small amount across a run, address it at the base stage.
Is geotextile required for the best base for a patio?
It’s not always mandatory, but it’s often worthwhile for preventing soil migration into the aggregate. Place it between the native soil and the aggregate, use woven polypropylene (not cheap non-woven), and avoid installing fabric between aggregate and bedding sand because it can trap fines and reduce drainage.
Can I build the patio base directly over topsoil?
Avoid it. Topsoil is soft, organic, and often contains roots that decompose, which leads to voids and settlement. Excavate down to stable subgrade, remove roots and debris, then compact that surface before adding the aggregate system.
Should I use polymeric sand for all joint types, or only paver patios?
It’s primarily used for paver and brick joints to lock units and reduce weeds, but it should be chosen based on your joint size and surface type. For flagstone that’s set with larger, irregular joints, you may need a different approach or jointing material to avoid staining or improper lock-up. Always match the joint product to the installation method.
My patio keeps sinking in one corner, do I just top up the sand?
Usually no. Replacing or topping sand can mask the problem while the underlying aggregate is still shifting or eroding. The practical fix is to lift the affected units, inspect the aggregate for washout or compaction failure, recompact and re-add aggregate if needed, then re-screed the bedding sand to restore the correct height and slope.
What’s the minimum base depth for patio pavers versus a driveway, if I expect vehicle traffic sometimes?
For pedestrian patios, crushed stone base around 4 to 6 inches is typical, for occasional vehicle traffic go closer to 8 inches minimum and use a well-graded aggregate. If you expect frequent or heavy vehicle loads, treat it like a pavement design problem rather than a standard patio build.
How thick should the concrete slab be if I’m installing porcelain tiles outdoors?
A reinforced concrete slab is the key control for porcelain over a compacted gravel sub-base, and the article’s guidance is a minimum 3.5 inches thick using a 3,000 PSI mix. Skipping the slab is the most common costly mistake because porcelain tolerates almost no flex or uneven movement.
Do raised patios and steps need different base treatment?
They often do. Raised sections increase risk of edge spreading and trapped water, so you usually need stronger perimeter restraint (for example, a concrete haunch) and careful drainage planning around the edges. Don’t rely on bedding sand to “hold things up” in raised or heavily constrained zones.
What should I do if weeds are growing in the joints after installation?
First confirm they’re coming from joint weed growth rather than an upward force from below. For most joint weed issues, pull existing weeds, use a non-staining patio-safe herbicide if appropriate, then re-sand joints with polymeric sand so joints lock and resist new germination. If weeds persist, inspect for joint washout and base drainage problems.
How can I prevent gravel patio migration and raking maintenance?
Gravel migration is normal, but you can reduce it by using proper depth, compacted subgrade, and geotextile under the aggregate, plus edging restraints that contain the layer. If you want near-zero maintenance, gravel may not be the best base choice, because the system is intentionally permeable and visually “active” under traffic.
Is it okay to use washed stone for the base if it drains well?
Washed stone typically lacks fines, which reduces compaction interlock and can lead to a looser base that shifts under load. For a patio base, you usually want angular crushed stone with fines included (not washed), because fines help it compact into a dense mass.