For most patios, compacted crushed stone (also called processed gravel or crusher run) is the best sub base material. For most patios, compacted crushed stone (also called processed gravel or crusher run) is the best sub base material best base for patio slabs. It locks together under compaction, drains freely, and stays stable through freeze-thaw cycles better than sand or unprocessed gravel. That said, the right choice depends on your soil, your climate, and what surface you're laying on top, so this guide walks through every realistic option, when to use each, and exactly how to build the layers.
Best Material for Patio Sub Base: Choose the Right One

Nolan Ellison
29 Apr 2026
What a patio sub base is (and what it actually has to do)
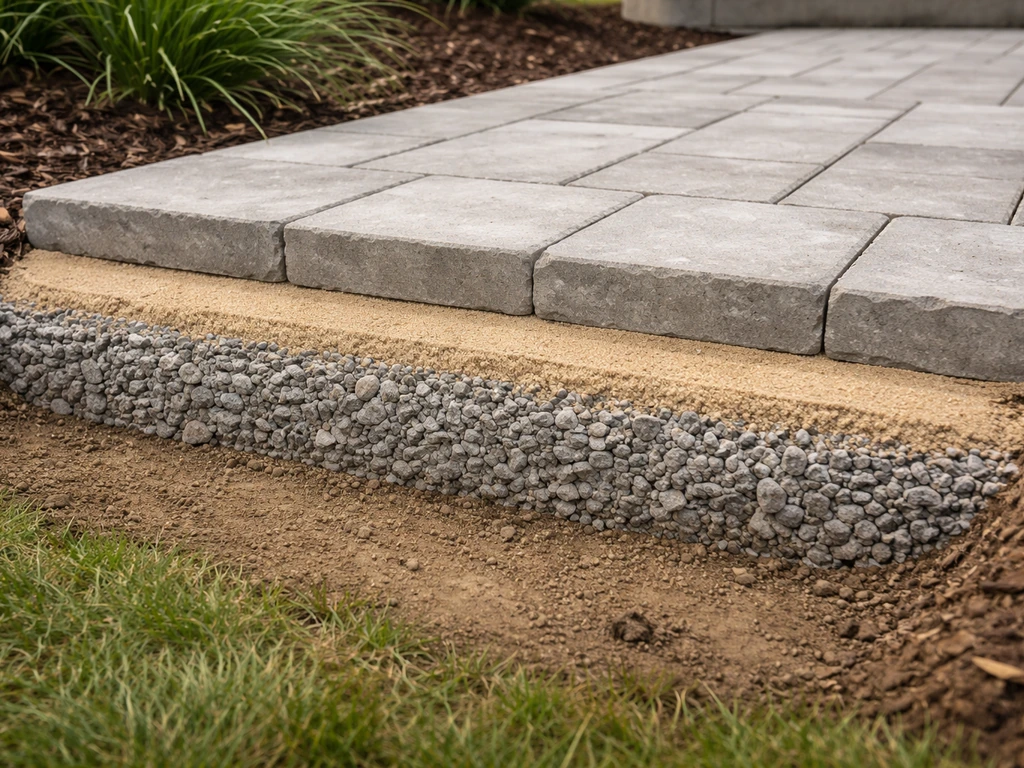
A sub base is the compacted granular layer that sits between your native soil (the subgrade) and your patio surface. Its job is simple but unforgiving: spread the load from foot traffic and furniture evenly so the surface above doesn't crack, sink, or tip. It also manages water by giving it somewhere to go before it reaches the subgrade, which is especially important if you're on clay. Some builds include a separate base layer directly under the bedding material, making the stack: subgrade, sub base, base, bedding, patio surface. In residential patio work the sub base and base are often combined into one well-graded compacted layer, and that's fine for most homeowners.
What the sub base must deliver, in plain terms: stable support that won't pump or shift under load, free drainage so water doesn't pool and undermine the layer, and enough depth to distribute stress before it reaches the native soil below. When it fails at any of those, you get sinking, heaving, or cracked pavers within a season or two. Getting the sub base right is genuinely more important than any other decision in a patio build, including the surface material itself.
The top sub base materials compared
There are five materials you'll realistically encounter when sourcing a patio sub base: crushed stone, standard gravel, decomposed granite, coarse sand, and recycled crushed concrete or mixed aggregate. If you’re planning brick pavers, the best base for brick patio is the same well-graded crushed stone or crusher run approach, just sized and compacted to your patio thickness and drainage needs. Each behaves differently under compaction, in wet conditions, and under freeze-thaw stress. Here's an honest look at all of them.
Crushed stone (crusher run / processed aggregate)
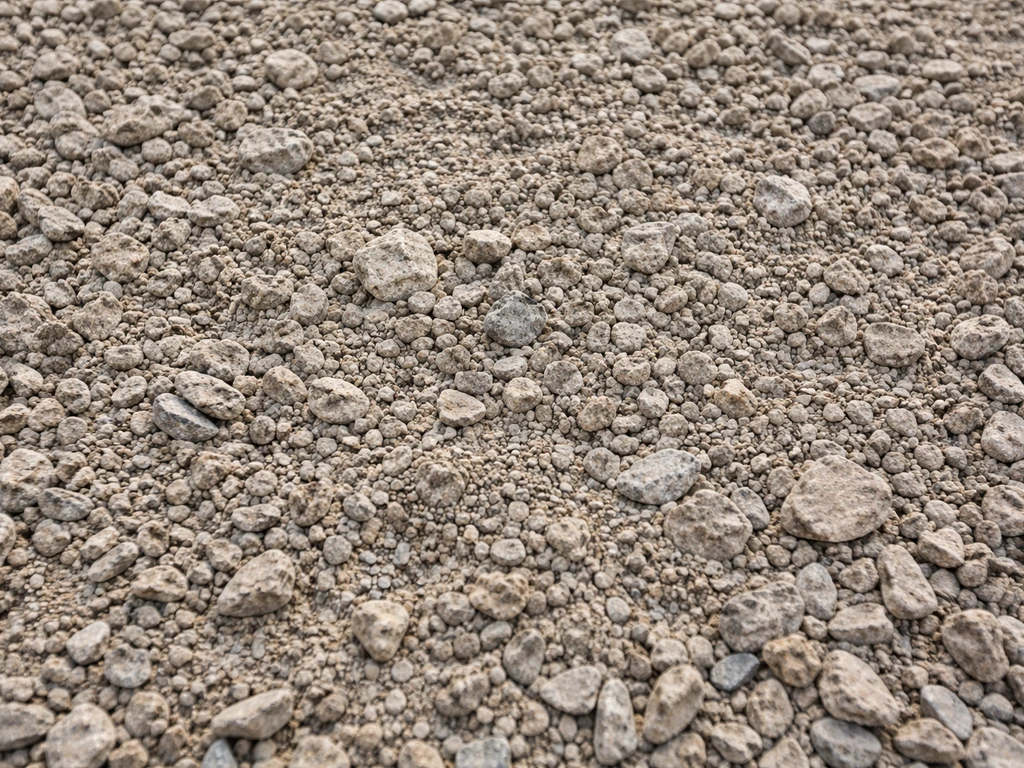
This is the gold standard for residential patio sub bases. Crusher run combines angular crushed particles with fines (stone dust) in a single product, typically labeled as 3/4 inch minus or 21A/21B depending on your region. The angular edges and the fine particles work together during compaction to create an almost concrete-like interlocking mass. It drains while still holding its shape, it doesn't shift under load, and it gives you the compaction density you need. ICPI (the Interlocking Concrete Pavement Institute) targets at least 98% Modified Proctor density for granular base materials, and crusher run hits that reliably with a plate compactor. If you're laying pavers, flagstone, porcelain tile, or natural stone, this is your first choice. For many patios, crusher run is widely considered the best base for a patio because it compacts tightly and drains while staying stable.
Clean crushed gravel (washed gravel)
Clean or washed gravel (3/4 inch or 1-1/2 inch single-size stone) drains exceptionally well because water moves freely through the voids. The downside is that same void space: clean gravel doesn't compact into a monolithic mass the way crusher run does. It stays loose and can shift under lateral stress, especially near edges. Where clean gravel earns its place is as a drainage layer underneath crusher run when you're on heavy clay or in a wet site, or as a thin leveling layer (1 to 2 inches of 3/4 inch minus rock) placed directly under bedding sand as Mutual Materials recommends in their standard sand-set paver sequence. On its own as the only sub base layer, clean gravel is a compromise, not a best practice.
Decomposed granite (DG)
Decomposed granite is a naturally weathered granitic material that compacts reasonably well in dry climates. It's popular in the Southwest and Pacific Coast states where freeze-thaw cycles are mild and the dry climate keeps it stable. The problem is moisture: DG erodes when it gets wet repeatedly, especially in its unstabilized form. Angi's 2026 cost data specifically flags higher replacement and erosion risk for unstabilized DG. If you use DG at all, either stabilize it with a binder or limit it to dry-climate applications under gravel or decomposed-granite-surface patios. Under porcelain tile, pavers, or heavy stone in a wet or cold climate, skip it.
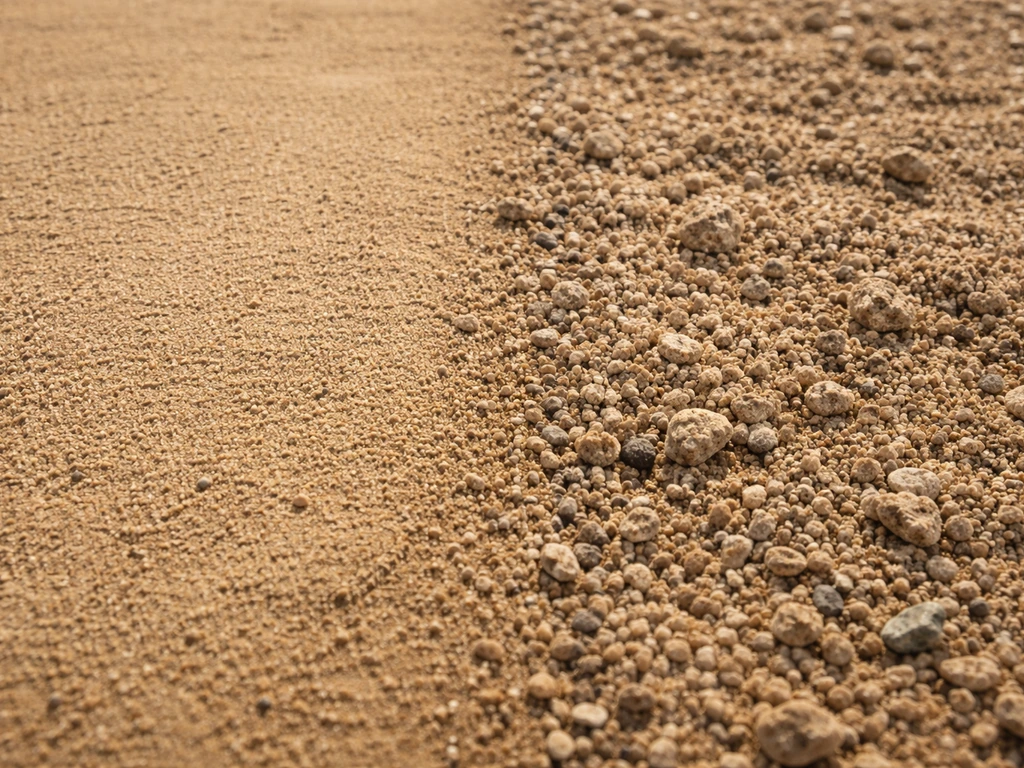
Coarse sand
Sand is a bedding material, not a sub base material. I know that's blunt, but it's the mistake I see most often on DIY patio installs. Sand shifts laterally under load, especially without proper edge restraint. It migrates downward into clay subgrades. In freeze-thaw climates it becomes a vector for frost heave because it holds capillary water. Sand's legitimate role is as a 1 to 1.5 inch bedding layer placed over a compacted stone base, graded to ASTM C33 specification, so pavers can be set and leveled. That's it. Using 4 or 6 inches of sand as a sub base is a common cause of sunken, rocking pavers within two or three seasons.
Recycled crushed concrete and mixed recycled aggregate
Recycled concrete aggregate (RCA) and recycled mixed aggregate are increasingly available from recycling facilities and can perform well as sub base material. The angular edges of RCA compact similarly to crusher run, and the 2026 pricing from green-cycle recyclers shows it typically comes in cheaper per tonne than virgin crushed stone. The caveats: quality varies by supplier, some RCA contains fine debris or soil contamination that affects drainage, and not all regions have reliable sourcing. If you can get a quality-controlled RCA product from a reputable recycler and visually inspect it before delivery (clean, angular, minimal soil fines), it's a perfectly viable and cost-effective sub base option.
| Material | Compaction quality | Drainage | Frost-heave risk | Best use case | Avoid when |
|---|---|---|---|---|---|
| Crusher run (3/4" minus) | Excellent | Good | Low (well-compacted) | Universal sub base for all patio types | Never — this is the default choice |
| Clean crushed gravel | Fair (no fines to lock) | Excellent | Very low | Drainage layer under crusher run; thin leveling layer | Using as the only sub base layer on clay |
| Decomposed granite | Good (dry climate) | Moderate | Moderate-high (wet climates) | Dry-climate patios, gravel or DG surface | Wet climates, freeze-thaw zones, under tile or pavers |
| Coarse sand | Poor (shifts laterally) | Moderate | High (holds capillary water) | 1–1.5" bedding layer only | Any use as a sub base layer |
| Recycled crushed concrete (RCA) | Good-Excellent (if clean) | Good | Low (if well-graded) | Budget-friendly sub base where quality RCA is available | Using unverified or soil-contaminated material |
How to pick the right material for your soil and climate
Your native soil and your local climate together determine which sub base approach will actually hold up. Get these two factors wrong and even the best compaction work on top won't save you.
Clay and expansive soils
Clay holds water, swells when wet, and shrinks when dry. It's the most demanding subgrade you can build on. The priority here is drainage: you want to get water out of the sub base and away from the subgrade as fast as possible. FHWA also emphasizes subsurface water and drainage requirements to support pavement performance and recommends geotextile separator layers with granular subbase to help minimize disturbance of sensitive subgrades priority here is drainage. Start with a layer of clean 3/4 inch gravel (2 to 4 inches) at the bottom of your excavation to act as a drainage blanket, then add your main crusher-run layer on top. A woven geotextile fabric between the clay subgrade and your granular layers prevents the clay from migrating up into the stone over time, which is a real failure mode on clay sites after several wet seasons. Engineering guidance from EB204 confirms that addressing wet soils before building the sub base, through enhanced drainage or simply letting the subgrade dry and stabilize, is a first step that no amount of extra stone thickness can substitute for.
Sandy and well-draining soils
Sandy subgrades are forgiving. Water drains quickly, the soil doesn't expand, and you can often use a thinner sub base. Crusher run is still the right choice, but you may not need the drainage blanket layer you'd use under clay. Compact the native sandy subgrade first before adding any material, which Mutual Materials' installation guidance specifically calls out as a mandatory first step.
Freeze-thaw climates (USDA zones 1–6)
This is where homeowners get the most misinformation. A common belief is that if you just go deep enough with your sub base, you'll stop frost heave. The engineering reality (documented in the FHWA and EB204 research) is more nuanced: simply piling on more unstabilized granular sub base does not reliably eliminate frost heave. In one Minnesota road study, heave persisted even with granular sub base up to 18 inches deep. What actually controls frost heave is drainage (keeping moisture out of the frost zone) and soil type (removing frost-susceptible fines from the sub base). Your sub base material must be non-frost-susceptible, meaning clean, well-graded crushed stone with minimal fines passing the No. 200 sieve. In cold climates, that clean stone combined with proper grading and drainage to move water away from the sub base does more than raw depth alone.
Matching sub base to patio surface type
- Concrete pavers and brick: Crusher run base plus 1 to 1.5 inches of ASTM C33-graded bedding sand. This is the ICPI-standard approach.
- Flagstone and natural stone (dry-laid): Crusher run base; some installers use a thin layer of coarse sand or stone dust as a bedding layer for easier leveling.
- Porcelain tile: Rigid installation over a concrete slab or a very firm, well-compacted crusher-run base with minimal flex tolerance. Porcelain cracks if the base moves at all.
- Gravel or pea gravel patio: Woven geotextile on subgrade, then clean crushed stone or DG (in dry climates). Less rigid surface requirement, more drainage focus.
- Composite deck panels or modular tiles: These typically need a flat, firm, and level base but tolerate more minor flex than porcelain; crusher run still preferred.
Sub base thickness and layer build-up by situation
Depth recommendations vary based on what you're building on and what the surface load will be. For a residential patio with foot traffic and outdoor furniture, these are practical starting points rather than engineering-stamped specs. Always check local building codes, especially if you're in a frost-heavy climate.
| Situation | Subgrade compaction | Drainage layer | Crusher run base | Bedding layer | Total excavation depth |
|---|---|---|---|---|---|
| Sandy soil, mild climate | Compact native soil | None required | 4–6 in | 1–1.5 in sand | ~6–8 in |
| Clay soil, mild climate | Compact, let dry if wet | 2–3 in clean gravel | 6 in crusher run | 1–1.5 in sand | ~9–11 in |
| Any soil, freeze-thaw climate | Compact native soil | 2–4 in clean gravel | 6–8 in crusher run | 1–1.5 in sand | ~10–14 in |
| Clay + freeze-thaw (severe) | Compact; consider drainage trench | 3–4 in clean gravel | 8 in crusher run | 1–1.5 in sand | ~13–15 in |
| Sandy soil, porcelain tile | Compact native soil | None required | 6 in crusher run (very firm) | Thin mortar or screed | ~7–8 in |
ICPI specifies compacting base material in 6-inch lifts. If your crusher run layer is 8 inches deep, that means two separate compaction passes: compact the first 6 inches, add the remaining 2 inches, compact again. Trying to compact 8 or 10 inches in one shot leaves the bottom of the layer loose, which is exactly where settlement starts.
Installation: step by step
- Mark and excavate: Dig to your target depth (see table above), adding an inch for tolerance. Slope the excavation floor away from your house at about 1/8 inch per foot so water sheds outward. Remove all organic material and topsoil.
- Compact the subgrade: Run a plate compactor over the native soil before adding anything. If the subgrade is wet clay, let it dry or address drainage first — this step cannot be skipped, and adding stone over soft wet soil just buries the problem.
- Lay geotextile fabric (if needed): On clay soils or any site with fine-grained subgrade, lay a woven geotextile fabric across the floor and up the sides of the excavation. This separates the subgrade from your granular layers and prevents migration.
- Add drainage layer (clay or wet sites): Spread 2 to 4 inches of clean washed gravel over the fabric. Don't compact this layer aggressively — its value is the open void space for drainage.
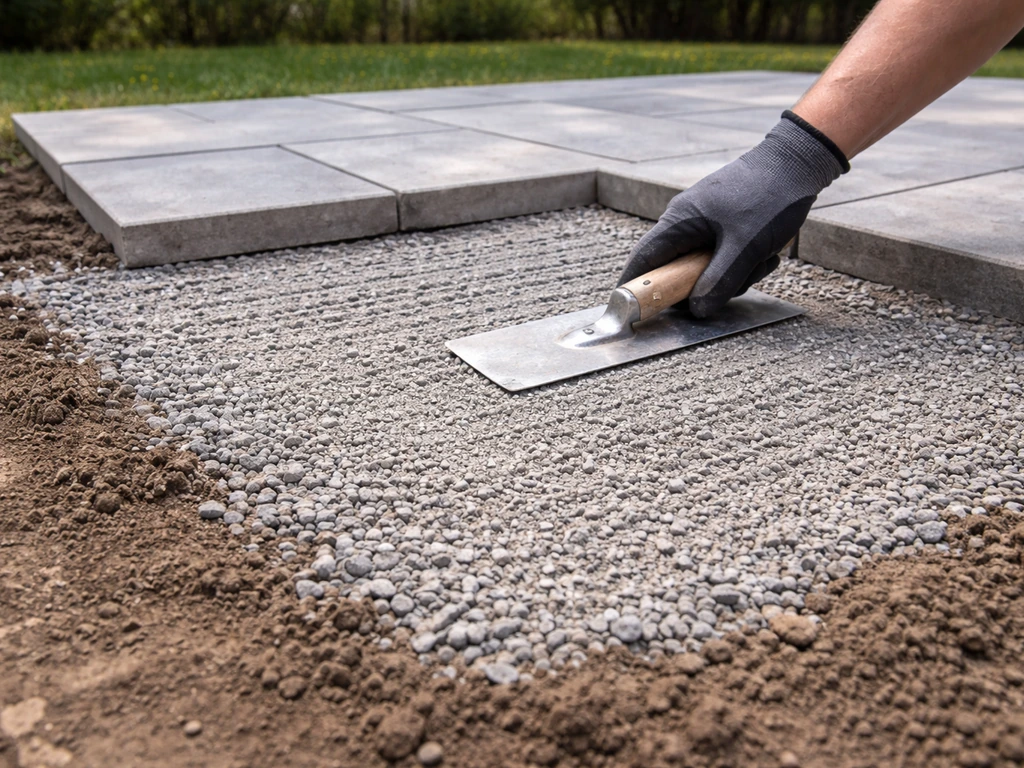
- Add and compact crusher run in lifts: Spread the first 6-inch lift of crusher run evenly. Lightly dampen it with water if it's bone dry (the fines need a bit of moisture to compact properly). Make at least four overlapping passes with the plate compactor. Check depth with a stake, then add the second lift if needed and repeat.
- Check for level and grade: Use a long level or string line to confirm the surface is graded at 1/8 inch per foot away from the structure. Low spots now become drainage traps later.
- Install edge restraints before bedding: Lock in plastic or aluminum edge restraints spiked into the compacted base before laying bedding sand. The edge restraint holds the whole system together laterally.
- Spread bedding sand: Apply 1 to 1.5 inches of ASTM C33-graded coarse sand over the compacted base. Screed it flat and uniform — do not vary the depth to compensate for an uneven base. As ARCAT's unit paver specification notes, bedding sand cannot be used to correct sub base deficiencies.
- Lay and set your patio surface: Place pavers, flagstone, or tile, then compact the surface with a plate compactor (with a rubber pad for pavers) to seat everything into the bedding layer. Fill joints with polymeric sand or fine aggregate as appropriate.
Drainage, weed control, and how to spot sub base failure
Drainage
Surface drainage is your first defense: the 1/8 inch per foot slope away from the house keeps the bulk of water moving. Below the surface, clean stone layers give water somewhere to go vertically before it has to migrate laterally. On sites with persistently high water tables or heavy clay, a perforated drain pipe (French drain) installed alongside the patio and daylighted to a lower point on the property is worth the extra work. Engineering guidance consistently identifies drainage and grading as more effective frost-heave mitigations than sub base depth alone.
Weed control
Weeds in a patio are almost always a top-down problem: seeds blow into joints and germinate in fine debris, not in your sub base. The geotextile fabric helps prevent subgrade soil from creeping up, but it won't stop surface weeds. Polymeric sand in the joints is your best first-line control. For gravel patios, a woven (not non-woven spun-bond) geotextile under the surface layer reduces weed penetration significantly better than the cheap fabric sold in rolls at big box stores.
Signs of sub base failure
- Rocking or wobbly individual pavers or stones (bedding layer has migrated or sub base has settled unevenly)
- Sections of the patio that are visibly lower than the original install (sub base settlement, often from inadequate compaction)
- Pavers or flagstones that heave upward in winter and may not return to original position (frost heave reaching the sub base)
- Persistent puddles on the patio surface after rain (sub base drainage has failed or the grade has shifted)
- Joint sand washing out after rain events (sub base is too high, bedding too thin, or drainage is channeling through joints)
- Visible cracking in a concrete or porcelain tile surface (sub base movement; these surfaces have zero flex tolerance)
If you already have a problem
Minor rocking pavers can sometimes be fixed by lifting individual units, adding bedding material, and resetting them. But if you have widespread sinking or repeated seasonal heaving, that's a sub base problem and the only real fix is to lift the surface, re-excavate to the correct depth, and rebuild the base layers properly. There's no product you can pour on top to fix a structurally inadequate sub base.
Cost, sourcing, and what maintenance actually looks like
What you'll pay in 2026
Crusher run and crushed stone pricing varies by region and delivery method, but 2026 aggregate price lists from suppliers like Dave Gendron Aggregates and R.J. Grondin Aggregates show typical delivered pricing in the range of $25 to $45 per ton for crushed gravel and processed aggregate. Recycled crushed concrete from green-cycle recyclers typically comes in at the lower end of that range or below it per tonne. GoodGravel's 2026 overview puts decomposed granite at roughly $40 to $70 per cubic yard depending on stabilization and region. For a 200-square-foot patio with 6 inches of crusher run, you're typically looking at 2.5 to 3 tons of material, plus delivery. Always get at least two local quotes because delivery distance drives the actual cost as much as the material itself.
How to estimate quantities
The basic formula: multiply your patio area (in square feet) by your intended depth (in feet), then divide by 27 to get cubic yards. Multiply cubic yards by 1.4 to convert to tons (this is an approximation; crushed stone is typically 1.3 to 1.5 tons per cubic yard depending on density). For a 300-square-foot patio with 6 inches of crusher run: 300 × 0.5 = 150 cubic feet, divided by 27 = 5.55 cubic yards, times 1.4 = about 7.8 tons. Add 10% for waste and uneven subgrade. If your patio area has uneven ground, focus on stable, well-compacted sub base layers first so the surface above does not sink or tip best patio for uneven ground. Most suppliers will help you confirm the quantity if you give them the square footage and target depth.
Where to source it
Local aggregate suppliers and quarries are your best source for crusher run and crushed stone. Call them directly, not a landscape supply retail chain, because you'll pay significantly less and get material that's sized and graded correctly. For recycled aggregate, search for concrete recycling facilities or demolition recyclers in your county. Big box stores sell bagged products but the economics don't make sense for anything over about 50 square feet. For DG, check landscape supply yards and ask whether it's stabilized or raw.
Maintenance expectations
A properly built crusher-run sub base is essentially maintenance-free for 10 to 20 years under normal residential use. What you'll maintain is the surface: refilling polymeric sand in joints every few years, releveling individual pavers if they shift, and keeping drainage paths clear of debris. If you used unstabilized DG, expect to replenish the surface layer every two to three years in wet climates because it erodes. The sub base itself shouldn't need attention unless you had an installation problem or there's a significant soil event like major root growth or underground water change.
FAQ
What specific size should I ask for when buying the best material for patio sub base (crusher run)?
For patios, “crusher run” or “3/4 inch minus” (often labeled 21A/21B regionally) is typically what to ask for, because it includes both angular stone and stone dust fines that lock together during compaction. If the product spec is only clean, single-size rock, it will drain but won’t interlock nearly as well, and you should treat it as a drainage/leveling layer, not the main sub base.
Can I install crusher run on wet or rainy days, or is that a bad idea?
Wet clay can be workable, but you generally should not place and compact granular layers when the subgrade is “muddy” or pumping water. A practical test is the hand squeeze, if it crumbles rather than smears and you can walk without leaving deep ruts, you’re closer to compaction conditions. If you can, wait for a drying period or improve drainage first, because compacting over saturated soil can still settle later.
Does the best material for patio sub base change if I’m laying porcelain tile or heavy flagstone?
If you plan on porcelain tile or heavy natural stone, prioritize a properly compacted crushed-stone sub base plus a stable bedding approach, and do not substitute sand as the main support layer. Tile and stone typically fail faster when the sub base allows even small lateral movement, so focus on edge restraint, correct compaction lift thickness, and proper jointing and drainage rather than just “adding more inches.”
How do I judge recycled crushed concrete (RCA) quality before using it as a patio sub base?
If your supplier delivers mixed aggregate or recycled material, the key is controlling the fine content and contaminants. Ask for a product that is visually clean, angular, and has minimal soil fines, and confirm whether it’s screened to limit material passing the No. 200 sieve. Even good-looking RCA can perform poorly if it’s contaminated with clay or debris that holds water.
Where exactly should geotextile fabric go when using crusher run under a patio?
Geotextile fabric is most helpful between the subgrade and granular layers on problematic soils, like clay, where you want to slow upward migration. Do not rely on fabric to “fix” a poorly drained site or a too-thin sub base. Also, keep fabric clean and flat during placement, so you do not trap soft pockets that can become settlement points.
What matters most for frost heave in cold climates, material depth or the type of sub base material?
Yes, some regions have a frost-susceptibility requirement or local rules about gradation and compaction. A common decision aid is to choose a well-graded, clean crushed stone with minimal fines for cold climates and confirm with your local building department or installer whether your target density and gradation must match code. In many places, depth alone is not the compliance metric, drainage and non-frost-susceptible gradation matter more.
Why does compaction in lifts matter, and what mistake causes settlement even with the right material?
You typically need compaction in lifts, and the practical mistake is trying to compact too thick in one pass. If you have 8 inches total crusher run, compact 6 inches first, then add the remaining 2 inches and compact again. If you skip the lift separation, the bottom portion stays loose and can settle, showing up later as rocking or cracks.
What should I do if my pavers heave seasonally, can I just lift and reset them?
If your patio has widespread heaving, assume it is structural rather than cosmetic. The “fix” that actually works is removing the surface and bedding, re-excavating to the correct depth, rebuilding the base layers, and correcting drainage and gradation. Spot-leveling only individual pavers can help when movement is isolated, but it usually fails when the whole sub base shifted.
What maintenance should I expect for a crusher-run patio sub base over 5 to 10 years?
You should budget for joint maintenance because polymeric sand can wash out or break down over time, especially if surface water is not draining properly away from the patio. Plan on checking joints after heavy rain seasons, and reapply polymeric sand only when joints are empty or failing, rather than trying to seal over movement problems.
When should I add a drainage blanket of clean gravel instead of using crusher run alone?
For a typical residential patio, crusher run as the main layer is usually the best first choice, but use clean gravel as an added layer only when the soil is very wet or clay-heavy. The drainage-blanket approach is usually about giving water a path before it hits the clay, not about replacing the main interlocking layer. If your subgrade is sandy and drains quickly, you often skip the blanket layer.