For most uneven ground situations, compacted gravel dry-laid pavers or properly bedded flagstone are your most forgiving and durable choices. They flex with minor ground movement, drain well, and can be re-leveled without tearing everything apart. If you're dealing with a noticeable slope rather than just a few dips, a pedestal system for porcelain pavers solves the problem elegantly. The material and method that will actually hold up long-term depends on three things: how severe your unevenness is, how firm your soil is, and what climate you're in. This guide walks through all of it.
Best Patio for Uneven Ground: Choose and Install Right

Nolan Ellison
29 Apr 2026
How to Prep an Uneven Patio Base
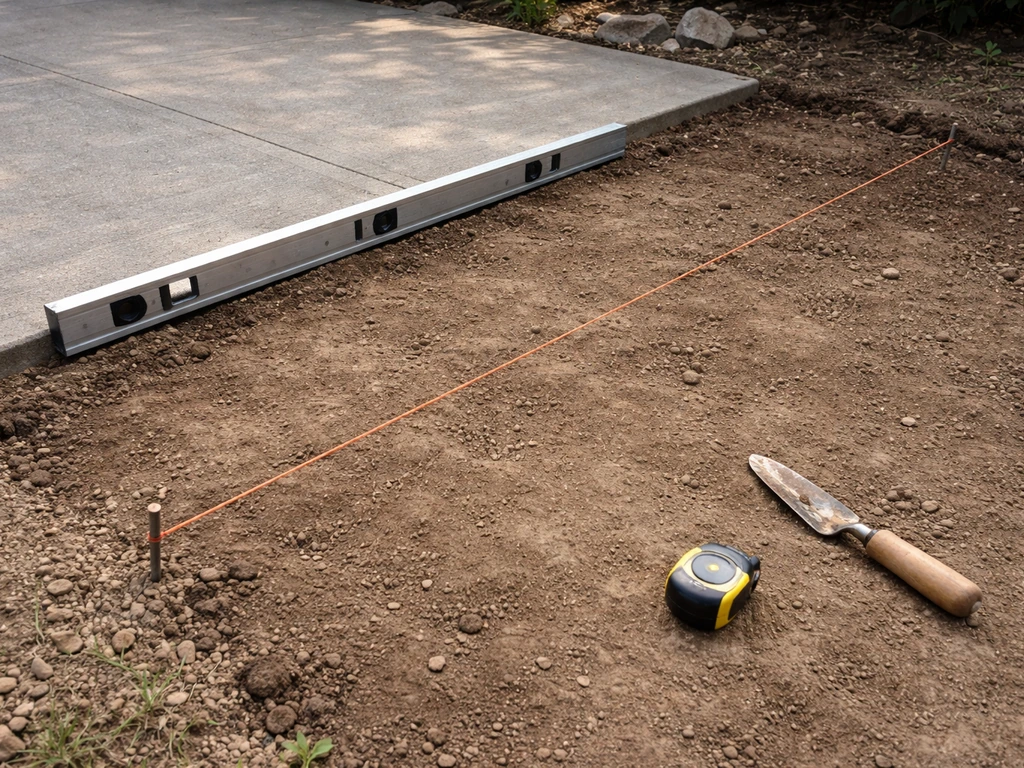
Before you pick a material, you need to know what you're actually dealing with. Grab a long level or a string line and measure your ground. Small dips of an inch or two across a patio area are completely normal and easy to correct in the subbase layer. A consistent slope of several inches from one end to the other is a different situation entirely. And soft, wet, or organics-rich soil is a different problem again. Don't skip this step, because the fix for each scenario is genuinely different.
Leveling vs Building Over
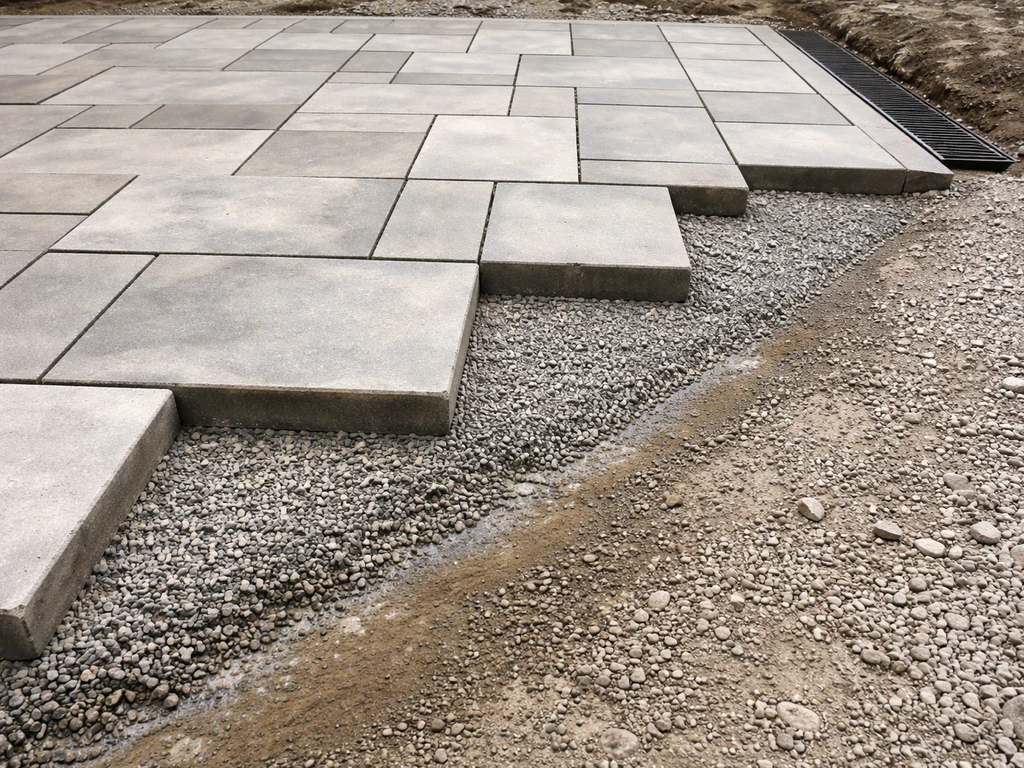
If you have isolated low spots or a grade that's off by less than 3 to 4 inches across the patio footprint, you can usually correct it in the subbase rather than doing major earthwork. You dig down uniformly, then use extra compacted gravel in low areas to build a level surface before screeding your bedding layer. This is the approach I recommend for most DIYers. It's cheaper and faster than regrading and it works reliably if you compact in 2-inch lifts and check level constantly.
If you have a significant slope, say 6 or more inches of drop across a 12-foot run, you have two real options: cut and fill to create a flat pad (which involves more excavation and potentially a small retaining edge), or embrace the slope and use a pedestal/raised support system. Pedestal systems are increasingly popular for porcelain pavers and composite decking panels because they let you set each support to a different height, creating a perfectly level surface regardless of what's underneath. More on that in the construction methods section.
One thing you absolutely cannot skip: remove all organic material from the subgrade. Grass roots, old mulch, topsoil, anything that compresses or rots over time needs to come out. Even 2 inches of organic-rich soil left under a patio will settle unevenly over years. Dig down to firm mineral soil, then build back up with compacted gravel to your target grade.
Best Patio Materials for Uneven Ground
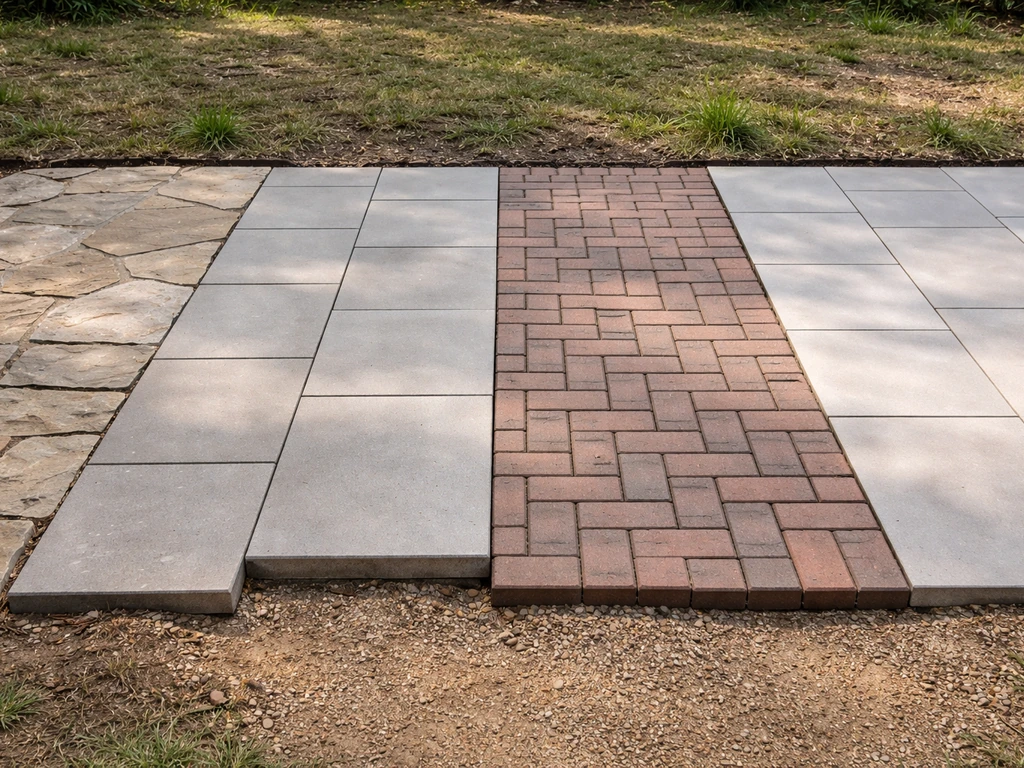
Not every material handles uneven ground equally well. Here's an honest breakdown of how each performs, including where they shine and where they fail.
| Material | Best Scenario | Tolerance for Movement | DIY Difficulty | Freeze-Thaw Performance |
|---|---|---|---|---|
| Flagstone (dry-laid) | Irregular dips, natural look, soft soil | High | Medium | Good if joints are open |
| Concrete Pavers | Moderate slopes, most climates | High | Medium | Excellent |
| Brick | Slight grade, firm soil | Medium | Medium | Good with proper base |
| Natural Stone (set) | Gentle slope, formal look | Medium | Medium-High | Good if well-drained |
| Porcelain Pavers (pedestal) | Significant slope, roof decks, raised patios | High (adjustable) | Medium-High | Excellent (ASTM C1026) |
| Gravel / Crushed Stone | Any grade, very uneven ground | Very High | Low | Excellent |
| Composite Panels | Moderate slope, deck-style install | High (framed) | Medium | Good |
Flagstone
Dry-laid flagstone is one of the most forgiving materials you can use on uneven ground. Because each stone sits independently on a compacted gravel and sand bed, minor ground movement just shifts individual stones rather than cracking an entire surface. Re-leveling a stone that has settled is a 10-minute job with a pry bar. The trade-off is that joints need regular weed management and the surface is never perfectly smooth. For steep slopes, flagstone gets tricky because large irregular stones are hard to keep stable on a grade.
Concrete Pavers
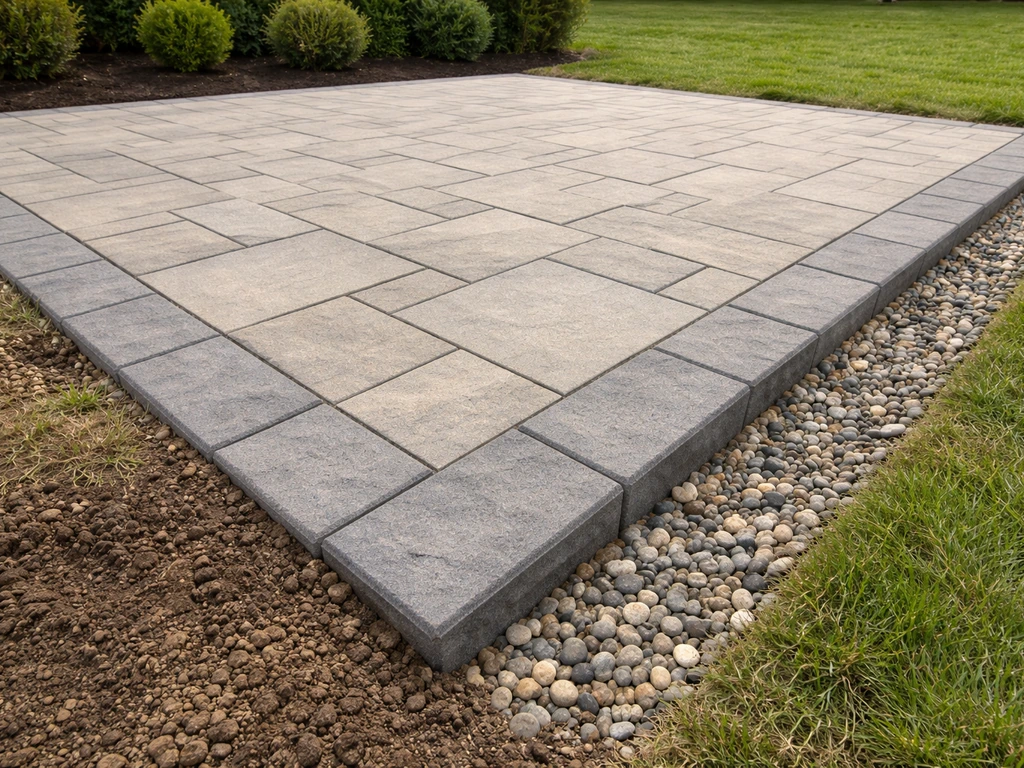
Interlocking concrete pavers are probably the most practical all-around choice for uneven residential ground. They're uniform in thickness (usually 2 3/8 inches for residential patios), which makes screeding a consistent bedding layer easier. The interlocking edge profile lets them shift a little without gaps opening up, and individual pavers can be lifted and reset if settling occurs. They handle freeze-thaw very well as long as drainage is correct.
Brick
Brick works well on gently sloped or slightly uneven ground, but it's less forgiving than pavers because brick is thinner and more likely to crack under point loads if the base has any voids. Use a full 4 to 6 inches of compacted gravel base and get the screeded bedding layer right before laying. In climates with hard freeze-thaw cycles, use only pavers rated for exterior paving rather than face brick, which can spall.
Natural Stone (Bluestone, Slate, Limestone)
Natural stone slabs look incredible but they're less forgiving than interlocking pavers on problematic ground. Thicker cut stone, at least 1.5 inches, does better because it bridges minor voids in the bedding layer. On uneven ground, the recommendation is to dry-lay natural stone in a compacted sand bed rather than mortar-setting it. Mortar joints crack over time with ground movement and freeze-thaw cycling, and once that happens you're looking at a grinder and a full re-pointing job. If the ground is firm and well-drained, mortar can work, but on anything questionable, go dry-laid.
Porcelain Pavers
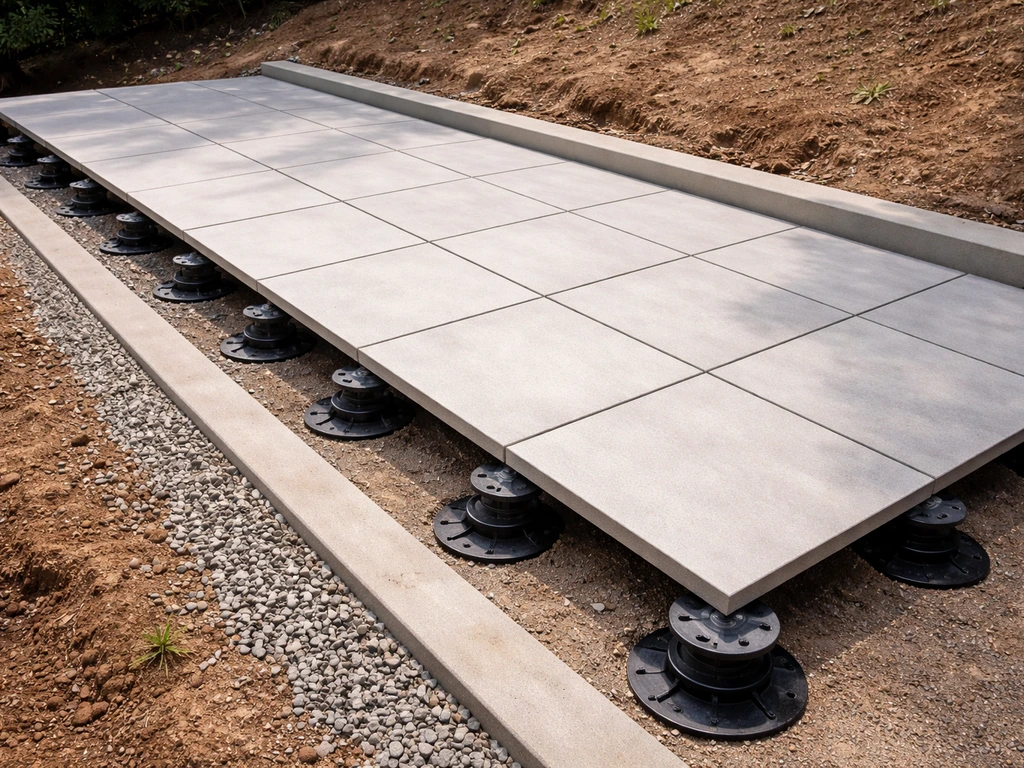
Porcelain pavers have become my go-to recommendation for sloped or elevated patios, specifically when used with an adjustable pedestal system. They're tested for freeze-thaw resistance under ASTM C1026 and their near-zero water absorption means they don't soak up moisture that later freezes and spalls the surface. On a slope, pedestals let you level every single tile regardless of what the substrate is doing. The downside is cost and the fact that porcelain is brittle under point impact, so any heavy dropped tools or furniture dragged across them can chip edges.
Gravel and Crushed Stone
Gravel is the ultimate forgiving surface for very uneven or sloped ground. It doesn't move as a rigid slab, so there's nothing to crack or heave. Angular crushed stone compacts well and stays in place better than round river gravel. The maintenance trade-off is real though: weeds push through over time, gravel migrates toward edges without solid restraints, and it's not comfortable under chairs and tables. For a utility area, fire pit surround, or heavily sloped section, it's hard to beat. Use a geotextile fabric under it to reduce weed pressure and prevent mixing with the soil below.
Composite Panels
Composite deck-style panels (typically 12x12 or 24x24 inch interlocking tiles on a plastic frame) work on moderate slopes when set on adjustable pedestals or sleepers. They're lightweight, splinter-free, and reasonably durable. On very uneven ground they work better than tile because the flexible plastic frame can conform slightly. Longevity is the main concern as lower-end composites fade and can warp after years of UV exposure and moisture cycling.
Construction Methods That Handle Slopes and Dips
Compacted Gravel Subbase (The Foundation for Most Patios)
For dry-laid pavers, flagstone, and brick, the compacted gravel subbase is everything. A typical residential patio needs 4 to 6 inches of compacted crushed stone (called crusher run, road base, or Class II base depending on your region). On soft or clay soils, go to 6 to 8 inches. Compact in 2-inch lifts with a plate compactor, not just a tamper. Above that goes a 1-inch nominal layer of coarse bedding sand, screeded flat before laying your surface material. That 1-inch sand layer is not structural, it's just for leveling and bedding, so don't make it thicker thinking more is better. Excess sand under pavers is a leading cause of long-term settling and wobble.
Mortar-Setting on a Concrete Slab
Mortar-setting natural stone or tile onto an existing concrete slab is an option if the slab is sound, level enough, and well-drained. The problem is that on uneven or moving ground, mortar joints crack. Freeze-thaw cycling repeatedly moves moisture into those micro-cracks and the joints fail within a few seasons. If you're in a freeze-thaw climate and the slab has any history of movement, I'd lean away from mortar-set unless you're using a flexible polymer-modified thinset and cutting expansion joints into the layout. On a solid, dry subgrade in a mild climate, mortar works fine.
Pedestal and Adjustable Support Systems
Pedestal systems are the cleanest solution for sloped patios, especially for porcelain pavers. Each paver sits on two to four plastic pedestals with a threaded or twist-lock height adjustment, typically with a working range starting at about 1 to 1.5 inches minimum height up to several inches depending on the system. You set each pedestal to bring the paver surface level regardless of the grade below. Drainage happens naturally through the open gaps between pavers. For slopes where you'd otherwise need to do significant cut-and-fill earthwork, pedestal systems save a lot of labor and allow easy access to utilities under the surface if needed. They're more expensive per square foot than a dry-laid install, but cheaper than major regrading.
Sand-Set with Edge Restraints
The standard dry-laid approach works for most residential patios on gently uneven ground. Compacted gravel subbase, 1-inch screeded bedding sand, pavers laid and compacted with a plate compactor (with a rubber pad), then polymeric joint sand swept and activated. Edge restraints are non-negotiable here. Without them, pavers creep outward over time, bedding sand escapes, and the whole surface starts to shift. Spike the restraints every 12 inches on straight runs and closer on curves.
Getting the Base Depth and Drainage Right
Drainage failure is the number one reason patios fail on uneven ground. Water that pools under or between pavers loosens bedding, promotes frost heave, and washes out joint material. The goal is to design water out of the system from the start.
The Right Drainage Slope
Aim for a 1/4-inch drop per linear foot away from your house or any structure. That's roughly a 2% grade, which is enough to move water off the surface without making the patio feel noticeably tilted. A 1/8-inch per foot minimum is acceptable for very short runs. On a sloped site, you may be able to use the natural grade to your advantage, just make sure the slope runs away from the foundation and toward a permeable area or drainage channel.
Subbase Depth by Soil and Climate
Standard firm soil in a moderate climate: 4 inches of compacted gravel is the minimum. Clay soil, poor drainage, or a freeze-thaw climate: go to 6 to 8 inches. For pedestal systems, your subbase can be thinner since the pedestals handle the height adjustment, but you still want a stable, well-drained surface under the pedestals. A 3 to 4 inch compacted gravel layer under pedestals is a good baseline. The subbase material itself should be angular, well-graded crushed stone, not sand or pea gravel, which doesn't compact properly.
Geotextile Fabric
Lay a non-woven geotextile fabric directly on the excavated subgrade before adding your gravel subbase. This does two things: it keeps the gravel from mixing down into soft soil over time (which causes settling), and it helps control weeds pushing up through gravel patios. Use a fabric rated for separation/stabilization, not the thin landscape fabric sold at garden centers, which clogs quickly and fails. The fabric goes under the gravel, not on top of it.
- Excavate to firm mineral soil, removing all organic material
- Lay geotextile separation fabric on the subgrade, overlapping seams by 12 inches
- Add compacted crushed gravel in 2-inch lifts to your target depth (4 to 8 inches depending on soil and climate)
- Check grade at every lift with a level and string line, building in your 1/4-inch-per-foot drainage slope
- Screed a nominal 1-inch bedding sand layer (for pavers/flagstone) or set pedestals (for porcelain on slope)
- Install edge restraints before or immediately after laying surface material
Installation Do's and Don'ts on Slopes
Do These Things
- Check level and grade constantly throughout the build, not just at the end. Every 4 to 6 square feet, lay your level across the surface.
- Use a screed rail system to set your 1-inch bedding sand layer consistently. Two parallel pipes set to grade work perfectly as screed guides.
- Compact pavers with a plate compactor after setting to lock them into the bedding sand. Use a rubber or foam pad between the plate and the paver surface.
- Install edge restraints on all four sides, or at minimum all exposed edges, before filling joints.
- Use polymeric joint sand in dry conditions. Sweep it in, compact again, and activate with water per the manufacturer's instructions. Standing water prevents it from curing properly.
- On a slope, start laying pavers from the bottom and work upward so you're always tying into set courses.
- For pedestal systems, check cross-slope level on every paver using a torpedo level placed diagonally corner to corner.
Don't Do These Things
- Don't make your bedding sand thicker than 1 inch to make up for a bad subbase. Thick sand beds compress unevenly and cause long-term wobble. Fix the subbase instead.
- Don't skip edge restraints thinking the surrounding soil will hold the pavers in place. It won't, especially on a slope.
- Don't mortar-set on an unstable or frost-prone subgrade without expansion joints. Mortar joints crack with ground movement and in freeze-thaw climates.
- Don't use round decorative gravel as bedding under pavers. It doesn't compact and causes rocking and settling.
- Don't install polymeric sand in wet conditions or when rain is forecast in the next 24 hours.
- Don't ignore low spots in the subgrade and try to compensate with a thick sand layer. Remove and recompact.
- Don't use regular landscape fabric under a gravel patio subbase. Use a proper woven or non-woven geotextile rated for separation.
How Different Materials Hold Up Over Time on Uneven Sites
Maintenance requirements vary a lot by material. Here's what you're actually signing up for over the long term, especially on ground that's prone to movement.
Flagstone and Natural Stone
Dry-laid flagstone is very low maintenance but you'll re-level individual stones every few years as the ground settles, especially after the first winter. Weed management in the joints is the ongoing job, either by pulling, torch, or applying a pre-emergent herbicide in spring. Mortar-jointed flagstone requires re-pointing as joints crack, which is more labor-intensive and needs to be done before water infiltrates and worsens the damage.
Concrete Pavers and Brick
Polymeric joint sand degrades over time from freeze-thaw cycles, pressure washing, and heavy rain. ICPI Tech Spec 4 describes joint sand stabilization practices for interlocking concrete pavements to help keep joints filled and performing as intended after installation blank" rel="noopener noreferrer">Polymeric joint sand degrades over time. Plan to re-apply joint sand every 4 to 7 years depending on your climate and maintenance habits. When joints open up, weeds move in and water infiltrates the bedding layer more easily, accelerating settling. The fix is straightforward: clean out the joints, add new polymeric sand, and re-compact. Settling sections can be lifted, subbase corrected, and re-laid without replacing the pavers themselves, which is a major advantage over poured concrete.
Porcelain Pavers
Porcelain is the lowest-maintenance surface material in the lineup. Its near-zero water absorption means it resists staining, moss, and freeze-thaw damage better than natural stone. Cleaning is straightforward: rinse with water or use a mild detergent for grease or tannin stains. Avoid acid-based cleaners on porcelain with matte finishes. On pedestal systems, individual tiles can be lifted and the pedestals adjusted or replaced without disturbing the rest of the surface, which is a real advantage on settling ground.
Gravel
Gravel patios need top-dressing every 2 to 4 years as material compacts and migrates. Weed control is the main ongoing task. The geotextile fabric underneath reduces but doesn't eliminate weeds over time. Keep edge restraints solid because that's what prevents the gravel from spreading into surrounding beds or lawn. In freeze-thaw climates, gravel is actually one of the most durable choices because there's nothing to heave or crack.
Composite Panels
Composites need periodic cleaning with a deck brush and mild soap to prevent algae and mold buildup, especially in shaded or damp spots. Check the pedestal or frame connections annually and tighten or replace any that have loosened. Higher-quality composites with capped polymer edges hold up much better against UV and moisture cycling than uncapped boards.
Matching Your Situation to the Right Solution
Before you order materials or start digging, take 30 minutes to assess your site properly. A well-built base is the best foundation for a long-lasting, level patio, especially if your ground is uneven best base for a patio. The best base for patio stones is usually a properly compacted gravel subbase with the right drainage slope. Here's what to measure and decide.
- Measure the total grade change across your patio footprint using a string line and a line level or a laser level.
- Identify whether unevenness is isolated dips (correct in the subbase) or a consistent slope (use pedestal system or cut-and-fill).
- Test soil firmness: if your heel sinks in more than half an inch when you stand on it, you have soft soil and need extra subbase depth.
- Note your climate zone: if you get hard freezes, prioritize drainage, open-joint systems, and freeze-thaw-rated materials.
- Set your budget: dry-laid pavers or flagstone are the most cost-effective DIY option; porcelain pedestal systems cost more but handle severe slopes with less earthwork.
- Decide on DIY vs. contractor: compacted gravel and dry-laid pavers are DIY-friendly; pedestal systems and mortar-set stone require more precision and are worth hiring out if you're not confident.
| Your Situation | Best Material | Best Method | Key Priority |
|---|---|---|---|
| Small dips, firm soil, any climate | Concrete pavers or flagstone | Compacted gravel + sand-set | Solid subbase, edge restraints |
| Consistent slope, any soil | Porcelain pavers or composite panels | Pedestal/adjustable support system | Precise leveling, gap drainage |
| Soft or clay soil, any grade | Concrete pavers | Deep gravel subbase (6-8"), sand-set | Geotextile + extra base depth |
| Hard freeze-thaw climate, slope | Porcelain pavers or concrete pavers | Pedestal or sand-set with drainage | Open joints, freeze-thaw rated material |
| Budget-first, any grade | Gravel or crushed stone | Geotextile + compacted angular gravel | Solid edge restraints, weed management |
| Existing concrete slab, mild climate | Natural stone or porcelain | Mortar-set or pedestal over slab | Check slab condition first, add expansion joints |
The base you build matters just as much as the surface you choose. Many of the issues that show up in paver and stone patios, wobbling, settling, cracking, weed invasion, are really base failures in disguise. Getting the subbase depth, drainage grade, geotextile placement, and edge restraints right from the start is what separates a patio that looks great for 20 years from one you're fighting with every spring. For many homeowners, the best base for patio slabs is a compacted crushed-stone subbase with proper drainage, plus an edging system to keep everything stable.
FAQ
Can I fix uneven ground for a patio by just adding more sand or bedding?
If your patio area has a soft layer (spongy feel, pumping when you step, or dark organic soil), you should not try to “build it up” with extra sand. Remove down to firm mineral soil, then replace with angular, well-compacted crushed stone. Extra thickness over unstable soil still settles later, and it can make even pedestal or paver surfaces look uneven after the first wet season.
What’s the difference between correcting small dips and dealing with a real slope?
A consistent slope across the whole footprint is usually a sign you should use either cut-and-fill to create a flat pad or a pedestal system, because a thin local “top-up” will not control the directional movement of the underlying grade. If the measurement shows several inches of drop over your run, plan the solution around that geometry, not around isolated dips.
How thick should the bedding sand layer be for pavers or flagstone?
No. Bedding sand thickness affects stability because that layer is for leveling only, and excess sand stays deformable under traffic. Sticking to about a 1-inch nominal bedding layer (and compacting the subbase with 2-inch lifts) helps prevent future wobble and uneven settlement.
How important are edge restraints on an uneven-ground patio?
Edge restraints are what stop outward creep and joint sand loss. For long straight runs, place spikes/anchors at about 12 inches spacing, and closer on curves, then confirm the restraints are rigid to grade before you lay pavers. Skipping this step is a common cause of gaps, movement, and cycling-driven washout.
Why does my patio keep getting uneven after installation, even when it’s level at first?
Even if you level the surface today, you can get repeat settling if water still finds low points. Use the target grade away from structures, confirm the slope is continuous, and make sure the patio drains toward a permeable area or a designed drainage path. Pooling under pavers is one of the fastest ways to trigger frost heave and joint deterioration.
Is mortar-setting natural stone or tile ever a good option on uneven ground in cold climates?
If you’re in a freeze-thaw climate and considering mortar-set stone or tile, the safer move is to avoid relying on mortar joints over questionable or moving ground. If you must mortar on concrete, you need a sound, level slab, robust expansion joint planning, and a more flexible setting approach than standard rigid mortar systems.
Do pedestal systems let me reduce the subbase depth?
For pedestals, you still need a stable, well-drained layer under the supports. A common baseline is roughly 3 to 4 inches of compacted crushed stone beneath pedestal zones, with angular, well-graded material. Don’t substitute with sand or pea gravel, since it won’t compact and support threads securely.
Where should geotextile fabric go, under the gravel or on top?
Yes, but only in the “fix the soil” sense. Geotextile should go under the gravel to prevent mixing down into soft soil and to reduce weed pressure. Don’t put thin landscape fabric on top of the subbase, it can clog and fail, and it won’t replace the role of a properly compacted angular stone layer.
How do I know if my subgrade is firm enough before I build the patio base?
You can walk test, too. Press down with your boot, look for visible pumping underfoot, and check for a consistently firm surface across the whole footprint, not just where you plan to build. If you hit organics or clay that stays wet, remove and replace rather than trying to “bridge” with thicker bedding.
What gravel type works best for uneven or sloped ground?
For gravel patios, angular crushed stone compacts and locks together better than round river gravel, and that matters on slopes. Also plan for restraints or edging early, because gravel migration to edges increases unevenness and creates maintenance hotspots.
What’s the best way to repair a localized settled section without redoing the whole patio?
If some tiles or pavers settle after a winter, you usually don’t need to replace the whole surface. For dry-laid systems, lift the affected units, correct subbase where needed, then re-set with fresh bedding if it has been contaminated. With pedestals, you can often adjust height locally without disturbing unaffected areas.
How can I tell whether unevenness is caused by drainage problems or base settlement?
If you notice the surface is level in dry weather but dips after rain, the issue is likely drainage or water trapping rather than “not enough leveling.” Verify the surface pitch away from the house, ensure the base is compacted with the right thickness, and confirm there is no standing water path under the patio.