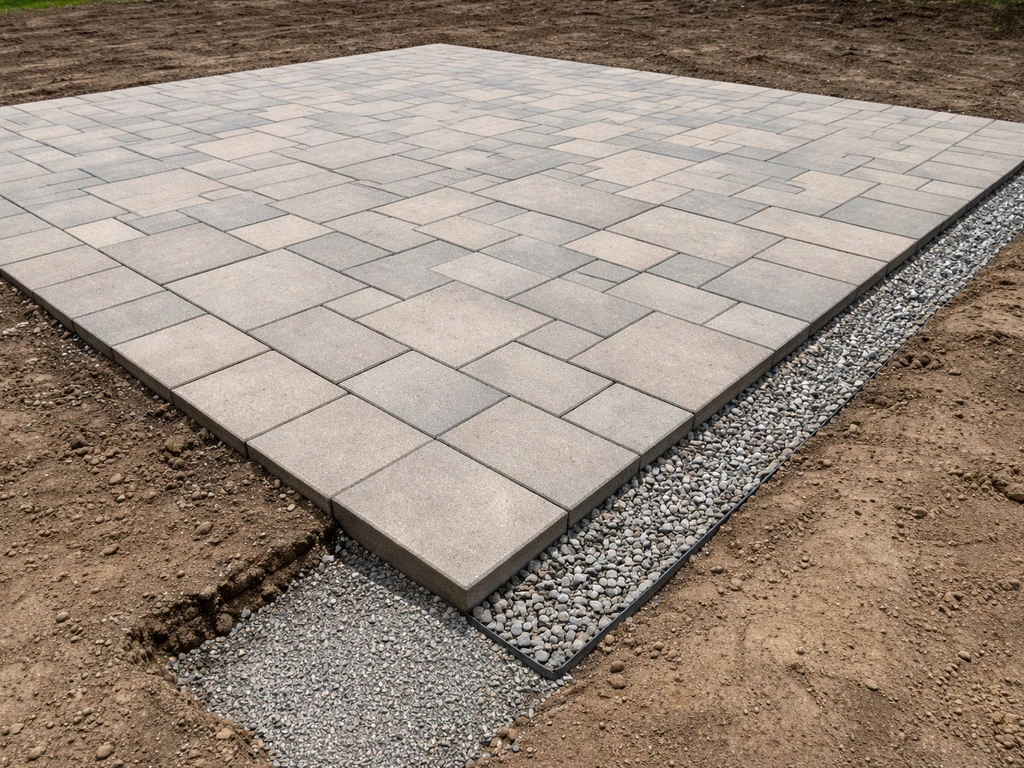
The best patio material for clay soil is concrete interlocking pavers, set on a properly compacted aggregate base with a geotextile separation layer, graded at 1/8 to 1/4 inch per foot away from the house. Pavers tolerate the shrink-swell movement that clay soil constantly produces, and because individual units can be lifted and reset, they're repairable in a way that poured concrete or mortar-set tile never will be. That said, the material choice is only half the answer. Without the right base system underneath, even pavers will sink, heave, and rock. Here's everything you need to know to get this right.
Best Patio Material for Clay Soil: Picks and Build Tips

Nolan Ellison
18 Jun 2026
Why clay soil causes patios to fail
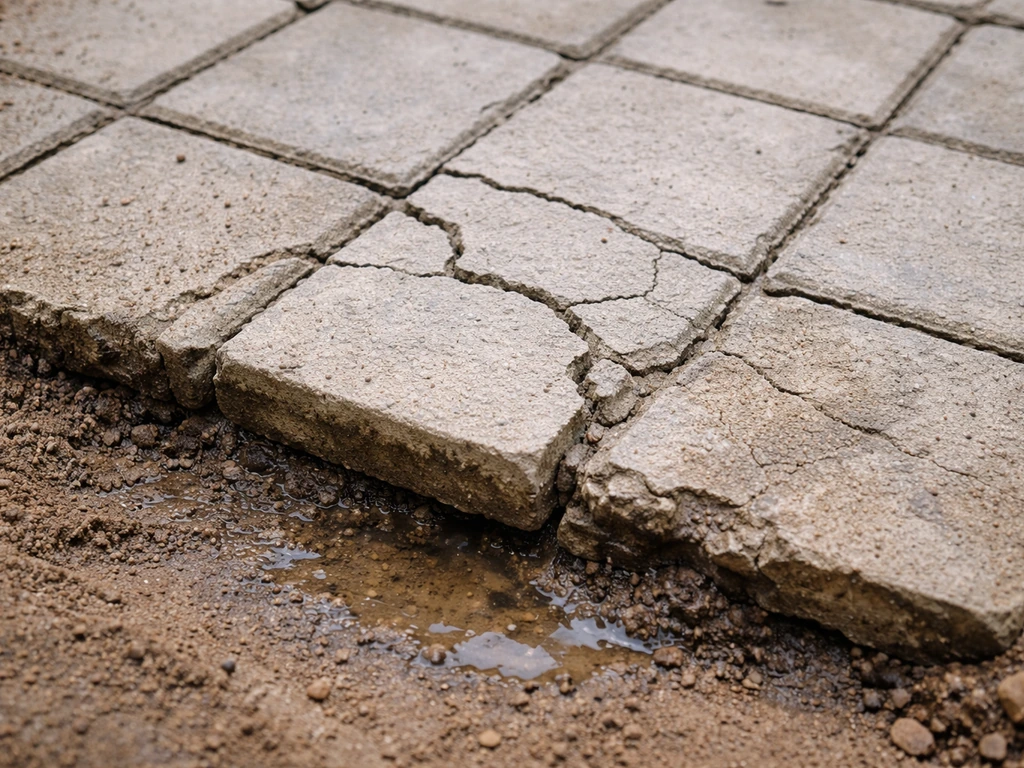
Clay is not a stable foundation. It absorbs water and swells, then dries out and shrinks. That cycle, called shrink-swell, repeats with every rain event, every dry spell, and every freeze-thaw cycle in winter. The British Geological Survey documents this clearly: when moisture changes unevenly under a paved surface, you get differential movement, meaning one section lifts while another drops. That's how a perfectly flat patio becomes a trip hazard in two or three seasons.
The three failure modes you'll see on clay soil are heaving (the ground pushes upward as clay expands), settling (sections sink as clay compresses or dries and shrinks beneath them), and drainage failure (clay's low permeability means water pools on top of or just under your patio instead of draining away). In cold climates, it gets worse fast. When water-saturated clay or base material freezes, it expands significantly. That expansion lifts patio units, and when it thaws, they don't always come back down level. Edge zones are usually the first to fail because cold penetrates from the sides as well as the top, and if water is pooling at the perimeter, freeze-thaw damage creeps inward from there.
Standing water, rocking pavers, visible dips, and joint sand washing out are all downstream symptoms of the same root cause: water isn't leaving fast enough, and the base wasn't built to isolate the patio from what the clay underneath is doing.
What 'best material' actually means for clay soil
When someone asks for the best patio material for clay soil, they're really asking three questions at once: Which materials tolerate movement without cracking? Which ones allow or encourage drainage? And which ones handle the load without spreading or sinking over time? The answers vary by material, and the tradeoffs are real.
- Movement tolerance: Can the material flex, shift slightly, or be individually reset without destroying the whole surface? Rigid assemblies (poured concrete, mortar-set tile) crack when the ground moves. Flexible assemblies (interlocking pavers, dry-set flagstone, gravel) move with the ground.
- Drainage behavior: Does the material itself allow water to pass through, or does it need to be sloped to shed water off the surface? Impermeable surfaces like porcelain tile need precise grading. Permeable surfaces like gravel drain vertically, but that only helps if the base can accept and route the water.
- Load performance: Can the material and its base handle foot traffic, furniture, and occasional wheeled loads without spreading or punching through into soft clay below?
On clay soil specifically, movement tolerance is the most important factor. For hot climates, you generally want a patio material that drains well and can tolerate frequent heat-driven expansion without cracking. A material that scores perfectly on drainage but cracks the first winter it sees heaving is a bad investment. That's why rigid, mortar-set systems are risky here and flexible, dry-set systems are preferred by most experienced installers working in clay-heavy regions.
How each material performs on clay soil
| Material | Movement Tolerance | Drainage Behavior | Clay Soil Risk | Repairability |
|---|---|---|---|---|
| Interlocking concrete pavers | High (flexible system) | Surface slope required; permeable versions available | Low with proper base | Easy: lift and reset individual units |
| Dry-set flagstone / natural stone | Moderate-high (flexible if dry-set) | Surface slope required | Moderate; irregular shapes can shift unevenly | Moderate: re-leveling needed periodically |
| Brick | Moderate (flexible if dry-set) | Surface slope required | Moderate; individual bricks can sink or heave | Good: individual bricks replaceable |
| Gravel / crushed stone | Very high (no rigid structure) | Drains vertically through itself | Low; no cracking risk | Easy but requires periodic replenishment |
| Porcelain tile | Low (rigid mortar-set system) | Surface slope required; no flex | High; cracks easily with any movement | Poor: entire sections may need replacement |
| Composite / PVC decking panels | High (floating system) | Gaps allow drainage | Low if on a properly leveled frame | Good: individual panels replaceable |
Interlocking concrete pavers
These are the gold standard for clay soil. The individual units interlock and distribute load across the surface rather than concentrating stress at one point. Because they're dry-set into a bedding sand layer (typically about 1 inch deep) over a compacted aggregate base, they can move slightly with the ground and be lifted and reset when they do shift. This is the system ICPI (Interlocking Concrete Pavement Institute) guidelines are built around, and it's the one I'd recommend to most homeowners dealing with clay. The main downside is cost: quality pavers with proper base prep are not cheap, especially if you hire a contractor.
Dry-set flagstone and natural stone
Flagstone set on a compacted sand-and-gravel base performs reasonably well on clay soil, particularly in warmer climates with less freeze-thaw stress. The irregular shapes are actually a slight liability here: because stones vary in thickness and size, they don't distribute load as evenly as uniform pavers, and thinner sections can tip or shift more readily. If you go this route, use stones at least 1.5 to 2 inches thick, keep the base deep and well-compacted, and accept that you'll probably need to re-level a stone or two every few years. Mortared flagstone on clay is a bad idea unless it's over a reinforced concrete slab, which has its own movement issues on clay.
Brick
Dry-set brick behaves similarly to interlocking pavers and is a good choice for clay soil when installed correctly. The main limitation is that standard modular brick is thinner and slightly more prone to individual unit displacement than thicker pavers. Use paving-specific brick (not wall brick), keep them dry-set, and fill joints with polymeric sand. Mortared brick on clay is risky for the same reasons as mortared flagstone: any ground movement cracks the mortar, and once that happens, water infiltrates and the whole section deteriorates quickly.
Gravel and crushed stone
Gravel is the most forgiving material on clay soil and the easiest to install. For dog owners, the best patio material is one that is durable, drains well, and stays comfortable underfoot. It has no rigid structure to crack, drains vertically through itself (though on dense clay you still need to manage where that water goes), and costs a fraction of pavers or stone. The tradeoffs are real though: gravel scatters with foot traffic, furniture legs sink into it, and it needs replenishment every couple of years. It's an excellent budget choice for a back-corner patio, a path, or a low-use sitting area, but it's not ideal for a primary entertaining space with heavy furniture.
Porcelain tile
I'll be direct: porcelain tile on clay soil is a high-risk choice. The material itself is beautiful and extremely durable against staining and weathering, but it requires a rigid, stable substrate. On clay, that substrate never stays perfectly stable. When the ground moves even slightly, mortar-set porcelain cracks, and since it's set as a continuous rigid assembly, one crack can propagate across multiple tiles.
If you insist on porcelain, it needs to go over a reinforced concrete slab, expansion joints must be installed every 8 to 12 feet per TCNA EJ171 guidance, and you have to accept that the slab itself may eventually heave or crack on aggressive clay. It's the right choice for climates with minimal freeze-thaw and well-managed drainage, but in colder or wetter regions on clay, it's asking for trouble.
Composite and modular panel systems
Composite or PVC deck-tile systems, designed as floating assemblies on a frame or on adjustable pedestals, actually handle clay soil movement quite well because they're not bonded to the ground at all. The frame can be shimmed and releveled, and individual panels swap out easily. The limitation is that the support frame or pedestals need a reasonably level starting surface, which requires some base prep, and the system feels less permanent or integrated than stone or pavers. For a rooftop-style patio aesthetic, a small urban courtyard, or a situation where you truly can't excavate deep enough for a proper paver base, composite panels are worth serious consideration.
The installation system that keeps your patio from failing
The material you choose matters less than the base you build under it. I've seen beautiful $20-per-square-foot pavers turn into a sunken disaster in two seasons because the contractor skipped a proper base. Here's what the base system needs to include for clay soil.
Step 1: Excavate and grade the subgrade
Excavate down far enough to accommodate your base layers plus the surface material. For a standard paver patio on clay soil, plan on at least 6 to 8 inches of compacted aggregate base, plus 1 inch of bedding sand, plus paver thickness (typically 2. 375 to 3. 125 inches for most residential pavers).
That's often 10 to 12 inches of total excavation depth. In freeze-thaw climates, consider going deeper, up to 12 to 15 inches of compacted base, because deeper base insulates against frost penetration. While you're excavating, establish the slope: the finished patio surface should fall at 1/8 to 1/4 inch per foot away from the house. Build that slope into the subgrade from the start, don't try to compensate for a flat subgrade with uneven base thickness.
Step 2: Install geotextile fabric over clay subgrade
Before any aggregate goes in, line the excavated area with geotextile landscape fabric. This is not optional on clay soil. The fabric separates the clay from your aggregate base so the clay fines don't migrate up into the base over time and degrade it. It also helps prevent bedding sand from working down into the base. CMHA/ICPI-aligned guidance specifically calls out geotextile use on clay subgrades for this reason. Use a nonwoven geotextile rated for separation applications, not the thin stuff sold for weed control.
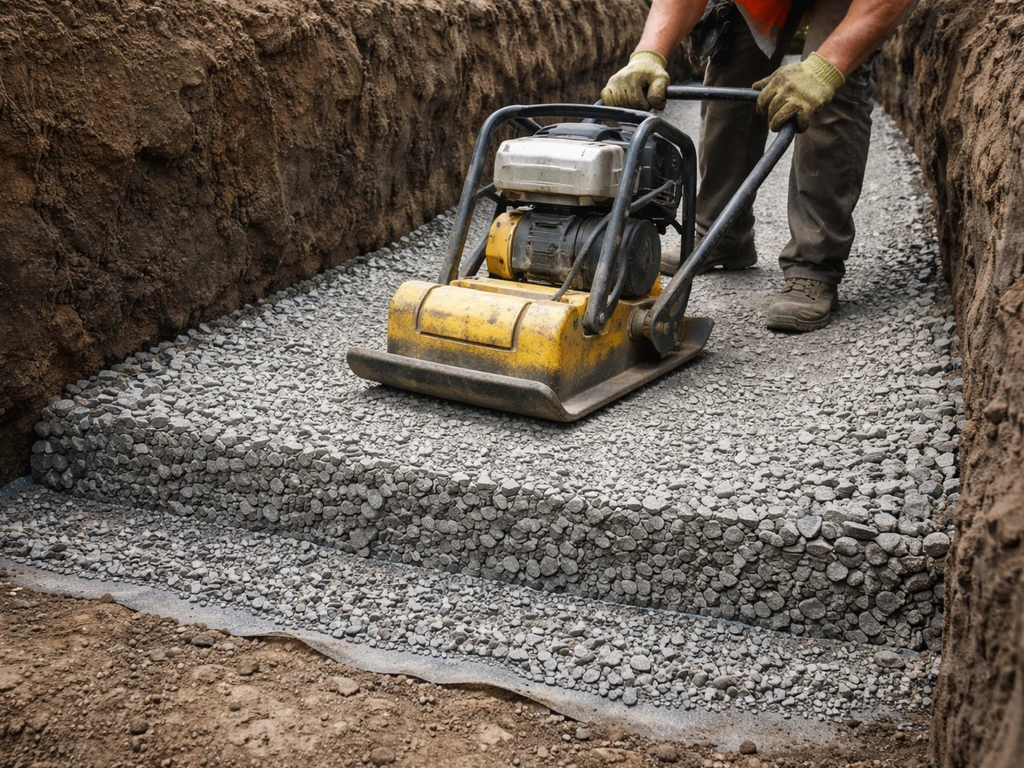
Step 3: Compact the aggregate base in lifts
Fill the excavation with compactable aggregate (typically crushed stone, often called crusher run or road base). Compact it in lifts of no more than 4 inches at a time using a plate compactor. Each lift should reach blank" rel="noopener noreferrer">95% Modified Proctor density, which is the standard NC State and most municipal construction specifications require for exterior improvements. Don't dump all your aggregate in and compact once: deep single lifts don't compact properly and leave soft spots that will sink later. Rent a plate compactor if you're DIYing this. It's one of the most important tools for the job.
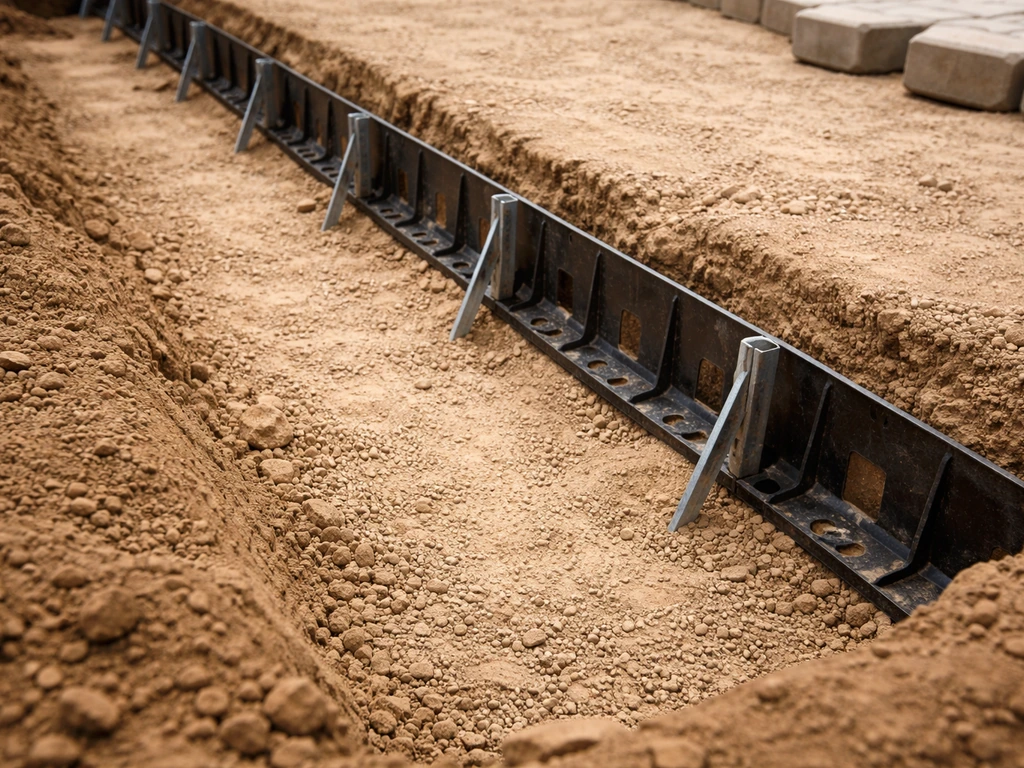
Step 4: Install edge restraints before anything else
Edge restraints must go in before you lay pavers, not after. This is a common mistake. Without edges locked in place, pavers will slowly migrate outward over time, opening up joints and allowing the whole surface to destabilize. Use plastic or aluminum paver edging spiked into the base, or concrete edge curbs if you want something more permanent. Pay extra attention to edges in freeze-thaw climates because, as mentioned, movement starts at the perimeter and works inward.
Step 5: Bedding sand and paver placement
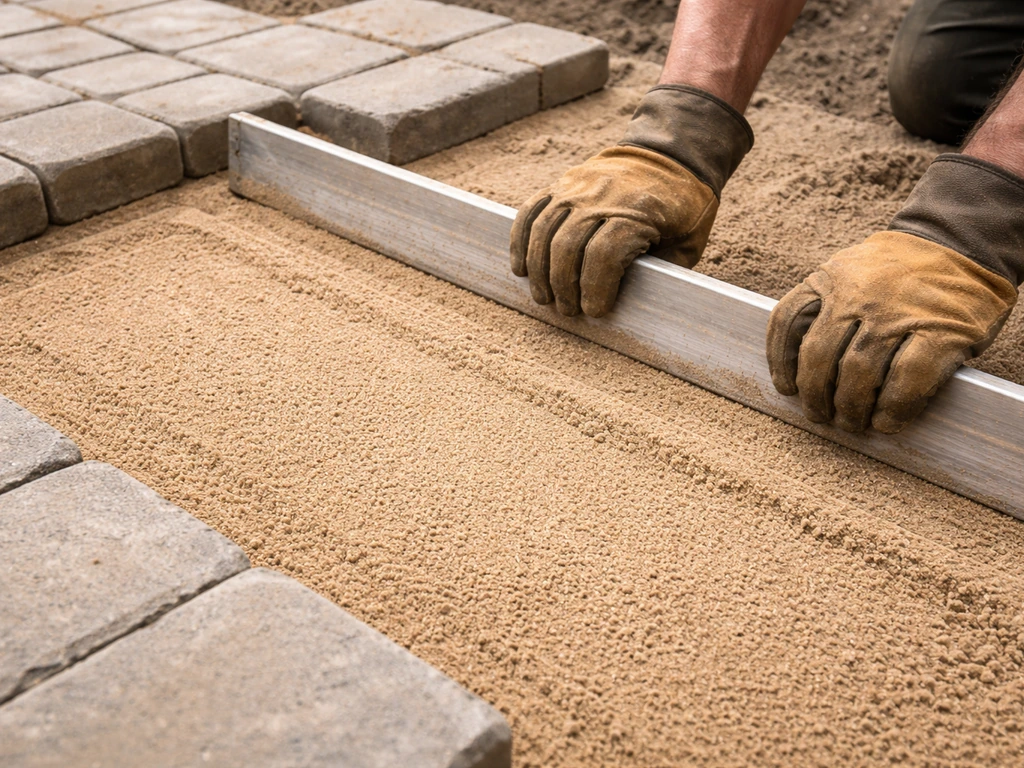
Screeded bedding sand goes on last, approximately 1 inch deep (nominal), and is not compacted before paver placement. It's there to provide a fine-graded setting bed that allows small adjustments during installation. Lay pavers on the sand, keeping joints tight and consistent. Once all pavers are down, run a plate compactor over the surface (with a rubber pad or protective mat on the plate) to seat them into the sand. Then sweep polymeric sand into the joints.
Step 6: Polymeric sand jointing
Fill joints completely to their full depth with polymeric sand, not just a thin surface layer. Sweep the sand across the paver surface, then use the plate compactor again to vibrate it fully into the joints. Repeat until joints are packed tight. Then mist with water in light passes to activate the polymer binder. Don't soak it: too much water before curing flushes the binder out of the joint. Avoid applying polymeric sand when near-freezing temperatures are forecast because the binder won't cure properly. Joint sand washout is one of the top causes of rocking pavers and edge deterioration, so getting this step right pays off over years of service.
Drainage: getting water off and away
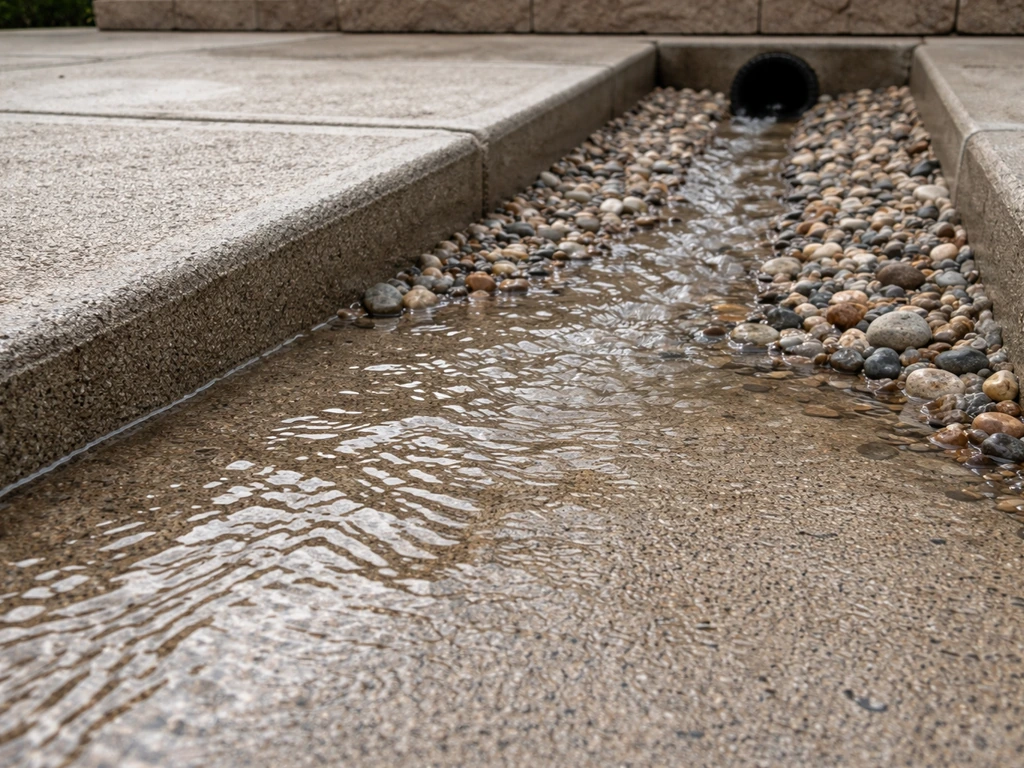
Slope alone is necessary but sometimes not sufficient on dense clay. If water runs off your patio and collects against the house foundation or pools at a low spot in your yard, you've just moved the problem. Route runoff toward a storm drain, a dry creek bed, a rain garden, or a daylight outlet at the yard perimeter. For larger patios, consider installing a linear drain or catch basin at the low edge to intercept surface water before it pools. In very wet climates or on particularly impermeable clay, a perforated pipe in gravel-filled trench at the patio perimeter (a French drain) can help relieve hydrostatic pressure under the base.
Best choice by scenario
| Scenario | Best Material Choice | Key Notes |
|---|---|---|
| DIY, moderate budget | Interlocking concrete pavers or dry-set brick | Rent a plate compactor; don't skip base depth |
| Hiring a contractor, higher budget | Interlocking concrete pavers or dry-set natural stone/flagstone | Specify base depth and compaction in writing |
| Freeze-thaw climate (cold winters) | Interlocking concrete pavers | Deeper base (12-15 in), stronger edge restraints, no mortar |
| Warm climate, minimal frost | Dry-set flagstone or pavers | Can use slightly shallower base; porcelain viable with proper slab |
| Tightest budget, flexible expectations | Gravel or crushed stone | Easiest install, lowest cost, periodic top-up needed |
| Premium look, warm/mild climate | Porcelain tile over reinforced concrete slab | Requires expansion joints every 8-12 ft; higher cracking risk on clay |
| Composite/modular panels | Raised composite deck tiles on pedestals | Good for small areas; avoids deep excavation; less permanent look |
If you're in a freeze-thaw region and you're hiring this out, the single most important thing to specify in your contractor quote is base depth and compaction. Get it in writing: a minimum 12-inch compacted aggregate base in two or more lifts, geotextile fabric on the clay subgrade, 95% compaction, and edge restraints installed before paver placement. Many contractors will propose a 4-inch base to save time and money. On clay soil in a cold climate, that is not enough.
What to avoid and common mistakes
- Installing any rigid mortar-set system directly over clay without a reinforced slab: The ground will move, the mortar will crack, water will enter, and the system fails.
- Dead-level grading: If your patio doesn't slope away from the house, water pools under the surface, accelerating freeze-thaw damage and clay swelling.
- Skipping geotextile fabric: Over a few years, clay fines migrate into your aggregate base and reduce its drainage and load capacity. This is especially problematic in wet climates.
- Compacting base in one deep lift: Deep single-pass compaction leaves soft zones. Always compact in 4-inch lifts.
- Installing edge restraints after pavers: The restraints need to lock the system in place from the start. Retrofitting them is a poor fix.
- Using too thin a base: 4 inches is common but rarely enough on clay. In freeze-thaw climates especially, go 12 to 15 inches.
- Filling polymeric sand joints only at the surface: Shallow joint fill washes out quickly, especially in heavy rain or freeze-thaw areas. Fill to full joint depth.
- Applying polymeric sand in cold or wet conditions: It won't cure properly and will wash out before bonding.
- Ignoring drainage routes: Sloping the patio is step one. Knowing where the water goes after it leaves the patio edge is step two.
- Choosing porcelain tile in a wet or cold climate on clay: Even with the best installation, the risk of cracking from ground movement is high.
Maintenance and troubleshooting over time
Pavers and dry-set stone
Every spring, walk your patio and look for rocking units, visible dips, or areas where water pools after rain. Catching movement early means a simple lift-and-reset repair rather than a larger re-do. Individual pavers or stones can be pulled, the sand underneath re-graded, and the unit re-set in an afternoon. If you notice widespread sinking in a section, it usually means the base underneath has compressed or clay has migrated into it, and that section needs to be taken up and rebuilt properly.
Check joint sand annually. Even polymeric sand can thin out over time from rain and traffic. Re-sweep and top up joints when you see them looking low. Polymeric sand joints that are kept full prevent weed germination and ant tunneling, two other things that destabilize pavers from below.
Sealing is optional for concrete pavers but can extend their color and resist staining. If you seal, use a breathable penetrating sealer rated for exterior pavers. Avoid film-forming sealers that trap moisture: on clay soil where moisture movement is already a problem, trapping water under a film can make surface efflorescence and spalling worse.
Gravel
Gravel patios need the least maintenance but the most replenishment. Top up with fresh gravel every year or two as it compacts and scatters. Keep the edging borders intact to prevent gravel from migrating into lawn areas. Raking after use keeps the surface even.
Porcelain and mortar-set tile
Inspect grout joints and movement joints annually. Cracked or missing grout is an early warning sign: if water enters the joints and reaches the substrate on a clay-influenced base, you're looking at rapid deterioration. Repoint cracked grout quickly. If tiles are cracking or tenting (lifting away from the substrate), that's a sign the base has moved and the individual tile repair won't hold long-term without addressing the root cause.
Composite and panel systems
Check pedestal or frame levels every year or two. Because these systems sit above the surface, any ground settlement shows up as a visible tilt or wobble in the panel. Adjustable pedestals can usually be shimmed back to level in minutes. Clean panels according to manufacturer guidance to prevent algae buildup in shaded or wet climates.
Spotting drainage problems early
The earliest warning signs of base or drainage failure are standing water after moderate rain (not a downpour), joint sand washing out, and a subtle springy or soft feeling underfoot on pavers. If you notice any of these, investigate before the next freeze-thaw season. Lifting a few pavers to inspect the bedding sand and base is easy and can reveal whether water is pooling under the surface. Catching it early is a half-day fix. Ignoring it until after a winter often means rebuilding a whole section.
What to ask for at your local supplier
When you go to a landscape supply yard or hardscape dealer, here's exactly what to ask for to make sure you're getting the right products for a clay-soil build:
- Compactable aggregate base (crusher run, road base, or dense-graded aggregate): Ask for the standard spec product they sell for paver base applications. Tell them it's going over clay and ask how deep they recommend. A good supplier will say at least 6 inches minimum, ideally more for clay.
- Nonwoven geotextile fabric rated for separation (not weed barrier): Specify you need it to prevent clay fines from migrating into your base.
- Concrete pavers at least 2.375 inches (60mm) thick for pedestrian use, 3.125 inches (80mm) for any area that might see a vehicle or heavy equipment.
- Coarse bedding sand (concrete sand): Not fine play sand, and not stone dust for your primary bedding layer.
- Polymeric jointing sand: Ask for a product rated for your joint width (most residential paver joints are 1/16 to 3/16 inch). Confirm temperature requirements before you buy.
- Plastic or aluminum paver edging with spikes: Ask for the heavy-duty version, not the lightweight garden border style.
If you're comparing this build against other patio situations, clay soil shares the drainage urgency you'd find in any wet-climate installation, and it overlaps heavily with freeze-thaw concerns in cold regions. The good news is that the same base system that handles clay soil well also handles most other challenging conditions: it's a universal upgrade worth doing regardless of where you live.
FAQ
Can I build a patio on clay soil if my yard is low and always stays wet?
Yes, but only if the patio can be fully isolated from the clay’s moisture cycle. If you use pavers, keep the same separated base build (geotextile separation, thick compacted aggregate, correct slope) and make sure downspouts drain away from the patio. On clay lawns, don’t rely on “good grass drainage,” because saturated subgrade will still pump fines into the bedding layer.
What’s the right way to fix a sunken or rocking section on clay soil?
Avoid “patching” a paver patio by just adding sand to rocking areas. If you see repeated settling or movement in the same spot, lift enough pavers to inspect the bedding sand and the aggregate beneath, then re-compact in lifts. Clay often causes voids and base compression that won’t be corrected by topping joints.
Is proper slope enough to prevent problems on clay soil?
Not by itself. Even with the correct slope, clay can hold water at the perimeter if runoff is dumped into the yard next to the patio or into low spots. Make sure you manage surface runoff direction (away from the house and toward a drain/outlet) and consider a perimeter French drain or linear drain if you get water pooling after moderate rain.
How do I choose and install geotextile fabric for a clay-soil patio?
Use a nonwoven separation geotextile, not thin weed-barrier fabric, and install it wrinkle-free with overlaps where seams meet. If the fabric tears or isn’t used, clay fines migrate upward and the base loses stability, leading to sinking and joint sand washout.
What mistakes cause polymeric sand joints to wash out on clay soil?
For pavers, polymeric sand is only as good as the base bedding and joint depth. Fill joints to full depth, compact after sweeping, then mist lightly to cure. Don’t apply when freezing is forecast, and don’t flood the surface before curing, because excess binder can wash out and you’ll get the same washout and rocking failure again.
Is mortared tile or flagstone ever a good idea on clay soil?
Avoid mortared systems unless they are on a truly stable reinforced slab, and expect that any slab movement can still crack finishes. For most homeowners on clay, the safer decision is dry-set interlocking pavers or brick with a properly compacted separated base.
What changes should I make if I’m installing a patio on clay in a freeze-thaw climate?
Yes, but the build needs more attention to freeze-thaw insulation and perimeter water control. Many contractors underbuild by using a shallow base, so specify minimum base depth, proper compaction in lifts, geotextile separation, and edge restraints installed before paver placement. Also check drainage points, because freezing damage often starts where water gathers at edges.
Can gravel be the best patio material for clay soil if I want something low-cost?
Gravel can work, but treat it as a low-use surface. On clay, you still need edging to keep material contained and some kind of water routing away from the patio, otherwise you may end up with soft spots and mud movement at the perimeter. Expect periodic top-ups (often yearly or every couple of years) and heavier furniture will need wider pads to avoid sinking.
What should I put in writing when hiring a contractor for clay-soil patios?
If you can, ask for proof of compaction criteria and what they mean for your specific build. “Compacted base” is vague, so request the target density (for example, 95% Modified Proctor) and how they will achieve it in lifts, plus confirmation that they will excavate to the total depth needed and compact each layer rather than doing a single deep pass.
How can I tell whether my clay soil is likely to be a shrink-swell drainage problem before building?
Test it by checking for standing water after a moderate rain and by watching how the ground behaves when you walk on the subgrade area before excavation. If the clay is persistently wet, plan for the full separated base plus better runoff routing, because moisture trapped under the patio is a root cause even when the surface looks “level enough.”