For most patio slabs, the best thing to put between them is polymeric jointing sand. If you are wondering what to put between patio stones, start with polymeric jointing sand for most slab styles. If you are also asking what can I use instead of patio slabs, the jointing approach still matters, and the best filler depends on your patio type and drainage needs what to put between patio stones. It locks together when watered, resists weeds, handles freeze-thaw movement, and stays put instead of washing out after the first heavy rain. That said, the right joint filler does depend on your patio type, joint width, and how much drainage and flexibility you need. Kiln-dried sand works well for tight 2–5 mm block paving joints. Mortar or a brushed cement-sand mix suits rigid, bonded stone or porcelain installations. Gravel or crushed stone chips work in wider, informal flagstone gaps. But if you want one material that covers the most scenarios reliably, polymeric sand is where I'd start.
What to Put Between Patio Slabs: Best Joint Infill Guide

Your main options for filling patio slab joints
There are five materials most homeowners will realistically choose from. Each has a real use case, and each has a failure mode if you pick it for the wrong situation. Each material has its own best use, so if you are choosing what to put between bricks on a patio, match the filler to your joint width and drainage needs rather than assuming one product fits all.
Polymeric jointing sand
This is a polymer-modified graded sand that you sweep into joints, then activate with a controlled water mist. As it dries, the polymer binders harden and hold the sand particles together into a firm but slightly flexible joint. Brands like QUIKRETE HardScapes, Techniseal HP NextGel, Sakrete PermaSand, and SEK PolySweep all work on this principle. Once cured, the joint resists erosion, weed seeds, and insects, while still being flexible enough to move with seasonal freeze-thaw cycles without cracking. QUIKRETE's polymeric sand handles joints up to 2 inches wide, which covers most residential patio applications. SEK PolySweep is specifically designed to expand and contract with freeze-thaw movement, which makes it a strong pick for colder climates.
Kiln-dried jointing sand

Standard kiln-dried sand is the traditional default for block paving and tight-jointed concrete pavers. It has no binder, so it stays loose and free-draining forever. Tobermore and Pavingexpert both specify it for close 2–5 mm joints in flexible block paving, where the sand creates frictional interlock between adjacent units and helps the whole surface act as a unified, load-bearing structure. The downside is that it does migrate out of joints over time, especially if you use a pressure washer or get heavy rainfall. It also does nothing to stop weeds once a seed lands on it. For low-traffic informal patios with good drainage, it is cheap and easy. For anything that needs to look tidy long-term, you will need to top it up periodically.
Pointing mortar (cement and sand)
A brushed-in dry mix of cement and sharp sand, or a wet-applied pointing mortar, is the right call for rigid, mortar-bed installations like bonded natural stone, porcelain tiles, or large-format paving slabs laid on a full mortar bed. It sets hard, locks slabs permanently, and completely blocks weeds. Products like Sika FastFix-110 are ready-mixed versions that resist erosion, weed growth, and insects once set. The trade-off is rigidity: if the base moves even slightly, mortar joints crack. This is why mortar pointing works best on stable, fully bonded bases, not on flexible or gravel-set patios where movement is expected.
Gravel or stone chippings

For wide, informal gaps in natural flagstone or irregular-cut stone, fine gravel (around 3–6 mm) or crushed decorative chippings give a relaxed, cottage-garden look. They drain freely, require no activation, and cost almost nothing. The problem is that they migrate, they do not stop weeds, and they feel crunchy underfoot when they spread onto the slab surface. They work well in purely decorative, low-traffic settings but are not a practical solution if you need clean edges or weed suppression.
Groundcover plants and creeping herbs
Creeping thyme, mind-your-own-business, or chamomile planted between wider flagstone joints is a genuinely useful option for garden patios where you want a soft, naturalistic feel. These plants effectively out-compete weeds once established, tolerate light foot traffic, and release a pleasant scent when brushed. The gap needs to be at least 20–30 mm wide to work, and they need some soil depth beneath them. Not practical for formal or high-traffic patios, but brilliant for a stepping-stone path or a loosely laid garden terrace.
How to pick the right joint material for your situation

The four things that actually drive this decision are drainage, weed pressure, climate, and traffic. Run through these quickly before you buy anything.
| Factor | Best joint material | Why |
|---|---|---|
| Freeze-thaw climate | Polymeric sand | Flexible after curing; designed to move with the slab without cracking |
| Heavy weed pressure | Polymeric sand or mortar | Blocks seed germination; no loose gaps for roots |
| High foot/vehicle traffic | Polymeric sand or mortar | Resists displacement; mortar for bonded rigid base only |
| Free drainage required | Kiln-dried sand or gravel | Stays permeable; no binders to clog water flow |
| Wide informal gaps (20 mm+) | Polymeric sand (wide-joint formula) or gravel/plants | Standard formulas may not fill deep wide joints adequately |
| Narrow block paving (2–5 mm) | Kiln-dried sand or polymeric sand | Fine grain fills tight joints without bridging |
| Mortar-bed rigid installation | Pointing mortar or ready-mix jointing compound | Matches the rigid base; movement cracking less likely |
| Low maintenance priority | Polymeric sand | Stays in place; minimal top-ups needed |
If you are in a climate with hard winters and real freeze-thaw cycling, polymeric sand is the clear winner. It was specifically engineered for this. Pavingexpert notes that for small joint widths there is limited joint volume acting as a water reservoir, which reduces freeze-related risk anyway, but a flexible binder helps further. If drainage is your top concern and you are building a permeable driveway or patio over a Type 1 granular sub-base, kiln-dried sand keeps water moving through the system without clogging. Mortar is for permanent, stable, rigid builds only.
Matching joint filler to your specific patio type
Flagstone and natural irregular stone
Flagstone joints are typically wide and uneven, anywhere from 10 mm to 50 mm or more. For these, use a wide-joint polymeric sand formula (check the product label for its maximum joint width, usually up to 2 inches or 50 mm), gravel chips, or plant groundcover. If the flagstone is laid on a mortar bed and the installation is bonded, a stiff mortar pointing compound is appropriate and will give a clean, durable finish. If the stone is set loosely on a gravel or sand bed, stick to flexible options only, because any mortar will crack as the stones shift.
Concrete block pavers and brick-style pavers

This is exactly the scenario kiln-dried sand was designed for. Joints are close, typically 2–5 mm, and the sand creates frictional interlock across the whole surface so the individual blocks behave as a unified flexible layer. Polymeric sand also works here and gives you better weed and erosion resistance. The Clay Brick Association, Tobermore, and Pavingexpert all reference this 2–5 mm joint standard for flexible segmental paving. If you are doing block paving over a flexible base (the standard residential approach), do not use mortar in the joints. It breaks the interlock mechanism and can cause spalling.
Porcelain and large-format stone tiles
Porcelain patio tiles are almost always laid on a full mortar bed with narrow, precise joints, typically 3–10 mm depending on the tile size. These joints need a proper pointing compound or ready-mixed jointing mortar. Products like Sika FastFix work well here. Do not use plain sand in porcelain tile joints: the joints are too tight to compact properly, and loose sand under a porcelain tile system will allow individual tiles to rock, crack, or pop. The base matters just as much as the joint material here, and if you are thinking about what to lay under the slabs, a proper concrete or mortar bed is non-negotiable for porcelain. If you are trying to decide what to lay under the slabs, use a proper concrete or mortar bed for a stable, non-rocking installation what to lay under patio slabs.
Stepping stones and informal garden patios
For a relaxed stepping-stone path or loosely arranged garden patio, you have the most flexibility. Wide gaps planted with creeping thyme or filled with fine gravel look great and require minimal skill to install. If you want tidier joints without maintenance, a wide-joint polymeric sand formula handles gaps up to 50 mm and gives you weed control without the work of maintaining living plants.
How to install joint filler properly
Getting the joint material right but installing it badly is one of the most common mistakes I see. The prep and technique matter almost as much as the product. Here is how to do it correctly from start to finish.
Step 1: Start with the right base
Joint performance is directly tied to what is under the slabs. For flexible block paving, a compacted Type 1 (MOT1) granular sub-base is standard, typically 100–150 mm deep for residential use. This compacted crushed aggregate layer provides the load-bearing stability that prevents slabs from shifting and joints from cracking apart. A geotextile membrane underneath helps separate the sub-base from native soil and prevents fines from migrating upward over time. If the base is not right, no joint filler will save you. The slabs will move, joints will open up, and you will be re-pointing every season.
Step 2: Lay slabs with consistent joint spacing
For block paving, aim for 2–5 mm joints consistently. Use spacers if you need to keep things even. For flagstone or natural stone, wider joints are fine but try to keep them consistent across the surface. Avoid joints that taper from wide to narrow across a single run, as this makes filling difficult and looks untidy. Once all slabs are laid and any bedding mortar or sand bed is fully set, make sure the surface is clean and dry before you apply jointing material.
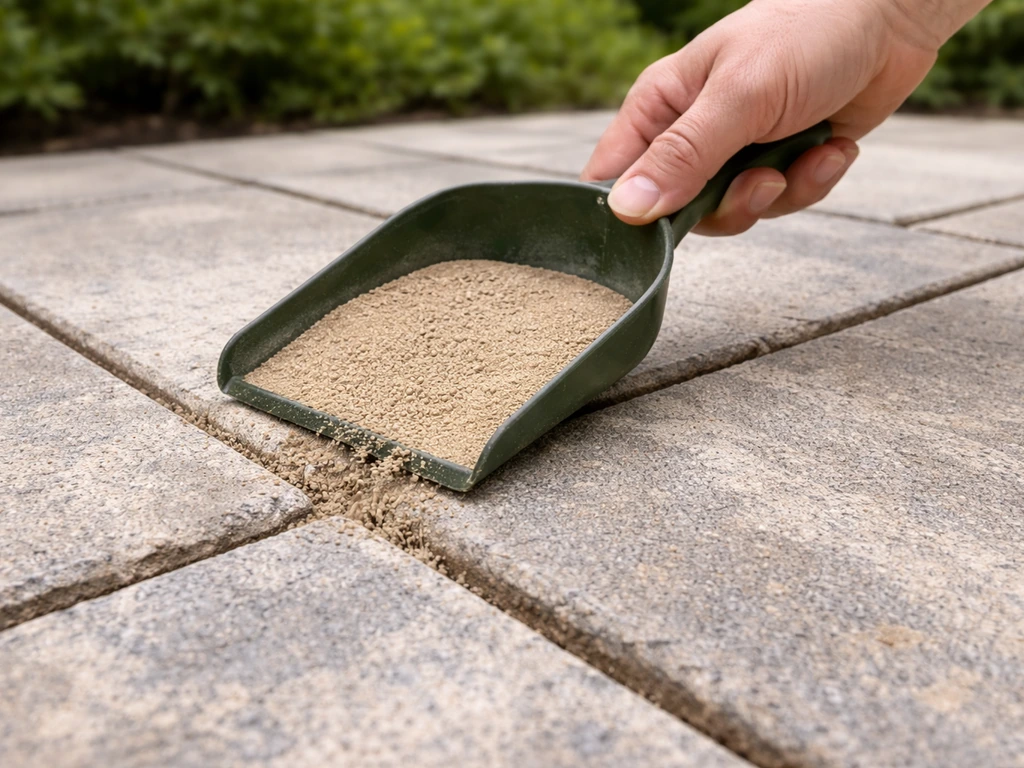
Step 3: Sweep in the jointing material
Pour the sand or jointing material onto the surface and use a soft-bristled brush to sweep it into the joints. Work in multiple directions to make sure material gets into the full depth of each joint. The SEK PolySweep instructions specify that after filling, the sand level should sit about 1/8 inch (roughly 3 mm) below the paving surface, not flush with it and definitely not overfilled. Tobermore specifies using a soft brush specifically to avoid scratching the slab surface. For polymeric sand, do not apply it when rain is forecast within 24 hours, and do not apply it onto a wet surface.
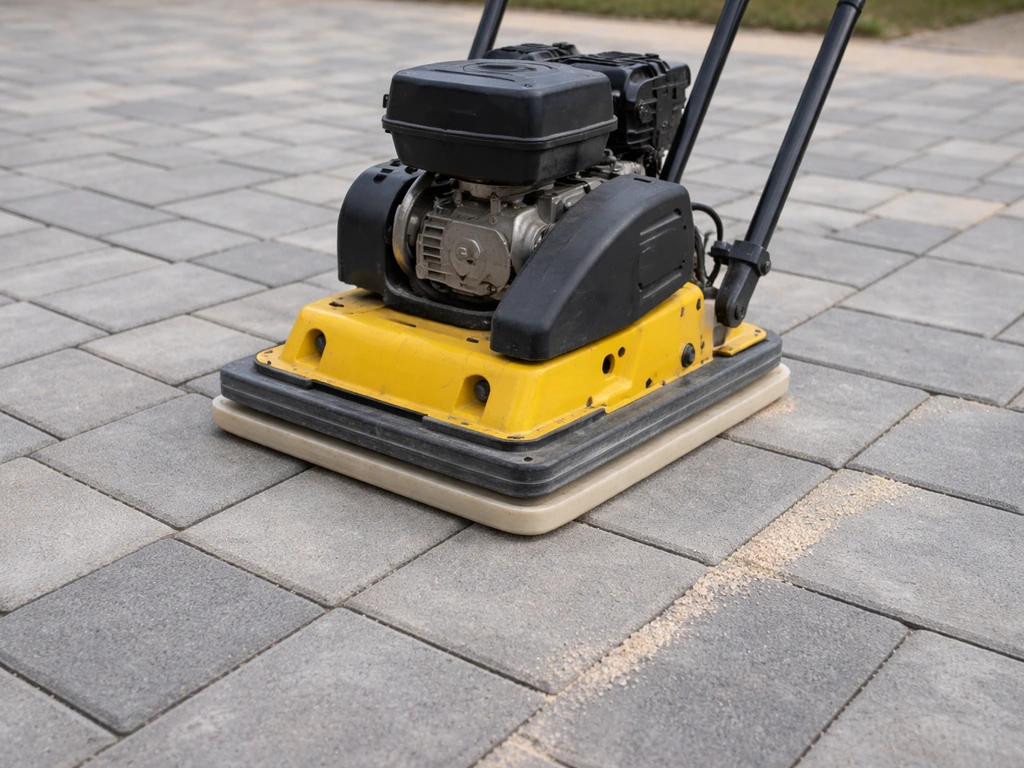
Step 4: Compact the surface
For block paving and pavers, run a plate compactor over the surface with a protective rubber or foam pad to push the jointing sand fully into the joints and consolidate the blocks. This step is critical because it develops the frictional interlock that keeps the whole surface stable. After compaction, top up joints where the sand has settled down and sweep in more material. Then blow or brush off all excess sand from the slab surface before water activation, because any sand left sitting on top will bond there and leave a gritty, powdery residue.
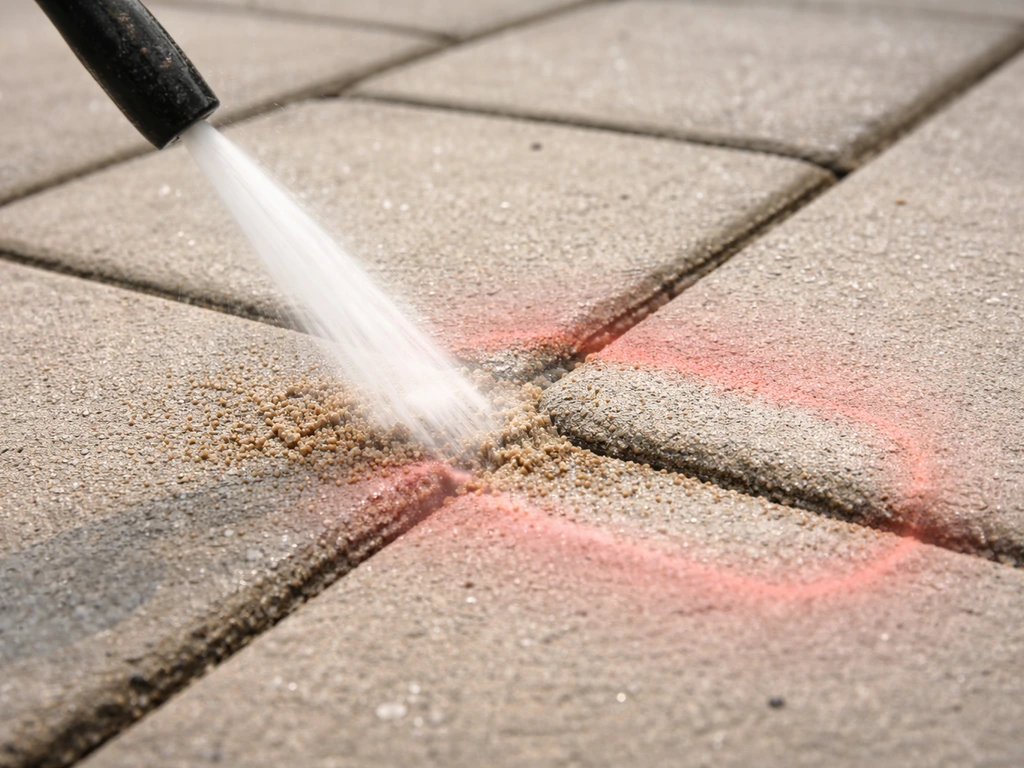
Step 5: Activate polymeric sand (if applicable)
If you are using polymeric sand, this step requires care. Use a garden hose on a gentle shower setting, not a jet or power washer. Work in sections, saturating each area thoroughly but without flooding it. Techniseal specifically warns against overwatering because it lengthens cure time and can compromise the polymer bonding. Techniseal's installation instructions for HP NextGel also caution against overwatering, since it can lengthen cure time and weaken polymer bonding Techniseal specifically warns against overwatering. Sakrete warns that excess water can cause a visible polymer film to float to the surface, which is a sign of improper activation. Once activated, let the surface dry completely before any foot traffic, which typically takes 24 hours in warm, dry conditions and longer in cool or humid weather.
Step 6: Final edging check
Check perimeter and edge joints last. These are the first places jointing material migrates out from, especially on patios that slope to an edge for drainage. If you have a restraining edging course or edge kerb, make sure the joint between the last slab and the edge is also filled and compacted. Edge restraints are a big part of keeping interior joints from gradually spreading over time.
Keeping joints in good shape over the years
Controlling weeds
Even with polymeric sand, some weeds will eventually find a foothold, particularly in any joint that has eroded slightly at the surface. The fastest fix is a handheld crack weeder or a stiff brush to remove them before roots get established. Avoid pulling them out with your hands because the roots loosen the joint material. If weeds are persistent, a patio-safe weed killer applied directly to the joints (not broadcast-sprayed across slabs) will deal with them without damaging the surrounding surface. Re-top any joints that look low after weeding.
Washing without destroying joints
This is where I have seen a lot of well-installed patios go wrong. A pressure washer on full power will strip kiln-dried sand and even soften newly applied polymeric sand out of joints. Use a wide fan nozzle, keep pressure below 1500 psi, and angle the spray along the slab surface rather than directly into the joints. A gentle brush wash with warm soapy water handles most patio cleaning jobs without touching the joints at all. If you have lost a significant amount of joint material after cleaning, top it up before the next rain.
Re-leveling sunken or shifted slabs
If a slab has dropped, rocked, or shifted, the joint material is not the problem. The base underneath has moved, and re-pointing over it will just fail again. You need to lift the slab, re-level the bedding layer, and relay it before re-filling the joint. For sand-bedded flexible paving, this is a relatively simple job. For mortar-bed installations, you may need to chip out old mortar and re-bed properly. Trying to fill a rocking slab's joints with mortar as a shortcut never works for more than one season.
Annual joint maintenance routine
- Inspect joints each spring after winter frost cycles for cracking, erosion, or settlement
- Remove any weeds early before roots deepen and disturb joint material
- Top up kiln-dried sand joints that have dropped more than a few millimetres
- For polymeric sand that has eroded, clean out the joint and apply fresh material rather than layering on top of degraded compound
- Check perimeter edges for signs of spreading or edge restraint failure
- Clean slabs with low-pressure wash or brush, avoiding direct high-pressure spray into joints
Materials that cause problems: what not to use
Some options seem reasonable but create real problems. Avoid these.
Regular builder's sand or play sand
Ordinary sharp sand or play sand has no binding properties and washes out immediately in rain. It also compacts down so quickly that joints open up and become weed highways within a season. Kiln-dried jointing sand is a specifically graded, dry, free-flowing product. It is not the same as the builder's sand sitting in a bag in your shed.
Soil or compost
Filling joints with topsoil to grow moss or groundcover sounds harmless but introduces organic matter that retains moisture, accelerates freeze-thaw damage to slab edges, and eventually causes heaving as roots expand. If you want plants between slabs, use a minimal amount of free-draining sandy soil, not rich compost.
Concrete or cement grout on flexible paving
Using a cement grout or solid mortar between flexible block paving joints is a serious mistake. It breaks the frictional interlock that the entire flexible paving system depends on. When the base moves even slightly (which it will), rigid mortar joints crack and pop, taking pieces of slab edge with them. Mortar is only suitable when the entire installation is rigid and bonded from sub-base to surface.
Polymeric sand applied wet or onto damp slabs
Polymeric sand applied to a damp surface or in humid, rainy conditions will begin activating before it is properly swept in and compacted. This causes it to bond unevenly, leave a powdery or filmy residue on the slab face, and produce weak joints that crumble within a year. Always apply to a fully dry surface and check the forecast. If rain is coming in the next 24 hours, wait.
Fine decorative gravel in narrow block paving joints
Coarse gravel or decorative stone chippings simply do not fit into 2–5 mm joints. Forcing them in damages slab edges and creates an uneven surface that rocks underfoot. Even if they go in, they do not create the frictional interlock that close-jointed block paving relies on. Gravel belongs in wide informal gaps only.
Quick comparison: joint materials at a glance
| Material | Best joint width | Weed resistance | Freeze-thaw safe | Drainage | Skill level | Longevity |
|---|---|---|---|---|---|---|
| Polymeric sand | 2 mm to 50 mm (product-dependent) | Excellent | Yes (flexible) | Good | Moderate | 5–10 years+ |
| Kiln-dried jointing sand | 2–5 mm | Poor | Yes (no binder to crack) | Excellent | Easy | 1–3 years before top-up |
| Pointing mortar / cement mix | 5–20 mm (rigid base only) | Excellent | Only on stable rigid base | Poor | Moderate-hard | 10+ years if base stable |
| Gravel / stone chippings | 15–50 mm+ | Poor | Yes | Excellent | Easy | Ongoing maintenance |
| Creeping groundcover plants | 20–50 mm+ | Excellent once established | Species-dependent | Good | Easy-moderate | Long-term with establishment period |
The bottom line: what to actually buy
For the majority of residential patios, polymeric sand is the right answer. It handles everything from narrow block paving joints to wide flagstone gaps (with the right formula), it locks out weeds, it survives winter frost, and it requires minimal maintenance once installed correctly. The only real ways to get it wrong are applying it wet, overwatering it on activation, or skipping the compaction step. For tight-jointed flexible block paving where drainage is the priority, kiln-dried sand remains the classic choice and works perfectly when topped up once a year. If you are trying to figure out what mix for patio slabs, kiln-dried sand is a common choice for tight joints when drainage is the main priority. For rigid, bonded porcelain or stone tile installations, use a proper pointing mortar and do not compromise. Get the base right first, match the joint material to your patio type, and the rest follows. If you are also planning around a patio fire pit, the same idea applies: choose a jointing material and base that can handle heat, water, and freeze-thaw movement what to put under fire pit on patio.
FAQ
Can I put jointing sand in wet patio slabs or right before rain?
You can, but only if you first confirm the product’s maximum joint width and that the surface is fully dry. For polymeric sand, damp joints can start the activation process early and leave a powdery residue, weak joints, and uneven bonding. If the patio gets rain soon, postpone application (24 hours is a good rule).
What should I do if I can’t finish filling and activating the joints in one day?
Yes, but not as a temporary substitute for missing joint material. If you need to pause, leave polymeric sand out of the joints until you can complete brushing and activation properly, otherwise it may bond prematurely where you stopped. For kiln-dried sand, you can top up after cleaning, but avoid pressurized washing that removes it first.
How do I repair low or missing jointing sand without making it worse?
Before adding more, scrape and brush out loose material, then re-fill to the correct depth. Don’t just “cap over” low joints, because trapped fines can prevent proper compaction and reduce weed resistance. A good target is joints filled just below the slab surface (not flush) so you can consolidate and avoid grit bonding on top.
What’s the best way to remove weeds from patio joints, and prevent them returning?
If weeds are only occasional, a stiff brush or crack weeder works best because it removes the top growth before roots establish. If weeds keep returning, treat directly in the joints with a patio-safe weed killer and avoid broadcast spraying across the slab faces. After treatment, sweep and top up any joints that eroded so water does not wash voids.
Can I pressure wash my patio after I filled the joints with polymeric sand?
Use the gentlest cleaning method that doesn’t erode joints. A soft brush with warm soapy water is usually safest. If you must pressure wash, keep it low-pressure and don’t aim the nozzle into the joints, because stripping joint sand quickly leads to open gaps and rapid weed reinfestation.
Why is mortar or cement grout a bad idea between flexible block paving slabs?
For flexible paver systems, no. Mortar and cement grout in 2 to 5 mm flexible joints can break the intended interlock, so movement leads to cracked joints and popped edges. Mortar is for rigid, fully bonded builds on a stable base, like a porcelain tile system on a proper mortar bed.
How can I tell whether my patio needs a flexible or rigid jointing material?
The “right” choice depends on whether your patio is expected to move. If your installation is flexible (typical residential block paving on a compacted granular base), use a flexible joint filler like polymeric sand or kiln-dried sand. If it is rigid and bonded (porcelain or natural stone on a full mortar bed), use the correct pointing compound or joint mortar.
Can I use gravel between patio slabs instead of sand?
Yes, but only in wide, informal gaps where migration is expected and you are not relying on tight interlock. Gravel and decorative chippings won’t work in tight joints, they can damage edges when forced, and they won’t suppress weeds. If you want a low-maintenance look with suppression in wider joints, consider a wide-joint polymeric sand formula or groundcover plants.
Is builder’s sand or play sand okay between patio slabs?
If the joint widths are tiny (about 2 to 5 mm), polymeric sand and kiln-dried jointing sand are the practical options. Regular builder’s sand or play sand lacks the binder and grading needed, it washes out, and it compacts too fast, leading to loosening and weed pathways. Always buy sand marketed for paving joints, not general sand.
What if my patio slabs are rocking, can I just refill the joints?
That depends on the underlying base. If a slab has rocked, dropped, or moved, the filler cannot fix it. You typically need to lift and re-bed the slab, re-level the bedding layer, and then re-fill joints. Re-pointing on a moving base often fails again after the next freeze-thaw or heavy load.
How full should patio joints be, and what happens if I overfill?
Generally, thin layers and careful activation matter more than “more product.” Overfilling polymeric sand can increase residue on the slab face and reduce a clean, smooth finish. Keep the sand slightly below the surface, then consolidate with a plate compactor (for pavers) and remove excess before activation.
Does hot weather or direct sun affect polymeric sand curing?
Yes, heat can change cure time and weed resistance setup. Very hot, sunny weather can speed activation, so work in smaller sections and avoid leaving polymeric sand uncovered too long before activation. If you see film or inconsistent hardening, you likely overwatered or activated under poor surface conditions, and you may need to clean out and reapply in that area.
Why do my patio edge joints keep washing out first?
Perimeter and edge joints are often the first to fail because water flows toward edges and the last course has the least restraint. Fill and compact the joints at the boundary carefully, and ensure edging restraints are tight. If perimeter joints stay low, re-pointing will be needed more frequently.