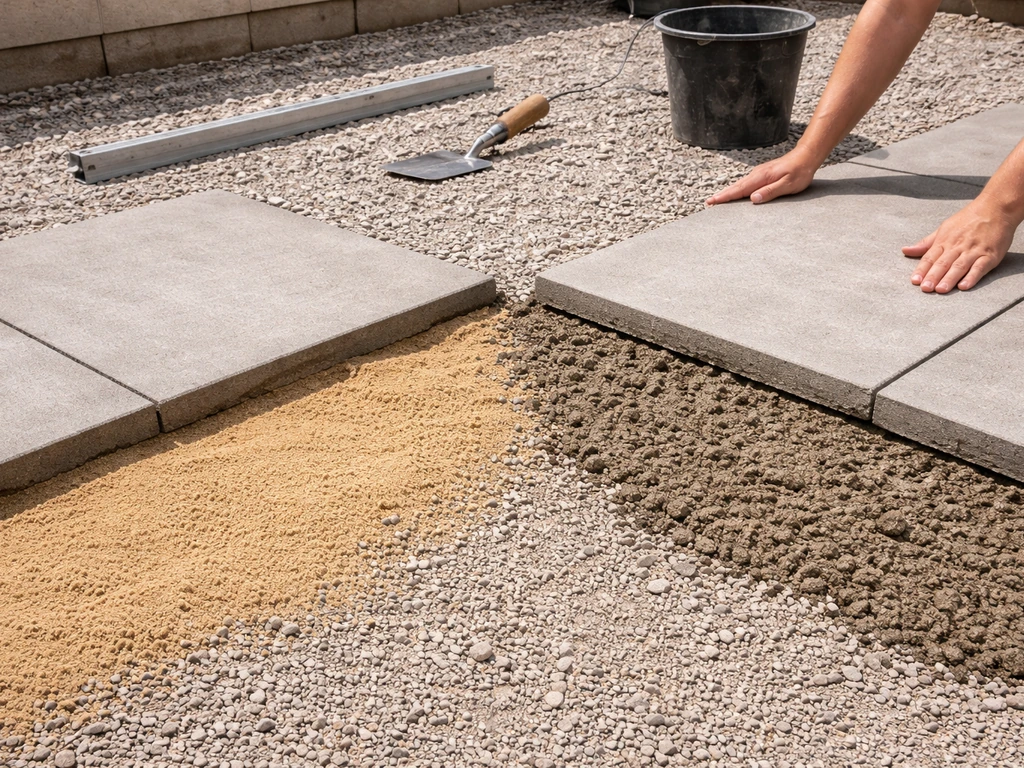
For most residential patio slabs, a 4:1 sand-to-cement bedding mortar is the go-to mix. That means four parts sharp sand to one part Portland cement, mixed dry first and then dampened just enough so the mix holds its shape when squeezed in your fist but does not release any water. This "damp not wet" consistency is the single most important thing to get right. If you are laying smaller concrete pavers on a well-compacted aggregate base, you can get away with a straight 1-inch coarse sand setting bed. But for larger format slabs, natural stone, or flagstone, the semi-dry mortar bed is your most reliable option and the one this guide focuses on.
What Mix for Patio Slabs: Mortar, Dry-Pack, and Ratios

Nolan Ellison
29 Apr 2026
What changes the "right mix" for your situation
Not every patio slab project calls for the same mix, and getting this wrong is usually where things go bad months down the line. Four variables matter most: the type of slab, the base underneath it, the thickness of your bedding layer, and how well the area drains.
Slab type
Standard concrete pavers (typically 60mm thick) are dense and fairly uniform, so a simple sand setting bed works well if the base is solid. Large-format concrete slabs (600mm x 600mm or bigger) are heavier and less forgiving of point voids underneath, so they need a full mortar bed.
On Reddit’s DIYUK thread about the best mortar mix for paving slabs, DIYers continue to debate sand-to-cement ratios such as 4:1, 5:1, and 6:1 for bedding patio slabs debate among DIYers on sand:cement ratios for patio/slab bedding. NBS Source records BAL Bedding Mortar as a paving laying-course mortar bed product that allows [fixings to meet BS 7533-4 requirements](https://source.
thenbs. com/product/bal-bedding-mortar/kidNragB7L6j7TTVxboKKF/rHPxPcsid23RzNtnAX1mbf). Natural stone and flagstone are the most demanding because they vary in thickness and are brittle under point loads. If you try to bed irregular flagstone on plain sand, some edges will have voids underneath, and the slab will rock and eventually crack.
A semi-dry mortar bed fills those irregular undersides and provides full, continuous support.
Base condition and drainage
Your base situation changes how thick and how strong your bedding mix needs to be. If you are laying onto a compacted hardcore/crusher run base with sharp sand blinding, a semi-dry mix works perfectly. If you are laying onto an existing concrete slab, you have more options including a slurry primer coat under the mortar bed.
Poor drainage is a major issue: water trapped under slabs with nowhere to go will push up through the mortar via capillary action, carrying dissolved salts to the surface (efflorescence) and in freeze-thaw climates it will cause spalling and heave. In wet climates or shaded spots, make sure your base has a 1 in 60 fall away from the house, and keep the bedding mortar layer at or below 25mm thick. A thicker bed holds more moisture.
Bedding thickness
The bedding layer should not exceed 25mm (about 1 inch). This is not arbitrary: a thick mortar bed takes longer to dry, shrinks more as it cures, and provides inconsistent support. If you find yourself needing 50mm or more of mortar to level out your slabs, the real problem is your base preparation, not your mix. Fix the base, not the mortar thickness.
Your three main mix options

There are three practical approaches for bedding patio slabs at home. If you are replacing patio slabs or planning a new patio, it helps to compare slab options with alternatives like pavers, gravel, or decking depending on your base and drainage. Each suits different conditions, skill levels, and slab types.
| Mix Type | Best For | Pros | Cons |
|---|---|---|---|
| Coarse sand setting bed (no cement) | Small concrete pavers on a compacted aggregate base | Fast, forgiving, easier to adjust level, allows drainage | Not suitable for large or irregular slabs, can wash out |
| Semi-dry mortar bed (4:1 sand:cement) | Large-format slabs, natural stone, flagstone | Full support, tolerates thickness variation, strong bond | Less forgiving to reposition, requires base prep |
| Wet mortar on a primed concrete base | Slabs going over existing concrete | Bonds to existing structure, thin layer possible | Risk of shrinkage cracks, needs slurry primer, less drainage |
For the vast majority of homeowners laying new patio slabs on a prepared ground base, the semi-dry 4:1 mortar bed is the right call. The sand setting bed is fine for standard small pavers if you know your base is solid and well-drained. The wet mortar approach over an existing concrete base is a specialist job that needs a bonding slurry or SBR primer and is more prone to cracking if you skip those steps.
One more option worth mentioning for natural stone specifically: some manufacturers reference a trass bed (a lime-based hydraulic cement blend) as an alternative to a standard Portland cement mortar. Trass is more permeable and gentler on porous stones. If you are working with a premium natural stone product, check the manufacturer's installation guide because some specify a 3:1 sand:cement mix or a trass bed rather than the standard 4:1.
The best mix recipes and ratios
Standard semi-dry bedding mortar (recommended for most slabs)
- 4 parts sharp (coarse) sand
- 1 part Portland cement (OPC)
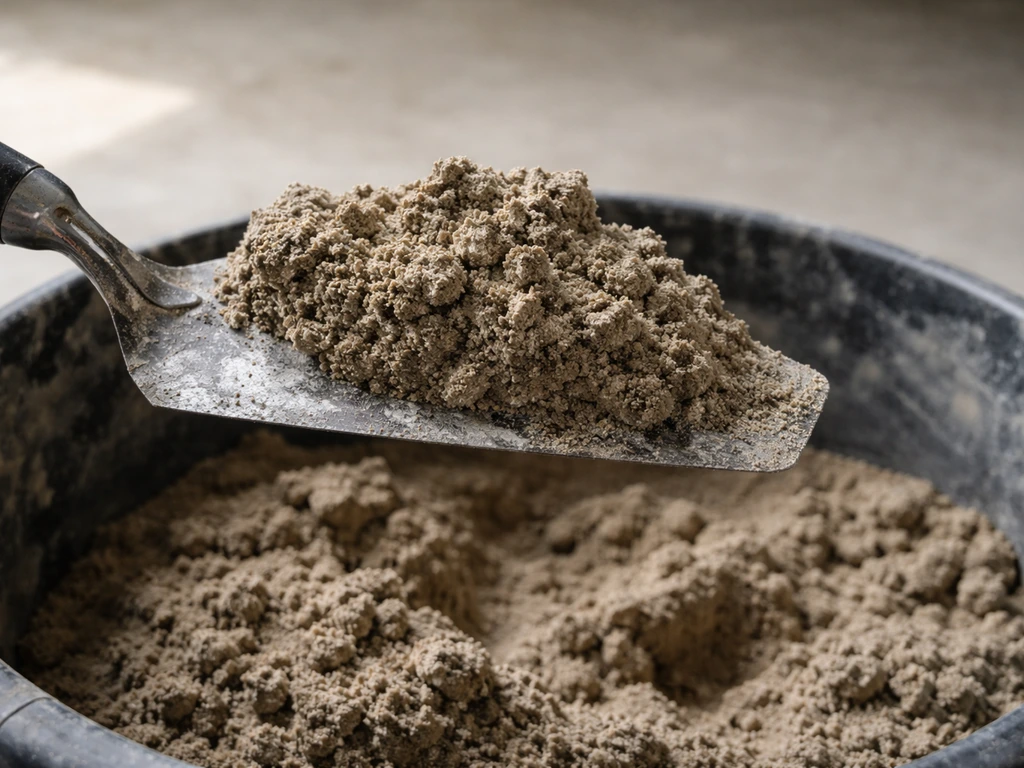
- Water: enough to make the mix damp, not wet
Mix the dry ingredients thoroughly before adding any water. Then add water very gradually, a small splash at a time, mixing as you go. The finished mix should look and feel like damp beach sand at low tide: it holds a clear shape when squeezed in your palm but no water runs or drips out. This is the consistency described as "damp and not wet" in industry guidance, and it is the target every time. If you have gone too wet, add small amounts of dry mix (sand and cement at the same 4:1 ratio) and re-mix rather than just adding more cement, which will make the bed too strong and brittle.
Mix ratio for natural stone and flagstone
For natural stone, especially porous types like sandstone or limestone, some guides recommend a slightly richer 3:1 sand:cement mix to get better adhesion to an irregular, absorbent surface. If the stone is very porous, dampen the back of the slab with clean water before laying it onto the mortar bed. This stops the stone from sucking moisture out of the mortar too quickly, which weakens the bond before it has a chance to set properly.
Workable time and batch size
A semi-dry mortar bed gives you roughly 30 to 45 minutes of workable time in normal temperatures (around 15 to 20°C). In hot or dry weather that window shortens. Mix in batches you can use in 20 to 30 minutes. Do not retemper a mix that has started to stiffen by adding more water as this weakens the cured mortar significantly.
Getting the base right before you mix anything

I have seen plenty of DIY patios fail within two winters, and almost every time the culprit was a poor base rather than the bedding mortar itself. The best mix in the world cannot compensate for a soft, uneven, or poorly graded sub-base. Sort this first.
- Excavate to the correct depth: for a typical domestic patio that means removing enough soil to allow for 100-150mm of compacted sub-base, 25mm of bedding material, and the slab thickness itself. For a 50mm slab that totals around 175-225mm of excavation.
- Grade the formation level: establish a fall of at least 1 in 60 (roughly 15-17mm per metre) away from the house. Use a long spirit level or a laser level to check this. Do not eyeball it.
- Compact the sub-base: lay hardcore or crusher run (Type 1 MOT or equivalent) in layers no more than 100mm deep and compact each layer thoroughly with a plate compactor. Rushing this step is the single biggest cause of slab movement.
- Add a sharp sand blinding layer: spread 25-30mm of sharp sand over the compacted sub-base to fill surface voids and create a level platform for your bedding. Do not compact this sand layer before laying the slabs as this prevents the bedding from bonding into it properly.
- Check your levels again before mixing: once the sand blinding is in place, re-check your falls and surface levels. It is much easier to correct now than after you have mixed a batch of mortar.
If you are in any doubt about whether the ground beneath has been well-consolidated, give it another pass with the plate compactor. A few extra minutes of compaction prevents months of slab rocking, cracking, and joint failure. The sub-base work is also directly connected to what goes between and under your slabs, which are topics worth revisiting separately once the base layer decisions are locked in.
Choosing the right joint filler for patios, including what to put between patio stones, helps lock everything in place and improves long-term stability. Once you have your base sorted, you can focus on what to put between patio stones to keep joints stable and reduce weed and washout problems.
When you are planning a patio fire pit, use the same thinking to choose what sits under and around the slabs so heat, drainage, and stability stay consistent what to put under fire pit on patio. If you are also planning how to finish the joints, start by considering what to lay under patio slabs for stable support and drainage what to put between patio stones.
Choosing the best underlay for patio stones depends on your base and drainage, and it helps prevent rocking, cracking, and washout. For patio slabs, the same principles apply: choose the right joint filler for stable joints and fewer weeds what to put between patio stones.
Laying the slabs: step by step
- Mix your bedding mortar to the correct damp consistency (4: 1 sand:cement as described above) in manageable batches.
- Spread the mortar bed over an area slightly larger than one slab, keeping it consistently around 25mm deep. Use a trowel or float to roughly level it.
- Lower the slab gently onto the mortar bed, positioning it close to its final location before it touches down. Avoid sliding it into position on the mortar as this drags and creates voids.
- Tap the slab down with a rubber mallet and check for level in both directions using a spirit level. Adjust the mortar bed beneath as needed by lifting and adding or removing material rather than rocking the slab repeatedly.
- Use consistent spacers to maintain joint gaps. For standard concrete pavers, a 3mm gap is typical; for natural stone, 10mm joints are common and allow room for pointing compound. Do not lay slab edge to slab edge with no gap as there is no room for slight dimensional variation or jointing material.
- Check your fall across every two or three slabs as you progress. It is very easy to drift on a long run and not notice until much later.
- Once all slabs are laid, leave them undisturbed for at least 24 hours before walking on them, and avoid heavy loads for 48 to 72 hours.
- Fill the joints once the bedding has set: use a dry brush-in jointing compound, a wet pointing mortar, or a polymeric sand depending on your joint width and drainage preferences.
One thing I always do before laying a single slab: dry-lay a small section first to check for any sizing inconsistencies in the slabs. It takes ten minutes and can save you from discovering a problem mid-job when the mortar is already down.
Common mistakes and how to fix them
Too-wet mortar
This is the most common error and it causes multiple problems: the slab sinks unevenly as the water compresses out, the mortar takes much longer to set, and the cured bed is weaker. If your mix is too wet, do not try to correct it by just waiting for it to stiffen. Instead, add small amounts of dry mix at the same 4:1 ratio and work it in thoroughly until you get back to the correct damp-not-wet consistency.
Spot bedding or voids under slabs
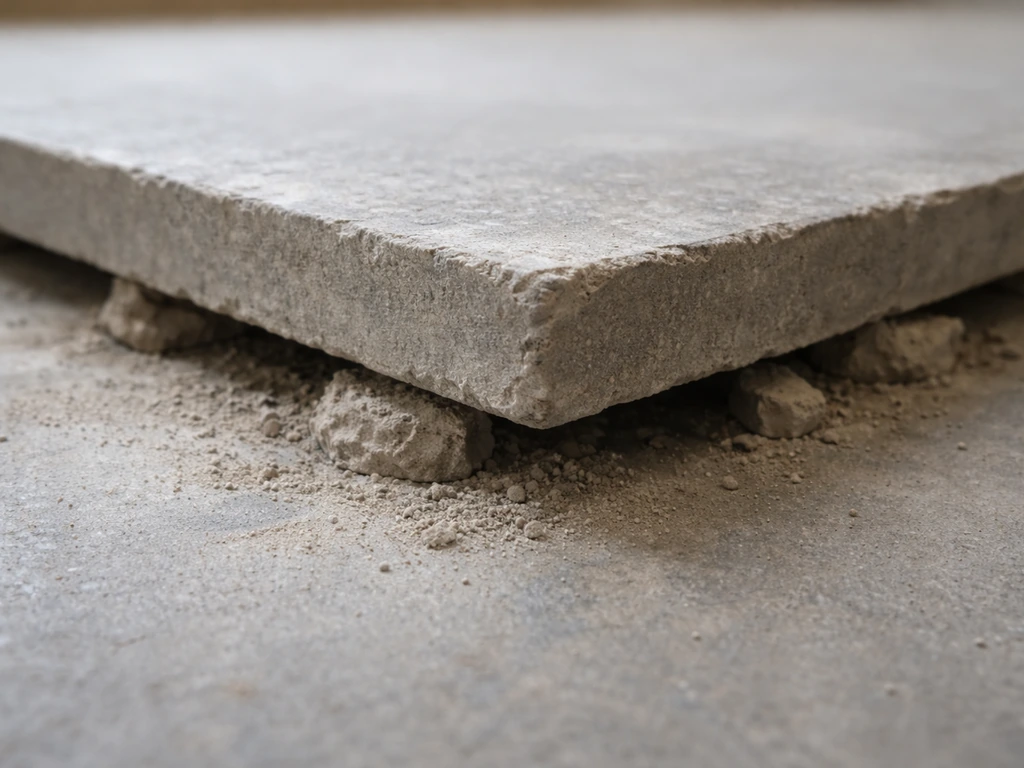
Laying mortar only at the corners and centre (sometimes called dot-and-dab or spot bedding) is a shortcut that causes serious long-term problems. The unsupported areas create hollow spots that flex under load, and on larger slabs this "drumskin" effect makes even small voids feel and sound much worse. It also allows water to pool under the slab. Always bed the full surface area. If a slab rocks after laying, lift it, add more mortar to the low spots, and relay it fully.
Rocking slabs
A slab that rocks when you stand on different corners was almost always caused by either a void in the bedding or a high point in the sub-base underneath. The only proper fix is to lift the slab, scrape off the old mortar, check the sub-base level, and re-bed with a fresh full mortar layer. Trying to wedge or point around a rocking slab does not fix the root cause.
Efflorescence
That white powdery bloom on the surface of new slabs or joints is efflorescence: water has moved through the mortar, dissolved soluble salts, and deposited them on the surface as it evaporated. It is most common in the first few months after installation and tends to clear with time and rain. Wet-dry cycles such as regular irrigation hitting the patio can make it recur. You can brush it off with a stiff brush or use a dilute acidic cleaner, but the underlying fix is ensuring good drainage and not keeping the base permanently damp. A quality slab sealer applied after the first year can help reduce recurrence.
Weak or crumbling bedding
If the mortar in your joints or bedding is soft and crumbles when probed after curing, it was either mixed with too much water, the ratio had too much sand, or it was laid in very cold conditions (below 5°C) that prevented proper hydration. In cold weather, protect freshly laid slabs with a cover for at least 48 hours. For weak existing bedding, the only reliable fix is to lift the affected slabs, remove the old mortar, and re-bed with correctly mixed fresh material.
Curing, sealing, and keeping it looking good
Mortar cures through a chemical hydration process, not simply by drying out. Keep foot traffic off the new patio for at least 24 hours, and avoid heavy loads or furniture for 48 to 72 hours. In hot, dry, or windy conditions, lightly mist the surface with water once or twice in the first 24 hours to slow the cure and reduce surface cracking. Do not flood it. In cold weather (under 5°C), cover the fresh work with hessian or a breathable fleece to retain heat.
Wait at least 28 days before applying any sealer. This is the time mortar and concrete typically need to reach full strength, and sealing too early can trap moisture and cause the surface to look milky or peel. When you do seal, choose a product appropriate for your slab material: a penetrating impregnator for natural stone and porous concrete, and a surface sealer if you want enhanced colour or a wet look on smooth-faced slabs. Always test in a discreet corner first.
For long-term maintenance, inspect the joints every spring. Jointing compound and pointing mortar can erode over time, particularly in high-traffic areas or in climates with significant freeze-thaw cycling. Repointing worn joints promptly prevents water ingress and the creeping edge damage that follows. A gentle pressure wash once a year keeps the surface clean without stripping the joint material, provided you do not blast the joints directly at close range. Avoid using steel brushes or harsh acid cleaners on natural stone as they scratch the surface and dull the finish permanently.
If you have used a sand setting bed rather than mortar (common for smaller concrete pavers), top up the jointing sand periodically as it settles and washes out. Polymeric jointing sand lasts significantly longer than plain kiln-dried sand and resists weed growth, making it well worth the extra cost for most homeowners. In a Reddit thread about polymeric sand for patio joints near a border, users discuss feasibility and joint-width limits, including questions around using about a 1 cm joint versus wider joints recommended by manufacturers polymeric jointing sand lasts significantly longer.
FAQ
Can I use the same sand-cement mix for both pavers and larger patio slabs?
Use the mix decision based on what you are actually bedding. If you are laying standard small pavers on a compacted, solid base, a straight sand setting bed is usually enough. If the slabs are large, natural stone, or flagstone, use a full semi-dry mortar bed (about 4:1) to eliminate rocking at small voids.
How do I know if my sand-cement mix is the right wetness for patio slabs?
For a damp-not-wet 4:1 mortar bed, you should be able to squeeze a handful and it holds shape, with no free water appearing on the surface. If you see water shining or it runs when you move the trowel, it is too wet. If it looks dry and won’t compact, add water gradually, don’t dump it in all at once.
What should I do if my patio slabs need a thick mortar bed to level?
If you need more than the typical 25 mm bedding layer to level out, stop and correct the sub-base. A thicker mortar bed stays moist longer, shrinks more, and can lead to inconsistent support. The practical fix is to re-grade and re-compact the base so the bedding layer returns to the target thickness.
Can I re-wet mortar after it starts to stiffen during the job?
No. Re-tempering stiff mortar by adding more water weakens the cured mortar because it disrupts hydration and increases shrinkage. If the batch starts to stiffen in the working window, discard it and remix the correct damp-not-wet consistency.
Should I dry-lay slabs to check fit, and is it okay to leave them dry-laid while I mix mortar?
Dry-lay is a check for slab size and edge consistency, not a placement solution. Once you are satisfied with spacing and fit, lift the slabs, spread the correct bedding mortar across the full contact area, then relay them in the same positions without spot bedding.
Do I need to dampen natural stone before laying it on mortar?
Slightly dampen very porous stones, like sandstone and some limestone, right before placing. This helps prevent the stone from pulling too much moisture from the mortar too fast, which can reduce bond strength before the mortar starts setting.
What changes when I’m installing patio slabs in cold weather?
Yes, if you are working cold. Below about 5°C, protect the fresh work (cover with hessian or breathable fleece) for at least 48 hours. In cold conditions, curing is slowed and weaker beds can result if you remove protection too early.
How do I fix patio slabs where the mortar became weak and crumbles?
If joints or bedding crumble when you probe after curing, the fix is almost always to lift the affected slabs and remove the old mortar bed. Patching mortar or adding more on top usually does not restore the full-depth support and bond.
My patio has white powder on the surface, what caused it and what fixes it long-term?
It is a sign the patio was staying wet enough to draw soluble salts to the surface. The remedy is to stop re-wetting the base, improve drainage fall away from the house, and ensure the bedding layer is not excessively thick. You can brush it off for appearance, but plan to correct the moisture path to prevent it coming back.
If I used a sand setting bed for pavers, how do I maintain the joints over time?
For a sand setting bed under small pavers, top up jointing sand periodically because it settles and gets washed out. If you want fewer weeds and less washout, use polymeric jointing sand rather than plain kiln-dried sand, especially in areas exposed to rain splash.
When can I seal patio slabs, and does the product type matter?
For slab sealer timing, wait at least 28 days before applying any sealer. Sealing too early can trap moisture and lead to a milky look or peeling. Also choose a penetrating impregnator for porous stone and porous concrete, then test in a discreet corner first.