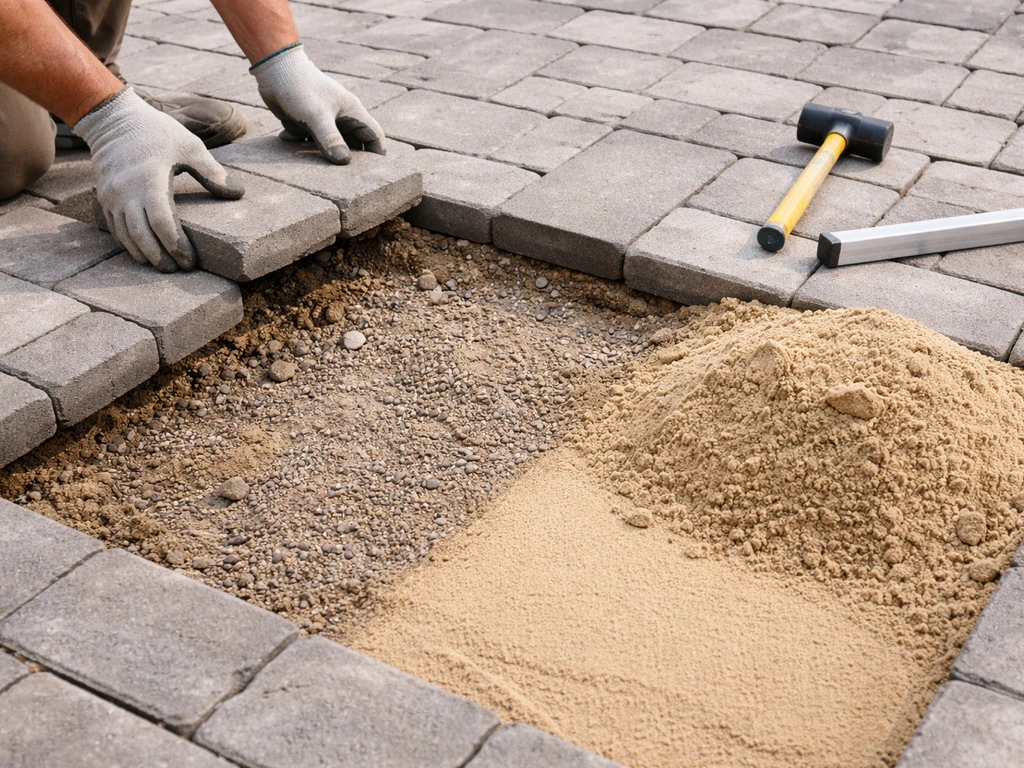
For most patio stones, the best underlay system is a compacted gravel or crusher run base (4 inches minimum for pedestrian use), topped with 1 inch of screeded bedding sand, with a geotextile fabric at the perimeter and rigid edge restraints anchored directly into the compacted base. That combination handles drainage, levels the surface, locks the stones in place, and keeps weeds from taking hold.
Best Underlay for Patio Stones: Base, Sand and Fabric Guide

Nolan Ellison
29 Apr 2026
The exact layering shifts a little depending on whether you're laying concrete pavers, natural flagstone, or brick, and your local soil and climate push the thicknesses around, but that core system is the right starting point for almost every residential patio project. If you need the joint-filling option, see what to put between patio slabs for a stable, weed-resistant finish.
Because patio slabs have different substrate and jointing needs, the right sand and base mix depends on your soil, drainage, and slab thickness what mix for patio slabs. For brick patio pavers specifically, the joint-filling material you choose (sand or polymeric sand) can make a big difference in stability and weed control what to put between bricks on a patio. For brick patios, choosing what goes between the bricks is just as important as the sand and base layers under them sand or polymeric sand.
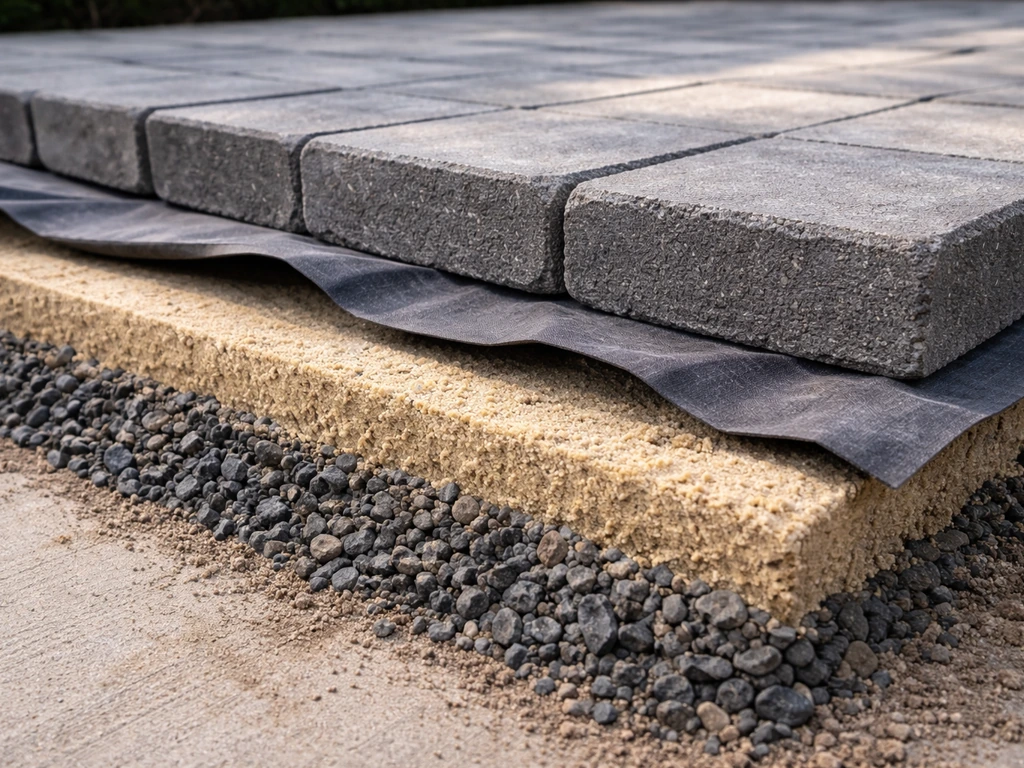
How underlay actually works beneath patio stones
Think of your underlay as three jobs working together: structure, drainage, and leveling. If you are trying to avoid traditional slabs, there are several solid alternatives depending on your surface needs and how you want the joints to be finished what can i use instead of patio slabs. what to lay under patio slabs what can i use instead of patio slabs? (related option).
The compacted aggregate base (gravel or crusher run) is the structural workhorse. It distributes the load from foot traffic and furniture across the subgrade so no single spot gets overloaded and sinks. The bedding layer, usually coarse sand, sits on top of the base and creates the smooth, screeded surface that each stone beds into. It also lets you make fine height adjustments stone by stone.
Drainage runs through the whole stack: water needs to get down through the joints, through the bedding layer, and then out through or around the base without pooling. If any layer holds water, you get freeze-thaw heaving in cold climates or soft, spongy ground in wet ones. Weed control is mostly a byproduct of getting the other layers right, which is why fabric laid under the base often causes more problems than it solves by trapping water.
The subgrade, which is just the native soil you're excavating down to, is where everything starts. A compacted subgrade is non-negotiable. Loose or disturbed soil under your base is the number one cause of settling. Once the subgrade is firm, the base layer locks in place, and everything above it stays stable.
Best underlay by patio stone type
Concrete and asphalt pavers
Manufactured concrete pavers are the most forgiving to work with because they're consistent in thickness. A 4-inch compacted gravel base over a well-drained subgrade, followed by 1 inch of ASTM C33-graded bedding sand, is the standard setup for a residential patio. ASTM C33/C33M is the ASTM standard that defines quality and gradation requirements for concrete aggregates, including fine aggregate sand, and it notes that sieve sizes are identified by standard designation in Specification E11 [ASTM C33-graded bedding sand](https://store. astm.
org/c0033_c0033m-24. html). The bedding sand is critical: it needs to be a coarse, washed concrete sand with very low fines (ideally no more than 1% passing the No. 200 sieve).
Fine mason's sand or play sand will pump down into the base over time, causing the pavers above to rock and sink. Screeded to a nominal 1-inch thickness, the right bedding sand beds the pavers firmly, helps initiate interlock, and stays where you put it.
Natural stone and flagstone
Flagstone and natural stone are irregular in thickness, sometimes varying by half an inch or more within a single piece. That variation rules out a pure sand-only bed for the flattest possible result. Most installers use one of two approaches: a dry-set method with a crushed stone base and a slightly thicker sand bed (up to 1.
5 inches in spots) to accommodate the variation, or a mortar-set method where the stones sit on a concrete slab or mortar bed for permanent, rigid installation. The dry-set approach allows drainage and is more DIY-friendly; the mortar approach gives you a flatter finish and is better for porcelain or thinner stone tiles prone to cracking under point loads.
For dry-set flagstone, a geotextile fabric under the base layer (not between base and bedding) helps prevent the base from punching down into soft clay subgrades.
Brick and clay pavers
Brick behaves a lot like manufactured concrete pavers in terms of underlay requirements, but bricks are often thinner and more brittle, so point loads from an uneven base cause cracking. Keep your base especially well compacted and your sand bed tight to the 1-inch specification. In freeze-thaw climates, bump the base thickness up to 6 inches because clay brick absorbs more moisture than concrete pavers and heaves more aggressively when that moisture freezes. Polymeric sand in the joints does a lot of work here by stabilizing brick that would otherwise shift with thermal movement.
Comparing the main underlay materials
| Material | Role in the system | Best for | Watch out for |
|---|---|---|---|
| Compacted gravel (clean) | Base layer, drainage, load distribution | Sandy, well-drained soils; permeable patios | Needs proper gradation; don't use pea gravel alone |
| Crusher run / road base | Base layer, structural stability | Clay or variable soils; heavy-use areas | Less permeable than clean gravel; not ideal for PICP |
| Coarse bedding sand (ASTM C33) | Bedding layer, leveling, paver interlock | All paver and brick installs | Must have low fines; don't use mason or play sand |
| Geotextile fabric | Separation, fines control at perimeter/sides | Clay subgrades; perimeter of any paver install | Under base, not between base and sand; can clog if wrong type |
| Polymeric jointing sand | Joint locking, weed suppression, washout resistance | All paver/stone types for joint filling | Not a bedding material; joint must be right depth and width |
| Mortar / concrete bed | Rigid base for mortar-set installs | Porcelain tiles, thin natural stone, formal patios | No drainage; needs expansion joints; less DIY-friendly |
Geotextile fabric placement trips people up more than almost anything else. The fabric should go on the sides of your base and subbase to stop fines from adjacent soils migrating in and destabilizing the base, and on the perimeter of patios to prevent the bedding sand from washing out around the edges. What you should not do is lay a weed-barrier fabric directly between your compacted base and your bedding sand.
That layer will trap water, prevent the two materials from locking together, and give you a slippery plane that encourages settling. Geotextile under the base on a clay or silty subgrade is a different story, though: that's a legitimate separation layer that keeps the base from punching into the soil. [ICPI recommends installing geotextile fabric under pavers in all clay soil applications](https://www. usfabricsinc.
com/geotextileapplications/lightweightseparation/).
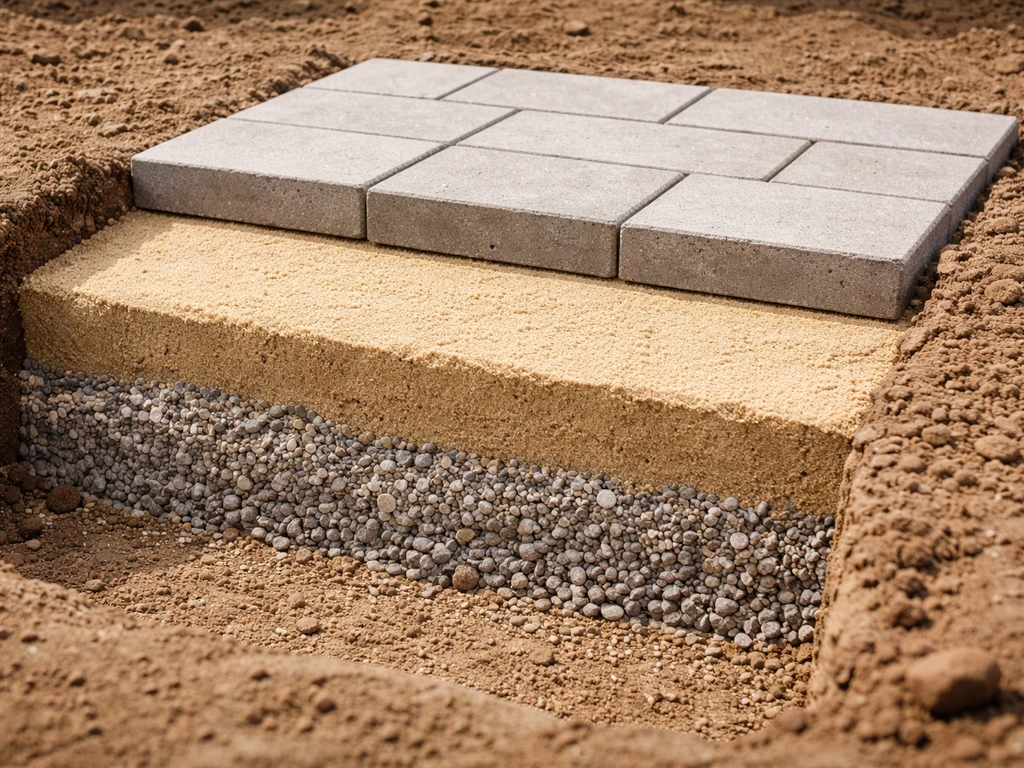
Layering, thickness, and compaction, done right
Here's the practical layering sequence for a standard dry-set patio. Excavate deep enough to hit undisturbed soil, then add your layer thicknesses back up: 4 inches of compacted base aggregate for a pedestrian patio on well-drained soil, 6 inches if you're in a freeze-thaw climate or have clay. Then 1 inch of uncompacted bedding sand, screeded flat. Then your stones. Total excavation depth is typically 7 to 9 inches below your intended finished surface, factoring in paver thickness (usually 2.375 to 3.5 inches for standard pavers).
Compaction is where DIYers cut corners and pay for it later. The subgrade needs to be compacted first, ideally to at least 95% modified Proctor density, which in practical terms means a plate compactor makes no visible impression and the soil doesn't deflect underfoot. Lay your base aggregate in 2- to 3-inch lifts, compacting each lift before adding the next. Don't dump 6 inches of gravel and compact it all at once: the bottom half won't be adequately compacted. Run the compactor in overlapping passes, and make a final pass with the plate compactor over the entire base before screeding sand.
Edge restraints have to go on before you screed your sand, not after. Scrape the bedding sand back at the perimeter so the restraint sits directly on the compacted base material. Soil backfill behind a restraint is never enough on its own: the restraint needs to be mechanically fastened to the base with spikes (typically 10-inch galvanized spikes at 12-inch intervals). An edge restraint sitting on top of sand will tip inward the first winter, spreading your patio and opening the joints.
Step-by-step installation and mistakes to avoid
- Mark out and excavate the area to the required depth (typically 7 to 9 inches below finished surface), including 6 inches beyond the patio edge on all sides for edge restraint anchoring.
- Compact the native subgrade with a plate compactor until it's firm and unyielding.
- Lay geotextile fabric on the subgrade if the soil is clay, silt, or soft, allowing it to extend up the sides of the excavation.
- Spread and compact the base aggregate in 2- to 3-inch lifts, checking for grade and slope (minimum 1 to 2% away from the house for drainage) after each lift.
- Install edge restraints on the compacted base perimeter, pinned with spikes, before touching the sand.
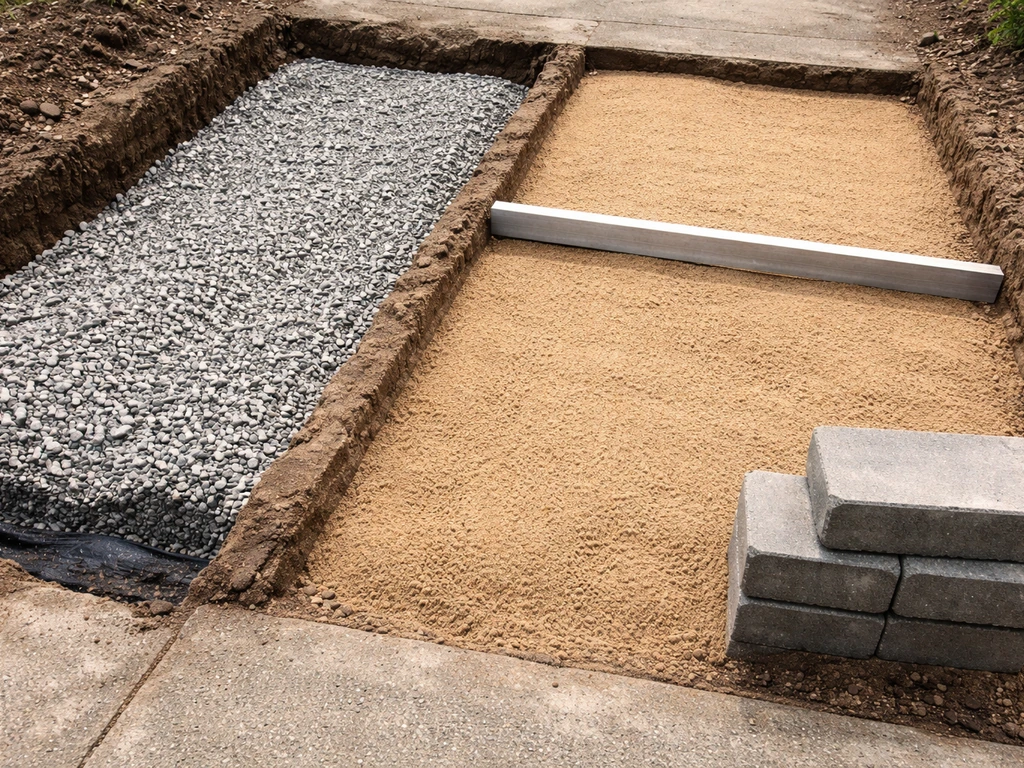
- Spread bedding sand and screed it to a consistent 1-inch depth using screed pipes as guides. Do not walk on screeded sand before laying stones.
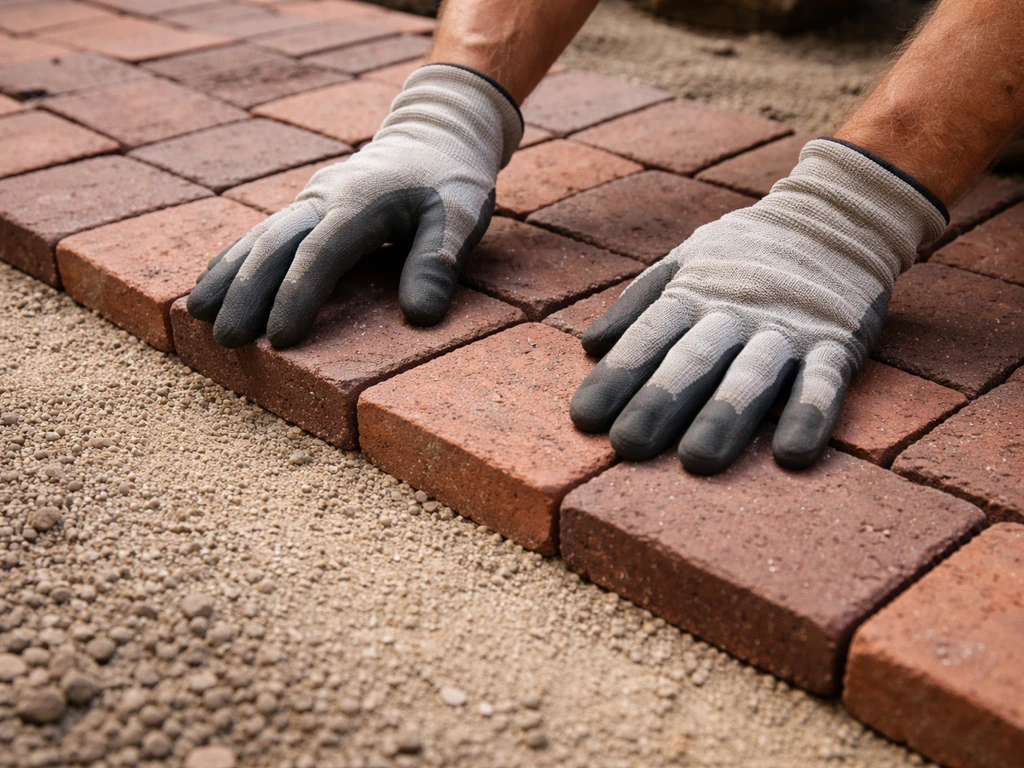
- Lay patio stones from one corner outward, butting joints tight and checking level as you go. Use a rubber mallet to seat each piece.
- Compact the finished surface with a plate compactor (use a rubber pad protector for natural stone) to drive stones into the sand bed and initiate interlock.
- Sweep jointing sand (plain coarse sand or polymeric sand) into joints, working diagonally. For polymeric sand, follow the manufacturer's wetting and curing instructions exactly. Fill joints so the sand sits roughly 1/8 inch below the top of the paver surface, not packed above it.
- Cover the perimeter area with geotextile fabric where bedding sand meets the edge restraint, to prevent sand migration.
Common failures and what actually causes them
- Rocking or sinking stones: almost always a base compaction failure or wrong bedding sand (too fine). The fix is lifting the affected stones, re-evaluating the base, and re-screeding with the right sand.
- Weeds through joints: usually means the joints were filled with plain sand that eroded and left space for seeds. Polymeric sand is the right long-term fix. Fabric under the base does very little for joint weeds.
- Water pooling: check that your patio still slopes 1 to 2% away from the house. Over time, settling in the center can reverse the slope. This is a base issue and requires lifting and re-grading the affected section.
- Frost heaving: inadequate base depth in a freeze-thaw climate, or a base material that retains water. In cold climates, 6 inches of clean, free-draining gravel is the minimum. Crusher run holds more moisture than clean crushed stone.
- Pumping fines: if you see fine soil appearing in your joints after rain, fines are migrating up through the base from the subgrade. This is a geotextile separation failure and means the base needs to be taken up and a separation fabric installed properly.
- Joint sand washout: a polymeric sand installation that failed is usually caused by wetting too aggressively, not allowing the sand to dry before rain, or using the wrong product for the joint width. Most polymeric sand is rated for joints up to 2 inches wide; wider joints need a different product or approach.
Keeping it performing year after year
Once a patio is installed correctly, maintenance is low-effort but not zero-effort. If you want the most stable surface, you still need to choose what to put between patio stones, and that usually comes down to sand or polymeric sand depending on how permanent you want the joints. The joints are the first thing to go. Plain sand washes out over one or two winters and needs annual topping up in early spring.
Polymeric sand lasts much longer, typically 5 to 10 years before it starts to crack and erode, but when it goes it needs to be removed and replaced properly. Don't just add new polymeric sand on top of old: scrape out the degraded joint material first, sweep in the new sand, and follow the wetting process carefully. Many polymeric sand failures are simply installation errors (wrong moisture level, rain before curing) and are completely avoidable on a redo.
Low spots that appear after the first winter or two are normal if the base wasn't fully settled before install. The fix is straightforward: lift the affected stones carefully with two flat-blade pry bars, add or remove bedding sand as needed, re-screed, and relay the stones. You don't usually need to touch the base unless the settling is severe or widespread. If you're finding large sections moving together, that's a base or subgrade problem and you'll need to excavate and re-compact.
Check your edge restraints every spring. Frost and soil movement can work spikes loose. A restraint that's started to tip or pull away from the base needs to be re-anchored before it takes the whole patio edge with it. Also inspect the perimeter geotextile if visible: if it's washed away or compressed, the bedding sand at the edges will start migrating and you'll see the outer pavers dipping inward.
One last thing that's easy to overlook: drainage around the patio, not just through it. Make sure the surrounding grade still directs surface water away from the paved area. Landscape changes, mulch buildup, or plant growth over time can dam water against the patio edge, keeping the base saturated and accelerating every kind of failure. A 10-minute check each spring can save a full reinstall later.
FAQ
Can I skip the gravel base and just put patio stones on sand or geotextile?
It depends on what you mean by “underlay.” If you’re talking about the full build up, you still need compacted aggregate base plus a correctly graded bedding sand layer. A foam or rubber sheet can sometimes work over very firm, level slabs or for lightweight applications, but it does not replace the structural load distribution and interlock you get from a compacted gravel base plus screeded sand.
Where exactly should geotextile fabric go under patio stones, and where should it not go?
Do not use fabric between the compacted base and the bedding sand if you want the layers to lock and drain predictably. A separator fabric under the base can be appropriate on soft clay or silty subgrades, but the base must still be compacted, and the sand must bed directly onto the aggregate.
What’s the most common bedding sand mistake that ruins a patio, and how do I avoid it?
If the bedding sand is fine or has too many fines, it will pump down and you’ll see rocking, sinking, or uneven joints. A practical check is to choose washed concrete sand with very low fines, and ensure it is screeded to a consistent thickness before relaying stones.
How do I adjust the underlay if I live in a freeze-thaw climate?
For frost-prone areas, a common upgrade is increasing compacted base thickness (for example, moving from a pedestrian minimum toward about 6 inches when you have clay or freeze-thaw conditions). You also want to keep water from accumulating at the edges, because trapped moisture accelerates heave even when the center looks fine.
Does the “best underlay” change if my patio stone is thin, like some tiles or irregular pavers?
Yes, but plan for joint and height behavior. For example, thinner stones or tiles concentrate point loads, so the base and bedding need to be tighter and sometimes thicker or more rigid depending on the stone type. If you’re installing porcelain or thinner tiles, a mortar-set or more rigid approach is often safer than a sand-only bed.
Should I use polymeric sand or plain sand, and how does that affect long-term stability?
Joint material affects stability, especially movement from freeze-thaw and thermal cycling. Plain sand is prone to washing out and needs topping up, while polymeric sand generally lasts longer, but it requires correct moisture during installation and must be removed and replaced when it degrades.
How can I tell whether a problem is fixable by re-leveling the sand, or whether I need to rebuild the base?
If the patio is moving as a whole section, the root cause is usually the subgrade or base not being fully compacted, not the surface sand alone. The practical decision point is: small isolated dips can be corrected by lifting and re-screeding bedding sand, but widespread shifting typically requires excavation and re-compaction.
What’s the right way to schedule installation if rain is possible?
You usually do not need to wait forever, but you should not rain on polymeric sand before it cures. The practical approach is to follow the product’s wetting and timing steps, and choose installation conditions when you can control exposure to rain for the curing window.
Why do patios sometimes fail even when the underlay layers were installed correctly?
Yes. The effective underlay system assumes the surrounding grade drains away from the patio. If landscaping changes, mulch piles, or plantings dam water at the perimeter, the base can stay saturated and fail faster, even if the stone layering is correct.
What’s the biggest edge-related mistake that causes patios to spread?
Edge restraints should sit on compacted base, not on bedding sand. If you skip scraping sand back at the perimeter and anchor restraints to the base, the edge can tip inward after freezing or traffic, spreading the patio and opening joints.
My patio has low spots after winter, what should I fix first?
If you see dips after winter, start with the most likely layer. For localized low spots, lift only the affected stones, adjust bedding sand by adding or removing, then re-screed and relay. If settlement is broad, investigate base and subgrade compaction before adding more sand.