For most homeowners, porcelain pavers or natural flagstone are the best outdoor patio flooring materials, but which one wins depends entirely on your climate, budget, and how much upkeep you're willing to do. In a freeze-thaw climate, dense porcelain pavers pull ahead because they absorb almost no water, which means virtually zero risk of cracking or heaving when temperatures drop. In mild, dry climates, flagstone and brick are hard to beat for beauty, repairability, and that timeless look. Gravel is the cheapest path to a usable patio. Composites work best on raised deck-style structures. Read through this guide and you'll know exactly which material belongs in your backyard.
Best Material for Outdoor Patio Flooring: Top Picks

Nolan Ellison
20 Jun 2026
How to choose the best patio flooring for your climate and use
Before you look at a single material, nail down the conditions your patio has to survive. Before you commit, it helps to compare what is the best surface for a patio based on climate, drainage, and slip resistance. Climate is the single biggest filter. If your region sees hard freezes, even occasionally, any porous material that soaks up water will eventually crack, spall, or heave as that water expands underground and inside the stone itself. Water pooling under or within a porous surface before a freeze is the primary driver of freeze-thaw damage, so drainage and material density matter enormously.
After climate, think about use. A patio where kids and dogs run around in wet weather needs real slip resistance. The industry wet traction benchmark for tile is a wet Dynamic Coefficient of Friction (DCOF) of 0. The Home Depot tile/spec PDF also explains that the reference wet COF benchmark was updated to a wet DCOF of 0.
42, replacing an older 0. 60 wet benchmark, in the ASTM C1028 context [wet Dynamic Coefficient of Friction (DCOF) benchmark of 0. 42](https://www. homedepot.
com/catalog/pdfImages/ce/cea7536f-196f-4953-bb4f-e559d3f76abd. pdf). 42 or greater, per ANSI/TCNA standards. Outdoor and poolside applications often demand even higher ratings like R11 or R12 on the European Ramp Test scale.
For accessible routes and transitions, the ADA recommends a maximum running slope of 1:20 (5%), so if your patio steps down to a lawn or pathway, that edge detail needs planning.
Here are the key questions to answer before you choose a material:
- Does your area freeze? If yes, skip highly porous materials like sandstone and unsealed brick unless you're prepared to manage them carefully.
- How much rain or humidity do you get? High moisture means algae and biofilm are a real slip risk on smooth surfaces.
- Will the patio be in full sun? Dark stone and porcelain can get painfully hot underfoot in summer.
- What's your realistic maintenance commitment — once a year, or do you want to forget about it?
- Do you need a DIY-friendly install, or are you hiring a contractor?
- What's your all-in budget: materials plus installation?
Once you've answered those, the right material usually becomes obvious. The sections below will confirm or challenge your instinct.
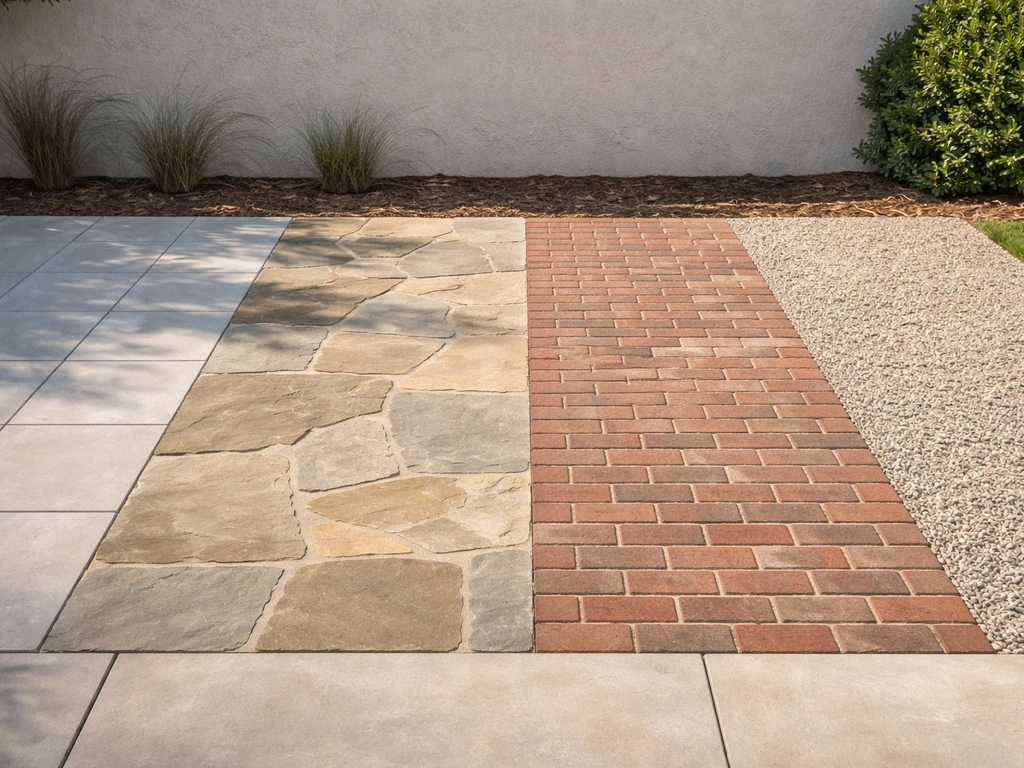
Top outdoor patio flooring materials and when each wins
Porcelain pavers
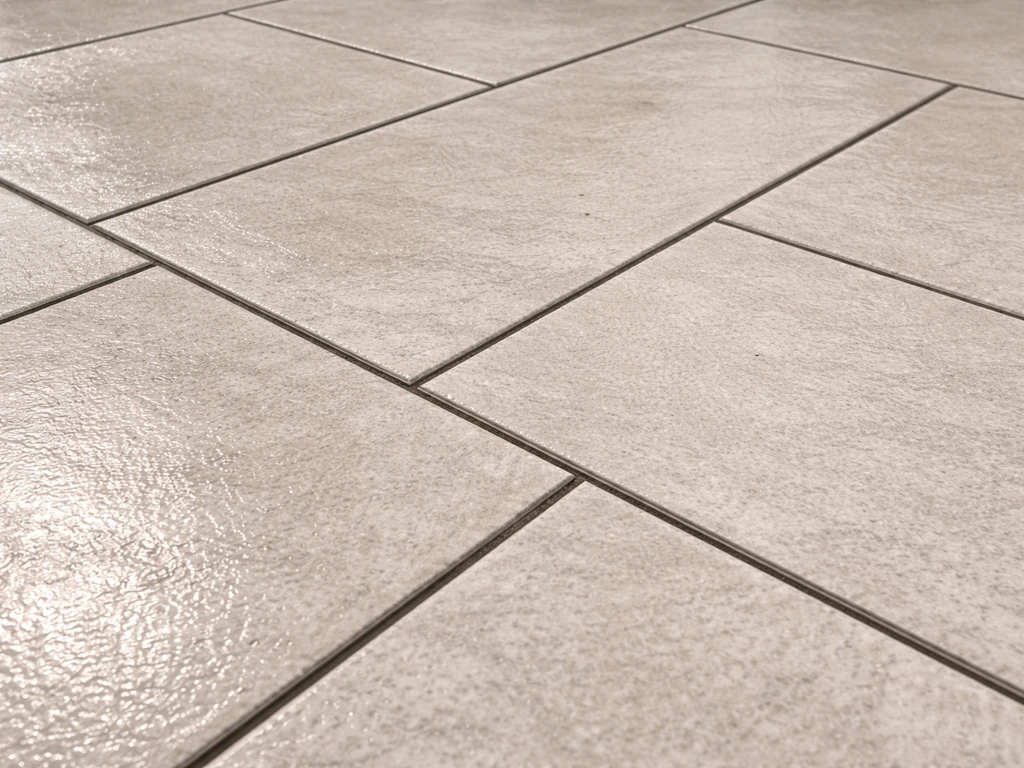
Porcelain pavers are the strongest all-around performer right now, and they've earned that reputation. They're fired at very high temperatures, which makes them extremely dense and water-resistant, water absorption is typically below 0. 5%, which is why they handle freeze-thaw cycles better than almost any natural stone. A quality outdoor porcelain paver can achieve wet static COF values in the 0.
50 to 0. 60 range, comfortably above the 0. 42 DCOF minimum. They come in massive formats (24x24 inches and larger), realistic stone and wood looks, and consistent coloring that doesn't fade fast.
The trade-off: they're heavy, they need a solid base, cuts require a wet saw, and cheaper versions can chip at the edges if they're thin. Budget for 20mm (about 3/4 inch) thick pavers for outdoor use, thinner formats are interior products that don't belong outside.
Flagstone
Flagstone, typically bluestone, limestone, or slate cut into irregular or sawn pieces, has a natural beauty that's genuinely hard to replicate. It's the right choice for a naturalistic or traditional landscape, and individual stones can be lifted and reset if they shift, making repairs straightforward. The catch is freeze-thaw performance. I've seen dry-laid flagstone patios where stones were seesawing by spring because moisture collected underneath and froze, lifting the stones and then dropping them back down unevenly.
If you're in a cold climate and want flagstone, you either need a well-drained base and low-absorption stone (bluestone absorbs less than sandstone), or you mortar-set it on a reinforced concrete slab. Dry-set flagstone on a sand-and-gravel base is a reasonable DIY project in mild climates; mortar-set on concrete is a job for someone who's done it before.
Natural stone (limestone, travertine, slate, sandstone)
Natural stone is a broad category, and the differences between types are dramatic. Slate and dense bluestone are tough and relatively impermeable. Travertine is elegant but porous, it has natural voids that trap water and debris, needs filling and sealing, and will deteriorate in freeze-thaw conditions unless treated meticulously. Sandstone is the riskiest choice in cold or wet climates: high-absorption sandstones can deteriorate rapidly when freeze-thaw cycles drive water into the stone repeatedly. In a warm, dry climate with shade, though, sandstone is beautiful and surprisingly durable. Always ask for the water absorption rating of any natural stone before buying, under 3% is safe for most climates, and under 1% is what you want in hard freeze zones.
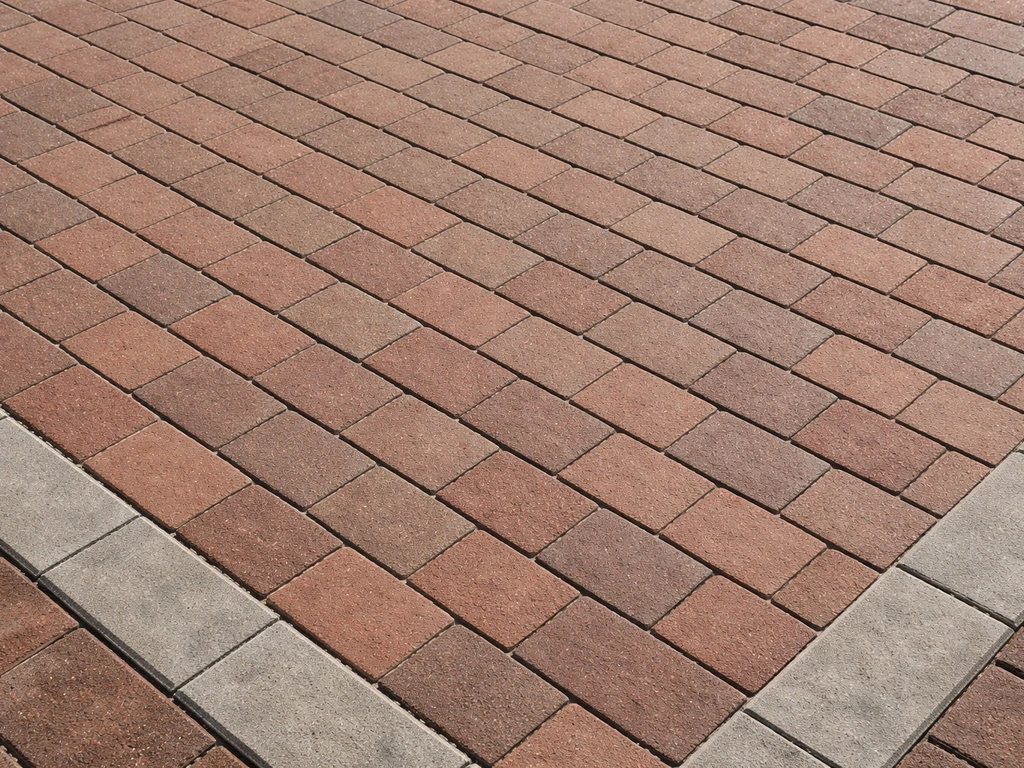
Brick pavers
Brick is warm, classic, and excellent for traditional homes. It dry-lays easily, individual units are cheap to replace, and it gets better-looking as it ages in the right conditions. The problem areas: some brick absorbs water readily, which means freeze-thaw spalling and efflorescence, that white salt crust, are real risks. Efflorescence happens when moisture moves through porous masonry, dissolves soluble salts, and deposits them on the surface as it evaporates.
Paver Sealer Store states that efflorescence on pavers is generally caused by moisture moving soluble salts to the surface where crystallization leaves a white residue moisture moves soluble salts to the surface. In a wet climate, this can be persistent. Buy pavers rated SX (severe weathering) if you're in a freeze-thaw region, and seal them every few years.
In mild, dry climates, brick is a great low-cost, high-charm option.
Gravel and decomposed granite
Gravel is the cheapest material to install, drains brilliantly (which is a genuine advantage in wet climates), and can look great in the right landscape style. The real downsides: it shifts underfoot, it's uncomfortable to walk barefoot, furniture legs sink in, and it migrates out of the defined area without solid edge restraints. Decomposed granite compacts better and stays put more reliably, but it still needs re-topping every few years in high-traffic areas. Gravel works best as a filler between stepping stones, in a low-traffic corner, or as a budget starting point in a space you'll upgrade later.
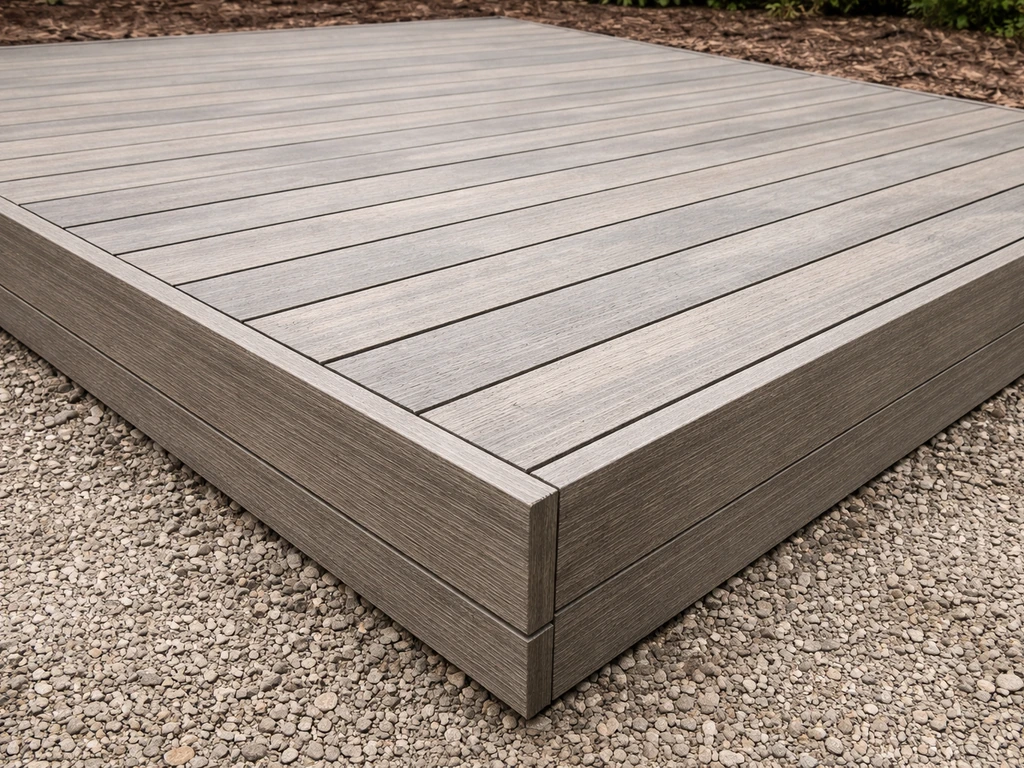
Composite decking and panels
Composite materials, wood-plastic blends, are really a decking solution rather than a ground-level patio surface, but plenty of homeowners use them on low-profile raised platforms. Quality composites resist splintering, warping, and fading better than natural wood, and routine cleaning keeps them looking good for years. The slip concern is real, though: algae and biofilm can form on the surface in shady or wet conditions, reducing traction. Anti-slip strips are available and worth using on steps and high-traffic sections. Composites are not ideal laid directly on grade, they need a framed substructure with airflow underneath to prevent moisture trapping and decay of the frame itself.
Material comparisons by cost, durability, slip resistance, and maintenance
| Material | Installed Cost (per sq ft) | Durability | Slip Resistance (Wet) | Freeze-Thaw Performance | Maintenance Level | Repairability |
|---|---|---|---|---|---|---|
| Porcelain Pavers | $15–$30+ | Excellent | Good–Excellent (DCOF 0.50–0.60+ for textured) | Excellent (low absorption) | Low | Moderate (cuts needed) |
| Flagstone | $15–$30 | Good–Very Good | Moderate (varies by finish) | Fair–Good (depends on stone type and base) | Moderate | Easy (lift and reset) |
| Natural Stone (travertine/limestone) | $20–$40+ | Moderate–Good | Moderate (needs texture) | Poor–Fair (porous types) | High | Moderate |
| Brick Pavers | $10–$20 | Good | Moderate | Fair (SX-rated brick needed) | Moderate | Easy (replace units) |
| Gravel/DG | $2–$8 | Low | Low (unstable surface) | Excellent (drains freely) | Low–Moderate | Easy (add material) |
| Composite Decking | $20–$40+ (with framing) | Good | Moderate (algae risk) | Good (if framed correctly) | Low–Moderate | Moderate |
Cost ranges above reflect typical installed prices in 2025-2026 and include basic labor. Complex patterns, large-format tiles, or sloped sites add cost. Porcelain and high-end natural stone are at the top of the budget range but earn it back through longevity and low upkeep. Brick and gravel give you the most value at the lower end. If budget is the main driver, the cheapest patio flooring options like gravel and basic concrete pavers can get you a functional surface fast, with the option to upgrade later.
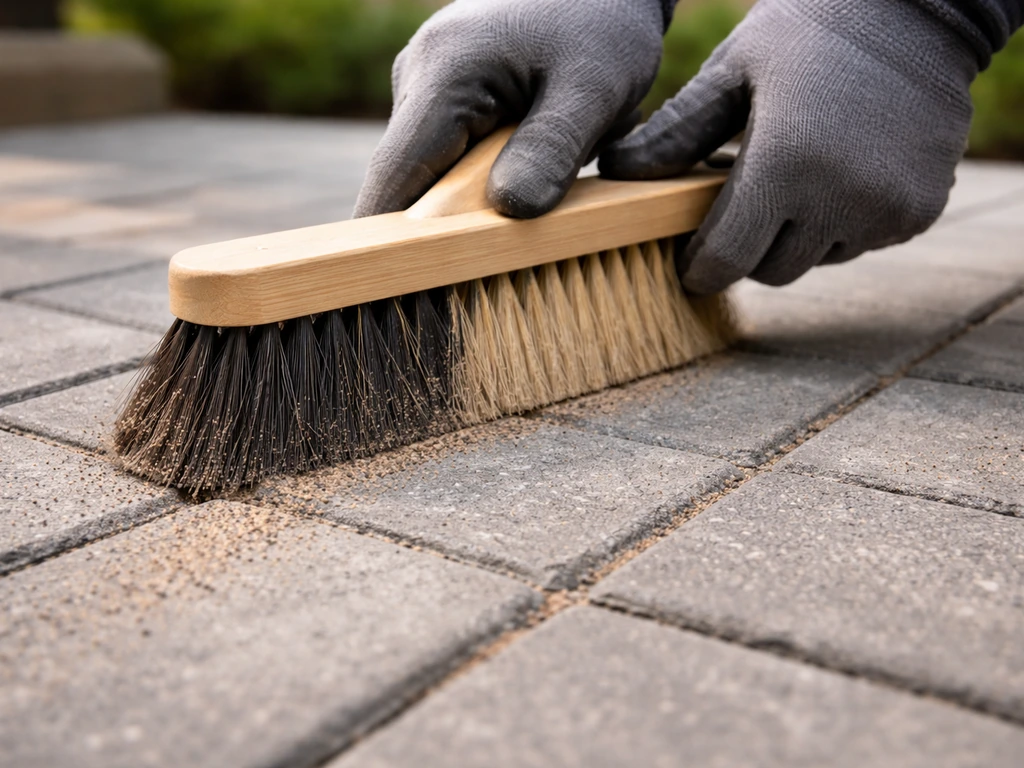
Installation considerations: base prep, drainage, and finishing details

The base is where most patio failures start. A beautiful patio laid on a poorly prepared base will crack, settle, and heave. No material compensates for bad groundwork.
Base depth and compaction
For a standard pedestrian patio using interlocking pavers, the ICPI (Interlocking Concrete Pavement Institute) standard calls for a minimum 4-inch compacted gravel base in stable, well-drained soil. In freeze-thaw climates or areas with poor drainage, go 6 to 8 inches. A typical build-up looks like this: 4 inches of compacted crushed stone base, 1 inch of bedding sand, then the paver layer (usually 2-3/8 inches for standard concrete pavers). Compact the gravel base in 2-inch lifts using a plate compactor, don't just dump it all in and compact once. The surface should slope away from the house at roughly 1 to 2 percent (about 1/8 inch per foot) for drainage.
Mortar-set vs. dry-lay
Dry-laying (sand-set) is forgiving, DIY-friendly, and allows the surface to flex slightly with freeze-thaw movement without cracking. It's the standard method for brick pavers, concrete pavers, and informal flagstone patios. Mortar-setting on a concrete slab gives you a more rigid, formal result and is required for large-format porcelain pavers, which are too stiff and heavy to flex in a sand bed. For mortar-set porcelain outdoors, use a latex-modified thin-set mortar rated for exterior use, and install exterior-grade grout with properly sized expansion joints, typically every 8 to 12 feet and at any change of plane. Skipping expansion joints is the number-one mistake on mortar-set outdoor tile jobs: when the slab moves with temperature changes, the surface cracks without relief joints.
Edge restraints and drainage
Edge restraints keep pavers from spreading laterally over time. Plastic paver edging spiked into the ground works fine for most installations. Concrete curbs or soldier-course bricks mortared in place are more permanent and look better at visible edges. Make sure water has somewhere to go, either a slight slope to a lawn, a drain, or a permeable base like gravel that allows infiltration. Never let water pool against a house foundation. If you're building near an accessible entrance, check that your patio-to-threshold transition doesn't create a slope steeper than 1:20 (5%) on the accessible route.
Grouting, jointing, and sealing
For mortar-set tile and stone, grout the joints once the mortar has cured (typically 24 to 48 hours depending on conditions). Polymeric sand is the go-to jointing material for dry-laid paver joints, it sets firm when wet, resists ants and weeds, and locks pavers together better than regular sand. Once jointing is done and everything has cured, consider sealing. Sealing is not mandatory for porcelain (which is already dense), but it's highly recommended for natural stone, brick, and concrete pavers. A penetrating silane-siloxane sealer reduces water absorption, inhibits efflorescence, and makes cleaning easier. Reapply every 2 to 5 years depending on exposure and traffic.
Maintenance and long-term care for common patio materials
How long your patio looks good and stays safe depends more on maintenance habits than on the material itself. Here's what each material actually needs:
Porcelain pavers
Porcelain is about as close to maintenance-free as outdoor paving gets. Sweep regularly and wash with water and a pH-neutral cleaner once or twice a year. Because the surface is so dense, stains don't penetrate easily. You don't need to seal porcelain, though a topical sealer can make cleaning easier in greasy cooking areas. Watch for algae in shaded, damp spots, a diluted bleach solution or a specialist patio cleaner clears it quickly. Keeping the surface clean is also the most effective way to maintain slip resistance, since biofilm is what makes smooth surfaces truly dangerous when wet.
Flagstone and natural stone
Sweep debris off regularly to prevent moisture retention and staining. Re-seal every 2 to 3 years with a penetrating stone sealer. In freeze-thaw climates, inspect the installation each spring for heaved or settled stones and reset them before they become trip hazards. Efflorescence, the white salt deposits that appear on stone and brick, can be scrubbed off with a dilute white vinegar or purpose-made efflorescence remover, then rinsed thoroughly. The key to preventing efflorescence long-term is reducing moisture infiltration: good drainage, proper sealing, and filling any cracks that let water in.
Brick pavers
Brick needs resealing every 2 to 4 years to stay protected against moisture and the efflorescence cycle. Power washing is effective for general cleaning but don't use too high a pressure, it can erode mortar joints and the surface of softer bricks over time. Replace individual cracked or spalled bricks as soon as you spot them: one failed unit accelerates moisture intrusion into neighboring units. Keep joints filled with polymeric sand to prevent water from sitting in open cracks over winter.
Gravel and decomposed granite
Rake regularly to redistribute material that's migrated from foot traffic. Add fresh gravel or DG every few years to top up areas that have compacted or spread. Check and reinforce edge restraints annually, this is where gravel installations always fail first. Decomposed granite benefits from a light wetting and compacting treatment when it gets loose.
Composite decking
Sweep and wash composites twice a year with a composite-safe deck cleaner. Check for algae and biofilm regularly, these are the main source of slip risk. Anti-slip strips on steps and transitions are cheap insurance. Inspect the subframe annually for moisture damage, especially at the ledger board attachment and any posts in ground contact.
Sourcing and build tips: samples, codes, permits, and contractor guidance
Always get samples before you buy
Order physical samples of any stone, paver, or tile you're considering and look at them outside in natural light, wet and dry. Colors shift dramatically between showroom lighting and afternoon sun. Check the surface texture of any tile: run a wet finger across it and see whether it grips. If it feels slick when wet, it's not suitable for an outdoor patio regardless of what the spec sheet says.
Permits and local codes
Most ground-level patios don't require a building permit, but rules vary by municipality. Check with your local building department before you start if your patio is attached to the house, elevated above grade, or exceeds a certain square footage (thresholds vary but 200 square feet is a common trigger). HOAs often have additional restrictions on materials, colors, and coverage ratios. If your patio connects to an accessible entrance, slope and transition requirements under ADA guidelines apply, the 1:20 maximum running slope is a real constraint that affects how you detail that edge.
Questions to ask a contractor
- What base thickness and material do you use for this soil type and climate?
- Are you using a polymeric sand or mortar joint, and why?
- Where will you place expansion joints, and what detail do you use at the house wall?
- What sealer do you recommend for this material, and is it included in the quote?
- Can I see a recently completed project with this material?
- What's your process if a stone or paver cracks or shifts in the first year — is that covered?
- Do you pull any necessary permits, and is that included?
Sourcing smart
Buy from a supplier who can tell you the water absorption rate and DCOF rating of any tile or stone, if they can't answer those questions, find a different supplier. To narrow down the best patio floor material for your conditions, prioritize low water absorption and the right slip resistance ratings water absorption rate. For porcelain, look for products labeled for outdoor use with a minimum 20mm thickness for ground-level patios.
For natural stone, buy from a yard that lets you hand-select pieces if you're doing flagstone, so you get consistent thickness and no hairline fractures. For brick, confirm the weathering grade: SW (severe weathering) or SX (severe exposure) for any freeze-thaw climate. Ordering 10% more than your calculated area is standard practice, you'll need it for cuts, breakage, and future repairs.
If you're still working out your material shortlist, it's worth thinking about what kind of surface finish and safety profile you need for your space. Non-slip performance in particular is worth digging into before you commit to any smooth-surface tile or stone, it's one of those details that's easy to overlook in a showroom but very hard to fix after installation. To get the best non slip patio flooring, focus on traction when wet and choose materials that resist algae and biofilm buildup non-slip performance.
FAQ
What’s the single best choice if I want the lowest long-term maintenance for an outdoor patio?
Porcelain pavers are usually the best fit when you want to minimize upkeep, they generally do not need sealing, they resist staining because water absorption is typically under 0.5%, and they also hold up well in freeze-thaw areas. The one maintenance task to plan for is algae control in shady corners, regular washing prevents biofilm from reducing traction.
Do I need to seal porcelain pavers or tiles?
Typically no. Porcelain is already dense and water-resistant, so sealing is optional. If you do add a product, choose a cleaner-friendly topical sealer for easier grease removal, but avoid coatings that change texture, some surfaces become more slippery when wet.
How can I tell if a natural stone will survive freeze-thaw in my area?
Ask for the water absorption rating before buying. As a rule of thumb from the field, under 1% is what you want in hard freeze zones, under 3% can work for many climates. Also verify the stone type, bluestone is generally safer than high-absorption sandstone, and travertine needs extra treatment because it is naturally more porous.
Is dry-set flagstone always DIY-friendly?
It can be in mild climates, but it becomes risky when freeze-thaw is possible, the problem usually comes from moisture collecting underneath and lifting stones. For cold regions, plan either a well-drained, properly engineered base plus low-absorption flagstone, or mortar-setting on a reinforced concrete slab (which is less forgiving to do incorrectly).
What’s the most common installation mistake that causes outdoor tile or pavers to fail?
Skipping expansion joints on mortar-set outdoor tile is the big one. When the slab moves with temperature changes, the surface can crack without those joints to provide a relief point. Use exterior-rated thin-set mortar and grout, and follow a joint spacing plan, typically every 8 to 12 feet and at changes of plane.
How thick should porcelain pavers be for an outdoor, ground-level patio?
Aim for about 20 mm (roughly 3/4 inch) for exterior use. Thinner “porcelain tile” products are often meant for interior floors, they are more prone to edge chipping and damage after freeze-thaw and repeated foot traffic.
My patio gets wet and is a safety concern, what should I look for beyond the material type?
Check slip testing numbers and surface behavior when wet. For tile and similar surfaces, the wet DCOF threshold is commonly 0.42 or higher, and poolside conditions often require higher ratings. Also consider texture and algae risk, even a high DCOF surface can become hazardous if biofilm builds up in shade.
Are composite deck boards safe for a ground-level patio?
They are usually not ideal if laid directly on grade because they need airflow underneath to avoid moisture trapping and frame decay. They can work on raised, framed platforms, and you should plan for algae control in damp or shaded areas, add anti-slip strips where people walk frequently.
What’s the right base thickness if my yard has poor drainage or frequent freezes?
If you are in freeze-thaw conditions or drainage is weak, you typically need a thicker compacted gravel base than the basic standard. Plan on 6 to 8 inches of compacted crushed stone for those cases, plus the correct bedding layer, and compact in lifts using a plate compactor.
How do edge restraints affect long-term patio performance?
They prevent lateral spreading and settlement, which is a common failure mode for gravel and unrestrained paver layouts. Recheck edge restraints annually, especially after winter, and make sure water has a path to drain away from the patio rather than pooling at the perimeter or near foundations.
What’s the best way to reduce efflorescence risk on brick patios?
Control moisture movement. Use weathering-rated brick for your region (SX or SW in freeze-thaw climates), seal with a penetrating sealer at the right interval, and keep joints properly filled so water does not sit in cracks. If efflorescence appears, clean it promptly and address the underlying moisture infiltration.
Do I need a building permit for an outdoor patio?
Often no for small, ground-level patios, but rules vary by municipality and factors like attachment to the house, elevated sections, and total square footage can trigger permits. It’s smart to confirm before building since the allowable slope and accessible-route details can also affect layout near entrances.
How much extra material should I order for cuts and repairs?
Ordering about 10% more than your calculated area is standard. This buffer helps for cutting waste, breakage during installation, and future replacement of individual units if a stone, tile, or brick is damaged.
Can I choose materials by just looking at samples in a showroom?
No, appearance changes with lighting and whether surfaces get wet. Order physical samples and view them outdoors in natural light, test wet grip by running a wet finger across textured areas, and reject anything that feels slick when wet even if the color looks great.