Concrete pavers are the best all-around patio flooring for most homeowners: they're durable, freeze-thaw resistant, relatively affordable, and forgiving to install and repair. But if you have a specific look, climate, or budget in mind, flagstone, porcelain tile, brick, natural stone, gravel, or composite decking might serve you better. The honest answer is that the best patio flooring is the one that matches your actual conditions, and this guide walks you through exactly how to figure that out.
Best Patio Flooring: Top Options by Climate and Budget

Nolan Ellison
3 May 2026
Quick recommendation by scenario
Before diving into the full material breakdown, here's the fast version. If you recognize your situation in one of these, you already have your answer. If you want a simple way to start, match your choice to your climate, drainage, and slip needs rather than a showroom look best surface for a patio.
| Your situation | Best pick | Why |
|---|---|---|
| Tight budget, DIY install | Gravel or concrete pavers | Lowest material cost, easiest to self-install with basic tools |
| Cold climate with hard freezes | Concrete pavers or brick | Tolerate freeze-thaw cycles without cracking when set on proper base |
| Hot, sunny climate (AZ, TX, FL) | Light-colored porcelain tile or flagstone | Reflects heat better than dark stone; flagstone stays cooler underfoot |
| Kids and pets in constant use | Concrete pavers or brick | Slip-resistant texture, easy to hose down, replaceable if one cracks |
| High-end look, modern aesthetic | Large-format porcelain pavers | Clean lines, low maintenance, huge range of looks including wood and stone finishes |
| Rustic or natural garden setting | Flagstone or natural stone | Blends with landscaping, no two pieces look the same |
| Poolside or wet area | Textured porcelain tile | Purpose-built slip ratings available, drains well, resists chlorine and moisture |
| Deck-style feel without the wood rot | Composite decking (WPC boards) | Warmest underfoot, most popular choice in 2025, zero splinter risk |
How the main materials actually compare
Every material has a legitimate use case and a situation where it fails. Here's an honest side-by-side look at the six options worth considering for most residential patios.
| Material | Look | Slip resistance | Heat retention | Durability | Freeze-thaw | Drainage/permeability | DIY-friendly |
|---|---|---|---|---|---|---|---|
| Concrete pavers | Clean, uniform, many finishes | Good (textured) | Moderate | Excellent (50+ yrs) | Excellent | Permeable options available | Yes |
| Flagstone | Natural, irregular, rustic | Good when rough | Low-moderate | Excellent (natural stone) | Good with dry-set | Good (gaps allow drainage) | Moderate |
| Porcelain tile/pavers | Modern, sleek, versatile | Excellent (rated tiles) | High (dark colors) | Excellent (resists stain/fade) | Good if rated for outdoor use | Poor (solid surface) | No (pro recommended) |
| Brick | Classic, warm, timeless | Very good (texture) | Moderate | 50–100+ yrs | Good (quality brick) | Permeable gaps possible | Yes |
| Natural stone (slate, travertine, bluestone) | Premium, unique | Varies by finish | Moderate-high | Very good | Fair (some stone cracks) | Depends on setting | Moderate |
| Gravel/crushed stone | Casual, garden-like | Poor (unstable surface) | Very low | Needs replenishment | Excellent | Best of all options | Yes (easiest) |
| Composite decking (WPC) | Wood-look, modern | Good (grooved boards) | Low (stays cooler) | 25–30 yrs | Excellent | Gaps between boards | Moderate |
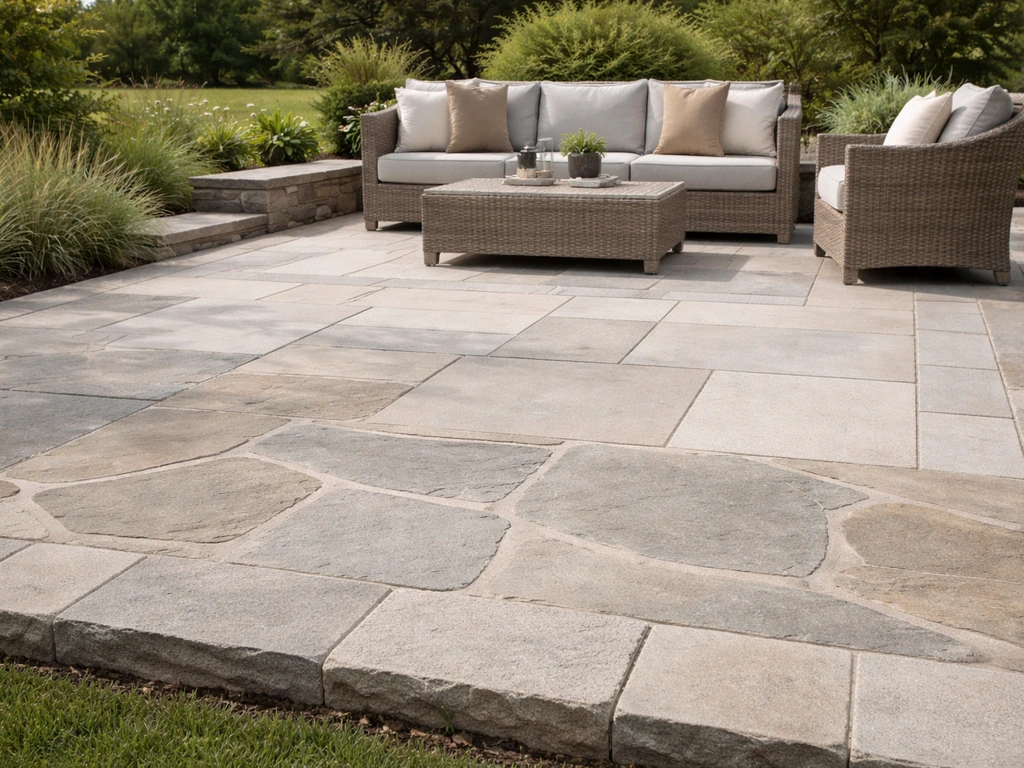
Flagstone
Flagstone is one of the most visually satisfying options if you want a natural, organic look. It works beautifully in garden settings and pairs well with perennial borders and rustic furniture. The irregular shapes can be a challenge to set level, though, and if you're mortar-setting it you need a rigid concrete base beneath. Dry-set flagstone (set in compacted gravel and sand) handles freeze-thaw better because the stones can shift slightly without cracking.
The gaps between pieces need attention: either fill them with polymeric sand, low-growing ground cover, or gravel to prevent weeds and keep the surface stable. One thing to know: very smooth-cut flagstone can get slippery when wet, so if you're in a rainy climate, look for pieces with a naturally rough cleft face.
Porcelain tile and large-format pavers

Porcelain has exploded in popularity, and for good reason. Modern large-format porcelain pavers (think 24x24 or even 24x48 inches) give you a high-end, seamless look that's genuinely low maintenance. They don't absorb water, won't stain from grease or wine, and they're frost-resistant when rated for outdoor use (check for a PEI rating of 4 or 5 and a freeze-thaw certification).
The catch is installation: porcelain requires a very flat, rigid base, precise cuts with a wet saw, and flexible tile adhesive with matching grout or butt-joint laying. This is a job most homeowners should hire out unless they have solid tile experience. Also, dark-colored porcelain can get very hot in direct sun, so if you're in a hot climate, go light or choose a matte finish.
Brick
Brick is one of the most underrated patio flooring choices. It's been around for centuries because it genuinely works: naturally textured surface for grip, excellent durability, and a warm aesthetic that suits almost any architectural style. For patios, always use paving brick (not standard wall or facing brick), which is denser and rated for ground contact and freeze-thaw. Brick can be dry-set on a compacted gravel and sand base or mortared onto concrete. Dry-set is more forgiving and easier to repair. The main downside is that brick can grow moss in shaded, damp climates, which requires periodic cleaning, and the earthy red color isn't for everyone.
Natural stone (slate, travertine, bluestone)
Natural stone is in the premium tier in both looks and cost. Bluestone is a popular choice for formal patios in the Northeast: it's dense, takes a nice edge, and holds up well to cold winters. Travertine is gorgeous but porous, which means it needs sealing and can feel rough underfoot if the pores aren't filled. Slate is beautiful but can delaminate in harsh freeze-thaw climates. Whatever natural stone you choose, always check its water absorption rating and confirm it's suitable for your climate before buying. Natural stone is also where sourcing matters most: thickness can vary, and inconsistent thickness makes installation much harder.
Gravel and crushed stone
Gravel is the cheapest and fastest patio surface to install, and it's genuinely good in the right situation. If you’re trying to find the cheapest patio flooring, gravel is usually the first option to compare, as long as it fits your comfort and foot-traffic needs. It drains perfectly (a real advantage in wet climates or areas with drainage problems), it never cracks, and it's easy to add or rearrange.
The downsides are real, though: it's uncomfortable to walk on barefoot, furniture legs sink in or wobble, it scatters, and it's tough for kids to play on. I'd recommend gravel mainly as a filler between stepping stones, a border material, or a surface in a low-traffic garden area rather than as a primary entertaining patio surface.
Composite decking (WPC)
Composite decking was cited as the most popular patio flooring choice in 2025, with about 46% of homeowners choosing it, and that tracks with what I see in outdoor living projects. Wood-plastic composite (WPC) boards give you the warm, comfortable feel of wood without the rot, splinters, or annual sealing routine. They stay cooler underfoot than stone or tile, which is a genuine comfort advantage in hot climates.
The trade-off: composite needs a proper subframe (pressure-treated joists or a sleeper system over a concrete slab), so it's not the simplest install. It also doesn't handle standing water as well as permeable stone options, so drainage underneath the structure matters. Lifespan is typically 25 to 30 years with minimal maintenance beyond occasional cleaning.
How climate and site conditions change everything
The single biggest mistake homeowners make is picking a material based on how it looks in a showroom without accounting for where they actually live. I've seen beautiful travertine patios crack apart after one brutal Minnesota winter, and I've seen perfectly installed porcelain patios become a slip hazard in a rainy Pacific Northwest yard. Here's how to filter your choices by climate and site.
Freeze-thaw climates (USDA zones 3-6)
If your ground freezes in winter, water infiltration and heaving are your enemies. Any material set in mortar on a non-insulated slab is vulnerable because the ground moves and the mortar doesn't. The most resilient approach in cold climates is dry-setting pavers, brick, or flagstone on a deep, well-compacted gravel base (typically 6 to 8 inches) with a sand setting bed.
Unilock’s slope installation guide specifies a 1-inch bedding course over compacted gravel base and notes using polymeric sand in joints to help prevent joint erosion and weed germination on sloped applications using a sand setting bed over a deep, well-compacted gravel base on a slope.
A spec for ICPI interlocking concrete pavements describes them as flexible pavements built over a compacted soil subgrade with a compacted aggregate base, and it provides typical thickness guidance such as about 4 to 6 inches for walks and 6 to 8 inches for driveways ICPI interlocking concrete pavements over a compacted soil subgrade with a compacted aggregate base.
This allows minor movement without cracking. If you love the look of porcelain or natural stone, use a flexible adhesive rated for exterior freeze-thaw use and install over a concrete slab with control joints. Avoid porous stones like travertine in freeze-thaw zones unless they're sealed religiously every one to two years.
Hot, sunny climates (zones 8-11)
In the South and Southwest, heat retention is the comfort problem. Dark stone, dark concrete, and dark porcelain can reach 140 to 160°F in direct sun, making them genuinely dangerous to walk on barefoot. Choose light-colored materials: cream or buff flagstone, light-colored concrete pavers with a brushed finish, or matte white/light gray porcelain. Composite decking stays significantly cooler than stone in these climates. Also consider how well your surface drains during sudden heavy rainstorms common in TX and FL: permeable pavers or gravel-jointed flagstone handle flash drainage better than solid tile.
Wet, rainy climates (Pacific Northwest, Southeast)
Slip resistance becomes the priority when surfaces are wet much of the year. If you want the best non slip patio flooring, prioritize a finish designed for wet traction and confirm the friction rating before you buy. Check the DCOF (Dynamic Coefficient of Friction) rating on any tile or porcelain you're considering: for outdoor wet areas, look for a DCOF of 0. 42 or higher.
Textured, cleft-face, or brushed finishes are safer than polished or honed surfaces. Drainage matters too: a slight slope of at least 1/8 inch per foot away from the house prevents pooling. In the Pacific Northwest, moss and algae growth on shaded stone or brick is common; budget for an annual cleaning with a diluted bleach solution or oxygen-based cleaner.
Site-specific drainage and soil conditions
Before you pick a material, look at what the ground actually does when it rains. If water pools in your yard for hours, you likely have clay-heavy soil with poor drainage. In that case, a permeable paving system (open-jointed pavers with gravel fill, or gravel itself) will serve you much better long-term than a solid impermeable surface that just moves the drainage problem to the edges. Also, if you have large tree roots nearby, avoid mortared surfaces entirely: roots will lift and crack them within a few years.
Sub-base, drainage, and installation basics for each material
The sub-base is where most patio failures actually start. A beautiful surface set on a poorly prepared base will crack, sink, shift, and develop drainage problems within a few years. Here's the minimum you need to know for each material type.
Dry-set pavers, brick, and flagstone

- Excavate to the right depth: typically 8 to 10 inches below finished grade (6 inches of compacted gravel base plus 1 inch of bedding sand plus the thickness of your material).
- Compact the subgrade soil with a plate compactor before adding any base material.
- Add compactable gravel (road base or 3/4-inch crushed stone) in 2- to 3-inch lifts and compact each lift thoroughly.
- Spread a 1-inch layer of coarse bedding sand (not mason's sand) and screed it level without compacting.
- Set your pavers, brick, or flagstone, keeping consistent gaps and checking for level as you go.
- Sweep polymeric sand into the joints and compact the finished surface with a plate compactor (use a rubber pad to protect the surface). Activate the polymeric sand with water.
- Slope the entire surface at least 1/8 inch per foot away from any structure.
Mortar-set tile, porcelain, and natural stone
- Start with a concrete slab: minimum 4 inches thick with rebar or wire mesh reinforcement, poured on a compacted gravel sub-base.
- Include control joints in the slab to manage cracking; these should align with planned tile joints above.
- Allow the slab to cure fully (at minimum 28 days) before tiling.
- Use a polymer-modified exterior tile adhesive (not standard interior mastic). For porcelain and freeze-thaw climates, use a flexible adhesive rated for outdoor use.
- Back-butter large tiles to ensure full coverage (at least 95% contact for wet areas).
- Leave expansion gaps at walls and edges; fill these with matching silicone sealant, not grout.
- Grout with a non-sanded or sanded exterior grout appropriate for your joint width. Seal natural stone and grout joints after installation.
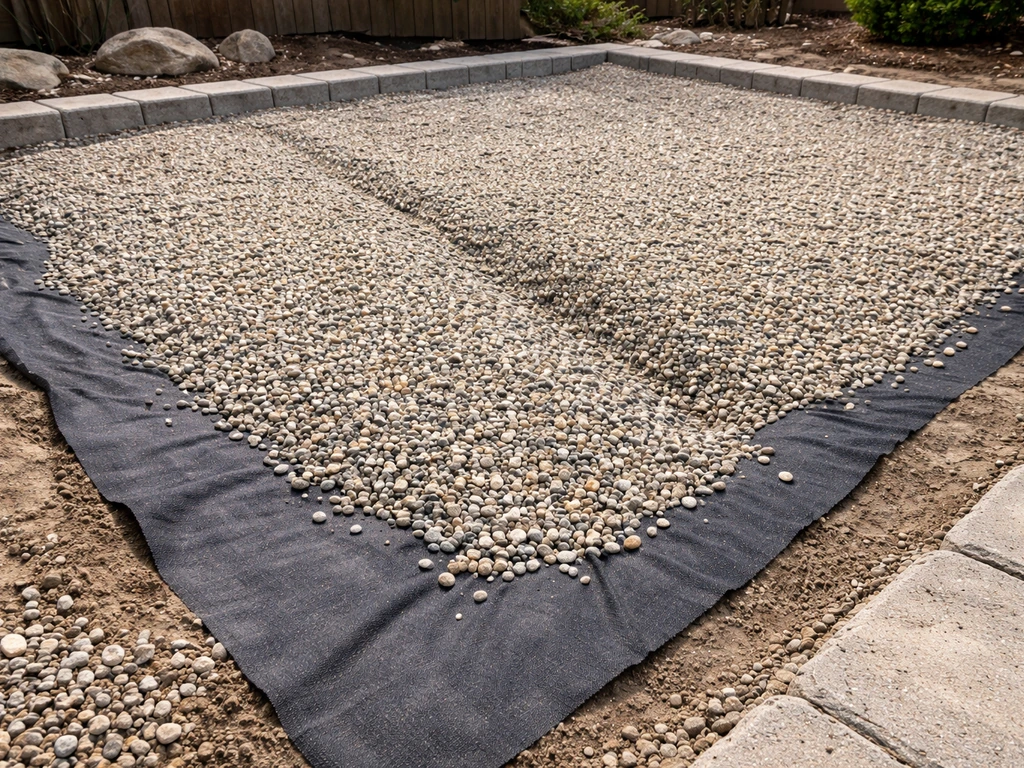
Gravel
- Excavate 4 to 6 inches and compact the subgrade.
- Install a heavy-duty landscape fabric (not the thin garden-center kind) to suppress weeds.
- Add a 3- to 4-inch layer of your chosen gravel and rake level.
- Install edging (steel, aluminum, or plastic) around the perimeter to keep gravel contained.
- Top up annually as gravel compresses and scatters over time.
Composite decking
- Either pour a concrete slab foundation or build a pressure-treated wood frame (like a traditional deck structure) over compacted gravel.
- Ensure the subframe has adequate drainage: water must be able to escape from underneath the boards.
- Install composite boards with manufacturer-specified hidden clips or face screws, maintaining the recommended gap between boards for drainage and expansion (typically 1/8 to 1/4 inch).
- Follow the manufacturer's maximum joist spacing (usually 12 to 16 inches on center for ground-level applications).
- Cap all cut ends with matching fascia boards to prevent moisture infiltration at cut edges.
Cost, lifespan, and maintenance: the real trade-offs
Upfront cost is only part of the story. A cheap gravel patio you need to replenish every two years can cost more over a decade than a well-installed brick patio that needs almost no attention. Here's an honest look at what you're actually signing up for with each material.
| Material | Material cost (per sq ft) | Install cost (per sq ft, pro) | Lifespan | Maintenance level | Key maintenance tasks |
|---|---|---|---|---|---|
| Concrete pavers | $3–$8 | $8–$18 | 50+ years | Low | Annual polymeric sand refresh; occasional power washing; reseal every 3–5 yrs (optional) |
| Flagstone | $5–$15 | $15–$30 | 50+ years | Low-moderate | Weed control in joints; reseal if mortared; reset settled stones |
| Porcelain tile/pavers | $4–$15 | $15–$35 | 30–50+ years | Very low | Occasional cleaning; inspect grout/sealant joints every few years |
| Brick (paving) | $4–$10 | $10–$25 | 50–100+ years | Low | Moss/algae cleaning in shaded areas; reset settled bricks; repoint mortar if used |
| Natural stone | $8–$25 | $20–$40 | 30–50+ years | Moderate | Seal every 1–3 yrs depending on stone; clean stains promptly; reset or repoint as needed |
| Gravel | $1–$3 | $3–$8 | Ongoing (replenish) | Moderate | Top up annually; re-rake after heavy rain; weed fabric replacement every 5–7 yrs |
| Composite decking (WPC) | $4–$12 | $15–$30 | 25–30 years | Low | Annual cleaning; inspect fasteners; no sealing required |
A few things stand out in that table. Gravel looks cheapest but demands the most ongoing attention. Brick and concrete pavers offer the best combination of durability and low maintenance for the price. Natural stone and porcelain deliver a premium result but push the total installed cost toward the higher end, especially for larger patios. If you're hiring out the full job, a 400-square-foot patio in concrete pavers might run $3,200 to $7,200 installed, while the same space in natural stone could hit $8,000 to $16,000 or more depending on your region.
Safety and comfort: slip resistance, heat, and patio use with kids and pets
Safety is one of those things that's easy to overlook until someone slips or a dog skids across a wet tile. If you have kids, elderly family members, or dogs sharing your patio, these factors belong on your checklist before aesthetics.
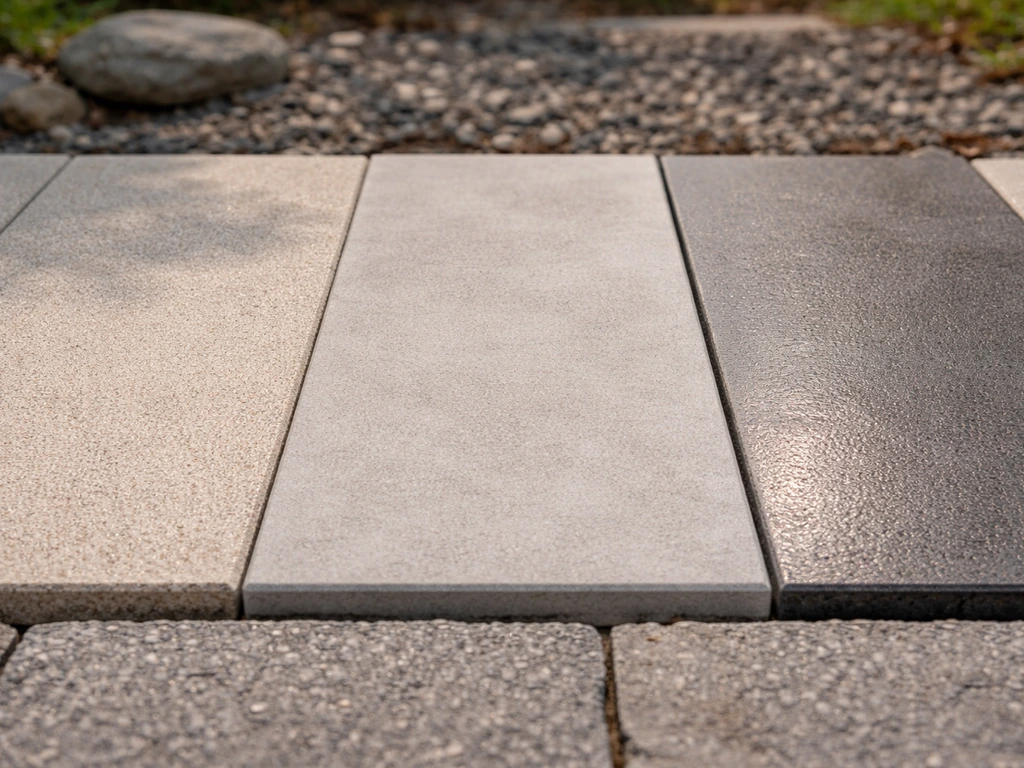
Slip resistance
For any patio that gets wet, the surface finish matters more than the material itself. Polished and honed finishes on natural stone and porcelain become genuinely slippery when wet; the same material with a brushed, flamed, or sandblasted finish is dramatically safer. For tile and porcelain, look for products with a DCOF (Dynamic Coefficient of Friction) rating of 0.42 or higher for outdoor use. Concrete pavers with a broom finish or exposed aggregate are naturally slip-resistant. Brick's texture gives it good grip. Gravel is technically non-slip but unstable underfoot, especially for older adults. Composite decking's grooved boards offer reasonable grip but can get slippery in wet conditions if algae or mold develops, so keep them clean.
Heat underfoot
Dark stone and dark porcelain in direct summer sun can become painfully hot and even cause burns on bare feet or paws. If you're in a hot climate, light-colored materials are genuinely safer. Composite decking consistently runs cooler than stone or concrete in hot sun, which is one practical reason it's become so popular in southern states. Gravel and flagstone with light coloring also perform well here. If you're set on a dark material, plan for shade structures, pergolas, or strategically placed planters to keep parts of the patio shaded during peak afternoon hours.
Kids and pets
For high-traffic family patios, durability and ease of cleaning matter more than anything else. Concrete pavers are nearly ideal: textured, tough, and if one cracks it can be popped out and replaced individually without disturbing the rest of the surface. Brick shares these qualities. Avoid gravel if you have small children (ingestion risk, hard to fall on) or large dogs who like to dig or scatter it. Porcelain is easy to hose down but can be slippery with wet paws, so stick to textured finishes. Composite decking eliminates the splinter problem you'd have with natural wood, which is a genuine advantage for kids running around barefoot.
Where to source materials and how to make your final decision
Sourcing tips
Where you buy matters as much as what you buy. For natural stone and flagstone, a local stone yard or masonry supplier will almost always have better selection and better prices than a big-box store, and you can see the actual pieces rather than a display sample. For porcelain pavers, tile showrooms and specialty tile distributors carry the large-format outdoor lines that home improvement stores typically don't stock. For composite decking, go to a dedicated decking supplier or manufacturer showroom so you can see the actual board profiles and color options in full scale. When you're at a showroom or yard, ask these questions specifically:
- Is this product rated for outdoor use and freeze-thaw cycling? (Critical for tile and natural stone)
- What is the DCOF or slip-resistance rating for wet outdoor conditions?
- What is the water absorption rate? (Under 0.5% is ideal for cold climates)
- What thickness is available, and is it consistent? (Flagstone and natural stone vary; inconsistent thickness means more work leveling)
- What is the lead time? (Natural stone and large-format porcelain can take 4–8 weeks to source)
- Do you carry matching trim pieces, edge pieces, and step treads?
- What adhesive, grout, or joint material do you recommend for this specific product?
Step-by-step decision checklist
Work through these steps in order and you'll arrive at a confident material choice without second-guessing yourself.
- Measure your patio area accurately: length x width in square feet, then add 10% for cuts and waste (15% for irregular shapes like flagstone or diagonal patterns).
- Note your climate zone and site conditions: does it freeze? Does water pool? Is it shaded or full sun? Are there tree roots nearby?
- Define your primary use: entertaining, kids' play area, poolside, quiet garden retreat, or high-traffic access path. This determines how much slip resistance, heat management, and durability you need.
- Set a realistic total budget: include materials plus installation (if hiring), plus base materials (gravel, sand, concrete), plus tools if DIY. Get two to three contractor quotes if you're not installing yourself.
- Eliminate materials that don't fit your climate or site: polished stone in a freeze-thaw climate, dark tile in a hot full-sun yard, gravel in a kids' play area, and so on.
- From the remaining candidates, pick the material that best matches your aesthetic preference and budget. Don't fight your preference: if you love the look of flagstone, it's worth the extra install effort.
- Visit a supplier or showroom in person. Bring your measurements, a photo of your house exterior, and your climate/use notes. Order samples or ask to borrow samples to view at home in your actual light conditions.
- Plan drainage: confirm your surface will slope at least 1/8 inch per foot away from the house, and identify where water will exit the patio area.
- Plan the sub-base: confirm excavation depth needed, whether you need to rent a plate compactor, and where excavated soil will go.
- Order materials with your waste factor added, confirm the delivery date, and line up your contractor or schedule your DIY installation window.
Maintenance quick reference
Once your patio is in, keeping it in good shape mostly comes down to a few simple habits. Sweep or blow debris off regularly so moisture doesn't sit on the surface. For stone or grout, reseal on schedule (check what the manufacturer recommends for your specific material). Control weeds in open-jointed surfaces with polymeric sand refreshes or careful spot-treatment with a safe herbicide. For composite decking, an annual wash with a deck cleaner and a soft brush removes the mold and algae that cause slipping and staining. Address any shifted, cracked, or sunken pieces promptly: a single paver or brick that settles creates a trip hazard and lets water pool in the wrong direction, which accelerates damage to surrounding material.
The right patio flooring comes down to matching the material to your specific situation, not chasing what looks best on a design blog. Work through the checklist above, be honest about your climate and how your family actually uses outdoor space, and you'll make a decision you won't regret five winters from now. If you're still narrowing down from a shortlist, the material comparison guide and the non-slip surface deep-dive on this site can help you get to the final answer.
FAQ
Is concrete paver really the safest choice for freezing winters, or can other materials work?
Not always. Even if freeze-thaw protection matters most, a patio that gets fast drainage, has a properly compacted base, and uses the right jointing material can reduce damage. The key decision point is whether the surface system is designed to tolerate minor movement (dry-set pavers, dry-set brick, or dry-set flagstone) versus being dependent on rigid mortar bonding.
How do I confirm a porcelain or tile product is truly rated for an outdoor patio in my climate?
Before buying, look for an explicit “outdoor/porch/floor” rating and verify the product is rated for freeze-thaw, plus a friction or wet-traction spec suitable for exteriors. If you only see interior tile ratings, treat it as a red flag because it can fail from water absorption and repeated temperature swings.
Do I need to seal natural stone or porcelain pavers, and how often?
Sealing requirements vary a lot. Natural stone like travertine often needs periodic reapplication (commonly every 1 to 2 years depending on product and exposure), while many porcelain pavers do not need sealing at all. Use the manufacturer’s maintenance interval for your exact stone type and finish, and plan for re-sealing before the wet season to keep stains and slipperiness down.
What base thickness and preparation do I need to avoid cracking or sinking patio flooring?
If you want the longevity benefits of pavers, choose a base build that is deep, compacted, and designed for your soil. For most residential cold-weather installs, that usually means a 6 to 8 inch class of crushed, well-compacted base plus a sand setting layer for dry-set systems, with edges restrained to prevent spreading.
If I’m worried about slips, what should I check besides the material type?
For wet climates or shaded areas, friction and surface texture matter more than the material name. Prefer cleft-face, brushed, flamed, or sandblasted finishes, and avoid polished or honed surfaces on areas that stay damp. For tile and porcelain, check wet outdoor slip targets such as DCOF 0.42 or higher, then still verify the finish style matches wet traction goals.
How do I prevent patio flooring from lifting if I have major tree roots nearby?
Yes, tree roots can destroy “rigid” patio systems, especially mortared stone or mortared brick. If you have roots within a few feet of the patio footprint, consider a paver system designed for small movements and avoid mortar-set construction, or create a root-control strategy and leave clearance where roots are most active.
Can composite decking work if my patio area floods or puddles after rain?
Composite decking needs a properly engineered subframe and drainage strategy under and around the boards. If you plan to have standing water or frequent puddling, prioritize boards and installation details that allow drying and ensure the sub-structure supports ventilation, otherwise you increase the risk of algae growth and surface slipperiness.
What’s the real risk of dark patio materials getting too hot, and how can I manage it?
Dark surfaces can reach burn-bare-feet temperatures in strong sun. If you must use darker materials, reduce exposure by choosing lighter grout or joint materials (where applicable), adding shade structures, and placing planters or seating zones that keep bare traffic paths out of direct sun during peak hours.
What should I do if my patio starts sinking or getting uneven after installation?
Yes, because uneven settling creates both trip hazards and water pooling. As a practical rule, if you notice rocking bricks or pavers, gaps that are opening, or water that won’t run off, address shifted units quickly. Delaying repairs often worsens the base problem, especially for larger stone and porcelain installs.
Can polymeric sand help with weeds, and is it always the right choice for every joint type?
Polymeric sand can be great for stability in open-jointed paver systems, but it is not ideal for every situation. In heavy freeze-thaw or areas with significant movement, follow the product’s temperature and maintenance guidance closely, and consider whether you need a more flexible jointing approach for your specific system.
What questions should I ask a stone supplier to avoid problems with thickness and installation difficulty?
When buying natural stone or flagstone, request or measure “same lot” material, confirm thickness tolerance, and check the finish face texture. Uneven thickness and inconsistent pieces are one of the biggest reasons installations run long and end up uneven, especially for irregular flagstone patterns.