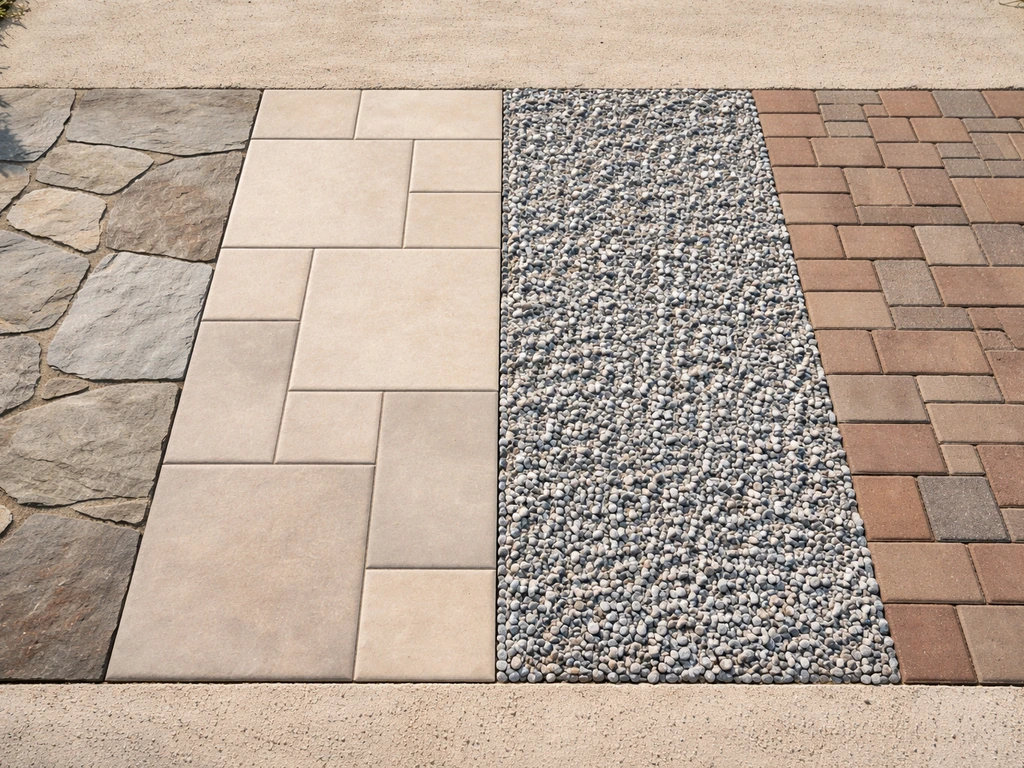
Concrete pavers and natural flagstone are the two best patio surfaces for most homeowners right now. If you want the best material for outdoor patio flooring overall, compare pavers and flagstone first based on your climate and budget Concrete pavers and natural flagstone. Pavers win on durability, ease of repair, and cost predictability. Flagstone wins on looks and comfort underfoot. But the honest answer is that "best" shifts depending on your climate, how hard you use the space, and what you can realistically spend. The best surface for a patio is the one that matches your climate, your level of foot traffic, and your budget for prep and installation best shifts depending on your climate, your use case, and what you can realistically spend.. A porcelain tile patio looks stunning in a mild coastal climate and becomes a cracking, heaving liability in a hard-freeze zone if it's installed wrong. Gravel costs almost nothing upfront and drains beautifully but needs regrading every few years. This guide walks through every major option so you can match the right surface to your actual yard. These options are part of the best ideas for patio flooring, but the real win comes from matching the material to your climate and how you’ll use the space. If you want the best patio flooring overall, start by matching the surface to your climate, foot traffic, and slip-resistance needs major option.
Best Patio Surface: Compare Flagstone, Tile, Gravel, Brick

What 'best' actually means for your patio
Before comparing materials, you need to pin down three things: your climate, your use case, and your real budget (not just material cost, but total installed cost including base prep and labor).
Climate is the biggest filter. If you get freeze-thaw cycles every winter, any material with high water absorption will fail over time unless it's specified and installed correctly. Porcelain tile, for example, is rated by ISO 13006 as frost-resistant only when water absorption is 0.5% or less. That spec exists for a reason: water that gets into porous tile or grout joints, freezes, and expands will crack and pop the surface within a few winters. In contrast, if you're in a hot, dry desert climate, your biggest concerns flip to UV stability, surface temperature, and cracking from thermal expansion.
Use case matters just as much. A patio that sees heavy furniture, regular foot traffic, and the occasional rolling grill cart needs a rigid, stable surface. A quiet reading corner in a shaded garden can get away with gravel or stepping stones. If you have kids running barefoot or elderly family members using the space, slip resistance becomes a primary spec, not an afterthought. The ANSI A137.1 standard sets a minimum Dynamic Coefficient of Friction (DCOF) of 0.42 for surfaces walked on when wet. Anything below that is genuinely risky when the surface is damp.
Budget reality: the cheapest material is rarely the cheapest finished patio. Gravel runs $1 to $3 per square foot installed. Concrete pavers typically land between $8 and $20 installed depending on pattern and region. Flagstone can range from $15 to $30 or more installed. Porcelain tile, once you factor in the rigid base, mortar, movement joints, and a professional install, can hit $25 to $45 per square foot in cold climates. Knowing those ranges upfront prevents the very common mistake of falling in love with a material and then getting a quote that's three times your budget.
Quick shortlist: best patio surface by scenario
| Your Situation | Best Surface Choice | Runner-Up |
|---|---|---|
| Freeze-thaw climate, tight budget | Concrete pavers | Brick |
| Freeze-thaw climate, higher budget | Flagstone (mortar-set) | Quality concrete pavers |
| Hot/dry climate, modern look | Porcelain tile (rectified, frost-rated) | Concrete pavers |
| Wet/rainy climate, drainage priority | Permeable concrete pavers | Gravel |
| Low budget, informal garden space | Gravel or decomposed granite | Stepping stones in gravel |
| High foot traffic, low maintenance | Concrete pavers | Porcelain tile |
| Premium aesthetics, entertainer patio | Flagstone or large-format porcelain | Brick with soldier-course border |
| DIY-friendly project | Concrete pavers or gravel | Brick pavers |
| Slip resistance is top priority | Textured concrete pavers or brushed flagstone | Anti-slip rated porcelain tile |
Flagstone and natural stone: beautiful but demanding
Flagstone and natural stone are the materials I get asked about most, usually because someone has seen a gorgeous magazine photo and wants that look. It absolutely delivers visually. Bluestone, travertine, slate, quartzite, and irregular flagstone all have a warmth and character that no manufactured product fully replicates. But they require more planning and more budget than most people expect going in.
Performance and installation
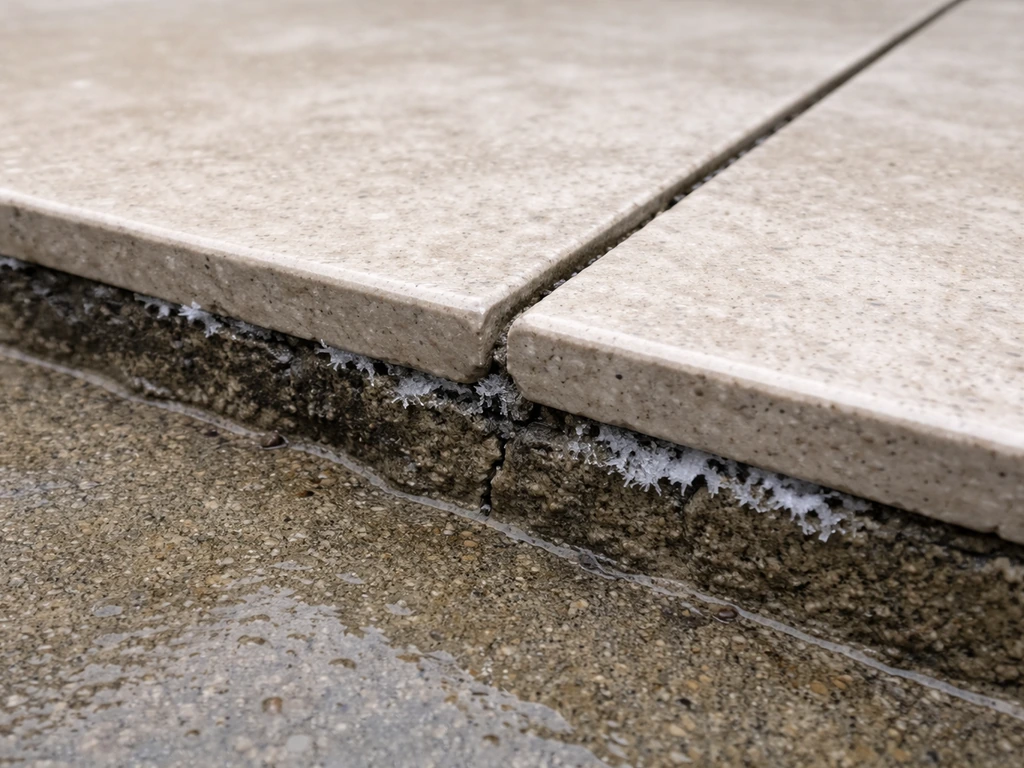
The most important decision with natural stone is your setting method. Sand-set stone patios are common in DIY guides, but the Stone Paver Institute warns clearly that sand-set natural stone can fail under repeated load because micro-movement in the sand bed chips and cracks stone edges over time. For a real, long-lasting installation, mortar-set is the right approach. A 1-inch mortar bed over a properly prepared concrete or compacted aggregate base is standard practice, with the substrate screeded level before stones are set. The mortar bed compensates for the natural thickness variation you get with irregular flagstone.
Base preparation is non-negotiable. You need a compacted aggregate base of at least 4 inches (6 inches in freeze-thaw zones) under any mortar-set stone installation. Skipping this is how patios heave and crack in the first two winters. The bedding sand thickness for sand-set applications, if you do go that route for a low-traffic garden path, should be between 3/4 inch and 1.5 inches per ICPI guidance, screeded consistently before setting stone.
Maintenance
Natural stone needs sealing. Flagstone in particular is porous enough that oil, wine, and organic staining will penetrate quickly without a penetrating sealer applied every one to three years depending on traffic and exposure. Routine cleaning follows the standard stone-care protocol: pH-neutral cleaner, soft scrub, rinse well, and never use acid-based cleaners on limestone or travertine (it etches the surface). Joint maintenance is ongoing too. Mortar joints crack over time and need repointing every several years. Moss and weeds will colonize any joint that loses integrity, so inspect joints annually.
| Factor | Flagstone / Natural Stone | Notes |
|---|---|---|
| Cost installed | $15–$30+ per sq ft | Varies widely by stone type and region |
| Lifespan | 50+ years if mortar-set | Sand-set lifespan is much shorter |
| Freeze-thaw resistance | Moderate to good (stone-dependent) | Travertine and slate are more vulnerable than bluestone |
| Slip resistance | Good when textured/brushed | Polished stone is slippery when wet |
| Maintenance | Moderate (sealing, joint repointing) | Annual inspection recommended |
| DIY-friendly | Moderate difficulty | Mortar-set is challenging for first-timers |
Porcelain tile patios: stunning when done right, brutal when done wrong
Large-format porcelain tile is having a moment in outdoor design, and honestly, when it's installed correctly, it earns that popularity. A 24x24 or 24x48 rectified porcelain tile in a light gray or wood-look finish can make a patio look genuinely luxurious. The material itself is extremely durable when it meets spec: ISO 13006 defines true porcelain as having water absorption of 0.5% or less, which makes it essentially frost-resistant. ASTM C1026 is the freeze-thaw test you want to verify your specific tile has passed before buying for a cold-climate install.
The real risks
The tile itself isn't usually what fails. It's the assembly underneath. Freeze-thaw failure in tile patios is driven by water getting into porous grout joints or the setting bed and freezing. TCNA guidance for exterior installations requires mortar rated for exterior applications, better than 95% mortar contact between tile and substrate (back-buttering is standard), and movement joints placed per TCNA Detail EJ171 to allow for thermal expansion and contraction. TCNA Handbook is described by the National Tile Authority as the primary North American reference for installation methods, performance standards, and material specifications for ceramic and stone tile installations TCNA guidance for exterior installations. If you skip movement joints on a large patio, the tile will eventually crack from thermal stress, guaranteed. I've seen this happen to beautifully installed patios within two seasons.
Slip resistance is the other critical spec. Many smooth, attractive porcelain tiles fall below the ANSI A137.1 minimum DCOF of 0.42 when wet. Always check the tile's tested DCOF before buying for an outdoor application. Textured or matte-finish porcelain tiles typically pass. Polished or semi-polished finishes often don't. If slip resistance is a concern and you want a more aggressive anti-slip profile, a textured anti-slip coating like an exterior-rated epoxy system can be applied, though it does change the visual finish.
Best-build practices for porcelain tile patios
- Start with a rigid concrete slab base, minimum 4 inches thick with rebar or wire mesh, over compacted aggregate subbase.
- Use only exterior-rated mortar (ANSI A118.10 or equivalent) for the setting bed, not generic indoor thinset.
- Back-butter every tile to achieve 95%+ mortar contact. No voids behind large-format tiles.
- Include movement joints per TCNA EJ171 guidelines at field intervals and at all perimeter/change-of-plane locations. Fill with exterior-rated sealant, not grout.
- Use frost-rated grout with a water-resistant additive in the joints. Keep joints consistent and sealed.
- Verify tile has passed ASTM C1026 freeze-thaw test if installing in a climate with regular freezing temperatures.
Porcelain tile is not a strong DIY candidate for cold climates. The margin for error on movement joints and mortar contact is narrow, and mistakes don't show up until the second or third winter. In mild climates (Zone 8 and warmer), a skilled DIYer with tiling experience can tackle it, but I'd still recommend having a tile contractor review the base plan before starting.
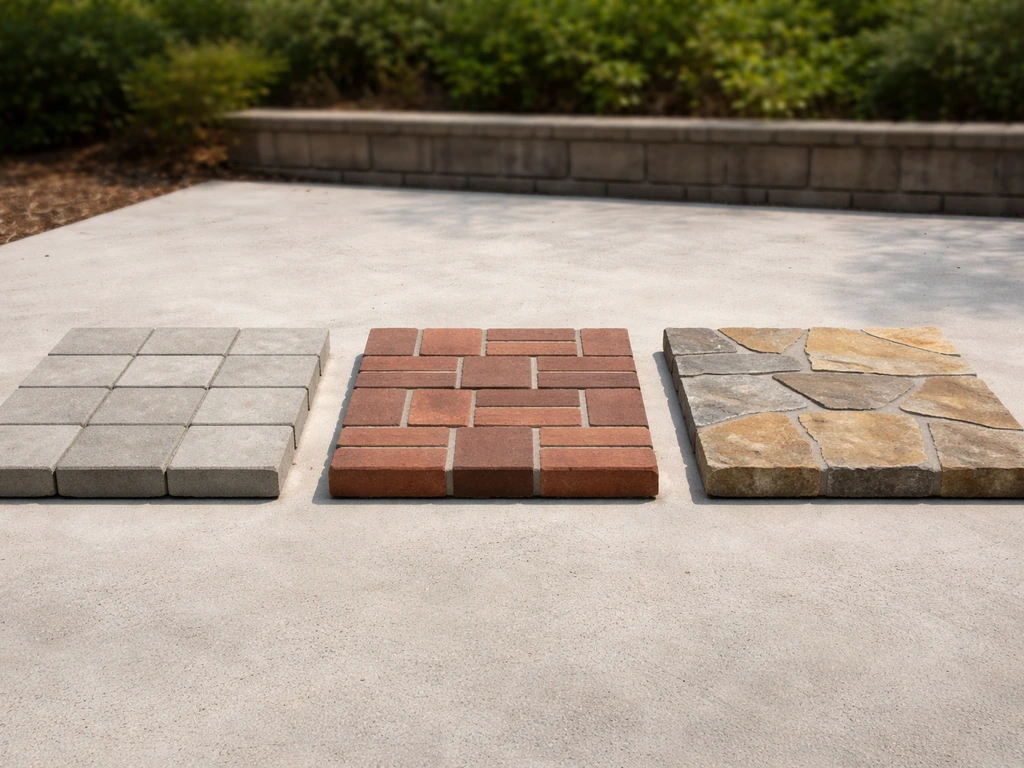
Brick and concrete pavers: the reliable workhorses
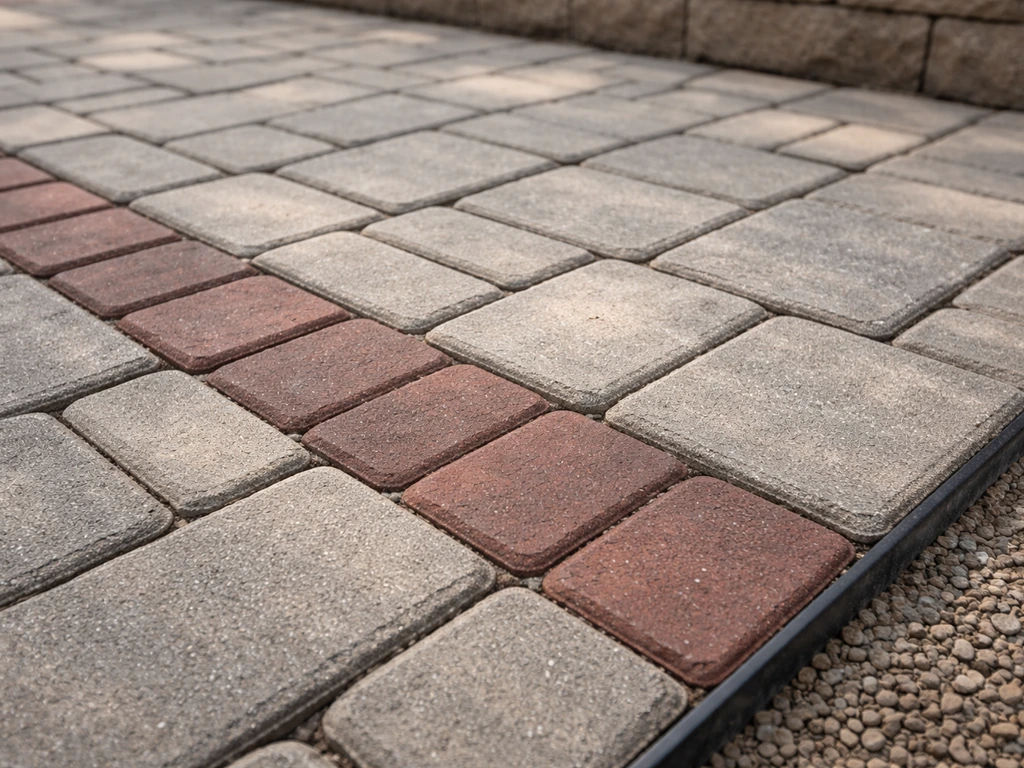
Concrete pavers and clay brick are the most field-proven patio surfaces in North America for a reason. They handle freeze-thaw cycles well, they're repairable (a cracked paver gets swapped out, not the whole patio), and the interlocking system allows some natural movement without cracking. If I had to recommend one surface for the widest range of climates and budgets, this is it.
Concrete pavers: installation and upkeep
The ICPI interlocking concrete pavement system layers are: compacted soil subgrade, aggregate base (typically 4 to 6 inches, more in poor soils), bedding sand at 1/2 to 1 inch screeded level, pavers, and edge restraints. Joint sand conforming to ASTM C144 (angular, sharp-edged particles that interlock when compacted) is swept into joints and compacted. Unilock specifies that the final joint sand height should sit about 1/8 inch below the paver's chamfered edge (or 1/8 inch below the flat surface on non-beveled pavers). A geotextile fabric over clay or silt subgrades prevents migration of fines into the bedding layer.
Maintenance is straightforward: inspect and top up joint sand annually (especially after the first winter), watch for efflorescence in the first one to two years (a normal surface salt migration process that cleans up with an appropriate cleaner per CMHA guidance), and reseal every two to three years if you want to maintain color and reduce weed germination in joints. Permeable concrete pavers are an excellent choice for areas with drainage challenges or local stormwater requirements. They use an open-graded crushed stone bedding layer (typically ASTM No. 8 stone) over an open-graded base (No. 57 stone, minimum 4 inches) instead of standard compacted aggregate and sand.
Clay brick: classic look, strong performance
Traditional clay brick pavers have a warmth and character that concrete pavers can approximate but not quite match. They're extremely durable in freeze-thaw conditions if you specify SW (Severe Weathering) grade brick for cold climates. Installation follows the same layered system as concrete pavers. The downside is cost: quality clay brick runs higher than concrete pavers, and color options are more limited. Moss and algae growth in shaded areas is also more common with brick than with smoother concrete pavers, so factor in annual cleaning if your patio is under tree cover.
| Factor | Concrete Pavers | Clay Brick |
|---|---|---|
| Cost installed | $8–$20 per sq ft | $12–$25 per sq ft |
| Lifespan | 25–50+ years | 50–100 years (SW grade) |
| Freeze-thaw resistance | Excellent | Excellent (SW grade only) |
| Repair | Easy (swap individual pavers) | Moderately easy |
| Color/style options | Very wide | Limited to earth tones |
| DIY-friendly | Yes, with proper base prep | Yes, similar process |
Gravel patios: honest about the trade-offs
Gravel is the most affordable patio surface and the easiest to install, but it comes with trade-offs that catch a lot of people off guard. Done right, a decomposed granite or crushed stone patio can look great, drain perfectly, and last indefinitely with minimal cost. Done lazily, it becomes a muddy, weedy, uneven mess within a couple of seasons.
Drainage and weed control
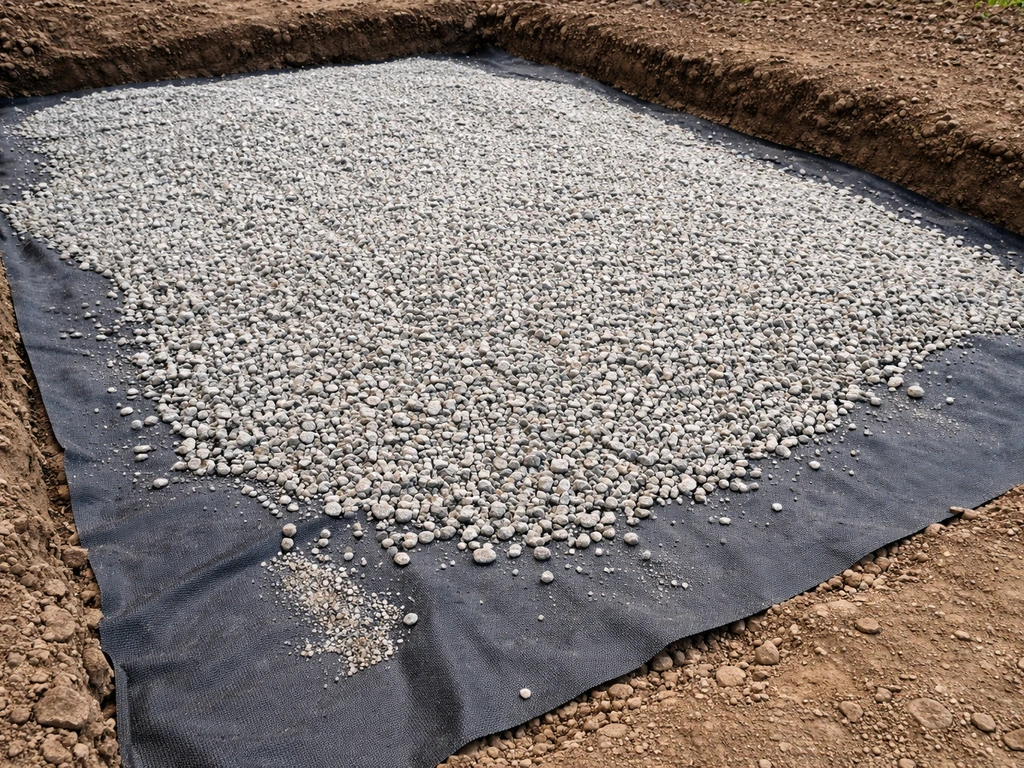
The drainage advantage is real. Gravel is inherently permeable, which makes it ideal for areas with poor drainage or where you want to minimize runoff. Lay a non-woven geotextile fabric over the compacted subgrade before adding gravel. This is the single most important step. The fabric suppresses weeds while allowing water through. Without it, weeds push up through the gravel within one growing season and the gravel mixes with the subgrade soil over time, making the whole surface uneven and muddy.
Regrading and replenishment
Gravel migrates. Foot traffic pushes it toward edges. Rain washes fine particles out. Expect to rake and regrade a gravel patio at least once a year, and replenish stone every two to three years. Edge restraints (plastic, steel, or stone borders) are essential to contain the material and reduce how often you need to redistribute it. Decomposed granite compacts better than round gravel and gives a more stable walking surface, but it does harden over time and can crack in sections, which then needs breaking up and raking to restore permeability.
One thing to be honest about: gravel is not comfortable under bare feet, it tracks into the house, and furniture legs sink into it unless you use wide-pad furniture or pavers placed as seating area bases within the gravel field. For a purely functional informal garden area or a side-yard path, gravel is excellent value. As your primary outdoor living surface, most people eventually wish they'd put in pavers.
Composite and alternative surfaces: where they actually work
Composite decking tiles, rubber pavers, resin-bound gravel, and epoxy or urethane coating systems don't get as much attention as stone or brick, but they solve specific problems really well and deserve a spot in your evaluation.
Composite deck tiles (interlocking 12x12 or 12x24 tiles in wood-look or stone-look finishes) are ideal for covering an existing concrete slab that's stained, cracked, or just ugly. They click together with no mortar and no major prep work. They're not structural surfaces, they don't handle standing water under them well without good drainage, and they can fade in intense UV exposure over time. But for a balcony, rooftop terrace, or quick refresh of a serviceable old slab, they're a practical, renter-friendly option.
Resin-bound gravel systems (aggregate bound in a clear UV-stable resin, troweled over a prepared base) are popular in the UK and gaining traction in the US. They look attractive, are permeable, and have a softer feel underfoot than hard tile. They require a primed concrete or tarmac base and proper drainage falls built into the sub-base. They're not DIY-friendly and cost more than regular gravel, but less than premium stone.
Epoxy and urethane coating systems applied over existing concrete can genuinely extend the life of a slab while improving slip resistance and appearance. Systems like UV-stable epoxy/urethane coatings are designed specifically for exterior exposure and UV resistance. Anti-slip variants with aggregate broadcast into the wet coating can meet or exceed OSHA and ADA slip-resistance targets. These are best applied by a professional, since surface prep (grinding, patching, priming) accounts for most of the performance outcome. If you have a solid existing slab and want a cost-effective upgrade without tearing anything out, a quality coating system is worth serious consideration.
| Surface Type | Best Use Case | Key Limitation |
|---|---|---|
| Composite deck tiles | Slab refresh, rooftop, rental property | Not suitable for poor drainage conditions |
| Resin-bound gravel | Permeable surface over existing base | Requires professional install, UV degrades over time |
| Epoxy/urethane coatings | Reviving sound existing concrete | Concrete must be in good structural condition |
| Rubber pavers | Playgrounds, pool surrounds, safety zones | Not premium aesthetic, limited design options |
How to choose and plan your build
Once you've narrowed down your material, the planning process follows a consistent set of steps regardless of what surface you choose. Here's how to move from decision to done.
Assess your site before you buy anything
Dig a test hole in your patio footprint about 12 inches deep. You want to know what your subgrade is: compacted gravel or sandy loam is good, clay or organic fill is a red flag that means more base work. Check how water drains during a rainstorm. If water pools in your patio area, you'll need to address grading and possibly drainage before laying any surface. A 1% to 2% slope (1/8 inch per foot minimum) away from the house is the target for any hard surface.
Estimate materials and price the real project
Calculate your square footage, then add 10% for cuts and waste (15% for irregular flagstone). Price your surface material, then separately price the base: crushed aggregate base, bedding sand, geotextile fabric, edge restraints, and jointing material. For a 200-square-foot patio, the base materials alone (aggregate, sand, fabric, restraints) typically run $300 to $600 before a single paver or stone is purchased. Contractors will quote the whole job, but knowing what the base costs helps you evaluate whether a quote is realistic.
Sourcing: local vs. online
Buy heavy hardscape materials (pavers, stone, aggregate) locally. Shipping cost on heavy stone makes online purchases uneconomical for most quantities. Local stone yards and hardscape suppliers typically carry regional materials that are known to perform in your local climate, which is a genuine advantage. For porcelain tile specifically, verify freeze-thaw test results (ASTM C1026) and DCOF ratings before ordering, whether local or online. Those specs should be on the product data sheet; if a supplier can't provide them, source from someone who can.
DIY vs. hiring out
Concrete pavers and gravel are the most forgiving DIY surfaces. The base work is physical but straightforward if you rent a plate compactor and follow the layered system properly. Flagstone in mortar, porcelain tile, and resin-bound systems all have enough technical complexity and freeze-thaw risk in cold climates that I'd strongly recommend at least getting a professional to do the base and layout, even if you do the finish work yourself. The base is where most patio failures start, and it's the hardest thing to fix after the surface is down.
Whichever surface you choose, the decision comes down to your climate's demands, how you'll use the space day to day, and whether you're optimizing for lowest upfront cost or lowest lifetime cost. Pavers win on value and repairability for most situations. Flagstone and porcelain win on aesthetics when your budget and climate support them. Gravel wins when budget is the hard constraint or drainage is the primary problem to solve. Nail the base prep regardless of what you put on top, and you'll have a patio that lasts.
FAQ
How do I choose the best patio surface if I live in a freeze-thaw climate but still want tile or flagstone?
Start by verifying the specific product specs for frost performance, not just the material name. For porcelain tile, confirm water absorption is 0.5% or less (and that it passed an exterior freeze-thaw test like ASTM C1026). For natural stone, plan for a true mortar-set assembly with adequate thickness, a properly compacted base (6 inches minimum in freeze-thaw), and movement joint placement, otherwise surface cracking often shows up in the second or third winter.
What is the single biggest installation mistake that causes patio surfaces to fail early?
Underestimating base preparation. Even durable finishes fail when the substrate is soft, poorly compacted, or lacks correct thickness and drainage control. A quick check is how water behaves during a rain, if the area holds puddles you usually need grading and drainage changes before any surface goes down.
Does slip resistance depend on the patio material, or is it mainly about the finish?
It is mostly about the finish and how wet it gets. Two products in the same material category can behave very differently, for example polished tile often fails minimum wet DCOF targets while textured or matte surfaces typically perform better. If you already own or are choosing a tile, look for a tested DCOF value for wet conditions and prioritize texture for barefoot or wet-morning use.
If I choose concrete pavers, how important are edge restraints and joint sand?
They are critical. Without edge restraints, pavers migrate and joint sand washes out or compacts unevenly, which leads to shifting and weed growth. Plan on sweeping in the specified joint sand and topping it up, especially after the first winter, since the first freeze-thaw cycle is when joints most often need replenishing.
How often should I regrade or maintain a gravel patio?
Expect at least annual raking and regrading. Replenish stone about every 2 to 3 years depending on rainfall and foot traffic. Also, inspect edges regularly, because gravel movement is usually edge-driven, once the border loosens the whole field slowly migrates and becomes uneven.
Is decomposed granite (DG) just another gravel, or does it behave differently?
DG usually compacts more tightly and gives a more stable walking surface than round gravel, which can reduce sinking under furniture legs. Still, it can harden and crack in sections, when that happens you typically need to break up the affected area, rake, then recompact to restore permeability.
Can I put any patio surface over existing concrete without base work?
Only in limited cases. Composite deck tiles can cover an existing slab for a quick refresh, but they are not a structural finish and standing water under tiles can cause problems if drainage is poor. Coating systems can improve appearance and slip resistance on existing concrete, but surface prep like grinding, patching, and priming usually determines whether the coating lasts outdoors.
What’s the best patio surface for heavy furniture and frequent foot traffic?
A rigid, stable paver system or mortar-set stone tends to perform best under rolling loads and regular movement. Loose or shifting surfaces like gravel are typically better for informal zones unless you add paver seating bases to prevent chair legs from sinking and to keep paths stable.
How do I prevent weeds on a patio, and which surface needs the most weed control?
Weed control is driven by what happens below the surface as much as what you can see. Gravel patios usually require geotextile fabric under the stone, otherwise weeds establish quickly. For interlocking pavers, keeping joint sand at the right height and maintaining edge restraints reduces weed entry, since gaps and washed-out joints are the primary weed pathways.
If I want natural stone, should I choose sand-set or mortar-set?
For long-term stability under repeated load, mortar-set is the safer choice. Sand-set can work for low-traffic garden paths, but micro-movement in the sand bed can chip stone edges over time. Mortar-set also helps accommodate thickness variation in irregular flagstone because the mortar bed can be screeded level.
Do I need to seal flagstone, and what happens if I skip it?
Sealing helps prevent fast staining because many flagstones are porous. Without a penetrating sealer, oil, wine, and organic materials can soak in quickly, and you may end up with permanent discoloration. Plan for resealing roughly every 1 to 3 years depending on traffic and exposure, then follow pH-neutral cleaning routines.
How do I estimate total cost for the best patio surface, not just material price?
Price the finish material and then price the entire assembly separately, base aggregate, bedding sand, geotextile, edge restraints, and jointing sand or mortar. Many budgets fail because base and labor are overlooked. For example, for a 200-square-foot patio, base materials alone can be several hundred dollars before you buy a single paver or stone.
Should I buy tile or stone online, and what should I verify before ordering?
You can, but only after you verify the performance specs on the product data sheet. For porcelain tile intended for cold climates, confirm both frost-related ratings (like ASTM C1026) and slip performance (wet DCOF, with attention to finish type). If a supplier cannot provide those numbers, switch sources before you commit to quantity and delivery.