
The best all-around border for a pea gravel patio is steel edging for most homeowners, concrete curb or soldier-course pavers for high-traffic or formal settings, and pressure-treated timber if you want a rustic look on a tight budget. Each one works well when installed correctly on a compacted aggregate base, but the right pick depends on your climate, how the patio looks from the house, and how much you want to spend per linear foot. Below I walk through every practical option, tell you where each one shines and where it fails, and give you the installation detail you need to keep gravel where it belongs.
Best Border for Pea Gravel Patio: Top Edging Choices & Installation

Nolan Ellison
22 Jul 2026
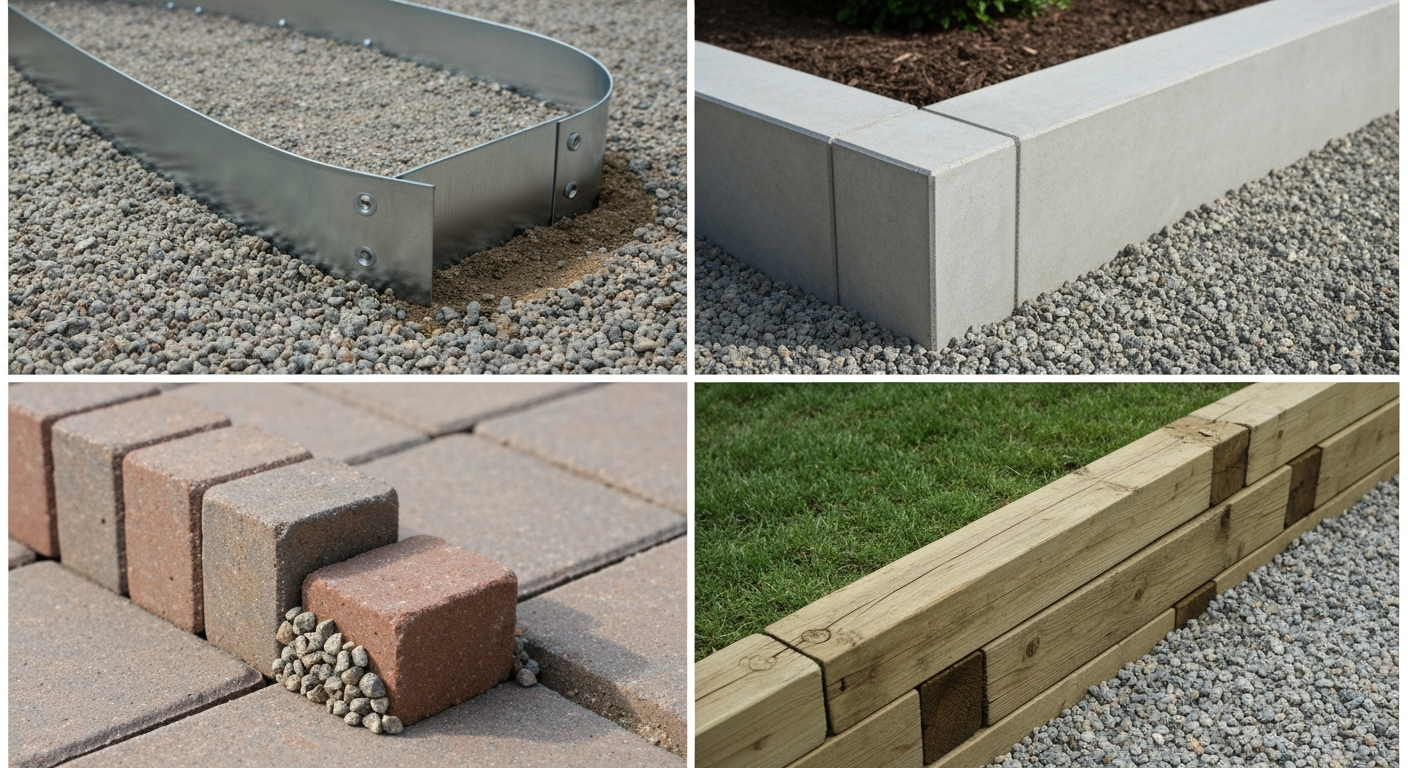
Quick summary: picking the right border for your pea gravel patio
Pea gravel is a loose, rounded aggregate that grades out roughly 1/8 to 3/8 inch in diameter. Because those smooth particles don't interlock, they scatter under foot traffic and creep outward over time unless something physical stops them. A border does two jobs: it creates a hard vertical face the gravel presses against, and it defines the patio edge so the whole project reads as intentional rather than accidental. Getting that border right matters more with pea gravel than with almost any other patio surface.
Here's my short recommendation list before we go deeper. Use steel edging when you want a nearly invisible, durable edge that flexes around curves and handles freeze-thaw cycles well. Choose concrete curb or poured-in-place edging when permanence and zero movement are the priority. Go with pavers or brick in soldier course when looks matter and the budget allows. Timber landscape ties are fine for a cabin-style project or a tight budget if you accept a 10-to-15-year lifespan and commit to pressure-treated material. Plastic bender board is cheapest upfront but has real UV and cold-weather brittleness issues, so use it only in mild climates for lower-traffic areas. Natural stone and gabion edging are the premium decorative options that double as design features.
Decision checklist before you buy edging
Before I price any edging material, I work through a short checklist on site. The answers cut the option list in half before you spend a dollar.
- Climate: Does your area get hard freezes? Freeze-thaw cycles heave soil and can crack or displace rigid edging. Steel and flexible plastic handle this better than poured concrete or dry-stacked stone.
- Soil type: Clay-heavy soil moves seasonally. Edging seated directly on native clay will migrate. Always seat edging on a compacted granular base, not on raw soil.
- Drainage: Is the patio area in a low spot or does water pool near it? Poor drainage accelerates rot in timber and undercuts any edging that relies on soil stability. A 2% slope (1/4 inch per foot) away from structures is the standard minimum.
- Traffic level: A backyard entertaining patio with chairs and foot traffic puts different demands on edging than a side path someone walks on daily. High-traffic areas need rigid, well-anchored restraints.
- Patio shape: Curved edges favor flexible steel or plastic bender board. Straight-edged rectangular patios work with anything.
- Budget per linear foot: Plastic is under $1/ft installed DIY; galvanized steel runs $2–$5/ft; pavers and brick $8–$18/ft; poured concrete curb $15–$30/ft professionally installed.
- Aesthetics: Will the edge be visible from inside the house or from the street? A buried steel edge is nearly invisible. Pavers, natural stone, and gabion become visual design elements.
- DIY vs. contractor: Plastic and steel edging are realistic one-person DIY projects. Poured concrete, gabion, and large flagstone borders typically require two people minimum and sometimes a contractor for forming and pouring.
- Maintenance tolerance: Some options (timber, plastic) need replacement eventually. Steel and concrete are close to set-and-forget materials if installed correctly.
All the main edging options at a glance
The table below gives a fast overview. The detailed sections that follow dig into installation specifics, climate fit, and real cost ranges for each material.
| Edging type | Best for | Main drawback | Typical DIY cost (per linear ft) | Approx. lifespan |
|---|---|---|---|---|
| Steel / galvanized steel | Curves, freeze-thaw climates, clean modern look | Visible rust on low-grade steel; coastal salt shortens life | $2–$5 | 20–50+ years (HDG) |
| Concrete curb / poured-in-place | Permanent high-traffic patios, straight runs | Labor-intensive to install; cracks in severe freeze-thaw | $4–$8 DIY / $15–$30 pro | 25–50 years |
| Pavers / brick (soldier course) | Formal aesthetics, moderate traffic | Higher material and labor cost | $8–$18 | 30–50+ years |
| Pressure-treated timber / landscape ties | Rustic/cabin look, budget builds | Rot risk; ICPI discourages for long-term restraint | $2–$6 | 10–20 years (UC4 PT) |
| Plastic / bender board (PVC/recycled) | Mild climates, curves, budget | Brittle in cold; UV degradation | $0.50–$2 | 5–15 years |
| Natural stone (flagstone, boulders) | Premium decorative look, natural settings | Heavy, labor-intensive, cost varies widely | $6–$20+ | 50+ years |
| Gabion baskets | Slope retention, bold design statement | Expensive, requires level footing, bulky | $15–$40+ | 30–50 years (galvanized wire) |
| Poured concrete curb (manufactured/precast) | Clean residential finish, driveways adjacent to patio | Less flexible than poured-in-place | $5–$10 | 20–40 years |
Concrete curb edging
What it is and when it makes sense
Poured-in-place concrete curb is the most permanent solution available. You form a trench around the patio perimeter, set form boards, pour a mix (typically a 3,000 psi mix minimum for exterior use), strip the forms after 24–48 hours, and backfill. The resulting curb is a monolithic barrier that pea gravel simply cannot push through. It's the right call for formal patios adjacent to concrete driveways, for high-traffic commercial-style residential installs, or anywhere you want zero maintenance for decades.
Pros
- Maximum rigidity: gravel containment is essentially permanent once cured.
- Compatible with paver installation standards — Belgard and EP Henry both cite poured-in-place concrete curbs as a standard edge restraint meeting ICPI requirements.
- Low long-term maintenance once installed correctly.
- Can be formed to almost any profile: curb-and-gutter, mowing strip, raised border.
Cons
- Concrete expands and contracts with temperature. In climates with 50+ freeze-thaw cycles per year, horizontal cracking is common within 10–15 years without proper control joints every 4–6 feet.
- Labor-intensive to form and pour — this is a two-person minimum job.
- Difficult and messy to remove if you ever want to reconfigure the patio.
- Requires a compacted sub-base under the footing, not just raw soil; a curb poured directly on clay will heave.
Climate, budget, and lifespan
Concrete curb performs best in USDA climate zones 7 and warmer (fewer than 30–40 hard freeze cycles per year). In colder climates, budget for control joints and use an air-entrained mix (4–7% air) to resist freeze-thaw spalling. DIY material cost is roughly $4–$8 per linear foot if you mix your own concrete, or $15–$30 per linear foot for a contractor to form and pour. A well-installed concrete curb in a temperate climate will last 25 to 50 years. Expect 15–25 years in a northern freeze-thaw climate without periodic crack repair.
Pavers and brick edging
What it is and when it makes sense
A soldier course (pavers or bricks set vertically on their long edge) creates a defined, attractive border that looks intentional and reads as a design element. This is my personal favorite option for any patio where aesthetics matter, because the edging becomes part of the patio rather than something you're hiding. You can match pavers to a home's brick facade or use a contrasting color for a frame effect. The border works by creating a physical vertical face the gravel presses against, and it meets ICPI edge-restraint standards when set on a compacted aggregate base with appropriate backing.
Pros
- High visual appeal — doubles as a decorative design element.
- Individual units can be replaced if one cracks or shifts, unlike poured concrete.
- Extremely durable material (concrete pavers typically rated for 8,000+ psi compressive strength; clay brick even higher).
- Compatible with ICPI installation standards when seated on compacted base.
- Pairs well with the pea gravel surface aesthetically — a natural, handcrafted look.
Cons
- Higher material and labor cost than steel or plastic.
- Soldier-course bricks or pavers set on edge can tip inward over time if the compacted base settles or if a secondary anchor (like a concrete haunching behind the edging course) is not used.
- Mortar-set joints between border pavers can crack in hard freeze-thaw climates; dry-set is actually more resilient in those conditions.
- Requires good base prep — ICPI Tech Spec 3 is explicit that edge restraints must rest on the compacted aggregate base, not native soil.
Climate, budget, and lifespan
Concrete pavers and clay brick are suitable for all climates. In freeze-thaw environments, use dry-set installation with a permeable joint and ensure positive drainage (EP Henry recommends 1/4 inch per foot slope, roughly 2%). Avoid mortar-set borders in climates below zone 6 unless you use a flexible mortar rated for freeze-thaw. Material cost for standard concrete pavers runs $1–$4 each; installed cost in soldier course is typically $8–$18 per linear foot DIY or up to $25+ with a contractor. Expect 30–50 years or more from quality pavers installed on a proper base.
Steel and metal edging
What it is and when it makes sense
Steel edging is what I install when a clean, nearly invisible edge is the priority and the design calls for curves. Products like EverEdge come in depths of 75mm, 100mm, and 125mm and use spikes (typically around 94–100mm long) driven into the compacted base to hold position. The result is a thin vertical flange that sits just at or slightly below the gravel surface, creating a crisp defined line without drawing visual attention. Aluminum edging works similarly and is lighter, though somewhat less rigid under lateral gravel pressure.
Pros
- Excellent for curves and organic shapes — bends smoothly without kinking.
- Hot-dip galvanized (HDG) steel has excellent service life, typically 20–50+ years in non-coastal environments. The American Galvanizers Association confirms service life is a function of zinc coating thickness and exposure — specify HDG, not just painted steel.
- Low profile means the edging nearly disappears once gravel is filled to level.
- Handles freeze-thaw cycles better than rigid concrete or brick, because it flexes slightly rather than cracking.
- Straightforward DIY installation — one person with a rubber mallet and a spike driver can install 100+ feet per day.
Cons
- Budget steel (painted, not galvanized) rusts out within 5–10 years. Always specify hot-dip galvanized or cor-ten for longevity.
- Coastal or salt-spray environments shorten the lifespan of even galvanized steel — in those settings, cor-ten or aluminum is the better call.
- The thin profile means pea gravel can migrate over the top if the edging is set too low or if traffic kicks gravel outward repeatedly.
- Spikes must be driven into the compacted base, not loose soil — if the base isn't prepared properly, the edging will tip under lateral pressure.
Climate, budget, and lifespan
Steel edging works well in all climate zones. It's particularly good in zones 4–6 where freeze-thaw cycling would crack rigid concrete. Avoid standard galvanized within 1–2 miles of saltwater coastline; use aluminum or cor-ten instead. EverEdge and similar products recommend burying the edging so the top sits roughly 15mm below turf cut height when used at lawn edges, which translates to setting it so the top is at or just below final gravel grade. DIY cost runs $2–$5 per linear foot for HDG steel products including spikes. Painted mild steel drops below $1.50/ft but is a false economy. Lifespan for HDG steel in a non-coastal setting is 20–50+ years.
Timber and landscape ties
What it is and when it makes sense
4x4 or 6x6 pressure-treated lumber, or true landscape ties (sometimes called railroad ties), are a common choice for a rustic or naturalistic patio look. Timber is easy to cut, easy to handle solo, and creates a chunky defined edge that suits informal garden settings well. But I'll be direct: ICPI Tech Spec 3 explicitly warns against using timber as a long-term edge restraint for pavers. The same concern applies to pea gravel patios. Timber decays in ground contact, and even UC4-rated pressure-treated lumber has a finite service life. Use it with clear eyes about replacement timelines.
Pros
- Low upfront cost: $2–$6 per linear foot installed DIY.
- Easy to cut and fasten with common tools — no special equipment needed.
- Warm, natural aesthetic that suits cottage gardens, woodland settings, and cabin-style outdoor spaces.
- Can be doubled or stacked for a raised-bed style border that adds height and visual definition.
- Widely available at any lumber yard or home center.
Cons
- Decays in ground contact — USDA Forest Products Laboratory guidance is clear that only properly pressure-treated (UC4 ground-contact rated) or naturally durable species should be used in buried applications. Untreated or UC2-rated lumber will rot within 3–5 years.
- Even UC4 pressure-treated lumber has a typical ground-contact service life of 10–20 years in humid climates; in wet Pacific Northwest or Gulf Coast conditions, lean toward the shorter end.
- Timber swells and contracts seasonally, which can shift gravel and misalign the edge over time.
- Splitting and checking (surface cracking) creates gaps where pea gravel escapes.
- ICPI's position is that timber is not recommended for long-term edge restraint — for a patio you want to last 20+ years, other materials serve better.
Climate, budget, and lifespan
Timber performs best in dry climates (zones 7+ with low humidity). It is a workable short-to-medium-term choice in any climate if you use UC4-rated pressure-treated lumber (rated for ground contact) and seal cut ends with a wood preservative. Avoid using landscape ties of unknown treatment status, old railroad ties may contain creosote, which is now restricted in many residential applications. Material cost for 4x4 PT lumber is approximately $0.80–$1.50 per linear foot; 6x6 landscape ties run $3–$5 per linear foot. DIY installed cost is $2–$6 per linear foot depending on fastening method. Plan for replacement in 10–20 years.
Plastic and bender board edging
What it is and when it makes sense
Plastic bender board, PVC edging strips, and recycled-content composite edging are the lowest-cost entry point for pea gravel containment. They're flexible, lightweight, and straightforward to install with simple plastic or metal stakes. I've used plastic bender board for informal garden-bed edging without complaints, but I'm more cautious recommending it as the primary restraint for a pea gravel patio that will see regular furniture and foot traffic. The main failure modes are UV embrittlement and cold-weather cracking. In zones 5 and colder, basic PVC bender board often becomes brittle within 5–8 years and snaps at stake locations when disturbed.
Pros
- Lowest upfront cost of any edging option: $0.50–$2 per linear foot.
- Extremely flexible — handles tight curves and irregular shapes easily.
- Lightweight and easy to cut with a utility knife or snips.
- Recycled-content and composite options (HDPE, recycled wood-plastic composite) are more UV-stable than standard PVC.
- No rust, no rot — in mild climates, a genuinely low-maintenance option.
Cons
- Standard PVC bender board becomes brittle in UV exposure and cold weather — expect cracking within 5–10 years in climates with hard winters.
- Thin profiles provide less lateral resistance than steel or timber for a gravel surface under active foot traffic.
- Plastic stakes often pull out over time as soil freezes and thaws, causing the edging to shift and bow outward.
- Low visual profile can look cheap on a formal or high-visibility patio.
- Recycled composite and HDPE products perform better but cost more ($1.50–$3.50/ft), narrowing the price advantage over thin steel edging.
Climate, budget, and lifespan
Plastic bender board is best suited to USDA zones 7 and warmer, particularly in dry climates with low UV-driven degradation on the visible face. If you're in a mild climate and cost is the overriding factor, it's a serviceable solution. In zones 5–6 or colder, spend the extra money on HDG steel edging and avoid plastic entirely for a patio application. Recycled-composite products are a meaningful step up in cold-weather durability. Budget plastic bender board typically lasts 5–10 years; recycled composite or heavy-gauge HDPE products can reach 15 years. Material cost is $0.50–$2 per linear foot for standard PVC; $1.50–$3.50 for recycled composite. Installed DIY cost including stakes is usually under $2.50 per linear foot even for better products.
Natural stone and gabion edging
Natural stone borders
Flagstone set on edge, large fieldstone boulders, or cut limestone blocks used as a border create a genuinely beautiful, permanent edge that integrates naturally into garden settings. This is the premium decorative choice. Cost ranges from $6 to $20+ per linear foot for materials depending on stone type and region; larger boulders can spike that considerably. Natural stone is all-climate capable and essentially permanent if properly set on a compacted gravel base. The main challenge is labor, large stone is heavy, requires two people to position, and demands careful leveling to avoid the wobbly appearance that makes a stone border look amateurish.
Gabion basket edging
Gabion baskets (wire mesh cages filled with stone) are the boldest design statement on this list. They work well as a border-retaining wall combination where the patio is slightly elevated or where you want a textured stone mass to separate the patio from a garden bed or slope. Galvanized wire gabion baskets last 30–50 years. The per-linear-foot cost is high ($15–$40+ installed) but includes substantial visual presence and functional slope retention. These are overkill for a flat, level patio in a typical suburban backyard but genuinely useful for sloped sites.
How to install pea gravel patio edging correctly
Base preparation: the step most people skip
Every edging option above performs better on a properly prepared base. The most common installation mistake I see is placing edging directly on native soil and calling it done. Soil compresses under load, clay heaves with moisture, and within one or two seasons the edging has migrated inward, outward, or settled unevenly. The correct sequence is: excavate 4–6 inches below finished patio grade, compact the subgrade (target roughly 95% Standard Proctor density per ASTM D698 for pedestrian areas), lay a non-woven geotextile separation fabric over the compacted subgrade (a 140–160 g/m² non-woven like Mirafi 140N or equivalent works well for separation and filtration), then place and compact a 3–4 inch layer of angular crushed stone (3/4-inch clean crushed stone or dense-grade aggregate). For step-by-step guidance on choosing and installing the best base for pea gravel patio, see our detailed guide on best base for pea gravel patio. blank" rel="noopener noreferrer">Typical DOT Project Spec (references ASTM D698; 95% compaction requirement) commonly requires 95% Standard Proctor relative compaction and specifies limits on lift thickness and compaction equipment. Pea gravel is not appropriate as structural base material because its rounded particles don't interlock and can't be meaningfully compacted. Use angular aggregate for the base and reserve pea gravel for the top 2–3 inch decorative layer.
Drainage: slope and perimeter water management
Set your finished patio grade at a minimum 2% slope (1/4 inch per foot) away from any structure. ProLandscape / contractor guidance, How much slope does a patio need (≈2% / 1/4" per foot) recommends a finished patio slope of about 2% (roughly 1/4" per foot) away from buildings to ensure proper runoff ProLandscape / contractor guidance — How much slope does a patio need (≈2% / 1/4" per foot). EP Henry's installation guidance uses this same 2% figure, and most municipal and contractor specs align on it. If the patio is in a low spot or is bordered by slopes that funnel water toward it, consider a perimeter French drain: a 4-inch perforated pipe laid on a gravel bed, wrapped in non-woven geotextile fabric, and sloped to a legal discharge point. The pipe perforations face down or sideways to collect subsurface flow, and you surround the pipe with washed 3/4-inch clean stone. A French drain on the uphill side of a pea gravel patio can be the difference between a stable surface and a muddy, eroded mess after heavy rain.
Setting and anchoring the edging
Once the compacted aggregate base is in place, set the edging so its bottom flange rests on the compacted base, not on native soil. ICPI Tech Spec 3 is explicit about this for any edge restraint adjacent to pavers, and the same logic applies to edging adjacent to pea gravel. For steel edging, drive spikes through the pre-drilled holes at the manufacturer's recommended spacing (typically every 12–18 inches on straight runs, every 8–12 inches on curves) into the compacted base layer. EverEdge specifies spike lengths around 94–100mm with the instruction to drive into the prepared base, not loose soil. For timber edging, use 12-inch galvanized landscape spikes or 3/8-inch rebar stakes driven through pre-drilled holes. For paver soldier courses, backfill behind the edging course with compacted aggregate or place a thin concrete haunch on the back face to prevent inward tipping.
Common installation mistakes
- Placing edging directly on native clay or uncompacted soil — it will move within one season.
- Using stakes that are too short (under 6 inches) in loose soil — always match spike length to base depth.
- Not accounting for freeze-thaw heave in cold climates — edging seated on a well-compacted base heaves far less than edging on native soil.
- Skipping the geotextile layer — without it, fines from native soil migrate up into the base and gravel layer over time, causing uneven settling.
- Setting the edging top too low — if the top of the edging is more than about 1/2 inch below the top of the pea gravel, gravel will roll over and off the edge constantly.
- Using raw or unknown-treatment timber in ground contact — it will rot far faster than expected.
Stabilizing the pea gravel itself
A good border contains the perimeter, but the pea gravel surface can still shift underfoot in the interior unless you address stabilization. There are three practical approaches, and they're not mutually exclusive.
Gravel stabilization grids (geocells)
Honeycomb-style stabilization grids (sold under names like NidaGravel, IBRAN-X, Presto GEOWEB, and similar products) are the most effective solution for interior gravel stability. You lay the grid on top of the prepared base (a geotextile underneath is recommended at a minimum of 120 g/m² non-woven), fill the cells with pea gravel, and the cellular walls prevent lateral scatter. The pea gravel locks into the cell pockets and feels stable underfoot even in high-traffic areas. These grids preserve full permeability while significantly increasing load capacity. Manufacturers specify infill aggregate gradations in the 5–20mm range, which pea gravel typically satisfies. Installation is genuinely straightforward DIY work.
Resin binders and gravel stabilizer products
Resin-bound systems (like those from Resiblock and similar suppliers) mix a polyurethane or epoxy resin with aggregate to create a permeable, bound surface. This is a step up in both cost and permanence from loose gravel. Resin systems require a stable, clean, dry base; Resiblock's technical data sheets specify application temperature ranges, curing windows, and explicit restrictions against applying over previously sealed or damp surfaces. This isn't really a weekend DIY project for most homeowners, but it's worth knowing about if you want the look of pea gravel with the stability of a bound surface. If you're considering a bonded surface, see our guide to the best glue for pea gravel patio for product recommendations and application tips. Expect $50–$100 per square meter professionally installed.
Geogrids for the base layer
If you're dealing with weak subgrade soils, a biaxial or triaxial geogrid (like Tensar TriAx TX130–TX190 series) placed at the bottom of the aggregate base layer reduces base thickness requirements and improves resistance to rutting over time. This is more of a structural base upgrade than a surface stabilization tool, but it's relevant if your native soil is soft clay or has poor bearing capacity. Lay the geogrid at the base, then compact aggregate on top in lifts.
Pea gravel selection and close alternatives
The edging choice interacts with the type of gravel you use. If you're asking whether pea gravel is good for patios, see our guide is pea gravel good for patios for a focused discussion of pros, cons, and better alternatives. Standard pea gravel at 3/8-inch diameter is the classic choice, but it's the hardest to contain because of its small, round, smooth particles. If you're open to alternatives that behave better underfoot and require less aggressive containment, consider these options. For a fuller list of choices and pros and cons, see alternative to pea gravel patio. See our guide on best pebbles for patio to compare sizes, stability, and which small stones work best with different edging options. For guidance on choosing the best pea gravel for patio, see our guide on the best pea gravel for patio.
| Material | Typical size | Stays put? | Drainage | Aesthetics | Cost vs. pea gravel |
|---|---|---|---|---|---|
| Pea gravel (rounded) | 1/8"–3/8" | Poor (scatters easily) | Excellent | Classic, natural | Baseline |
| Crushed stone / #57 gravel | 3/4" | Better (some interlock) | Excellent | More rustic/utilitarian | Similar or slightly less |
| River rock | 3/4"–2" | Moderate (too large to scatter) | Excellent | Bold, decorative | Higher |
| Decomposed granite (DG) | 1/4" minus | Good when compacted or stabilized | Good | Warm, sandy look | Similar |
| Marble chips / decorative pebbles | 1/4"–1/2" | Poor to moderate | Excellent | High-end decorative | Higher |
River rock is heavier and larger than pea gravel, so it's naturally more stable but also harder to walk on comfortably. For a focused comparison of stability, comfort, and appearance between river rock and pea gravel, see our guide on river rock vs pea gravel for patio. Crushed stone interlocks better than rounded pea gravel and is a more practical surface for high-traffic areas, though it lacks the smooth visual softness that makes pea gravel appealing. If pea gravel's tendency to scatter is your main frustration, crushed decomposed granite compacted with a plate compactor is worth a look, it behaves more like a solid surface while still offering the gravel aesthetic.
Maintenance and long-term care
Annual maintenance tasks
- Rake pea gravel back to level after winter heave, heavy rain events, or after furniture has pushed it into piles.
- Top up pea gravel depth in high-traffic zones — a 2–3 inch depth is standard; below 1.5 inches the base starts to show through.
- Check edging stakes and pull-outs every spring; re-drive any stakes that have heaved or loosened.
- Clear organic debris (leaves, seeds) from the gravel surface before it composts in place and creates a growing medium for weeds.
- Inspect timber edging annually for rot, splitting, or displacement — address problems early before they allow significant gravel migration.
Weed control under and around pea gravel
The geotextile layer under the gravel base does provide some weed suppression, but it is primarily a separation fabric, not a weed barrier. For weed control specifically, a separate woven or non-woven polypropylene landscape fabric laid just below the pea gravel surface layer (above the crushed stone base) is effective. Do not rely on the geotextile alone for weed suppression in areas with aggressive weed pressure. Pre-emergent herbicide applied in early spring is a useful annual supplement.
Troubleshooting common problems
| Problem | Likely cause | Fix |
|---|---|---|
| Gravel migrating over edging top | Edging set too low relative to gravel grade | Raise edging or reduce gravel fill level; set edging top at or just above gravel grade |
| Edging leaning outward | Spikes too short or set in loose soil, not compacted base | Pull and reset with longer spikes into recompacted base |
| Timber edging rotting | Non-UC4-rated material or untreated wood | Replace with UC4 pressure-treated lumber or switch to steel |
| Pea gravel surface uneven / sunken spots | Base not properly compacted before installation | Remove gravel, recompact base, re-lay gravel |
| Pooling water on patio | Insufficient slope or blocked drainage path | Add slope (minimum 2%) or install perimeter French drain |
| Weeds growing through gravel | No weed barrier above base layer, or barrier degraded | Add woven landscape fabric above base; apply pre-emergent in spring |
Comparing all edging options side by side
If you want my honest recommendation in one place: for most homeowners in most climates, HDG steel edging is the best default. For product comparisons and user feedback, see our pea gravel patio reviews for real-world performance and installer tips. It's durable, handles curves, handles freeze-thaw, nearly disappears at grade, and costs a fraction of pavers or concrete. If the patio is formal and visible from the house or street, step up to a paver or brick soldier course. If budget is genuinely the constraint and you're in a mild climate, plastic bender board will work for 8–12 years. Timber is fine for a rustic aesthetic if you're committed to UC4 material and accept a future replacement project.
| Edging type | Freeze-thaw performance | Coastal climate | Curved edges | Visual impact | DIY difficulty | Best budget tier |
|---|---|---|---|---|---|---|
| Steel (HDG) | Excellent | Good (not saltwater) | Excellent | Minimal/clean | Easy | Mid ($2–$5/ft) |
| Concrete curb | Fair (needs control joints) | Good | Poor | Clean/formal | Moderate-hard | Mid-high ($4–$30/ft) |
| Pavers / brick | Excellent (dry-set) | Excellent | Moderate | High / decorative | Moderate | High ($8–$25/ft) |
| Timber (UC4 PT) | Fair | Poor-fair | Poor | Natural/rustic | Easy | Low ($2–$6/ft) |
| Plastic bender board | Poor-fair | Good | Excellent | Minimal | Easy | Low ($0.50–$2.50/ft) |
| Natural stone | Excellent | Excellent | Moderate | Premium/natural | Hard | High ($6–$20+/ft) |
| Gabion | Excellent | Excellent | Poor | Bold/industrial | Hard | Premium ($15–$40+/ft) |
Sourcing and product selection tips
When buying steel edging, confirm the product is hot-dip galvanized rather than just painted or electro-galvanized, the coating thickness difference is significant for long-term performance. For pavers, buy from a manufacturer with published compressive strength specs (8,000 psi minimum for a patio application). For pressure-treated timber, look for the UC4B or UC4C designation stamped on the lumber end, these are the appropriate ground-contact ratings. For gravel stabilization grids, verify the manufacturer publishes a technical data sheet with load capacity, infill gradation requirements, and geotextile recommendations; products without this documentation are hard to evaluate. Buy pea gravel from a supplier who can give you a gradation report or at least confirm the size range, nominal 3/8-inch pea gravel should be clean, washed, and free of fines to maintain drainage and aesthetics.
FAQ
What are the best edging (border) options for a pea gravel patio and when is each best?
Top edging options: 1) Poured concrete curb — extremely durable, good for heavy loads and wet climates; higher cost and more permanent. 2) Concrete pavers / brick — attractive, strong, easy to match hardscapes; moderate cost, good in most climates. 3) Metal / steel (hot‑dip galvanized or stainless) — thin profile, long life (if correct coating), best for modern aesthetics and tight gravel containment; choose HDG for non‑coastal sites. 4) Timber / landscape ties (pressure‑treated or naturally durable species) — low cost and easy to install but shorter lifespan in ground contact; only for low‑budget or temporary installs and dry climates if untreated. 5) Plastic / bender board (rigid polymer) — inexpensive, flexible for curves, resists rot; less rigid under heavy loads and can uplift if poorly anchored. 6) Natural stone (set on compacted base or mortared) — premium look, durable if installed on proper base; higher cost and heavier installation. 7) Gabion baskets — industrial look, very sturdy and good for slopes or retaining; pricey and heavy. 8) Poured curb (concrete edge poured against forms) — similar to poured concrete curb but can be formed to any shape; durable and permanent. Suitability: choose rigid restraints (concrete, pavers, stone, gabion) where loads, vehicle access, or heavy edging forces exist. Use flexible options (metal, plastic, timber) where curves or budget/DIY are priorities but ensure correct anchoring and base support.
How do I pick the right edge restraint by climate, budget, and aesthetics?
Climate: avoid untreated wood in wet or humid climates — use pressure‑treated (UC4) or durable species, or choose HDG steel, concrete, pavers, or stone. In coastal/salt environments choose stainless or specially coated steel or nonmetal alternatives; HDG service life is reduced near salt air. Budget: low cost — timber, plastic bender board; mid — pavers, metal edging; high — natural stone, poured concrete, gabions. Aesthetics: natural/soft look — timber or stone; crisp modern look — steel edging; traditional/finished look — pavers or concrete curb. Also consider permanence: temporary renters or renters’ projects should favor removable/low‑impact edges (plastic or lightweight metal anchored appropriately).
What base and drainage preparation is required before installing an edging and pea gravel patio?
Base and drainage essentials: 1) Subgrade: remove topsoil/organic matter to stable subgrade and scarify if needed. 2) Geotextile: install a non‑woven geotextile (select grade by fines and use; commonly ≥120 g/m²) to separate native soil from aggregate and reduce migration. 3) Structural base: use compactible angular aggregate (e.g., crushed stone, #57 or 3/4") compacted in lifts to ~95% Standard Proctor for pedestrian areas. Typical base thickness: 3–6 inches for walkways; 6–12+ inches for heavier loading or poor soils. 4) Bedding layer: a 1