For most homeowners, porcelain paving slabs are the best all-around choice in 2026: they handle freeze-thaw cycles well when ASTM C1026 frost-rated, they resist stains without annual sealing, and modern formats look nearly identical to natural stone. That said, 'best' shifts depending on your climate, budget, and how the patio will be used. A shaded wet patio in the Pacific Northwest needs different thinking than a sun-baked terrace in Arizona, and a flagstone path in a cottage garden is a completely different project from a crisp contemporary porcelain deck. This guide walks through every main material, compares them honestly, and ends with clear 'if your situation is X, pick Y' guidance.
What Are the Best Slabs for a Patio Choose by Climate

Nolan Ellison
10 Jun 2026
What 'best slabs' actually means for your patio
The word 'best' is doing a lot of work in this search. Before you start comparing materials, get clear on three things: your climate, your budget, and how hard the surface is going to work. A slab that performs brilliantly in mild coastal California can crack or stain badly in a Chicago winter. A beautiful $35-per-sq-ft natural stone patio is a great investment for a forever home but probably overkill for a rental property. And a smooth, polished porcelain that looks stunning in a showroom can be a slip hazard the moment it rains if you choose the wrong finish.
The key decision factors are: durability and frost resistance, slip safety (especially when wet), installation complexity and subbase requirements, appearance and available finishes, installed cost per square foot, and long-term maintenance effort. This guide covers all of them. If you are still figuring out the fundamentals of what a patio slab actually is, or how to narrow down your material shortlist, those are worth reviewing alongside this article before you buy anything.
The main slab materials compared
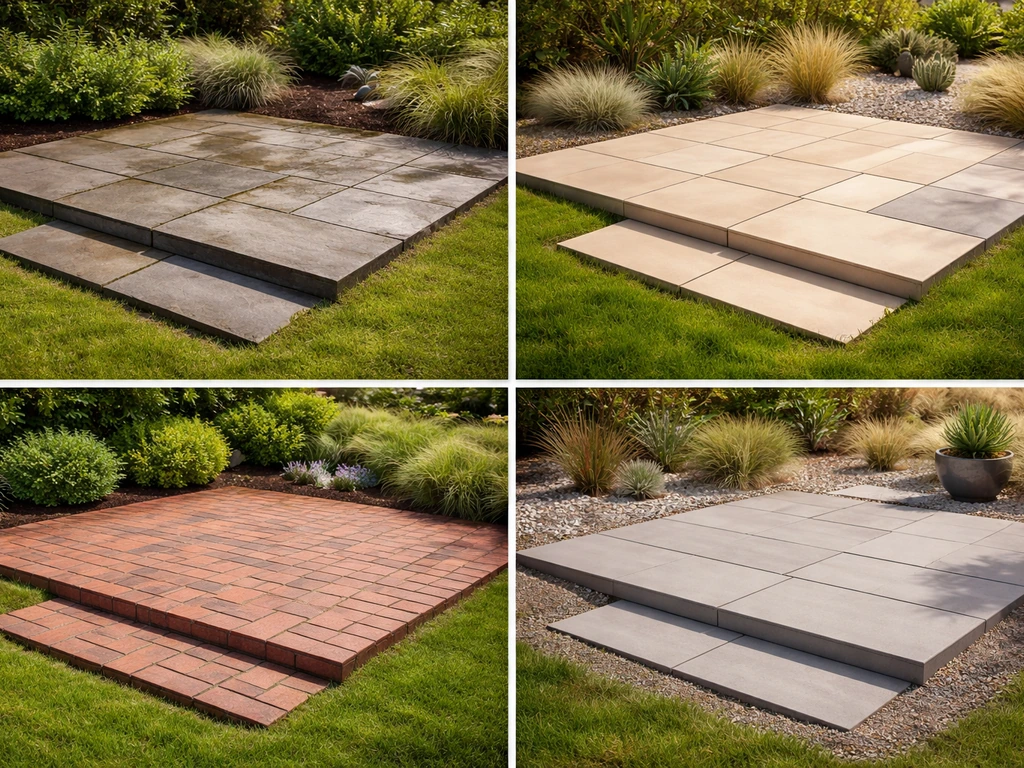
There are four main categories you will encounter: natural stone (flagstone and cut stone types like slate, sandstone, limestone, and granite), porcelain paving slabs, brick pavers, and composite or concrete-based slabs. Each has a genuinely different performance profile.
Natural stone: flagstone and cut stone
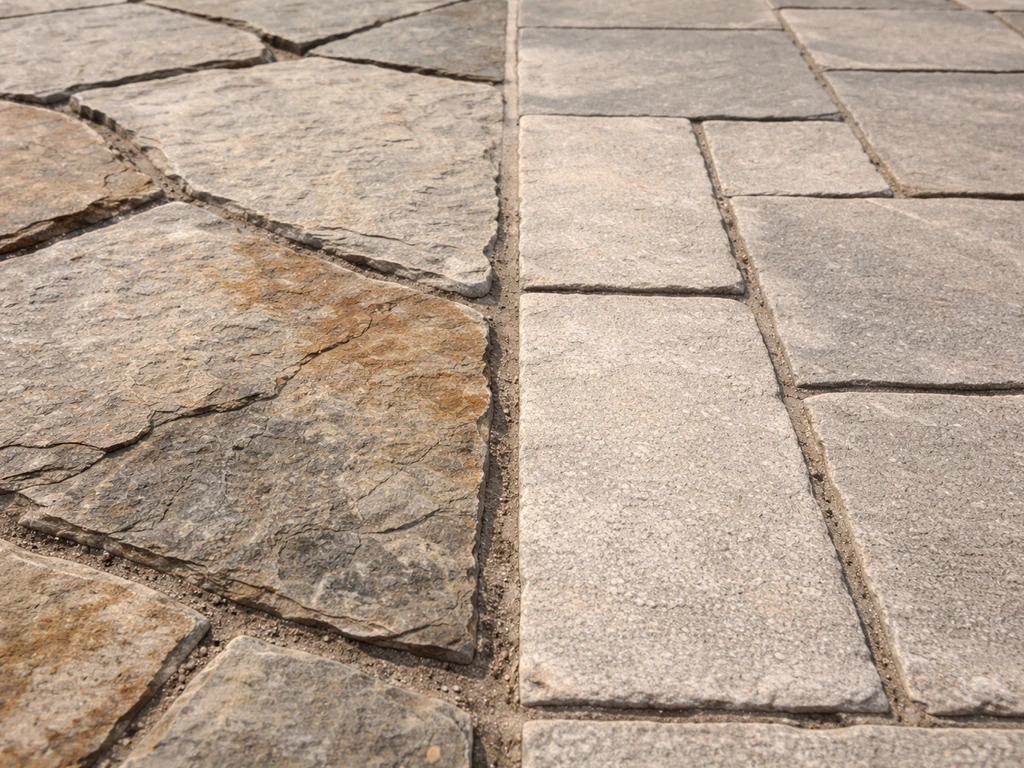
Natural stone is the most varied category. Flagstone usually means irregularly shaped pieces of sedimentary or metamorphic rock, while cut stone gives you consistent square or rectangular formats. Common types include slate, sandstone, limestone, bluestone, and granite. The appeal is real: no manufactured product fully replicates the depth and variation of natural stone, and a well-laid flagstone patio can last 50 or more years. The trade-offs are also real. Softer stones like sandstone and some limestones absorb water and can flake or spall in hard freeze-thaw climates. Slate is beautiful but splits if flexed or if the subbase moves. Granite is essentially indestructible but expensive and cold underfoot in winter. Most natural stone needs periodic sealing to resist staining, and organic debris like leaves can stain porous stones quickly. Installed costs typically sit in the $15 to $35 per sq ft range, with premium stones pushing higher.
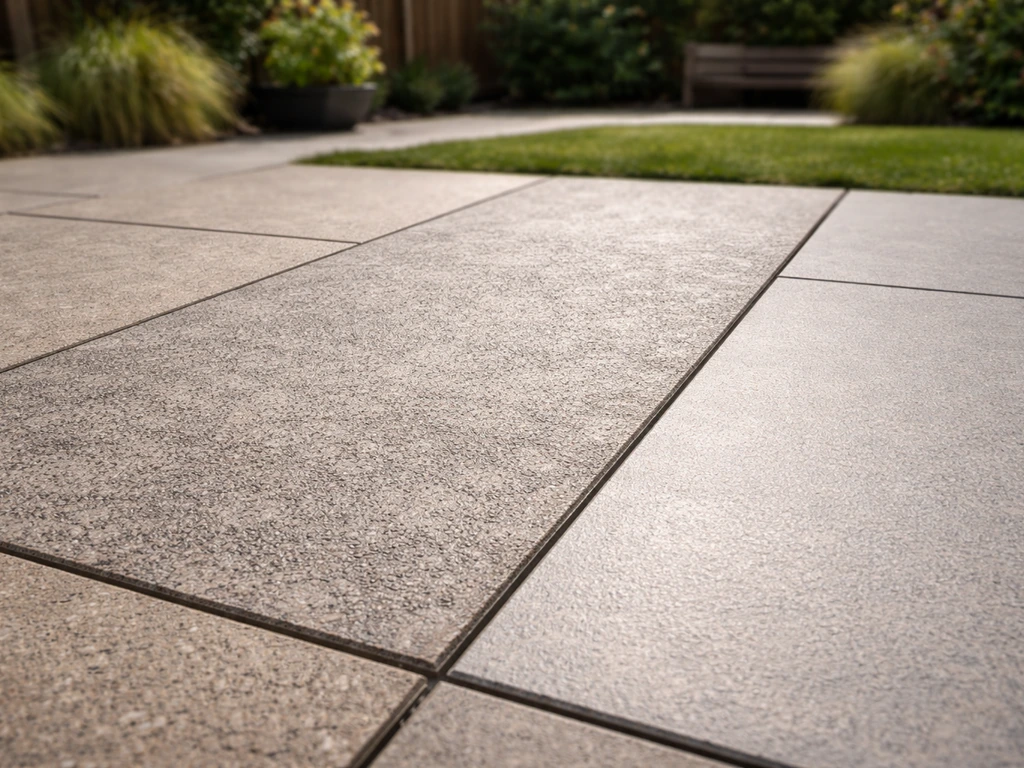
Porcelain paving slabs
Porcelain has become the dominant choice for new patios in the last several years, and for good reason. When manufactured to 2cm (approximately 3/4 inch) thickness and tested to ASTM C1026 for frost resistance, it handles freeze-thaw cycling well, does not absorb water at meaningful levels, resists most stains without sealing, and comes in formats that credibly mimic stone, wood, and concrete. The key qualification is that not every porcelain product is frost-rated, so you have to check the technical sheet and specifically look for the ASTM C1026 or ISO 10545-12 frost-resistance certification before buying for a cold climate. Slip resistance is also a product-specific variable, not a category-wide guarantee, which the safety section covers in detail. Porcelain tends to sit at the higher end of installed cost, often $20 to $40 per sq ft installed, partly because installation requires careful leveling, proper adhesive or pedestal systems, and precise cutting.
Brick pavers
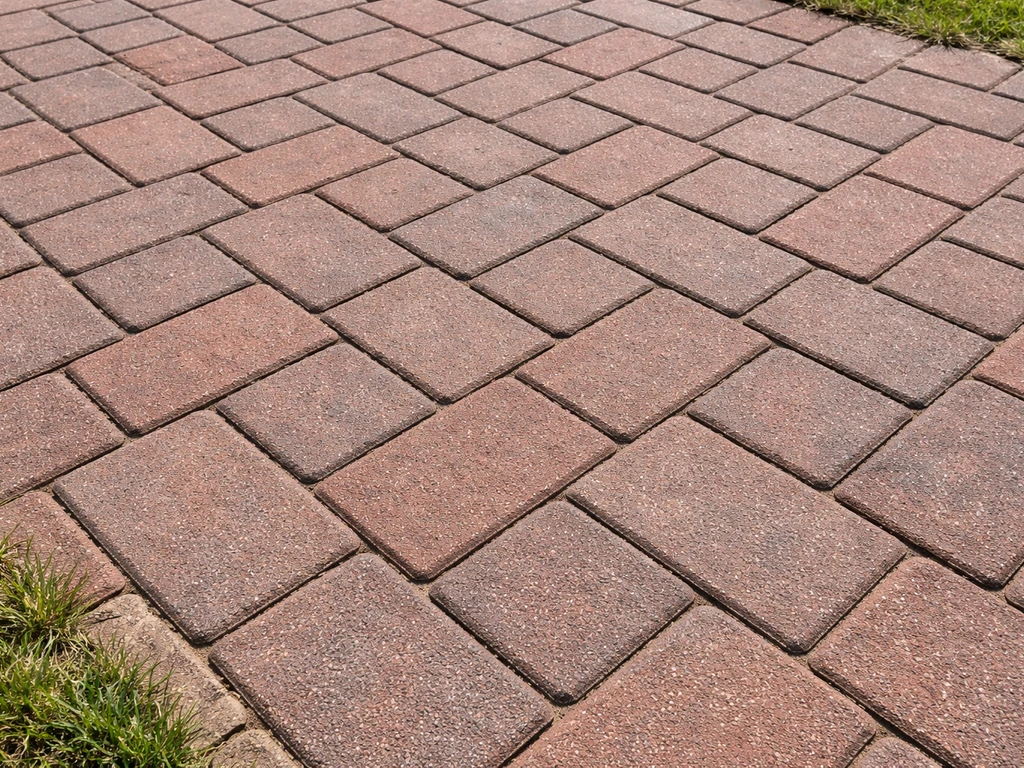
Brick pavers are a classic, especially for traditional, cottage, or formal garden aesthetics. They are dense, durable, and when properly installed on a compacted base, they flex slightly with ground movement rather than cracking the way monolithic materials do. Individual pavers can be lifted and reset if the surface settles, which makes repairs genuinely easy. Installed costs run roughly $14 to $28 per sq ft for brick pavers. The downsides: brick is porous enough to support moss and algae growth in shaded wet conditions, and the mortar or jointing sand between units can erode and need periodic topping up. In hard freeze-thaw climates, use vitrified or engineering-grade brick rather than softer face brick, which can spall.
Composite and concrete-based slabs
Concrete and composite pavers (including pre-cast concrete slabs, concrete paving stones, and manufactured stone composites) offer the widest range of entry-level price points and the most consistent sizing for DIY installation. They are heavier per unit than porcelain, and their color is integrated through the slab rather than applied as a surface glaze, so minor chips are less visible than on glazed tiles. The main weaknesses are efflorescence (a whitish salt bloom that can appear on the surface, especially in wet conditions) and the fact that standard concrete pavers fade over time in strong UV. Polymer-modified composite slabs and higher-density concrete pavers hold color better. Installed costs for standard concrete pavers often start around $10 to $20 per sq ft, making them the most accessible option.
| Material | Frost Resistance | Slip Safety (Wet) | Installed Cost (per sq ft) | Maintenance Level | Best For |
|---|---|---|---|---|---|
| Natural Stone (flagstone/cut) | Variable by stone type | Variable by finish/texture | $15–$35+ | Medium-High (sealing, stain care) | Aesthetic-first patios, cottage/informal gardens |
| Porcelain (2cm frost-rated) | High (when ASTM C1026 certified) | High (when R11+ finish specified) | $20–$40 | Low (no sealing needed) | Contemporary patios, freeze-thaw climates, low-maintenance priority |
| Brick Pavers | Medium-High (use vitrified brick in cold climates) | Medium (texture helps) | $14–$28 | Medium (joint maintenance, moss control) | Traditional/formal styles, DIY-friendly repairs |
| Concrete/Composite Slabs | Medium (density-dependent) | Medium (depends on surface texture) | $10–$20 | Low-Medium (sealing optional, efflorescence management) | Budget projects, large areas, DIY installs |
Which slab works best in your climate
Freeze-thaw climates (Zones 3–6, northern US, Canada, northern Europe)
This is where material selection really matters. Water expands about 9% when it freezes, and if it has soaked into a porous slab, repeated cycles will eventually fracture it. For porcelain, only buy slabs with a confirmed ASTM C1026 or ISO 10545-12 frost-resistance rating, written on the technical data sheet. For natural stone, dense, low-absorption options like granite and some bluestone perform well; avoid softer sandstones and some limestones unless they are sealed regularly and the supplier confirms freeze-thaw suitability. For brick, stick with vitrified or engineering-grade units. Concrete pavers need a high-density mix and a well-drained subbase so water does not pool under them. In all cases, getting the drainage and subbase right matters as much as the material itself.
Hot, dry climates (southwestern US, southern Europe)
In intense heat, light-colored materials stay more comfortable underfoot since they reflect rather than absorb solar radiation. Porcelain and light limestone or travertine are good picks. Dark granite or dark concrete pavers can get uncomfortably hot. UV fade is a factor for standard concrete pavers; higher-quality units and polymer-composite formats hold color better. Natural stone sealing is still advisable even in dry climates because fine dust and oil from outdoor cooking stain unprotected surfaces quickly.
Wet, shaded areas (Pacific Northwest, UK, humid southeast US)
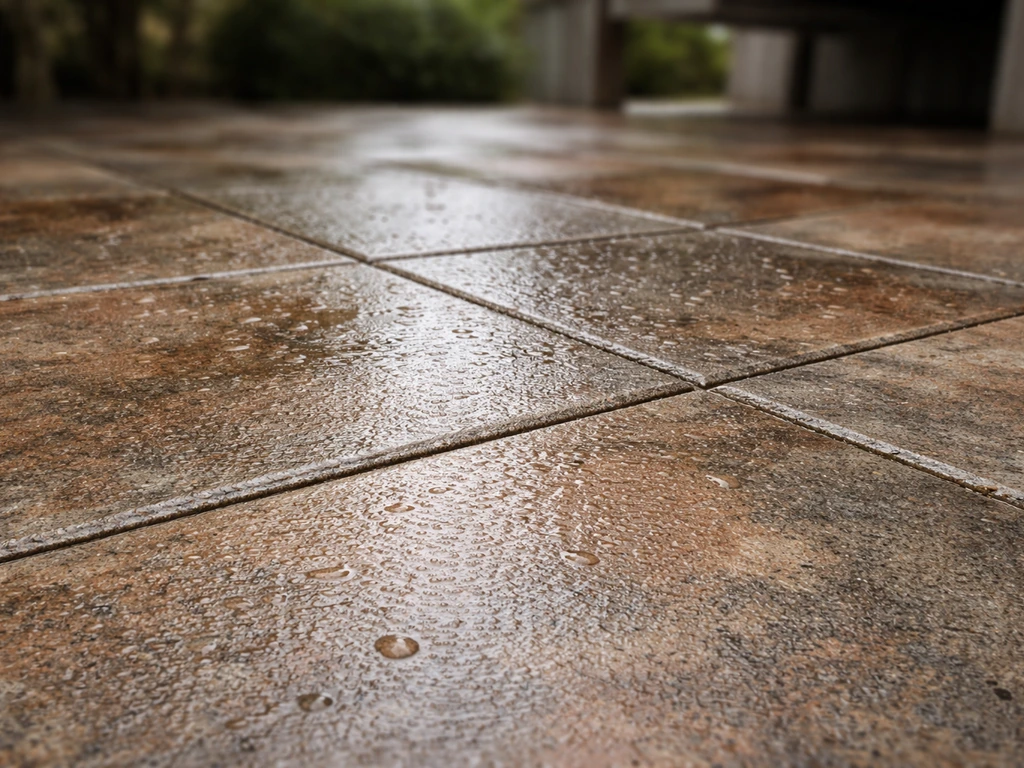
Moss and algae are the main enemies here. Textured porcelain with an R11 or better slip rating and a relatively open surface profile sheds water well and does not give algae much to grip. Natural stone with a riven or bush-hammered finish also works, but you need to stay on top of cleaning and may need annual algae treatments. Smooth-finished materials of any kind become dangerously slippery in permanently damp shade. Brick is fine but needs a moss-control routine. Good drainage built into the subbase and a minimum 1:80 surface fall away from the house are essential regardless of material.
Slip resistance and safety: what the ratings actually mean
Slip resistance is a specific, testable property, not just a feel. The two rating systems you will encounter most are the DIN 51130 R-scale and the ANSI A326.3 wet DCOF value. Understanding which applies to your situation helps you buy confidently.
The DIN 51130 ramp test classifies surfaces from R9 (low anti-slip) through R13 (highest anti-slip). For a residential patio that will get wet, R11 is the widely recommended minimum: it means the surface has been tested and confirmed suitable for external areas subject to heavy wetting. R12 steps up to areas like pool surrounds where water is constantly present. Some natural stone products and most quality outdoor porcelain paving are tested and rated; a product rated R11 corresponds to a PTV (pendulum test value) of 36 or above, which is what leading paving manufacturers like Bradstone reference when confirming a product is 'suitable for wet external use.' If a product does not quote an R rating or a PTV value in its technical sheet, treat it as unverified for wet conditions.
ANSI A326.3 wet DCOF is the US standard you will find on porcelain tile technical sheets. The threshold for wet interior areas is a wet DCOF of 0.42 or greater. For exterior patios, which are exposed to more variables than an interior wet room, many installers and manufacturers recommend looking for values meaningfully above this floor. Always check the product's declared use classification in its technical data sheet and match it to your actual conditions.
Practically speaking: textured, riven, or brushed surfaces always outperform polished or smooth ones when wet. On any patio, build in a slight surface fall (at least 1:80, ideally 1:60) to move water off quickly. For wood-look porcelain, check the profile of the embossing: some have a slip-safe texture along the grain and a near-smooth finish across it, so check the actual R rating and do not assume texture alone is sufficient.
Installation basics that determine whether your patio lasts
I have seen more patio failures from a bad subbase than from a bad material choice. The slab type you pick matters much less than whether it is sitting on a properly prepared, well-drained base.
Subbase depth and preparation
For a pedestrian patio, industry guidelines consistently specify a compacted gravel or crusher-run base of 4 to 6 inches for most residential applications. If the patio doubles as a parking area or sees any vehicular use, that steps up to 6 to 8 inches. Excavate, compact the subgrade, and lay geotextile membrane before the aggregate if your soil is clay-heavy or poorly draining. This part is not optional and not somewhere to save money or time.
Mortar-set vs dry-lay (sand-set)
Dry-lay (sand-set) installation is the standard approach for brick pavers and concrete/composite paving. The method involves screeding bedding sand to a nominal 1-inch thickness over the compacted base (using ASTM C33 coarse, angular concrete sand at roughly 1/2 to 3/4 inch depth before screeding) and then setting pavers into it. Joints are filled with polymeric sand once the field is complete. It is DIY-accessible, allows pavers to flex slightly with ground movement, and lets you lift and relay individual units easily. Polymeric sand in the joints should be topped up every 3 to 5 years as it compacts and erodes.
Mortar-set or full-bed adhesive installation is required for porcelain paving slabs and preferred for most cut natural stone. Porcelain is rigid and dimensionally consistent; it does not 'flex' safely, so any movement in a loose-laid system translates into cracks. A proper cement-based adhesive bed (or pedestal system for raised/drainage installations) on a solid concrete slab or very well-compacted base is essential. Porcelain patio slabs are also available in pedestal-supported systems where 2cm slabs rest on adjustable cement pedestals over a drainage layer, which is excellent for roof terraces or sloped drainage situations.
Joints and grouting
For mortar-set installations, grout joint width and the grout type affect both appearance and durability. Narrow joints (3 to 5mm) look clean and contemporary; wider joints (10mm+) suit irregular flagstone and more rustic styles. Use a flexible outdoor grout or a jointing compound rated for exterior use, not standard interior tile grout, which lacks the elasticity to handle temperature movement. For dry-lay brick and concrete pavers, polymeric sand is the modern standard: it locks in place when activated with water, resists weed germination better than plain sand, and is far more stable over time.
Maintenance and how long each material lasts
Sealing: necessary or optional?
Natural stone needs sealing. How often depends on the stone's porosity and your climate, but a general rule is to deep-clean, allow 24 to 48 hours of dry time, and then apply a penetrating (impregnating) sealer every 1 to 3 years for absorbent stones like sandstone and limestone, and every 3 to 5 years for denser options like granite or slate. If you are working with slate specifically, the best slate patio sealer depends on how porous the stone is and whether the surface needs a penetrating or topical finish. Penetrating sealers are preferred over topical sealers for exterior use because they do not leave a film that can peel or trap moisture. If you have slate, the related topic on slate patio sealers covers the nuances of sealer selection for that specific material in more detail.
Porcelain does not need sealing for stain protection since its non-porous surface resists absorption by nature. Brick and concrete pavers can be sealed to slow efflorescence and staining, but sealing is not mandatory for structural performance. One thing to watch with concrete pavers: sealing locks in any existing efflorescence, so if you plan to seal, deal with the salt deposits first with a purpose-made efflorescence remover before applying any sealer.
Routine cleaning
For all materials, regular brushing and rinsing prevents organic debris from staining. A low-pressure wash (not a high-pressure jet directly on joints) is effective for most surfaces. Algae and moss can be treated with a dilute patio cleaner; for heavily contaminated natural stone, a specialist stone cleaner rather than a general household acid is the right tool since acids can etch limestone and marble. For concrete pavers, mold and organic stain removers handle most seasonal buildup well.
Weed control
Weeds push through joints, not through slabs. The best weed control is good joint filling from day one: polymeric sand significantly outperforms plain grit or sand in resisting germination. Top up joints every 3 to 5 years before gaps appear, and treat any persistent growth with a contact weedkiller rather than persistent residual products that can affect nearby plants and soil.
Repairs and longevity
Brick and concrete dry-lay patios are the easiest to repair: lift the affected units, re-level the bedding sand, relay, and refill joints. Natural stone can be re-laid similarly if it was set on a flexible bed. Mortar-set porcelain and stone are harder to repair because the adhesive bond makes individual tiles difficult to lift without cracking. The flip side is that properly installed mortar-set porcelain is extremely stable and unlikely to need spot repairs for many years. Chips in porcelain can be touched up with grout colorant for minor damage, but a badly chipped tile in a prominent location typically needs replacing as a unit.
Your buying checklist before you commit
Before you order or hire anyone, run through these checks. Skipping any of them is how homeowners end up with a slab that looks wrong, performs badly, or fails after two winters. If you want to narrow it down fast, the best approach is to follow a step-by-step process for how to choose patio slabs based on climate, safety, and installation details.
- Confirm frost resistance. If you are in a freeze-thaw climate, check that the product's technical data sheet explicitly lists ASTM C1026 (US) or ISO 10545-12 (EU/international) frost-resistance test results and that the product passes. Do not assume: verify.
- Check the slip rating for your conditions. For any area that will get wet, look for DIN 51130 R11 minimum on the technical sheet, or a wet DCOF above 0.42 for ANSI A326.3-rated products. For pool surrounds or permanently wet areas, ask for R12.
- Match the installation method to the material. Porcelain requires mortar or adhesive bed over a solid base. Brick and concrete pavers suit dry-lay sand-set. Natural stone varies by format: cut stone usually needs mortar; flagstone can be dry-laid over a well-prepared gravel base.
- Confirm subbase depth for your soil type. Sandy or well-draining soil: 4 inches compacted crusher run minimum. Clay or poorly draining soil: 6 inches or more, plus consider a geotextile membrane and additional drainage provisions.
- Order 10% extra. Cutting waste, breakage, and future repairs mean you will regret not having matching material in stock, especially for natural stone where dye lots and quarry runs vary.
- Get the surface fall right. Minimum 1: 80 fall away from the house, preferably 1:60. Check this with your installer before any slabs go down, not after.
- Ask about joint material. For dry-lay, specify polymeric sand. For mortar-set, specify flexible exterior jointing compound or grout. Plain sand and standard interior tile grout are the wrong products for outdoor paving.
- Check for current stock and lead times. Some natural stone and custom porcelain formats have 4 to 8 week lead times. Confirm availability before finalizing your design around a specific material.
- Get at least two installer quotes if not doing it yourself, and ask each installer how they plan to prepare the subbase. The answer tells you a lot about their standards.
To summarize the 'if X, choose Y' guidance: freeze-thaw climate and low-maintenance priority, choose frost-rated porcelain with R11+ texture. Cottage garden or natural look on a moderate budget, go with flagstone or sandstone over a well-drained base (and commit to sealing). Traditional home or rental property where easy repairs matter, brick pavers are a reliable and cost-effective choice. Large area on a tight budget with a DIY installer, concrete composite pavers on a compacted gravel base deliver solid value. Pool surround or permanently wet zone, specify R12-rated textured porcelain or a riven natural stone with confirmed slip performance, and build in drainage from the start.
FAQ
Are 12 inch or smaller patio slabs always safer and easier than large formats?
Not automatically. Larger porcelain slabs can be fine if the installer manages flatness and cuts precisely, but they require better layout planning to reduce noticeable joint lines and to avoid lippage. If you expect uneven subgrade or you are DIYing, smaller units often forgive minor base irregularities more easily, but the real determinant is subbase prep and the correct installation method for the slab type.
What’s the biggest mistake people make when choosing the best slabs for a patio?
Buying for looks and then treating drainage and subbase as an afterthought. Even the right slab material can fail early if water pools, the surface fall is too small, or the base is not compacted and well-drained. If you only change one thing, verify the aggregate depth, compaction, and that runoff directs away from the house.
Can I use indoor tile slabs outside if I seal them?
Usually no. Indoor tiles are typically not built or tested for freeze-thaw cycling and may have different water absorption behavior and slip performance. Sealing cannot compensate for a product that is not frost-rated or not intended for wet external use, so check the technical sheet for frost and slip ratings before buying.
For freeze-thaw areas, is frost resistance the only rating I should care about?
No. Frost resistance reduces cracking risk, but slip safety and installation movement control still matter. For wet patios, prioritize an R rating or wet DCOF suitable for exterior conditions, and choose grout or adhesive systems designed for outdoor temperature movement, not standard interior products.
How do I know if my porcelain is truly safe for wet patio conditions?
Look for a published slip rating on the technical sheet, not just a description like “textured.” For wet areas, a commonly targeted minimum is DIN 51130 R11 (or higher for continuously wet zones), or an appropriate wet DCOF value for your specific declared use category. If no slip metric is provided, treat wet performance as unverified.
Do I need joint sealing on porcelain or natural stone patios?
Porcelain generally focuses on grout joints staying clean and properly filled, and it does not need a penetrating sealer for stain resistance. Natural stone often needs sealing, but sealing is about the stone surface, not the joints. If you choose a sealed stone, clean and seal the stone itself, then keep joints filled correctly because failing jointing can invite water and staining at edges.
How often should I reapply sealant on natural stone, and what triggers more frequent resealing?
A general schedule is every 1 to 3 years for more absorbent stones like sandstone and limestone, and every 3 to 5 years for denser options like granite or slate. Increase frequency if you see darkening after rain, faster staining around cooking areas, or water no longer beads on the surface after cleaning and drying.
What’s the difference between a penetrating and a topical sealer, and which should I choose?
Penetrating sealers soak into the stone and reduce absorption, which lowers staining risk without forming a film. Topical sealers sit on the surface and can peel or trap moisture in outdoor freeze-thaw conditions. For most outdoor patios, penetrating options are the safer default, especially for naturally porous stone.
My patio tiles feel rough but still get slippery in the rain. Why?
Textured appearance does not guarantee tested wet slip performance. Some textures are shallow or have inconsistent profiles, which can still allow slick behavior when fully wetted. Verify the published R rating or wet DCOF for your exact product and finish, and also confirm adequate surface fall and cleaning, because algae growth can make any surface behave differently.
Is polymeric sand required for brick and concrete paver patios?
It is not mandatory, but it is strongly recommended because it stabilizes joints and reduces weed germination compared with plain bedding sand. If you skip it, joints tend to wash out or stay loose, leading to more movement, more weeds, and more maintenance over time. If you use it, plan to top up every 3 to 5 years as joints compact and erode.
What should I do if I see efflorescence on concrete pavers before sealing?
Treat efflorescence first. Sealing can trap existing salt bloom, making it persist or appear worse. Use a purpose-made efflorescence remover, then allow full drying before any sealer application, and expect that ongoing moisture issues from drainage can cause recurrence.
How do I choose slab color for hot climates so the patio stays comfortable?
In intense sun, lighter colors generally feel cooler because they reflect more heat and absorb less. Dark granite or dark concrete can get uncomfortably hot, even with a durable surface. If you want a darker look, consider a higher-slip, textured finish and be prepared for more heat underfoot.
If a single porcelain slab chips, can it be repaired without replacing the whole thing?
Minor chips can sometimes be disguised with grout colorant, but that approach is usually limited to small, less noticeable damage. If the chip affects edges, alignment, or a prominent walking area, replacement as a unit is often the only durable fix because mortar-set porcelain is difficult to lift without risking cracking.
What base thickness should I use if my patio is mostly for walking, but occasionally a small vehicle might cross it?
A typical pedestrian-ready build is 4 to 6 inches of compacted aggregate, and when you expect any vehicular crossing it is safer to plan for 6 to 8 inches. The exact design also depends on subgrade strength and whether water is draining away correctly, so if vehicle loads are occasional, err toward the deeper build and verify compaction.