You can replace a faux stone patio tabletop successfully as a DIY project if you identify the material correctly first, choose a backer board and adhesive rated for outdoor freeze-thaw cycles, and give the mortar a full 28-day cure before putting weight on it. The most common replacement systems use a 1/2-inch cement backer board topped with porcelain tile, concrete overlay tile, or a thin faux stone panel bonded with a polymer-modified thinset rated for exterior use. Get that combination right and the new top will outlast the original by years.
Faux Stone Patio Table Top Replacement: DIY Guide

Nolan Ellison
2 Jun 2026
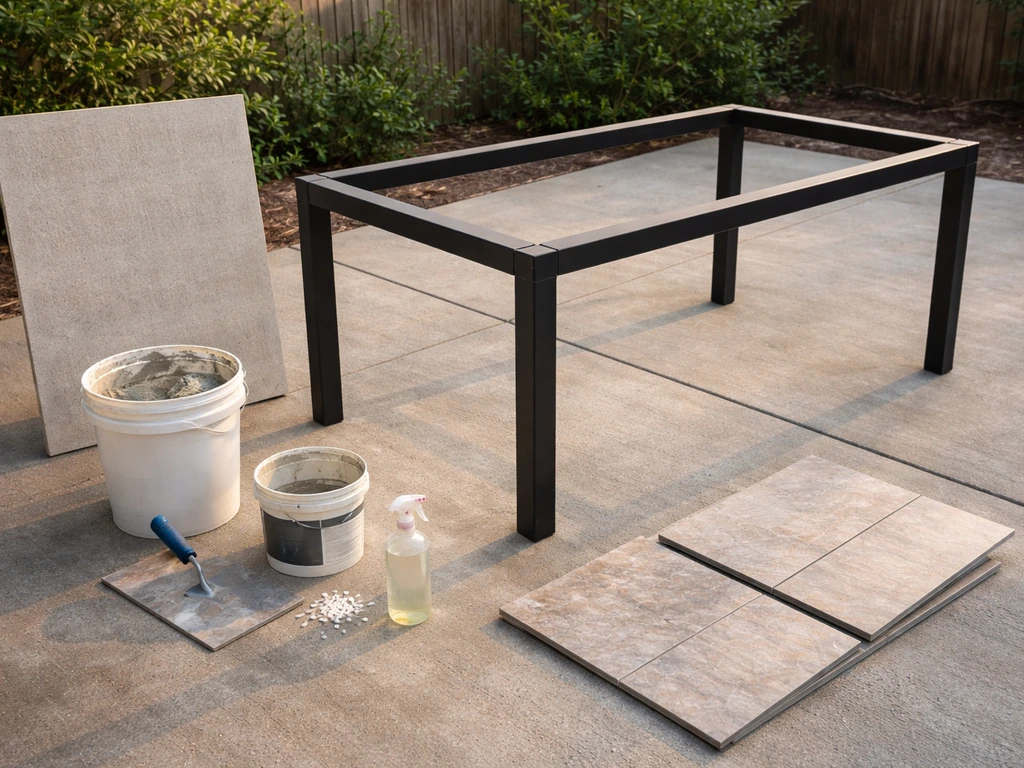
Figure out what your tabletop is actually made of
Before you order anything or pick up a pry bar, spend ten minutes figuring out what you are dealing with. Faux stone tabletops fall into four main categories, and each one has a different removal method, fastening system, and compatible replacement material.
- Concrete overlay or cast concrete top: Heavy (often 40-80 lbs for a standard 36-inch round top), poured or cast with an aggregate finish that mimics stone texture. Tap it with a knuckle and you get a dull thud. Look for hairline cracks from thermal expansion and check the underside for a steel reinforcement mesh.
- Resin or fiberglass composite top: Lightweight (under 20 lbs), hollow-sounding when tapped, and often sold as 'all-weather stone look.' The surface is a gel coat over fiberglass. Chips show a tan or gray resin layer underneath rather than real aggregate.
- Tile-over-backer system: Individual faux stone tiles (typically 12x12 or 16x16 inches) mortared onto a cement board or MDF substrate. Look at the edges or underside for grout lines and a board layer. This is the most DIY-friendly to replace.
- Laminate or printed faux stone sheet: A thin decorative sheet over a plywood or MDF core. Check the edge — if you see layers of wood grain with a thin printed surface, this is it. These fail fastest outdoors because the core swells.
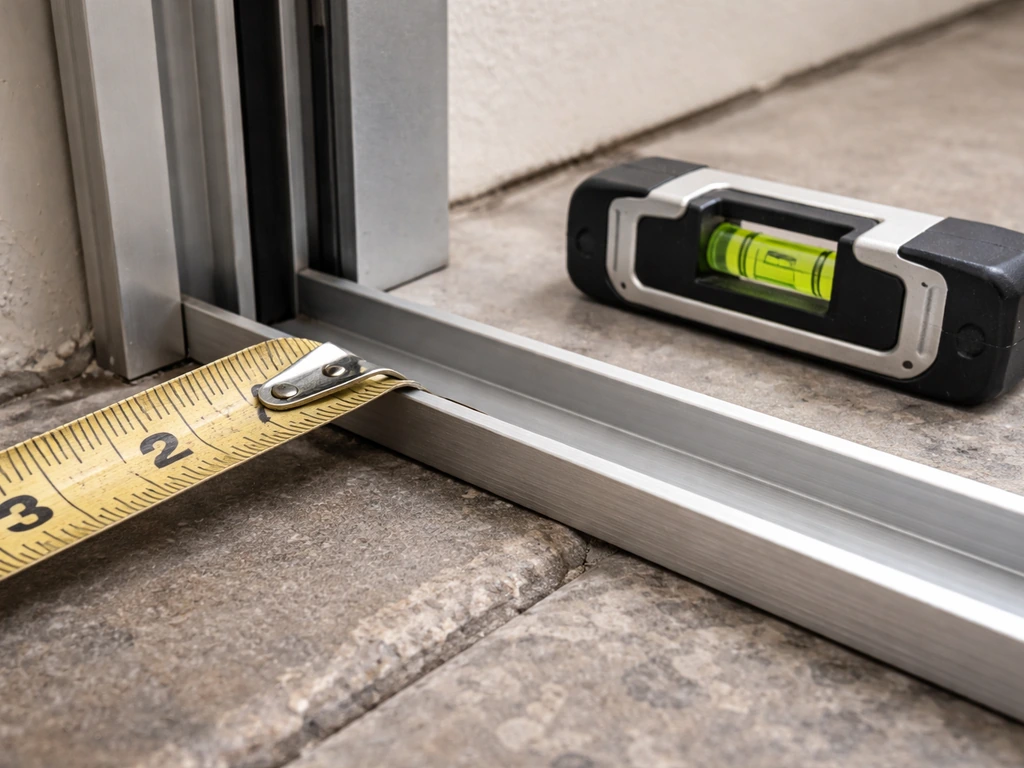
To check thickness, measure the top edge directly with a tape measure or digital calipers. Most tile-over-backer systems run 1.25 to 1.75 inches total (1/2-inch backer plus 3/8-inch tile plus mortar bed). Cast concrete tops are usually 1.5 to 2.5 inches thick. This measurement matters because your replacement stack needs to match or come close so the top sits flush on the frame and doesn't throw off table height or stability.
Also check the fastening method. Flip the table over (get a helper for cast concrete tops) and look underneath. Common attachment styles include: a lip or channel on the frame that the top simply rests in, threaded bolts or tabs that go up through the frame into the substrate, adhesive only, or a combination of mechanical clips and adhesive. Take photos before you do anything else. You'll refer back to them during reinstallation.
Repair vs full replacement: how to decide
A full replacement is not always necessary, and it's worth being honest with yourself here because a replacement job can cost $150-$500 in materials and a full weekend of time. Run through these scenarios first.
| Problem | Best Fix | DIY Difficulty |
|---|---|---|
| Grout cracking or missing between tiles | Grout removal and re-grouting with sanded exterior grout | Easy |
| One or two cracked tiles | Individual tile removal and replacement with matching tile | Easy-Medium |
| Top is loose or wobbles on the frame | Re-anchor with epoxy adhesive or tighten frame bolts | Easy |
| Surface looks dull or stained | Deep clean and re-seal with a penetrating outdoor sealer | Easy |
| Concrete top has surface cracks under 1/4 inch wide | Fill with flexible polyurethane concrete crack filler and re-seal | Easy-Medium |
| Multiple tiles lifting or de-bonding | Remove all tiles, prep backer, re-mortar and re-tile | Medium |
| Backer board is waterlogged, soft, or delaminated | Full replacement of top system | Medium-Hard |
| Concrete top is cracked through, spalling badly, or broken | Full replacement | Hard (heavy lifting) |
| Laminate core is swollen or bubbling | Full replacement — this material should not be outdoors | Medium |
One thing I've seen trip people up: they go straight to replacement when all they had was a hollow-sounding tile or two that had de-bonded from the backer. Tap every tile with a coin. A hollow sound means the thinset has released underneath. If it's fewer than 20% of tiles, re-bonding or replacing just those tiles saves you the whole job. Only when the backer itself is compromised or the substrate has structural damage does a full tear-out make sense.
DIY or hire a pro, and what bases are compatible
Most tile-over-backer replacements are genuinely doable for a confident DIYer with basic tile experience. The harder calls are cast concrete tops (which require either ordering a pre-cast replacement or knowing how to build a form and mix a fiber-reinforced concrete), and any job where the table frame itself needs welding or structural repair.
When to DIY
- The frame is in good shape (no rust through, no cracked welds, legs are stable)
- The replacement system is a tile-over-backer or a pre-made composite panel
- You are comfortable with basic tile work: dry fitting, spreading thinset, grouting
- The tabletop is 36 inches or smaller in diameter (manageable weight and cuts)
When to call a pro
- The table frame is wrought iron or steel with rust, cracked welds, or bent legs that need a metal fabricator
- You want a poured cast concrete replacement (formwork and mix design require experience to avoid cracking)
- The table is large format (48 inches or wider) and the tile layout involves complex cuts around frame supports
- You are in a climate with hard freeze-thaw cycles and want a warranted installation
Base compatibility check
Your new top system needs a compatible frame. Steel and aluminum frames with a flat lip or channel are ideal for a tile-over-backer build. Wrought iron frames with decorative open work underneath the top typically use mechanical tabs or an adhesive-only system. If the frame has a flat perimeter rail and open center, you need to add a substrate panel that spans the opening before you can lay tile. Check that the frame can support the added weight: a cement backer plus tile system typically adds 4-8 lbs per square foot more than the original laminate top it replaces.
Step-by-step replacement: measure, remove, prep, install, seal
Step 1: Measure and plan
Measure the usable frame opening or lip dimension, not the old top's outer edge. For a tile-over-backer system, your backer board should fit inside or sit on top of the frame lip by at least 1/2 inch on each side. Sketch the tile layout dry on paper first, centering your pattern and planning where cut tiles will fall. Avoid cuts narrower than half a tile at any visible edge. If you are using large-format tiles (anything over 15x15 inches), factor in a wet saw with a tile blade.
Step 2: Remove the old top safely
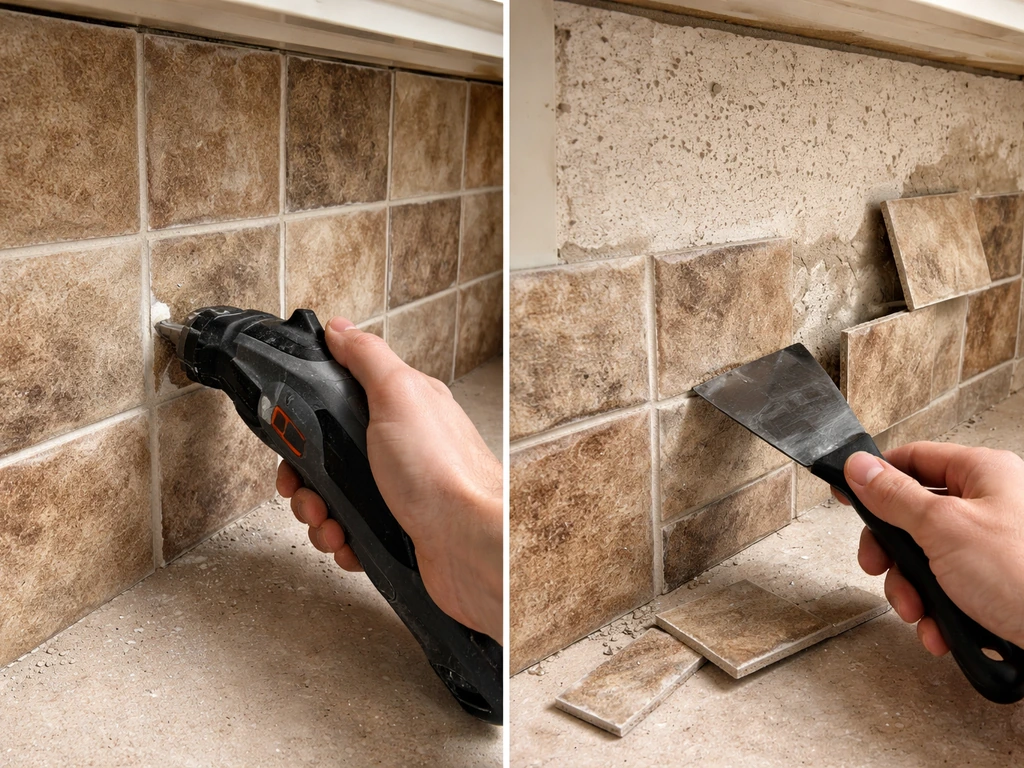
- For tile-over-backer: Use a grout saw or oscillating tool to cut grout lines, then insert a wide putty knife under each tile and tap with a mallet. Work from the edges inward. Remove the backer board by unscrewing fasteners or slicing through any adhesive bead with a utility knife.
- For cast concrete: This takes two people minimum. Cut any adhesive or caulk bead at the frame joint with a utility knife, then lift straight up. Have a flat surface or dolly ready to set it on — do not drop it.
- For resin/fiberglass: Usually sits in a channel with a bead of silicone. Slice the silicone, lift out. Straightforward.
- For laminate over MDF: Often screwed from below or held by clips. Remove screws or pry clips open, then pull the panel out. Expect it to be heavier than it looks if it has absorbed water.
Step 3: Prep the frame
Clean all adhesive residue off the frame lip using a heat gun and scraper or a citrus-based adhesive remover. Check for rust: surface rust on steel can be treated with a rust converter and sealed with a metal primer, but if you can push a screwdriver through a rusted section, that frame needs professional repair before you do anything else. Verify the frame is level end-to-end and side-to-side with a spirit level. Shim as needed under the legs. A warped or out-of-level frame will crack tiles or cause grout failure within one season.
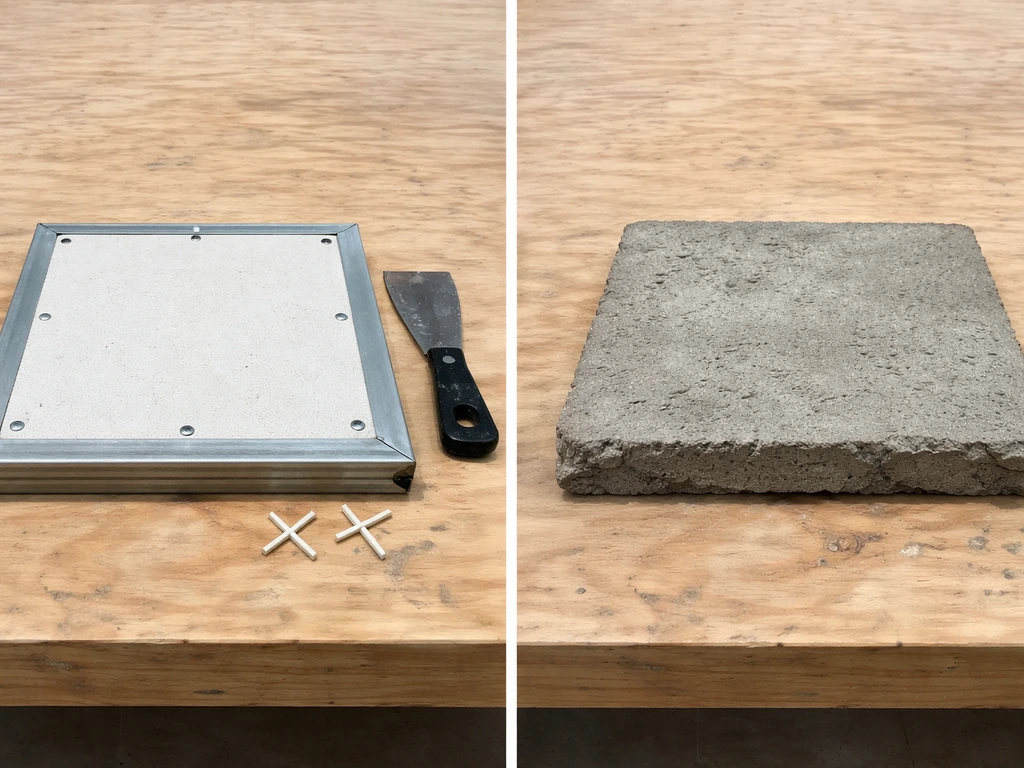
Step 4: Install the backer board
Use a 1/2-inch cement backer board (ANSI A. 118. 9 / ASTM C1325 rated) for standard tile work. A cement backer board system rated under ANSI A.
118. 9 and ASTM C1325 is a common standard used for these installations [(ANSI A. 118. 9 / ASTM C1325 rated)](https://cdn-global.
laticrete. com/-/media/project/laticrete-international/shared/files/support-and-downloads/technical-datasheets/tds294-tile-stone-backer-board-selection-guide. ashx? d=20210316T170813Z&hash=509FED2E4F5DD264186E8423EA5C85877CF4DF70&la=en&vs=2).
Go to 5/8 inch if you are using heavier stone-look porcelain tiles over 10 mm thick or if you need to match the height of the existing top. Cut cement board with a scoring knife and snap method or an angle grinder with a diamond blade, do not use wood saw blades.
Secure the board to the frame with stainless steel screws (1. 25-inch minimum) spaced 8 inches apart. Apply a bed of unmodified thinset between the board and the frame rail first to eliminate any flex. Tape all seams with alkali-resistant fiberglass mesh tape and flat-trowel a layer of thinset over the tape.
Let this dry overnight.
Step 5: Lay the tile or panel
Dry-fit all tiles first. Then mix your polymer-modified thinset (rated for exterior and freeze-thaw use) to a peanut butter consistency. Use a 3/8-inch V-notch trowel for tiles under 15 inches, or a 1/2-inch square notch for larger format tiles. Apply thinset to the backer board with the flat side first, then comb. Back-butter each tile as well for outdoor work, this eliminates air voids that trap water. Press each tile firmly and twist slightly to collapse the notch ridges. Use 1/16-inch spacers for a tighter grout line that's easier to keep clean on a tabletop. Check alignment frequently. Let thinset set for a minimum of 24 hours (48 hours in temperatures below 60°F) before grouting.
Step 6: Grout and seal
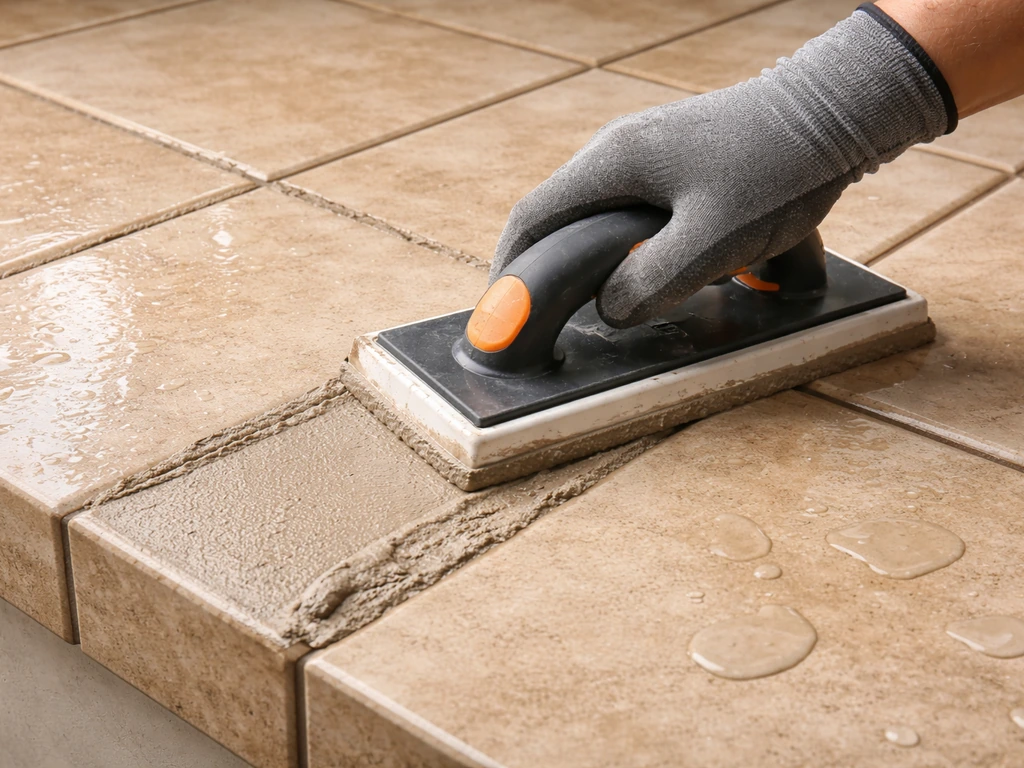
Use a sanded exterior-rated grout for joints wider than 1/8 inch, or unsanded for joints at 1/16 inch. Mix to a smooth paste, float diagonally across joints, and wipe clean with a damp sponge in circular motions. Allow grout to cure 72 hours before sealing. Apply a penetrating siloxane-based sealer designed for outdoor tile and grout. This type soaks in rather than forming a surface film, which means it won't peel in UV or freeze-thaw conditions. Two coats, with the second coat applied while the first is still slightly tacky, gives the best penetration.
Adhesives, mortar, backer boards, and finishes that hold up outdoors
The single biggest failure point in outdoor tile work is using interior-rated products. It is tempting to grab whatever thinset is on sale at the hardware store, but in an outdoor setting the top will go through repeated wet-dry cycles, UV exposure, and in most climates at least some freeze-thaw stress. The water that gets into micro-voids in an interior-rated thinset expands when it freezes and pops tiles off. Use exterior-rated products from the start.
| Product Type | What to Look For | What to Avoid |
|---|---|---|
| Thinset mortar | Polymer-modified, exterior/freeze-thaw rated, ANSI A118.4 or A118.15 compliant | Standard unmodified white thinset, interior-only mastic |
| Backer board | Cement backer board meeting ANSI A118.9 / ASTM C1325; 1/2 in standard, 5/8 in for heavy tile | MDF, foam board, standard drywall, any wood-core substrate |
| Grout | Sanded or unsanded exterior-rated grout; epoxy grout for near-zero maintenance | Interior grout only, pre-mixed tub grout |
| Sealer | Penetrating siloxane or silane-siloxane blend rated for outdoor tile and freeze-thaw | Surface-film acrylic sealers, interior tile sealers |
| Frame adhesive (if used) | Marine-grade or outdoor construction adhesive (such as MS polymer or polyurethane) | Standard construction adhesive, interior silicone |
Epoxy grout is worth calling out separately. It costs more and takes more skill to work with because it sets fast, but for a tabletop (which will have food, drinks, and cleaning chemicals on it regularly) epoxy grout is essentially stain-proof and needs no sealing. If this is a dining table you use heavily, the upgrade is worth it.
For the backer board, the 1/2-inch cement board handles the vast majority of faux stone tile jobs. Step up to 5/8 inch if your replacement tiles are thick porcelain (10 mm or more), if the frame has a deep channel that needs to be filled to maintain the right top height, or if the span between frame supports is wide enough that you want the extra rigidity. On a round table with a center post, the backer will be well-supported, but on a rectangular table with only perimeter rails and no cross supports, 5/8 inch adds meaningful stiffness.
Curing, weather-proofing, and keeping it from cracking again
Curing timelines to respect
Polymer-modified thinset reaches handling strength in 24-48 hours but full cure takes 28 days. During that period, avoid hard impacts and prolonged water pooling on the surface. Grout needs at least 72 hours before getting wet and a full 28 days before you consider it at full strength. In hot, dry weather (above 90°F), mist the grout lightly with water twice a day for the first 48 hours to slow the cure and prevent shrinkage cracking. In cold weather (below 50°F), you should not be installing tile at all, the mortar won't cure properly and can fail before it ever reaches usable strength.
Weatherproofing details that actually matter
- Slope: Even a tabletop benefits from a very slight slope (1/8 inch per foot) toward the outer edge so water drains off rather than pooling in the center. Build this into your backer board installation by shimming slightly at the center.
- Edge treatment: The perimeter edge where the top meets the frame is the number-one entry point for water. Seal this joint with a backer rod (foam rope) pressed into the gap, then caulk over it with a paintable polyurethane or silicone-hybrid outdoor caulk. Do not use thinset or grout for this joint — rigid materials crack here.
- Cover it when not in use: A UV-resistant outdoor table cover reduces thermal cycling dramatically, which is the main driver of tile and grout cracking. This simple habit extends resealing intervals significantly.
- Avoid standing water: In climates with hard freezes, standing water in grout joints is the primary cause of spalling. Verify drainage is working after every installation.
Maintenance schedule
| Task | Frequency | Notes |
|---|---|---|
| Clean surface with pH-neutral cleaner | Monthly or after heavy use | Avoid vinegar, bleach, or citrus-based cleaners on sealed tile — they degrade sealer |
| Inspect grout for cracks or voids | Every spring | Catch hairline cracks early and fill before water infiltrates |
| Re-apply penetrating sealer | Every 1-2 years | More often in freeze-thaw climates or if water stops beading on surface |
| Inspect and re-caulk perimeter edge joint | Every 2 years | Check for shrinkage, cracking, or loss of adhesion |
| Check frame for rust or loose fasteners | Every spring | Treat surface rust immediately; tighten any loose backer board screws |
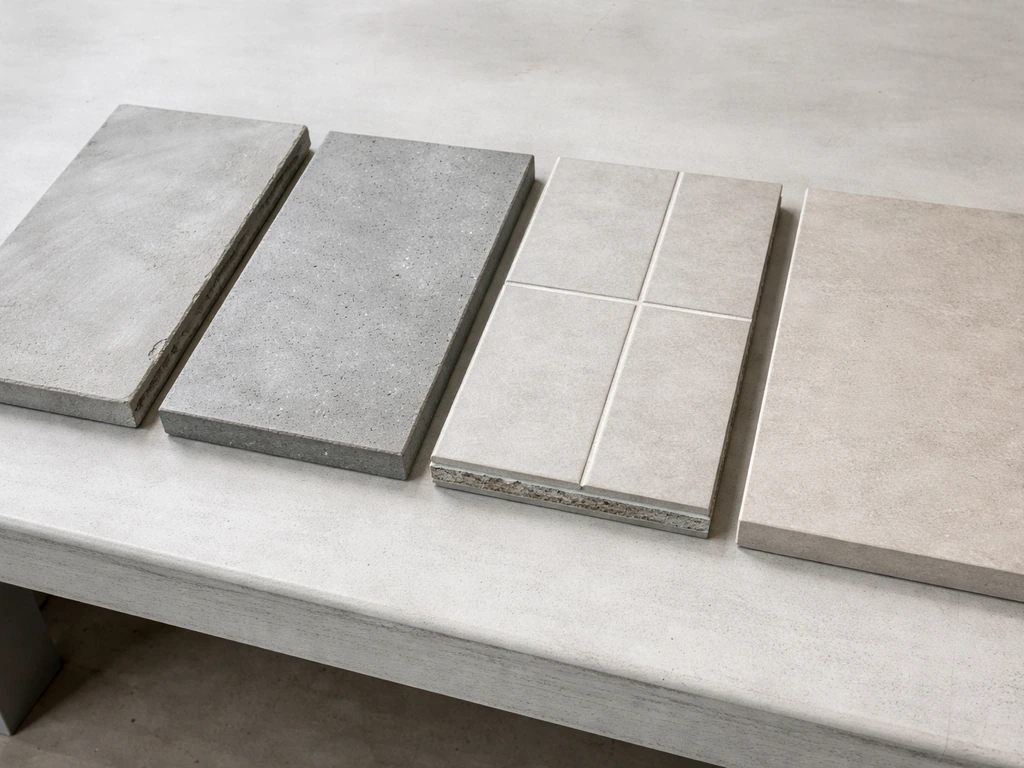
How faux stone compares to more durable replacement options
If you are going through a full replacement, it's worth asking whether you want to stick with a faux stone look or upgrade the actual material. The look is achievable with several different tile types, and they perform very differently outdoors. This is especially relevant if your original top failed prematurely and you want to avoid a repeat.
| Material | Durability Outdoors | Freeze-Thaw Performance | Maintenance | Cost Range (materials only) |
|---|---|---|---|---|
| Faux stone resin/composite panel | Moderate — surface chips, UV fades | Poor to moderate | Low (no grouting) | $30-$80 per panel |
| Concrete overlay tile (faux stone look) | Good — depends on mix quality | Moderate — needs good sealing | Medium (annual sealing) | $3-$8 per sq ft |
| Porcelain tile (stone-look) | Excellent — very hard surface | Excellent if rated for exterior use | Low to medium | $4-$12 per sq ft |
| Natural stone tile (slate, limestone) | Variable — slate is excellent, limestone is soft | Variable — test for water absorption rating | Medium to high | $8-$25 per sq ft |
| Cast concrete top | Excellent if fiber-reinforced | Good with proper sealing | Medium (sealing every 1-2 years) | $50-$200 depending on size |
Porcelain tile with a stone-look finish is genuinely the strongest all-around choice for an outdoor tabletop in most climates. For a patio surface, choose the best outdoor non-slip tile option you can by prioritizing exterior-rated, frost-resistant materials with a slip-resistant finish best tile for outdoor patio non slip. It's harder than natural stone, nearly non-porous, frost-resistant when rated for exterior use, and available in very convincing travertine, slate, and concrete textures.
The installation process is the same tile-over-backer system described above. If you want to confirm performance before you buy, check interlocking patio tiles reviews for real-world durability comparisons. If you are already tearing out the old top, upgrading to exterior porcelain costs only a little more in materials and gives you a top that should last 15-20 years with basic maintenance.
The sibling topic of tiles for patio table tops covers tile selection in more detail if you want to compare options before committing. Choosing the best tiles for patio use comes down to exterior ratings, freeze-thaw resistance, and the right installation system. If you are comparing options, start by choosing the best tile for outdoor patios with a confirmed exterior and freeze-thaw rating.
If you are comparing options, tiles for patio table tops will help you choose the right size, finish, and outdoor rating for your build.
Realistic costs, timelines, and sourcing tips
What you will spend
| Item | Typical Cost Range | Notes |
|---|---|---|
| Cement backer board (1/2 in, 3x5 sheet) | $10-$18 per sheet | One sheet covers most standard round or square tabletops |
| Exterior polymer-modified thinset (50 lb bag) | $25-$45 | One bag is more than enough for a single tabletop |
| Porcelain or concrete-look tile | $4-$12 per sq ft | A 36-inch round top is roughly 7 sq ft |
| Exterior grout (10 lb) | $15-$30 | Sanded for joints over 1/8 in |
| Penetrating siloxane sealer (quart) | $18-$35 | Covers multiple applications for one tabletop |
| Tools (if not already owned): wet saw, notched trowel, grout float, spacers | $40-$150 rental or purchase | Wet saw rental from home center is most cost-effective |
| Professional installation (labor only) | $200-$600 depending on complexity | More for cast concrete fabrication |
Total DIY materials for a tile-over-backer replacement typically run $80-$180 for a standard 36-42 inch tabletop. Add tool rental if needed and you're in the $120-$250 range. A professional doing the full job on a standard table typically charges $300-$600 including materials, more if fabrication is involved.
Where to source materials
Home improvement stores carry most of what you need: cement board, thinset, grout, and basic tile. For a wider selection of stone-look porcelain tiles, tile specialty stores or online tile retailers typically have better options, and many offer free samples so you can see the color and texture before ordering. When sourcing tile, always confirm it carries a freeze-thaw rating if you are in a climate that gets below 32°F. This is usually listed in the product spec sheet as 'suitable for exterior use' or with a specific PEI wear rating of 3 or higher.
Questions to ask when hiring help
- Have you done tile work on outdoor furniture specifically, not just patio floors? (Furniture has different structural support challenges than a slab-on-grade floor.)
- What thinset product will you use and is it rated for exterior freeze-thaw? Ask for the product name.
- Will you use cement backer board, and what thickness?
- Do you include sealing in the quote, or is that extra?
- What is your process for handling the perimeter edge joint between the top and the frame?
- Do you offer any workmanship warranty, and what does it cover?
The most important thing you can do today is the identification step. Take ten minutes to figure out exactly what category your current top falls into, photograph the underside and the fastening system, and measure the thickness. Everything else, material choice, backer board spec, adhesive selection, and whether to DIY or hire out, follows directly from that. Once you know what you have, the path forward is straightforward.
FAQ
Can I repair just the failed faux stone tiles instead of replacing the whole tabletop?
Not necessarily. If only a small portion has let go (for example, a few tiles with a hollow sound and the backer is still solid), you can often remove just the loose tiles, clean all old thinset from the backer, then re-set those tiles using the same exterior freeze-thaw rated thinset. The key is to confirm the backer and substrate are intact, then blend the grout joints so the repaired area matches the existing line and height.
How close does the replacement thickness need to match the original faux stone patio table top replacement?
Aim for a replacement system that lands within about 1/8 inch of the original top height so the frame lip supports the new assembly evenly. If you end up too thick, the tabletop can bind, rock, or sit proud, which increases stress on grout joints. If it is too thin, you may lose bearing contact with the frame and get cracking from flex.
My table frame is mostly a perimeter rail, can I still do a tile-over-backer installation?
You usually do not want to set cement backer directly to untreated wood or a soft, flexible substrate. For outdoor tabletops, use a rigid substrate plan (cement backer on a sound frame lip or a spanning substrate panel where the center is open). If your frame has only perimeter rails, adding a spanning substrate panel helps prevent bounce and tile failure.
What happens if I accidentally use interior-rated thinset or grout on an outdoor tabletop?
Use exterior-rated materials intended for freeze-thaw. Interior thinset that lacks freeze-thaw performance is a common cause of tile popping, especially when the tabletop gets wet and then freezes. For the tile itself, confirm the product states exterior use and frost resistance, typically shown in the spec sheet.
Can I tile a tabletop if the table legs or frame wobble slightly?
Yes, but only if the table is stable enough for tile cracking resistance. Mortar and grout may cure, but a wobbly frame still flexes and breaks grout or loosens tiles. Before tiling, verify level end-to-end and side-to-side, then shim under legs so the frame does not move under light pressure.
What if my frame has an open center and no proper lip for the replacement top to rest on?
If you do not have a lip or channel for bearing, you need to create support before you install backer and tile. That means adding a substrate panel spanning the opening (with the right thickness to achieve the correct top height and stiffness). Installing tile on unsupported spans is a fast way to get cracking or debonding.
Should I always use 1/16 inch grout joints for faux stone patio table top replacement?
For outdoor tabletop use, 1/16 inch spacers often look great and keep the grout line narrow and easier to maintain, but the grout still needs to fully wet and pack in. If you are working with larger-format tiles or less-than-perfect flatness, you may need slightly wider joints for easier alignment, because tight joints amplify the impact of minor lippage.
Can I reduce materials to save height, like using a thinner backer board?
Yes. You can sometimes use thinner systems, but you must still match the required stiffness and height. If you reduce backer thickness, you generally increase the risk of flex on a tabletop, which leads to grout cracks and tile movement. The safest decision rule is to keep the rigid stack and adjust height with a designed system rather than skipping rigidity.
When is the right time to apply sealer after grouting an outdoor patio table top?
Do not seal grout too soon. Seal only after grout cure and drying are complete, and keep the surface free of dust, thinset haze, or cleaning residues that prevent penetration. Also, use a penetrating siloxane sealer intended for outdoor tile and grout so it does not peel under UV and freeze-thaw conditions.
Is epoxy grout actually better for a patio dining tabletop, or is it just more work?
Epoxy grout is often worth considering when the tabletop sees frequent staining or aggressive cleaners, but it requires careful workflow because it sets faster and needs correct mixing ratios. If you choose epoxy, plan for faster cleanup and follow an epoxy-specific sponge method to avoid permanent haze.
How do I plan tile cuts so the tabletop looks right and stays structurally sound?
Tile layout adjustments matter even more on tabletop shapes like round or ornate frames. Plan your pattern so the “worst” cuts land on less visible edges, then dry-fit repeatedly to verify the centerline aligns with the table frame. For large tiles, confirm your wet saw can handle the cut size and keep the joint widths consistent across the entire perimeter.
Can I just treat rust on a steel patio table frame, or do I need repair first?
If your frame has active rust or compromised metal strength (for example, you can push a screwdriver through it), you should not proceed with a tile installation. Tile assembly is heavy, and rust-related weakness can worsen over time, causing movement and cracking. Treat surface rust that is stable with a rust converter and metal primer, but repair structural rust before installing the replacement top.
How long should I wait before using the patio table after installing the faux stone patio table top replacement?
Avoid using the tabletop before full cure. While thinset and grout may reach handling strength sooner, full performance takes weeks, and early water exposure can weaken the bond. In hot weather, lightly mist grout early to reduce shrinkage cracking, and in cold weather avoid installation entirely if temperatures will not support proper curing.
What are the most common mistakes that cause tile failure on outdoor tabletop replacements?
If you see lippage, uneven ridges in thinset, or inconsistent grout line widths during dry fit and setting, stop and correct immediately. Most tabletop failures trace back to flatness and support issues, not to the tile product alone. A quick recheck of frame levelness and backer bonding before setting usually prevents hours of rework.