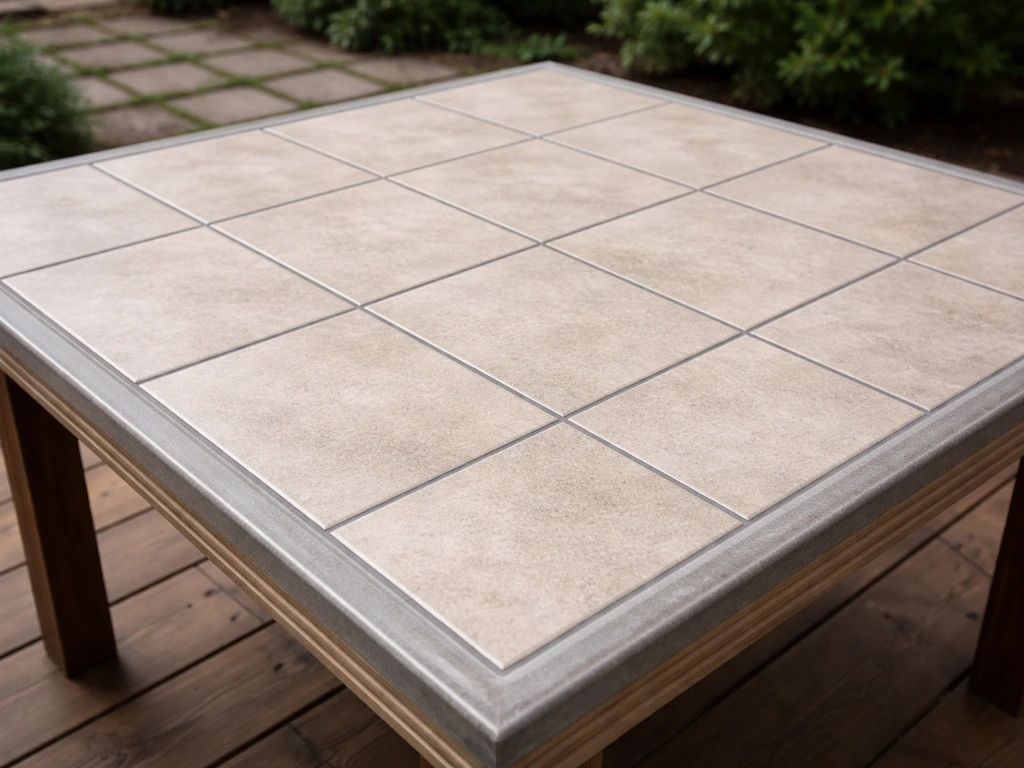
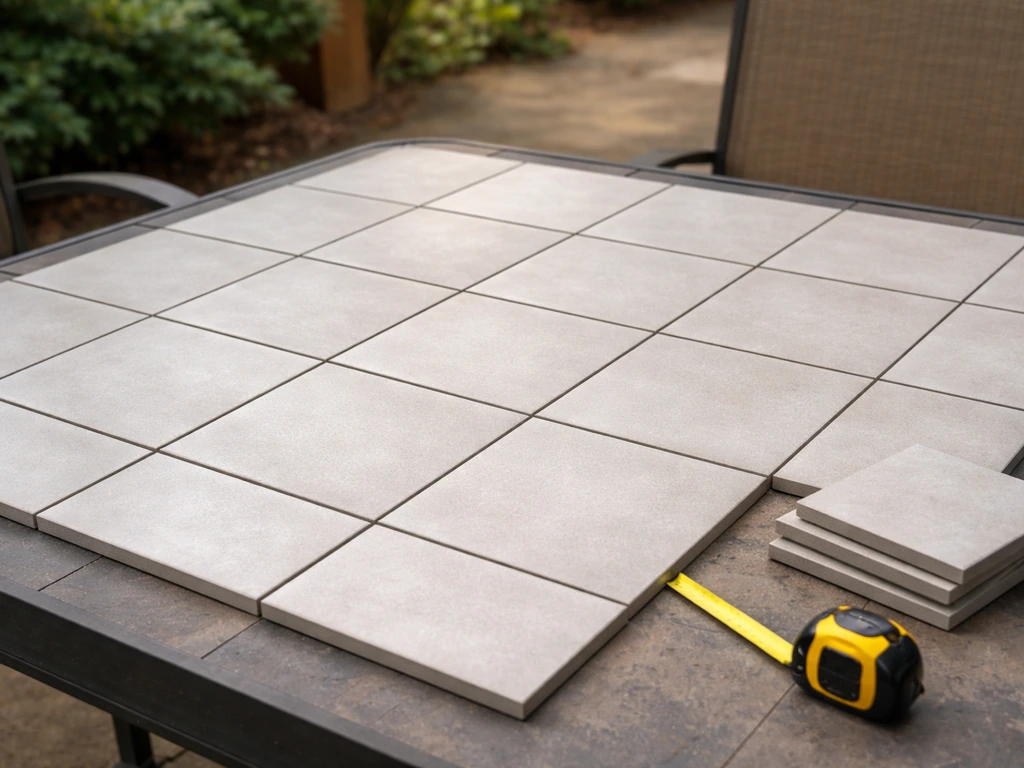
Porcelain tile is the best choice for a patio table top in almost every climate. It absorbs less than 0.5% water, resists freeze-thaw cracking, cleans easily, and bonds reliably with the right modified thinset. If you're in a mild, frost-free climate, natural stone or ceramic can work too, but porcelain is the safest default. If you want to narrow down the best options for your patio setup, reading interlocking patio tiles reviews can help you compare durability, slip resistance, and weather performance before you buy. The full project takes one weekend: a few hours of prep, a few hours of tiling, then 24-48 hours of curing before the table is back in use.
Tiles for Patio Table Top: DIY Weatherproof Guide

Nolan Ellison
1 May 2026
What makes a patio table top tile-friendly (and what to avoid)
Not every outdoor table is worth tiling. If you want a solid DIY result, using the best interlocking patio tiles can also help the finished surface stay tight and stable outdoors tile-friendly. The frame needs to be rigid, because any flex in the base will eventually crack your grout lines or pop tiles loose. Metal frames (steel, aluminum) are ideal. Heavy-duty hardwood frames can work if they're properly sealed and dimensionally stable. Lightweight folding frames, thin particleboard tops, and flimsy plastic tables are not good candidates, you'll invest time and money only to watch the tiles shift and crack within a season.
The existing top surface also matters. A solid steel or aluminum tabletop with no flex is nearly perfect. A rotting wood top needs to be replaced before tiling, not tiled over. If the table has an open slatted frame with no solid deck, you'll need to add a backer board substrate before any tile can go down. Tables with a single-layer plywood or MDF top need a cementitious backer board over them to prevent moisture from warping the wood and popping tiles.
Avoid glass tops (obviously), loose tabletops that aren't secured to the frame, and any surface that wobbles noticeably when you push on it. Also avoid very thin tiles (under 3/8 inch) on a table that sees heavy objects set on it, they can crack under point loads. Rectified porcelain at 3/8 to 1/2 inch thick is a good sweet spot for tabletop use.
Choosing the right tiles, grout, and adhesives for outdoor use
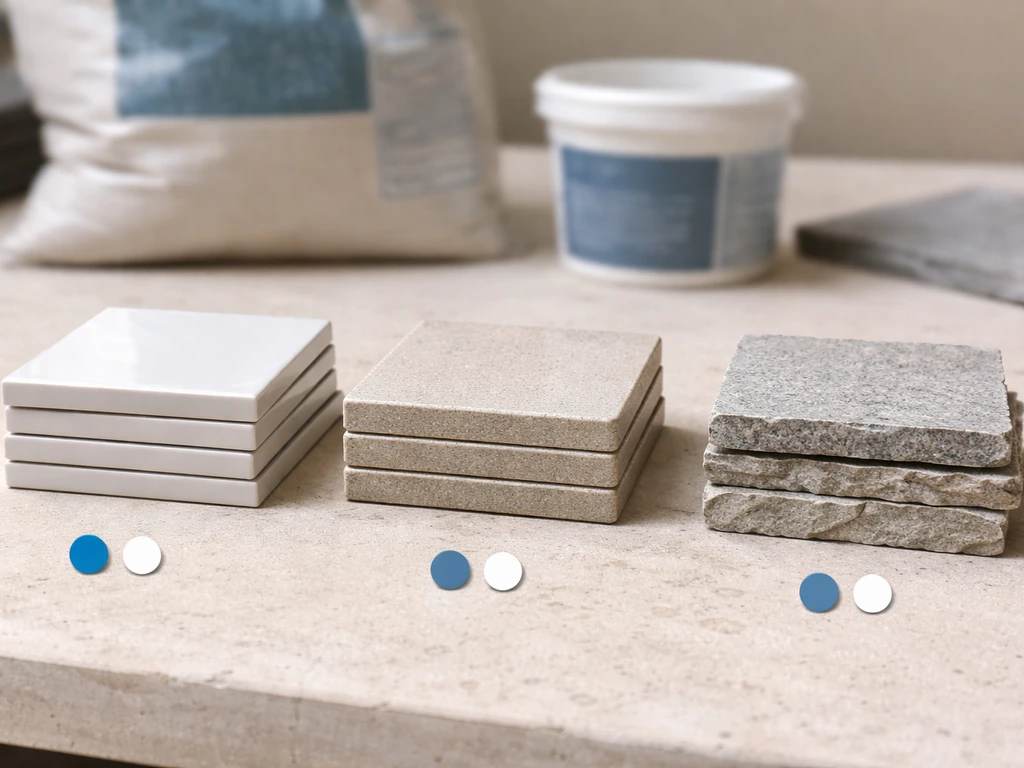
Tile types compared
The tile you pick determines how well the whole project holds up outdoors. Here's a plain comparison of the three most common options:
| Tile Type | Water Absorption | Freeze-Thaw Safe? | Best For | Watch Out For |
|---|---|---|---|---|
| Porcelain | ≤0.5% | Yes, in most climates | Any outdoor table, any climate | Harder to cut; needs diamond blade |
| Natural Stone (Granite) | ~0.2–0.4% | Yes (dense granite) | Upscale look, mild-to-cold climates | Needs sealing; heavier weight |
| Natural Stone (Marble/Travertine) | 1–3%+ | No — risky in freeze-thaw zones | Mild/frost-free climates only | Absorbs water; can spall or crack when it freezes |
| Ceramic (glazed) | 1–6% | No — high risk in freezing climates | Frost-free zones, covered patios | Glaze can chip; not frost-rated |
Porcelain wins for outdoor tabletops because its water absorption is typically at or below 0. For the patio itself, choose the best tiles for patio use based on water absorption and freeze-thaw performance. 5%, the same threshold used by the TCNA to classify frost-resistant tile. That near-zero absorption is what keeps water from getting into the tile body, freezing, expanding, and cracking the tile from the inside. Marble and travertine can absorb several times more water, which is why they're risky anywhere temperatures drop below freezing. Granite is an exception among natural stones; dense granite varieties have absorption rates close to porcelain and can perform well outdoors, but you'll want to verify the specific stone's absorption rating before buying.
Grout selection
For a table top, use unsanded grout for joints up to 1/8 inch wide, or sanded grout for joints 1/8 to 1/2 inch. Both need to be exterior-rated or polymer-modified. Epoxy grout is the premium option and worth considering here: it's highly water-resistant, stain-resistant, and won't crack or shrink the way cement-based grout can over time. On a small project like a tabletop, the extra cost of epoxy grout is minimal and the performance payoff is significant. If you go with cement-based grout, use a polymer-modified formula and plan to seal it after it cures.
Adhesive and thinset selection
Never use mastic or standard interior tile adhesive on an outdoor project. They break down with moisture. You need a polymer-modified thinset mortar rated for exterior use. Products like Laticrete 254 Platinum are specifically formulated for exterior ceramic, porcelain, and stone installation. If you're setting tile over a Schluter membrane or Schluter board, their ALL-SET modified thinset is optimized for that assembly. For standard backer board applications, any exterior-rated polymer-modified thinset works. Mix to a smooth peanut-butter consistency, not too wet, not crumbly, and apply with a notched trowel sized to your tile (typically a 3/16-inch V-notch for small tiles, 1/4 x 3/8-inch square notch for larger tiles).
Tools, materials, and supplies checklist for a DIY tiled top
Before you start, get everything on this list together. Running to the hardware store mid-project after your thinset has started skinning over is a genuine pain.
- Tiles (porcelain recommended; buy 10-15% extra for cuts and breakage)
- Exterior-rated polymer-modified thinset mortar (e.g., Laticrete 254 Platinum or equivalent)
- Cement backer board (1/4-inch for tabletop use) or Schluter DITRA uncoupling membrane, if adding a substrate
- Waterproofing membrane: liquid-applied (e.g., Laticrete HYDRO BAN) or sheet membrane (e.g., Schluter KERDI)
- Polymer-modified sanded or unsanded grout (or epoxy grout for best outdoor performance)
- Tile sealer (penetrating/impregnating sealer for stone or grout sealer for cement-based grout)
- Silicone caulk (100% silicone, exterior-rated, color-matched to grout) for perimeter edges
- Bullnose tiles or tile edge trim (Schluter JOLLY or similar) for exposed edges
- Notched trowel (size matched to tile)
- Margin trowel for mixing and detail work
- Tile wet saw with diamond blade (rent one if you don't own it)
- Tile spacers (1/16 to 1/8 inch for tabletop work)
- Rubber mallet and beating block
- Grout float
- Bucket, mixing paddle, drill
- Sponges, clean rags, grout haze remover
- Tape measure, pencil, chalk line or straightedge
- Level (short torpedo level works fine for a table)
- Safety glasses and gloves
- Painter's tape to protect table frame legs and edges
Prep work: securing the frame, leveling, waterproofing, and backer setup
Step 1: Check and secure the frame
Put the table on a flat surface and push on all four corners. If it wobbles, find the source before doing anything else. Tighten all bolts, re-weld any cracked welds on metal frames, or sister in additional wood support on wood frames. The finished tile surface will be heavier than the original top, so check that the legs and frame connections can take the added load. A typical 36x36-inch tiled tabletop adds 15-30 lbs depending on tile thickness and substrate.
Step 2: Install backer board or substrate (if needed)
If your table has a solid metal or aluminum deck, you can often tile directly onto it after cleaning and scuffing the surface (use 80-grit sandpaper or an angle grinder with a flap disc to roughen smooth metal). Prime the metal with a bonding agent before thinset. If the table has a wood top, screw down 1/4-inch cement backer board over it using corrosion-resistant screws every 6-8 inches. Do not skip the backer board on wood, tile over bare plywood outdoors is a recipe for failure. If you're using a Schluter DITRA membrane as your uncoupling layer, embed it into a full layer of thinset on the substrate before tiling.
Step 3: Waterproof the substrate
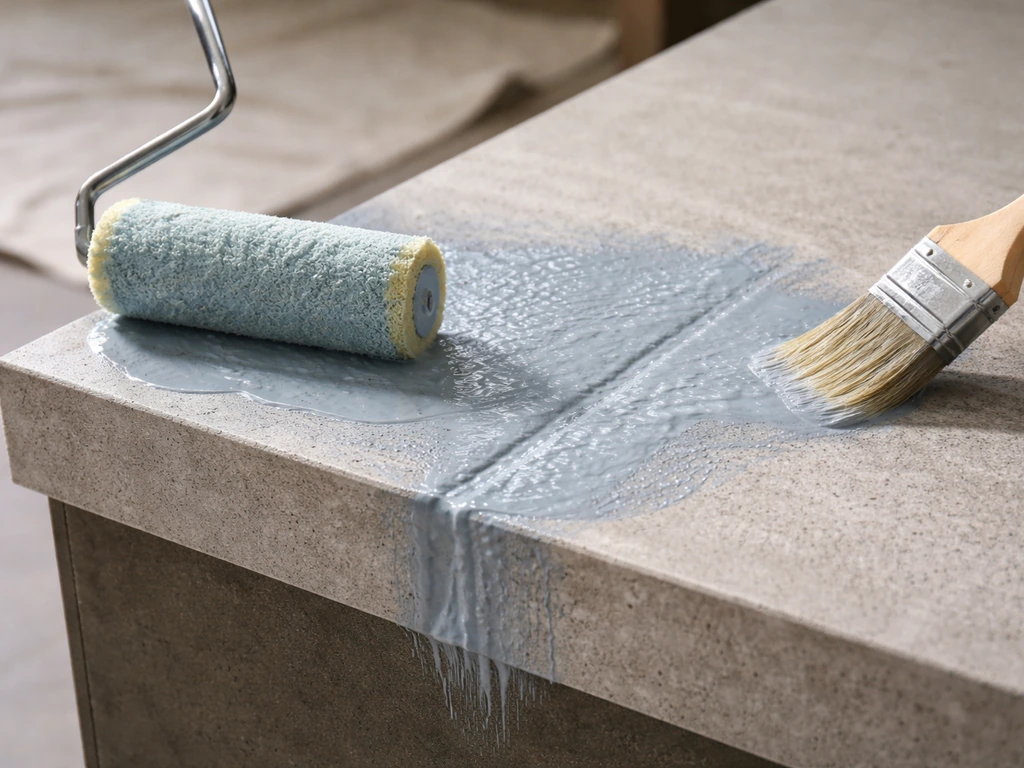
This step is often skipped on table tops, and it's a mistake. Water gets under tiles through grout joints, especially at the edges of a table where water sheets off the surface. A liquid-applied membrane like Laticrete HYDRO BAN is easy to brush or roll onto the backer surface and dries in a relatively short window depending on temperature and humidity. [LATICRETE HYDRO BAN](https://www.
laticrete. com/en/products/hydro-ban-quick-cure)® Quick Cure is an ANSI A118. 10 compliant, liquid-applied waterproofing membrane. [Schluter KERDI sheet membrane is another solid option, it bonds into the thinset layer and acts as a vapor retarder.
](https://assets. schluter. com/asset/570120892212/document_6plrad34eh1rj0g61f54npqu6c/Waterproofing%20Data%20Sheet. pdf?
content-disposition=inline) Either way, pay extra attention to the perimeter edges and any corners where the deck meets the frame. Those are the first places water finds a way in. Let the membrane cure fully (check the manufacturer's color-change indicator or timing chart) before applying thinset over it.
Step 4: Level the surface
Check the substrate with your torpedo level. A table top doesn't need a dead-flat surface, a very slight pitch toward one edge actually helps with drainage and is fine for tile. What you can't have is a hump or depression in the middle, because tiles will crack over a high spot or rock over a low spot. If the surface is uneven by more than about 1/8 inch over a 10-inch span, fill low spots with floor-leveling compound or skim-coat the high spots down before waterproofing.
How to tile a patio table top (layout, cutting, thinset application, setting tiles)
Plan your layout first
Dry-lay your tiles on the table before mixing any thinset. Find the center of the table and work outward so the cut tiles at the edges are roughly equal on all sides. Avoid ending up with a sliver of tile at one edge, if that's what the math gives you, shift the layout half a tile width so cut pieces are larger and more balanced. Mark your layout lines with a pencil or chalk line so you have a reference when the tiles are wet.
Mix and apply thinset
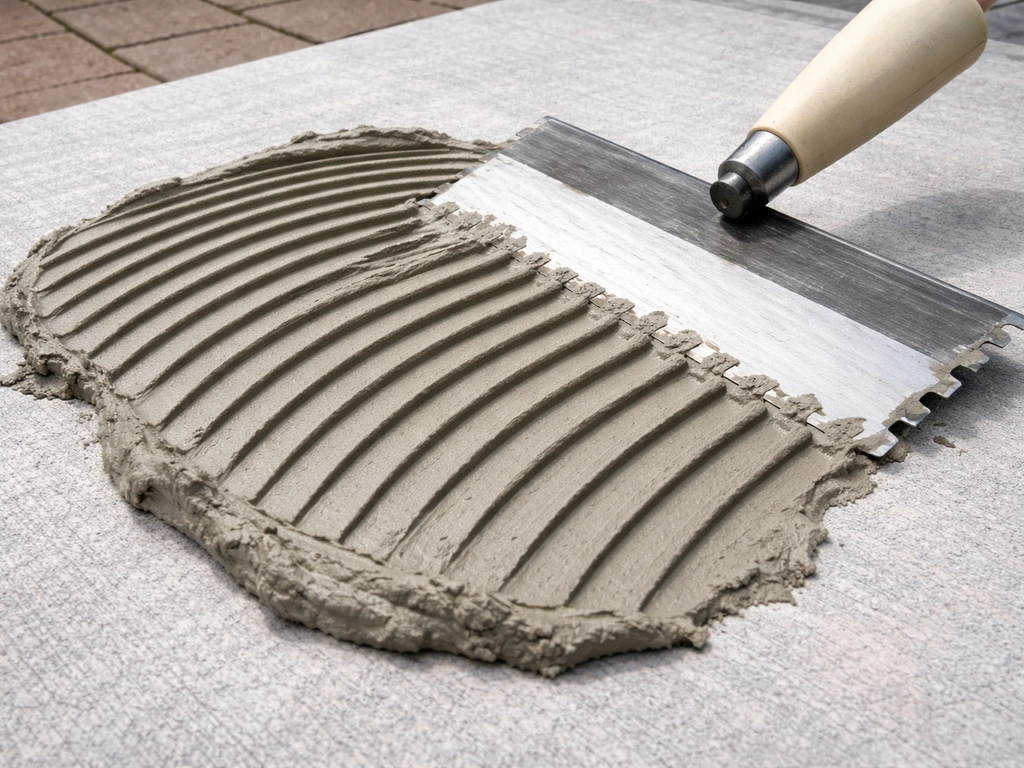
Mix your exterior-rated polymer-modified thinset to a smooth, non-slumping consistency and let it slake for 5-10 minutes, then remix. Working time with most standard thinsets is around 20-30 minutes once spread, and pot life is roughly 2-4 hours in the bucket. On a small tabletop, work in sections, don't spread more thinset than you can tile in 15 minutes. Use the flat side of your notched trowel to key a thin layer into the substrate first, then comb the full thinset layer with the notched side. Back-butter each tile as well by applying a skim coat of thinset to the tile back, this is especially important on larger tiles and on smooth metal substrates to ensure full contact.
Set and align tiles
Press each tile firmly into the thinset with a slight twisting motion, then use your rubber mallet and beating block to embed it. Check coverage by lifting a tile occasionally: you want at least 95% thinset coverage on the back (you'll see the full notch pattern transferred to the tile). Any bare spots are potential crack points or water infiltration zones. Use tile spacers to maintain consistent joint width. Check level across tiles frequently, use your torpedo level across every two or three tiles to catch any lippage early, before the thinset firms up.
Cutting tiles for edges and curves
A wet saw with a diamond blade is the right tool here. For straight cuts on porcelain, score-and-snap tile cutters can work on thinner tiles, but porcelain at 3/8 inch or thicker really needs a wet saw to cut cleanly without chipping. For round table tops, you'll need to cut a series of curved pieces, mark the cut line with a pencil and make a series of relief cuts perpendicular to the curve first, then cut the curve itself. Take your time; rushing curved cuts on porcelain almost always means a cracked tile.
Edge treatment
Raw cut tile edges on a table top look unfinished and are a chip risk. Your options are bullnose tiles (tiles with one factory-finished rounded edge, used at perimeters), metal edge trim like Schluter JOLLY (which creates a clean finished edge and protects the tile corner), or a field tile with the edge eased on the wet saw. I usually recommend Schluter JOLLY trim in brushed stainless for outdoor tables, it holds up to weather, looks intentional, and protects the tile edge better than a raw cut. Install the trim before setting the edge tiles so it's embedded in the same thinset layer.
Grouting, sealing, and protecting edges for freeze-thaw and water
When to grout
With standard exterior-rated thinset, wait at least 24 hours before grouting under typical conditions (roughly 70°F, 50% RH). If you used a fast-set thinset product like Schluter FAST-SET, you can grout in as little as 4 hours. Don't rush it, grouting too early can shift tiles that haven't fully bonded, especially on a vertical or near-vertical surface. The thinset should feel firm and not move under hand pressure before you grout.
Grouting process
Remove tile spacers before grouting. Mix grout to a smooth, peanut-butter consistency and let it slake. Apply with a grout float held at a 45-degree angle, pressing grout firmly into joints. Work in small sections. After 10-15 minutes (check manufacturer instructions, the window varies), wipe off excess with a barely damp sponge in a circular motion, then clean diagonal to the joints. Rinse the sponge constantly. You'll likely need 2-3 passes to remove all haze. For epoxy grout, timing is more critical, follow the manufacturer's instructions closely because it sets faster and is harder to remove once it cures.
Perimeter caulk, don't skip this
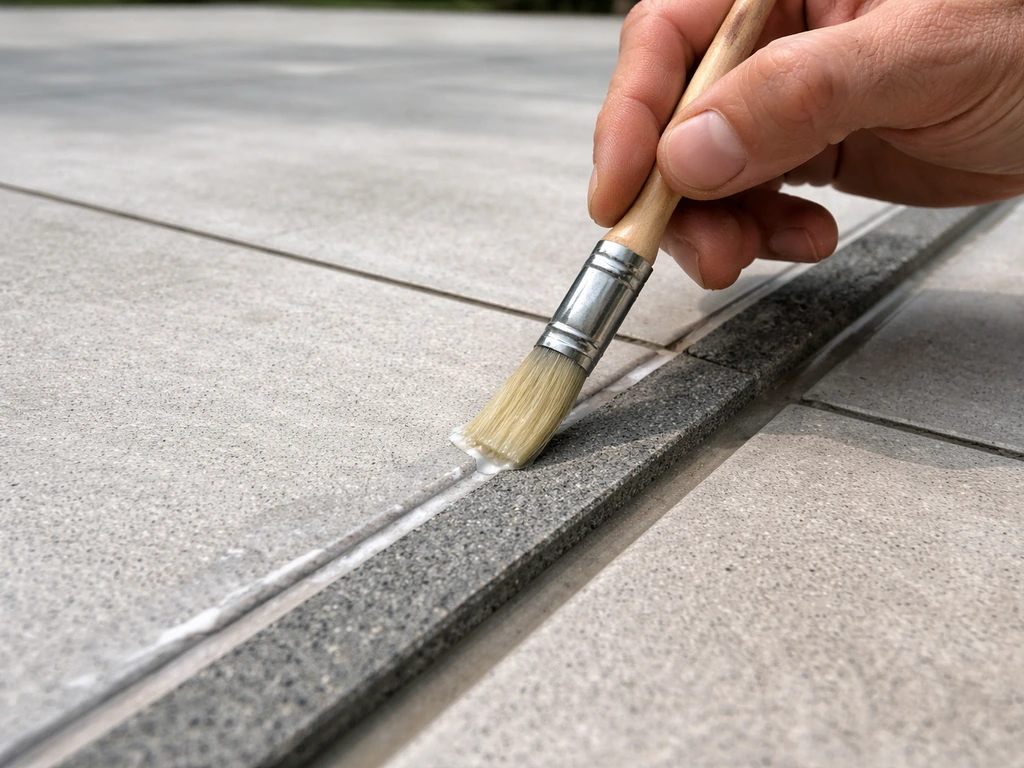
Where the tile meets the table frame or edge trim, use 100% silicone exterior caulk (color-matched to your grout) rather than grout. This perimeter joint needs to flex slightly with temperature changes. Grout at this joint will crack within a season outdoors because the tile and the metal or wood frame expand and contract at different rates. Silicone absorbs that movement without cracking. Apply a clean, continuous bead, tool it smooth with a wet finger, and let it cure fully before getting it wet.
Sealing grout and stone
Porcelain tile itself doesn't need sealing, the tile body is dense enough that water can't penetrate it. But cement-based grout does need a penetrating sealer to reduce staining and water absorption. Apply grout sealer after the grout has cured for at least 72 hours (ideally longer, some manufacturers recommend waiting a full week). For natural stone tiles, apply a penetrating impregnating sealer to both the stone and the grout. Reapply sealer once a year for tables in heavy use or harsh climates.
Cure times, installation testing, troubleshooting, and long-term maintenance
Cure timeline at a glance
| Stage | Standard Thinset | Fast-Set Thinset |
|---|---|---|
| Open time (thinset in use) | 20–30 minutes | 15–20 minutes |
| Pot life (in bucket) | 2–4 hours | 1–2 hours |
| Time to grout | ~24 hours | ~4 hours |
| Time to light use (objects on table) | 24 hours | 24 hours |
| Full bond cure | 28 days | 28 days |
| Waterproofing membrane cure (before tiling) | Per mfr. (color-change indicator) | Per mfr. (color-change indicator) |
| Grout sealer wait after grouting | 72 hours minimum | 72 hours minimum |
Testing the installation
Once the thinset has fully cured (24 hours minimum before touching; let it sit 72 hours before doing any real testing), do a tap test across every tile: use a coin or the handle of a screwdriver and tap lightly on the tile surface. A solid, dense sound means good thinset contact. A hollow or drummy sound means there's a void under the tile, that tile needs to come up and be reset. Hollow tiles on an outdoor surface are a serious problem because water collects in that void, and in freezing weather it expands and cracks the tile or pops the bond.
Common problems and fixes
- Hollow tiles: Pull up the tile (use an oscillating tool to cut the grout joint first), scrape off old thinset, back-butter generously, and reset. Don't leave hollow tiles outdoors through winter.
- Cracked grout joints: Usually caused by substrate movement or insufficient silicone at perimeter joints. Remove cracked grout with a grout saw, clean the joint, and re-grout. Switch the perimeter joint to silicone caulk if you haven't already.
- Tiles moving or shifting: If a tile wobbles when you press on it, the thinset bond has failed. Remove, clean substrate, check for moisture damage to the substrate, and reset.
- Grout haze that won't come off: Use a diluted sulfamic acid-based haze remover (not muriatic acid — too harsh for most tile surfaces). Follow directions carefully and rinse thoroughly.
- Water pooling on the surface: A slight re-pitch toward one edge helps. If the problem is severe, it may mean the table isn't level on your patio — adjust the table legs before re-tiling.
- Tile chipping at edges: Usually means raw cut edges weren't protected with edge trim or bullnose. Epoxy a chip back in place if it's small, or consider adding edge trim over the perimeter.
Long-term maintenance
A well-installed tiled table top is genuinely low maintenance. Clean it with mild dish soap and water, avoid anything acidic (vinegar, citrus cleaners) on natural stone or cement grout. Reapply grout sealer once a year if you have cement-based grout. Before your first winter, inspect all perimeter silicone joints: if the caulk is cracking, peeling, or has gaps, remove it and replace it.
That perimeter joint is the most common failure point over time, and fixing it takes 20 minutes and a few dollars of caulk. If you're in a freeze-thaw climate and the table will sit outside through winter, make sure there are no standing water situations on the surface, water trapped in a low spot that freezes will eventually lift a tile.
One more thing worth noting: if your original table top has reached the end of its life and you're deciding whether to tile over it or replace it entirely, tiling over a damaged substrate rarely works long-term. If your current patio tabletop is beyond repair, a faux stone patio table top replacement can be a cleaner upgrade than trying to tile over a failing surface. A fresh substrate, even just a new sheet of backer board, gives you a much better foundation and the project will last years longer. The extra hour of prep is worth it every time.
FAQ
Can I tile a patio table top over rusted or painted metal if I roughen it?
Only if the coating is solid and sound, rust is removed completely, and you can achieve good mechanical grip. After cleaning and sanding, apply a bonding primer made for metal, then do a small test bond (thinset blob and tile) to confirm it doesn’t peel within a day or two.
Is porcelain tile always the right choice, even if I want a matte look for less glare?
Matte porcelain works, but prioritize tiles with a tested slip rating for wet conditions. Textured surfaces can shed water better, but very smooth glazes can become slippery when water sheets off the tabletop.
What thinset notch size should I use for tiles that are not small but also not large (like 6x6)?
If your tile is around 6x6 and relatively thick, the common middle choice is typically the 1/4 x 3/8 inch square notch. The decision aid is coverage, if you cannot get near-full transfer (about 95% or more), your notch is too small and you should increase notch size.
How do I handle tables with a decorative lip or raised edges?
Treat the lip as part of the substrate geometry, don’t try to “cheat” it with thicker grout. Use backer board or membrane continuity up to the change in level, and plan grout and caulk locations at transitions so water can drain off rather than pond at the edge.
Should I use grout at the perimeter edges where the tabletop meets the frame?
No, use 100% exterior silicone at the perimeter transition between tile and the frame or trim. Grout is rigid, and when the metal or wood moves with temperature, perimeter grout joints are the first to crack outdoors.
Can I use thinset or mortar to build up dips so my tiles lie flat?
Yes, but do it before waterproofing with a compatible exterior patch or leveling compound, then skim-coat only what’s needed. Don’t rely on thick grout or random extra thinset that may shrink or create weak spots, and re-check with a level across multiple directions.
How do I prevent lippage on a small tabletop where pieces are constantly getting bumped?
Set a couple of tiles, then re-check with a straight edge across grout lines and corners before moving on. On small tables, lippage shows up quickly, use spacers consistently and embed tiles with a slight twist but avoid over-pressing that forces tiles to sit at different heights.
What’s the safest way to clean haze if I’m using cement-based grout?
Use a barely damp sponge, wipe diagonally, and rinse the sponge often. If you wait too long, haze becomes much harder to remove and you can scratch matte porcelain, take your time with multiple light passes rather than one aggressive scrub.
Is epoxy grout worth it for a tabletop compared with cement-based grout?
It’s often worth it for heavy outdoor use because it resists staining and water absorption better and tends to be more stable over time. The trade-off is cleanup difficulty and tighter timing, so it’s best if you can follow the manufacturer’s batch size and wipe schedule closely.
Do I need to seal porcelain tile itself or only the grout?
Usually only the grout. Porcelain tile itself is generally dense enough that sealer isn’t necessary, but cement-based grout should be sealed after full cure (commonly at least 72 hours, often longer depending on conditions).
What should I do if the tap test finds hollow tiles after curing?
Remove and reset the affected tiles. Filling a void from the top is not reliable, because water can still collect in the pocket and expand during freeze-thaw, leading to cracked tiles or bond failure.
How can I stop water from pooling on the tabletop over time?
Aim for a slight pitch toward drainage (a small slope is fine), keep the surface plane consistent (no humps), and make sure the perimeter is not trapping water against the frame. After installation and again before winter, check by sprinkling water lightly and observing whether it sheets off or sits in one area.
Can I grout immediately after a fast-set thinset, even if it feels firm?
Don’t grout based only on feel, confirm the product’s minimum cure time and grout window. Even with fast-set, you can shift tiles if the bond is still gaining strength, so follow the manufacturer’s timing for your specific thinset and temperature.
Is tiling over a damaged tabletop ever acceptable if I want to save time?
It’s usually a bad gamble. If the existing deck is rotted, delaminating, or flexing, it will transfer movement to the tile and grout, you should replace the substrate or add new backer board on top of a sound base.