
Yes, you can use gravel as a sub-base for a patio, and for most residential patio builds it is the standard recommended approach. Compacted crushed stone gives you a stable, load-bearing platform that also drains freely, resists settling, and works under concrete pavers, flagstone, brick, natural stone slabs, porcelain pavers, and loose-gravel surfaces. The key conditions: you need the right gravel type (angular and crushed, not round), adequate depth (typically 6 inches for standard patios, 8 inches or more on weak or clay-heavy soils), proper compaction in lifts, and a compatible bedding layer on top before you lay your surface material. Skip any of those steps and even a good gravel base will shift, sink, or heave.
Can You Use Gravel as a Sub‑Base for a Patio? Guide

Nolan Ellison
20 Jul 2026
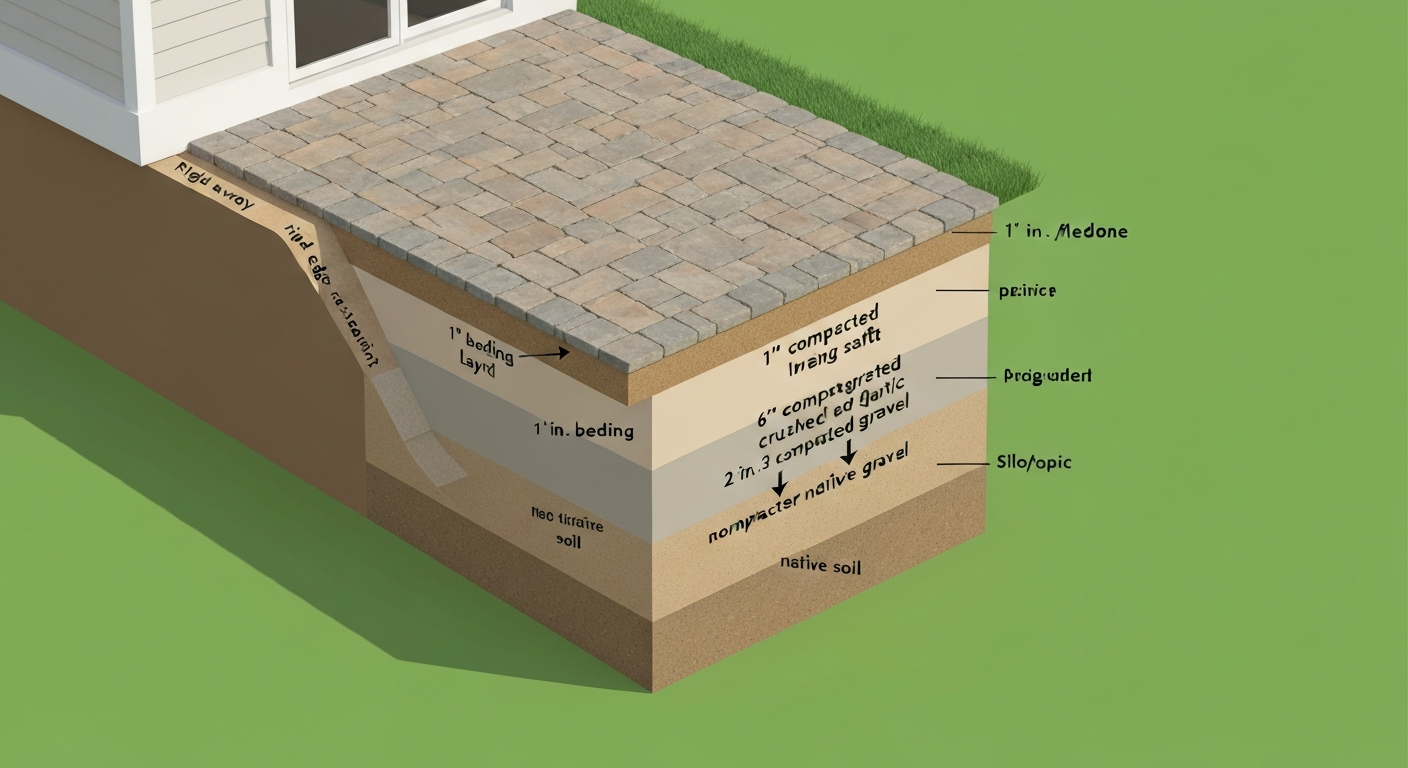
When gravel works well as a patio sub-base
Gravel is a genuinely versatile base material, but it performs best under specific conditions. On well-draining sandy or loamy soils, a compacted gravel base handles residential patio loads without any extra engineering. On moderately firm clay soils, gravel still works, but you will want to go deeper (8 inches minimum) and lay a geotextile fabric at the bottom to prevent the clay from slowly pumping up into the base over time. On loose, organic, or waterlogged soils, gravel alone is not enough, and you should either excavate deeply to reach firm subgrade or consider a concrete slab base instead.
In terms of patio use, gravel sub-bases handle foot traffic, outdoor furniture, gas grills, and standard entertaining loads comfortably. For anything significantly heavier, like a large hot tub (which can weigh 3,000 to 5,000 pounds full) or a permanent outdoor kitchen with masonry, a thickened concrete pad or a base engineered specifically for that point load is the safer call. For everyday residential patios, though, a properly compacted gravel base is exactly what manufacturers like Unilock and Belgard specify in their installation technical guides.
Recommended gravel types and sizes
Not all gravel is the same, and this is where a lot of DIY patio projects go wrong. Rounded river rock or pea gravel looks harmless at the landscape supply yard, but it cannot be compacted into a stable mass. Angular, crushed stone is what you need because the fractured faces lock together under compaction. Here are the specific materials you should be asking for by name at your local supplier. For help choosing the best gravel for patio base, see our detailed guide. For guidance on selecting the best gravel for patio projects, see our recommended types and sizes.
| Material | Also Called | Fines Content | Best Use |
|---|---|---|---|
| 3/4" minus crushed stone | No. 411, crusher run, road base | High (contains screenings/fines) | Compacted structural sub-base for pavers, flagstone, brick |
| ASTM No. 57 stone | 3/4" clean/clear stone | Very low (washed, open-graded) | Drainage layer, permeable paver base, under porcelain slabs |
| ASTM No. 21A / dense-graded aggregate | DGA, processed gravel | Moderate | Sub-base on weaker soils needing dense grading |
| Coarse concrete sand | Bedding sand, torpedo sand | None | 1" bedding layer only, not a structural base |
For a conventional patio with concrete pavers, brick, or flagstone, 3/4" minus (No. 411) is the workhorse material. The fines fill voids between larger particles, giving you a dense, almost concrete-like surface once compacted. For porcelain slabs, Daltile's installation guide specifically calls for 6 to 8 inches of 3/4" clear stone (ASTM No. 57) beneath outdoor porcelain, because the open-graded base drains instantly and prevents moisture from building up under a low-permeability surface. For permeable paver systems, you also want clean No. 57 or similar open-graded stone throughout. The one material to avoid as a sub-base in all cases: rounded pea gravel. It shifts under load and is essentially impossible to compact to useful density.
Layer depths and compaction targets for different patio surfaces
Depth and compaction requirements vary by surface type and soil condition. The figures below are grounded in manufacturer technical guides (Unilock, Belgard, Daltile) and standard DOT aggregate base specifications, which commonly require compaction to at least 95% of maximum dry density per ASTM D698 (Standard Proctor) or ASTM D1557 (Modified Proctor). For homeowner purposes, 95% Proctor is the target your contractor should be aiming for if you are hiring out. If you are doing it yourself with a plate compactor, compact in 3 to 4 inch lifts and make multiple overlapping passes until the surface no longer visibly deflects.
| Patio Surface | Sub-base Depth (good soil) | Sub-base Depth (poor/clay soil) | Bedding Layer | Compaction Target |
|---|---|---|---|---|
| Concrete pavers | 6 in. compacted gravel | 8–10 in. compacted gravel | 1 in. bedding sand | 95% Standard Proctor |
| Flagstone (natural stone) | 6 in. compacted gravel | 8 in. compacted gravel | 1 in. sand or stone dust | 95% Standard Proctor |
| Porcelain slabs (2CM) | 6–8 in. No. 57 clear stone | 8 in. No. 57 clear stone | Dry-set mortar or open-graded chip | Well-drained, not compacted dense |
| Brick pavers | 6 in. compacted gravel | 8 in. compacted gravel | 1 in. bedding sand | 95% Standard Proctor |
| Loose gravel surface | 4–6 in. compacted gravel base | 6 in. compacted gravel base | 2–3 in. decorative gravel on top | Firm enough to resist rutting |
One lesson I learned early on: never try to compact the entire base depth in a single pass. I once watched a crew dump 8 inches of crusher run and try to compact it in one go with a plate compactor. The top 3 inches looked solid but the material below was loose. The patio shifted in the first winter. Compact in 3 to 4 inch lifts, lightly moisten each lift before compacting, and test firmness by walking on it. Your foot should leave no impression before you add the next lift.
Step-by-step installation checklist
This checklist covers a standard compacted gravel sub-base installation for a hard-surface patio (pavers, flagstone, brick). Adjust depth targets based on the table above for your specific surface and soil conditions.
- Mark out the patio area and add 6 inches beyond the finished edge on all sides to allow for edge restraint installation.
- Excavate to the required total depth: sub-base depth plus 1 inch bedding layer plus the thickness of your surface material. For a 6-inch base, 1-inch sand, and 2.375-inch paver, that is roughly 9.5 inches total.
- Remove all organic material, roots, and topsoil. Grade the bottom of the excavation to a consistent slope of at least 1% (1/8 inch per foot) away from the house or toward a drainage outlet.
- Install geotextile fabric (nonwoven polypropylene, minimum 4 oz/sq yd, AASHTO M288 compliant) across the entire excavated area, overlapping seams by at least 12 inches. Extend it up the sides of the excavation. This prevents subgrade soil from pumping into your gravel base.
- Add the first 3 to 4 inch lift of angular crushed stone (3/4" minus / No. 411 for conventional bases; No. 57 clear stone for permeable or porcelain applications). Spread evenly.
- Compact the first lift with a plate compactor (minimum 3,000 lb centrifugal force for residential work). Make at least two overlapping passes in perpendicular directions. Lightly mist the stone before compacting if it is very dry.
- Add subsequent lifts of 3 to 4 inches each, compacting each one before adding the next, until you reach the required total sub-base depth.
- Check that the compacted surface is firm and does not deflect underfoot. Verify your cross-slope is still at least 1% in the intended drainage direction.
- Install rigid edge restraints (plastic extruded or steel) on top of the compacted base along all free edges (any edge not bordered by a wall, curb, or building foundation). Spike or pin them into the base per manufacturer instructions. Edge restraints must be placed before the bedding layer, not on top of it.
- Spread the bedding layer (typically 1 inch of coarse sand or stone dust) and screed it to a smooth, consistent thickness. Do not compact the bedding layer.
- Lay your surface material, maintaining consistent joint widths as required.
- Compact the finished surface lightly (for concrete pavers and brick) to set the units into the bedding layer, sweep joint sand or polymeric sand into joints, and compact again.
How gravel sub-base works with different patio surfaces
Concrete pavers
Concrete pavers are the most straightforward application for a compacted gravel sub-base. The ICPI (Interlocking Concrete Pavement Institute) and manufacturers like Unilock and Belgard have standardized this system: compacted aggregate base, 1 inch bedding sand, pavers, polymeric sand in joints. The gravel base needs to be 3/4" minus or equivalent dense-graded stone compacted to 95% Proctor. Edge restraints are non-negotiable: without them, the pavers at the edges will migrate outward over time, causing joint widening and eventual base exposure. ICPI and CMHA guidance recommends installing a rigid edge restraint on top of the compacted base (not on the bedding sand) for all free edges to prevent lateral migration and loss of joint/bedding material ICPI / CMHA — Application Guide for Interlocking Concrete Pavements (edge restraint guidance).
Natural stone and flagstone
Flagstone works well over a compacted gravel base with a 1 inch layer of coarse sand or stone dust (decomposed granite) as bedding. Because flagstone pieces vary in thickness, the bedding layer does extra work in leveling individual pieces. Make sure your base is especially flat before laying irregular flagstone, because any wobble in the base gets amplified in the finished surface. Some installers prefer dry mortar mix as a bedding for flagstone over gravel bases for added stability.
Porcelain slabs (2CM)
Porcelain is the most demanding surface for sub-base specification. Daltile's installation guide requires 6 to 8 inches of ASTM No. 57 clear stone (3/4" clean stone, essentially no fines) because porcelain has almost zero permeability and any trapped moisture under a dense-graded base can cause significant pressure problems in freeze-thaw climates. The open-graded No. 57 base allows water to drain freely through the base. Porcelain slabs are also brittle compared to concrete pavers, so any sub-base soft spots will cause cracking rather than the gentle displacement you might see with pavers. Take base preparation more seriously for porcelain than for any other surface type.
Brick pavers
Clay brick behaves similarly to concrete pavers from a base perspective: compacted 3/4" minus base, 1 inch of bedding sand, rigid edge restraints. Brick is slightly more sensitive to uneven settling because the units are typically thinner and less flexible than concrete pavers. On any soil with expansive clay content, go to 8 inches of base depth and be diligent about the geotextile layer.
Loose gravel surface
A loose gravel patio is really a two-layer system: a compacted base layer of angular stone (crusher run or similar) topped by a decorative layer of smaller or different-colored gravel. For a quick overview of pros and cons, see the guide on "is a gravel patio a good idea" for help deciding if a loose-gravel finish suits your needs. The base layer still needs to be compacted and properly sloped for drainage. Without a firm base underneath, the decorative gravel will rut and migrate constantly, especially in high-traffic areas. A geotextile beneath the base layer also helps keep the gravel from mixing with the soil below over time, which extends the life of the surface noticeably.
Furniture stability and load-bearing on gravel sub-bases
A well-compacted gravel sub-base, once covered with pavers or flagstone, is functionally rigid and furniture behaves the same as it would on any hard surface. The consideration is the surface material on top, not the gravel underneath. That said, there are some real load-bearing scenarios worth addressing directly.
- Standard outdoor furniture (chairs, tables, loungers): no special base requirement beyond standard 6-inch compacted gravel under a hard surface.
- Heavy furniture with small feet (cast iron, thick teak): chair leg loads are concentrated but well within what a compacted paver surface can handle. Felt or rubber foot caps prevent scratching, not structural damage.
- Gas grills and smokers: typically 50 to 200 pounds, which is trivial on a compacted hard-surface patio. No additional base depth needed.
- Outdoor kitchen structures with masonry countertops: these can exceed 1,000 pounds concentrated in a small footprint. Consider adding a concrete footing under heavy masonry sections rather than relying on the gravel base alone.
- Hot tubs: a filled hot tub of standard size weighs 3,000 to 5,500 pounds. This is too much for a standard gravel sub-base under pavers. A reinforced concrete slab, minimum 4 inches thick over 4 inches of compacted gravel, is the correct base for a hot tub. Check with the manufacturer for their specific structural requirements.
- Fire pits and outdoor heaters (freestanding): generally light enough for a standard gravel base and paver surface, but ensure the surface material is heat-tolerant.
On a bare loose-gravel surface (without hard pavers on top), furniture stability is a different story entirely. Chair and table legs sink into loose gravel, wobble, and generally create a frustrating experience. Wide-foot furniture, furniture pads, or stepping stone inserts under furniture legs significantly improve stability on loose gravel. If patio furniture usability is a primary concern, a hard-surface patio over a gravel sub-base is a much better choice than a loose-gravel finish. For guidance on choosing the best gravel for patio furniture to improve stability, see our guide on best gravel for patio furniture.
Drainage, frost heave, and climate considerations
Getting drainage right
One of the biggest advantages of a gravel sub-base over a solid concrete base is permeability. Crushed stone drains freely, which reduces hydrostatic pressure buildup under your patio and decreases runoff compared to an impermeable slab. That said, drainage only works if the base and subgrade actually allow water to move. Before committing to a gravel base on clay-heavy soils, do a simple infiltration test: dig a hole about 12 inches deep, fill it with water, and time how long it takes to drain. EPA guidance suggests a minimum infiltration rate of around 0.25 inches per hour as a lower threshold for meaningful infiltration, though testing on your specific site is always the right call. On soils that drain slower than that, water will still sit in and around your base layer even if the gravel itself is permeable. In those cases, add a perforated drain pipe at the base of the excavation before laying the geotextile and gravel.
Regardless of soil type, always slope the finished patio surface and the sub-base at least 1% (about 1/8 inch per foot) away from the house foundation. For patios larger than about 300 square feet, a 1.5% to 2% slope is better. This keeps surface water moving and reduces the volume of water entering the base during heavy rain.
Frost heave in cold climates
Frost heave is the main enemy of patio bases in cold climates, and gravel sub-bases handle it better than you might expect, but only if installed correctly. Frost heave happens when water in fine-grained, frost-susceptible soils (primarily silts and fine sands) freezes and forms ice lenses that lift the soil and anything above it. FHWA and ACPA guidance explain frost‑heave via ice‑lens formation and recommend mitigating it by replacing or stabilizing frost‑susceptible silty soils, providing a granular non‑frost‑susceptible cap, and ensuring effective subgrade drainage blank" rel="noopener noreferrer">ACPA/EB204 — Subgrades and Subbases for Concrete Pavements (frost action discussion). ACPA and FHWA guidance identifies silty soils as the most frost-susceptible, while clean angular gravel is inherently non-frost-susceptible because its large void spaces drain before ice can form. The strategy is to replace frost-susceptible soil with a granular non-frost-susceptible cap (your gravel base) down to a depth that interrupts the frost-heave mechanism.
The practical rule: in USDA cold hardiness zones 6 and warmer (frost depths typically under 24 inches), a standard 6 to 8 inch gravel base on a well-draining subgrade is generally sufficient. In colder zones (zones 5 and colder, frost depths of 24 to 60 inches or more), you have two realistic options: excavate deeper and fill with non-frost-susceptible gravel all the way to the frost depth (expensive but effective), or accept that the patio will experience minor seasonal movement and choose a flexible surface like concrete or brick pavers that can be easily releveled rather than a rigid surface like porcelain that will crack. Always check your local building department for the frost depth design value in your specific location, as it varies significantly even within a single state.
Routine maintenance, repairs, and winter care
Annual maintenance routine
A properly installed gravel sub-base under a hard surface patio is largely maintenance-free for the first several years. The surface maintenance routine matters more than the base. For loose-gravel patios, plan on raking and releveling the surface gravel once or twice a year, and topping up any low spots with fresh material. Gravel migrates at edges and high-traffic entry points more than anywhere else, so check those areas first each spring.
Recompaction and regrading
If pavers or flagstones develop a noticeable rock or wobble, the bedding layer (not usually the gravel base) has shifted or washed out. Pull the affected units, re-screed the bedding sand, relay the units, and refill the joints. If you find widespread settling across a large area rather than isolated units, the sub-base itself may have consolidated. That is more work: you will need to lift a section of pavers, add base material, recompact, relay the bedding sand, and relay the pavers. This is rare with a properly installed base but more common when the original depth was inadequate or compaction was skipped.
Weed and vegetation control
Weeds growing up through paver joints are a surface-layer problem, not a sub-base problem. Polymeric sand in joints is the best preventive measure for hard-surface patios. For loose-gravel patios, a well-installed geotextile fabric under the base layer helps significantly, but it does not eliminate weeds completely because airborne seeds will germinate in the surface gravel layer. A pre-emergent herbicide applied in spring to loose-gravel surfaces reduces the maintenance burden considerably without damaging the stone.
Winter care
For hard-surface patios on gravel bases, avoid using metal snow shovels that can chip pavers or gouge mortar joints. Plastic shovels or rubber-tipped blades work better. On concrete and brick pavers, calcium chloride or magnesium chloride ice melt is safer than rock salt, which accelerates surface scaling. In climates with hard freezes, check paver joints and edge restraints each spring and resand or refasten anything that has shifted over the winter cycle. For loose-gravel patios, winter maintenance is minimal since gravel does not ice-melt damage and is easily releveled after snowmelt.
When to choose a different base instead
Gravel is the right base for most residential patios, but there are situations where it is not the best answer. Here is a straightforward comparison to help you decide.
| Base Type | Best For | Not Ideal For | Approximate Cost vs. Gravel |
|---|---|---|---|
| Compacted gravel (crusher run / No. 411) | Most patios: pavers, flagstone, brick, loose gravel surfaces on stable to moderately firm soils | Very poor/organic soils, hot tubs, heavy masonry outdoor kitchens | Baseline |
| Compacted gravel + concrete slab | Porcelain on weak soils, hot tubs, heavy outdoor kitchens, cold climates with deep frost | Budgets where drainage is a priority; permeable paver systems | 1.5x to 3x more expensive |
| Sand-only base (no gravel) | Very small projects, stable sandy soils, temporary installations | Clay soils, anywhere with freeze-thaw cycles, heavy loads | Similar to gravel but less durable long-term |
| Open-graded clear stone base | Permeable paver systems, porcelain slabs, areas with drainage problems | Budget builds where standard crusher run performs adequately | Slightly higher material cost than crusher run |
The bottom line on gravel as a patio sub-base: for the vast majority of homeowner patio projects, compacted angular crushed stone at the right depth, installed with a geotextile separator and proper edge restraints, is not just an acceptable base, it is the recommended one. The cases where you need something more substantial are real, but they are the exceptions rather than the rule. Get the depth, material type, and compaction right, and your gravel base will outlast the patio surface you put on top of it.
FAQ
Can you use gravel as a sub-base for a patio?
Yes — gravel is commonly used and appropriate as a patio sub-base when the correct type, gradation, layer depth and compaction are used and when site conditions (drainage, frost susceptibility, soil bearing) permit. Use open‑graded stone (No. 57/3/4" clear) for permeable systems and drainage layers, and use a crushed stone with fines (3/4" minus, No. 411 or similar) for a compacted, load‑bearing base under pavers/porcelain/flagstone.
Which gravel types and sizes are recommended for a patio sub‑base?
Common, industry‑accepted options: - No. 57 (3/4" clear, angular crushed stone): open‑graded, excellent drainage; best for permeable pavers or drainage layers. - 3/4" minus / No. 411 (crushed stone plus fines): contains fines so it compacts into a stiff base for conventional pavers and larger natural stone. - #8 or bedding sand (not a base): 1" bedding layer of coarse sand or grit is often used on top of the compacted base for pavers or flagstone setting. - For porcelain pavers, many manufacturers call for 6–8" of compacted 3/4" clear stone or specified crushed aggregate beneath a 1" bedding layer. Choose angular crushed stone rather than rounded pea gravel for structural bases.
How deep should the gravel sub‑base be?
Typical recommended compacted base depths for backyard patios: - Standard patio/walkway: 4–6" compacted aggregate base + ~1" bedding sand (total excavation ≈6–8"). - For heavier loads (vehicles, frequent heavy furniture) or poor subgrade: 6–8" compacted aggregate base. - Driveways or vehicle traffic areas: 8–12" compacted base. Manufacturer guidance for pavers and porcelain commonly recommends a 6" minimum compacted base; some specify 6–8" depending on use.
What compaction target should I use?
Professional practice and many agencies require compacting the aggregate base to about 95% of laboratory maximum dry density (Modified or Standard Proctor references via ASTM D698/D1557). For small residential patios, aim for firm, well‑compacted lifts (typically 95% is the formal target; in the field this equates to no visible movement under foot and tight stone interlock). Compact in lifts (3–4" per lift for hand/plate compactors) and lightly moisten the aggregate to aid compaction.
Step‑by‑step installation checklist for a gravel sub‑base patio
1) Plan & check: confirm frost depth, drainage, utilities and local code. 2) Excavate: remove topsoil to accommodate base + bedding + final surface (typically 6–8" excavation for a 4–6" base + 1" bedding). 3) Address subgrade: scarify or stabilize soft/frost‑susceptible soils; add geotextile separation if needed. 4) Install geotextile (optional but recommended where soils mix): nonwoven fabric for separation/stabilization. 5) Place aggregate in lifts: add 3–4" lifts of 3/4" minus or specified aggregate. 6) Moisten and compact each lift with plate compactor to ~95% (or until firm); repeat to final base thickness. 7) Install rigid edge restraints on top of compacted base (not just on bedding). 8) Add 1" bedding layer (coarse sand or specified bedding) and screed level for pavers/flagstone, or place surface material (porcelain, slabs, loose gravel). 9) Jointing and finishing: joint sand or jointing material, compact surface pavers, clean up. 10) Verify drainage slope (minimum 1/8–1/4" per foot, typically 1%–2%) away from structures.
Do I need geotextile fabric under the gravel?
Often recommended: use nonwoven separation fabric where you have fine/soft subgrade soils or expect mixing of subgrade and base aggregates. Geotextile improves long‑term stability, reduces contamination of the base by silts, and aids performance in wet or marginal soils. In stable, well‑draining granular soils it may be optional.