
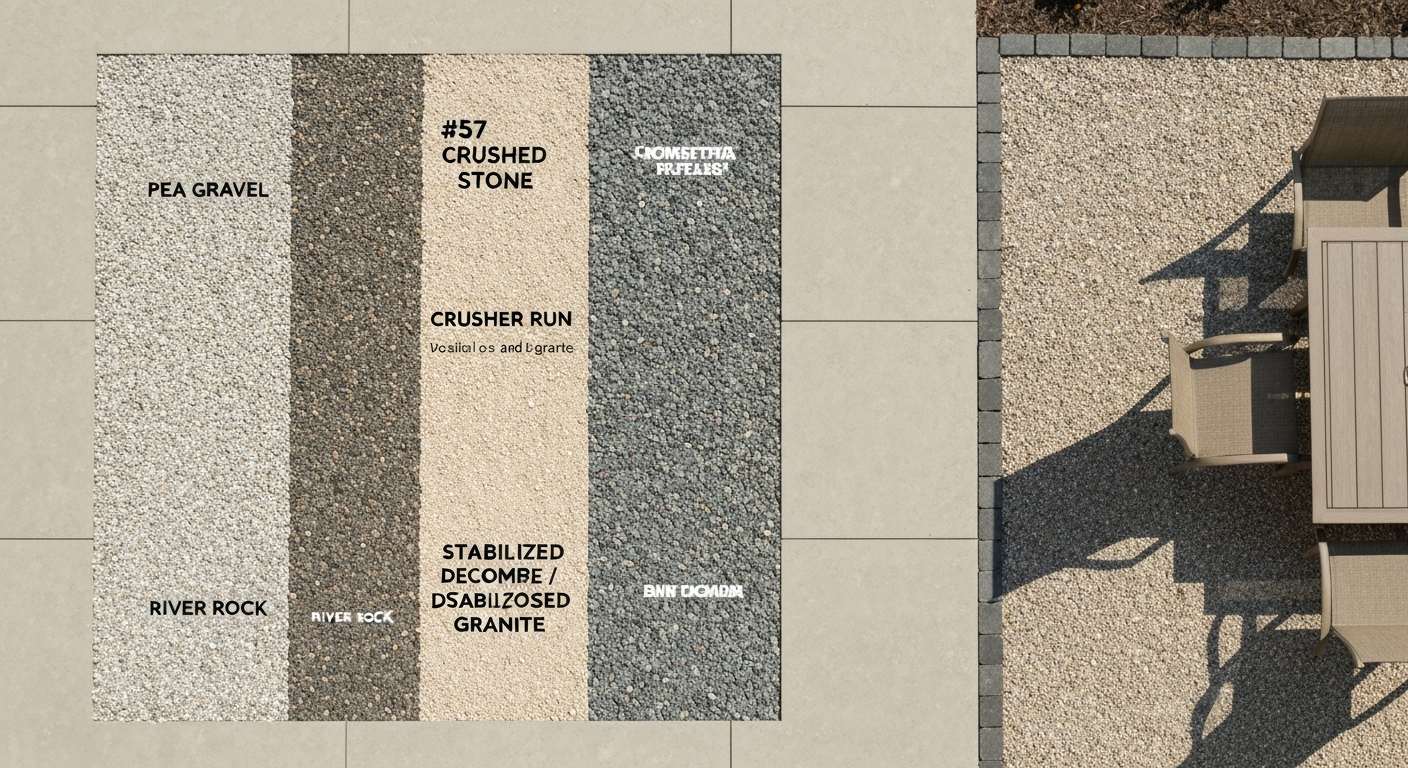
The best gravel for patio furniture is crushed stone (specifically #57 or crusher run) or stabilized decomposed granite. Both compact well, resist shifting under furniture legs, drain reliably, and hold up through freeze-thaw cycles. Pea gravel looks appealing on paper but shifts under point loads and causes furniture to rock and sink, making it the worst choice for a seating area. If you want a finished gravel surface that actually supports a dining set or lounge chairs without wobbling, crushed angular stone or compacted DG is the answer.
Best Gravel for Patio Furniture: Types, Base Installation & Stability

Nolan Ellison
16 Jul 2026
Quick recommendations: best gravel for furniture-bearing patios
Before getting into the full breakdown, here are the direct picks based on use case. These recommendations assume a properly prepared compacted subgrade underneath.
| Use Case | Best Gravel Choice | Why |
|---|---|---|
| Finished surface, furniture stability priority | Crusher run / crusher fines (3/8" minus) | Angular fines compact into a firm, semi-paved surface that resists shifting |
| Finished surface, drainage priority + decent stability | Stabilized decomposed granite | Polymer binder locks fines in place; drains adequately; firm underfoot |
| Finished surface, aesthetics + light furniture | #57 crushed stone (3/4") | Angular interlock prevents rolling; still requires leg pads; drains excellently |
| Sub-base under pavers or flagstone | #57 crushed stone or crusher run | Angular aggregate compacts to near 98%; correct ICPI base spec for pedestrian patios |
| Decorative only (no furniture) | Pea gravel or river rock | Fine for mulch-bed coverage or visual filler; not suitable under furniture legs |
One thing I always tell people when they're planning a gravel patio: the gravel type matters a lot less than the preparation underneath it. Even the best crushed stone will sink and shift if you skip subgrade compaction. More on that in the installation sections below.
How the main gravel types actually compare
There are six gravel types you'll regularly encounter at suppliers and home improvement stores. Each has a specific particle shape, size, and structural behavior that determines whether it belongs under your dining set or in a decorative bed along the fence line.
Pea gravel
Pea gravel runs about 1/4" to 3/8" (6 to 10 mm) in diameter and is naturally rounded and smooth. It drains quickly and looks pleasant, but rounded particles do not interlock, so the surface shifts freely under load. A dining chair leg pressing down on pea gravel creates a small crater every time someone sits down. I've seen homeowners lay 3" of pea gravel, put out a heavy cast-iron set, and then spend every weekend raking it back into shape. It can work for a casual fire-pit area where people mostly stand, but for a furniture-bearing patio, it's a poor choice unless every chair and table leg sits on a flat paver or platform.
Crushed stone (#57)
#57 crushed stone has a nominal top size of around 3/4" and is an angular, open-graded aggregate. The angular edges interlock under load and compaction, giving it far better resistance to lateral movement than pea gravel. It's the industry standard for paver sub-bases (ICPI specifies it as the choker and base course material) and drains exceptionally well because it's open-graded with minimal fines. As a finished surface it's a bit coarse and sharp underfoot, but it's genuinely one of the most stable options you can put under heavy furniture. Leg pads or rubber feet still help, but the stone won't shift into a pit the way rounded aggregates do.
Crushed limestone
Crushed limestone behaves similarly to other crushed angular aggregates and is commonly what's sold as "crusher run" or "road base" in regions where limestone is the local quarry rock. It typically includes a blend of particle sizes from 3/4" down to fines ("3/4" minus"), which helps it compact tightly. It's slightly softer than granite-based crusher run but still performs well as a base material. In humid climates, limestone fines can wash out over time if drainage is inadequate, so getting the slope right matters more with this material.
Decomposed granite (DG)
Decomposed granite is screened to 3/8" minus, meaning all particles are 3/8" or smaller, with a significant proportion of sand-sized fines. When compacted, those fines bind the surface into something that feels almost like packed dirt. Unstabilized DG can lose its surface fines over time with rain and foot traffic. Stabilized DG adds a polymer or organic binder mixed in before compaction, which locks the surface together considerably better. For furniture use, stabilized DG at 4" compacted depth is a genuinely good finished surface: firm, relatively flat, and easy to rake back into shape if disturbed. Valley‑Wide Recreation & Park District Standards, Stabilized Decomposed Granite (specs include binder rates and compaction targets) specifies minimum compacted thicknesses, required binder mixing procedures, and target compaction values for stabilized DG installations Valley‑Wide Recreation & Park District Standards — Stabilized Decomposed Granite (specs include binder rates and compaction targets). Many municipal park specs (and ADA pathway specs) use it precisely because it holds together reliably.
River rock
River rock is rounded like pea gravel but larger, typically ranging from 3/8" up to several inches. The larger size means individual stones are more visible and decorative, but the rounded profile makes river rock even worse than pea gravel for structural purposes. It offers zero interlock, rolls under load, and is genuinely uncomfortable to walk on. Use it as decorative fill around planting beds, along drainage swales, or under raised decks. Do not plan to put a furniture set on it without a raised platform or individual pavers under every leg.
Crusher fines / screenings (3/8" minus)
Crusher fines (also sold as stone screenings, crusher dust, or 3/8" minus depending on your region) are the fine byproduct of the crushing process. They're angular with a high proportion of fines and compact into a very firm, almost-paved surface. GravelShop's product page for Crusher Fines (3/8" Minus) notes these materials are angular with significant fines and compact tightly GravelShop's product page for Crusher Fines (3/8" Minus) notes these materials are angular with significant fines and compact tightly.. This is one of the best options for a finished gravel patio that needs to support furniture because the compacted surface is resistant to individual leg indentation. The trade-off is drainage: the high fine content means permeability is much lower than open-graded #57 stone. On a properly sloped site this isn't an issue, but on flat ground or in clay-heavy soils, water can sit on the surface after heavy rain. One important note from ICPI specs: do not use screenings as the bedding layer under pavers. They don't meet ASTM C33 requirements for bedding sand and can cause uneven settlement.
Side-by-side comparison
| Gravel Type | Particle Shape | Typical Size | Compactability | Furniture Stability | Drainage | Aesthetics | Approx. Cost (per ton) |
|---|---|---|---|---|---|---|---|
| Pea gravel | Rounded | 1/4"–3/8" | Poor | Poor | Excellent | High | $35–$65 |
| #57 Crushed stone | Angular | ~3/4" | Good | Good | Excellent | Moderate | $30–$55 |
| Crusher run / crushed limestone | Angular w/ fines | 3/4" minus | Excellent | Very good | Moderate | Moderate | $25–$45 |
| Decomposed granite (stabilized) | Angular, fine | 3/8" minus | Very good | Very good | Moderate | High | $45–$80 |
| River rock | Rounded | 3/8"–3"+ | Very poor | Very poor | Excellent | Very high | $50–$90 |
| Crusher fines / screenings | Angular, fine | 3/8" minus | Excellent | Excellent | Low–moderate | Moderate | $20–$40 |
Stability vs drainage vs looks: picking the right gravel for your priorities
Most homeowners are balancing three things at once: they want furniture that doesn't wobble, they want water to drain away after rain, and they want the surface to look good. The frustrating reality is that the gravel types that look the best (pea gravel, river rock) perform the worst structurally, and the most stable options (crusher fines, crusher run) look utilitarian. Here's how to think through the trade-offs.
When furniture stability is the top priority
Choose crusher fines (3/8" minus) or stabilized decomposed granite, compacted to a minimum 4" depth over a prepared subgrade. Both compact into a surface firm enough that a standard patio chair leg won't sink more than a few millimeters. Stabilized DG has the edge on appearance (warm tan or gray tones) while crusher fines have the edge on cost. Either way, pair them with wide-base furniture feet or rubber leg caps and your set will feel almost as stable as it would on a concrete pad.
When drainage is the top priority
Choose #57 crushed stone as your finished surface layer if your site has drainage challenges or sits in a heavy-rainfall region. The open-graded structure means water passes through almost instantly. The stability is acceptable for heavier furniture (cast iron, thick aluminum frames) with leg pads, but lightweight furniture and thin legs will still shift more than on a compacted fine surface. For the best of both worlds, install a 4" compacted base of crusher run for drainage-capable structural stability, then top it with 1"–2" of #57 as the visible surface layer.
When aesthetics matter most
If you've already committed to pea gravel or river rock for visual reasons, the best strategy is to use the decorative gravel only as a 1"–2" top dressing over a properly compacted base of crusher run or #57 stone. Place 12"x12" or 16"x16" flat pavers or concrete stepping stones under every furniture leg. This approach lets you keep the look you want while offloading the structural job to the materials underneath.
Finished gravel surface vs compacted gravel sub-base: which approach do you need?
This is a question that comes up a lot, and it's worth being clear about it because the two applications require different materials and different build specs. Gravel as a finished patio surface means the gravel is what you walk and place furniture on. Gravel as a sub-base means it sits under pavers, flagstone, or another hard surface and you never see it. If you’re asking can you use gravel as a sub base for patio, see the dedicated sub-base guide for recommendations on materials, layer depths, and compaction. The gravel type, layer depth, and compaction targets are different for each.
A finished gravel surface is typically 2"–4" of aggregate (finer, compactable materials work best) laid over a compacted subgrade, with edging to contain it and a weed barrier underneath. It's lower cost, faster to install, and fully permeable. The trade-off is ongoing maintenance: raking, topping up over time, and accepting that furniture stability will never match a hard surface. If you're wondering whether a gravel patio is a worthwhile investment at all, the answer depends heavily on your site, climate, and furniture type. For a concise pros-and-cons overview, see is a gravel patio a good idea.
A compacted gravel sub-base is built specifically to support pavers or flagstone above it. ICPI specifies a minimum 4" compacted aggregate base for pedestrian patios (6" for driveways or weak subgrade situations), with the base compacted in 2"–4" lifts to approximately 95"–98% Standard Proctor density. This base is topped with 1" of ASTM C33 bedding sand (or ASTM No.8 stone for permeable paver systems), then the pavers or flagstone. The sub-base gravel is never the finished surface. Understanding the difference between these two roles is important before you source materials, because you may need both: a base layer of crusher run for structure and a top layer of a different aggregate for surface finish. For more on selecting the best gravel for patio base, see the dedicated guide on choosing aggregate for sub-bases and finished surfaces.
| Factor | Finished Gravel Surface | Compacted Gravel Sub-Base |
|---|---|---|
| Visible surface material | Yes, gravel is the surface | No, pavers/flagstone sit on top |
| Best materials | Crusher fines, stabilized DG, #57 | Crusher run, #57 crushed stone |
| Typical depth | 2"–4" over compacted subgrade | 4" (pedestrian); 6" (drive/weak soil) |
| Compaction target | Firm; moderate compaction | ~95–98% Standard Proctor (ASTM D698) |
| Bedding layer needed? | No | Yes: 1" ASTM C33 sand or No.8 stone |
| Cost | Lower | Higher (more material + labor) |
| Maintenance | Regular raking, topping up | Minimal once pavers are seated |
| Best for | Casual patios, fire pits, budget builds | Long-term permanent patio surfaces |
Installation specs: what you need to get right before you dig
Whether you're building a finished gravel surface or a sub-base, there are five specs that determine whether the project holds up. Skip any of them and you'll be fixing problems within a season.
Depth
For a finished gravel patio with furniture: install a minimum of 3" of compactable aggregate over a firmly compacted subgrade. If you're using open-graded stone like #57 as your finish layer, a 2" base of crusher run beneath it plus 1.5"–2" of #57 on top gives you the best combination of stability and drainage. For a paver sub-base: the ICPI minimum for pedestrian patios is 4" of compacted aggregate base. On soils with poor bearing capacity (clay, wet sites), go to 6". Always compact in lifts of no more than 3" of loose material (which compacts down to roughly 2"–2.5") to achieve even density throughout the layer.
Compaction
The subgrade (the native soil after excavation) should be compacted to at least 95% Standard Proctor density (ASTM D698) before any aggregate goes down. The aggregate base for pavers targets 95"–98% Standard Proctor. For a finished gravel surface, you won't have lab testing on a DIY project, but the practical target is: no visible movement when you walk on it, and a plate compactor leaves no impression in the surface after two passes. Use a plate compactor with at least 5,000 lbf centrifugal force for base compaction, compacting each lift with at least two overlapping passes before adding the next lift.
Edging
Edging is non-negotiable for any gravel surface. Without it, the aggregate migrates outward over time and you lose both depth and containment. Steel landscape edging (11-gauge or heavier) is the most durable option. Plastic edging works but can flex and lift over freeze-thaw cycles. Hardwood timber borders (4x4 or 6x6) look good and hold up for 10"–15 years if treated. For paver systems, ICPI guidance requires the base to extend 8"–12" beyond the paver edge before the edging stake goes in, giving the base material room to spread the load.
Weed barrier
Use a non-woven geotextile fabric (not plastic sheeting) between the subgrade and your first aggregate layer. Woven fabric works for coarse base stone but fine particles from above can migrate through it over time. Non-woven geotextile allows water through while blocking weed seeds and preventing base material from punching into soft subgrade under load. Do not put landscape fabric between the base layers themselves, and do not put it on top of the surface aggregate. It belongs at the very bottom, between soil and first stone layer.
Slope and drainage
Every gravel surface needs a minimum 1% slope (1/8" per foot) away from any structure. A 2% slope (1/4" per foot) is better in high-rainfall regions. This is especially important for lower-permeability materials like crusher fines and stabilized DG. Slope the excavated subgrade, not just the finished surface, so water doesn't pond below the gravel layer. In freeze-thaw climates, good drainage below the aggregate layer is critical: water trapped in the base freezes, expands, and heaves the surface. A gravel patio with proper slope drains and returns to normal after a frost cycle. One without slope can crack, heave, and shift every spring.
Step-by-step: building a finished gravel patio for furniture use
Materials list (for a 12' x 16' patio, approximately 192 sq ft)
- Crusher run or #57 crushed stone for base layer: approximately 1.5 tons (for a 2" compacted base layer at 192 sq ft)
- Finished surface aggregate (crusher fines, stabilized DG, or #57): approximately 1.5–2 tons (for a 2"–2.5" finish layer)
- Non-woven geotextile landscape fabric: 220–230 sq ft (add overlap at edges)
- Steel or heavy-duty plastic landscape edging: approximately 56 linear feet plus corners and stakes
- Landscaping stakes or spike anchors for edging: 1 per 2 linear feet
- Optional: polymer stabilizer binder if using DG (follow manufacturer rate, typically 1 lb per sq ft for 4" depth)
- Plate compactor (rental): 1 day rental sufficient for this size
- Hand tamper for edges
- Garden rake and gravel rake
- Stakes and string line for layout and slope reference
- Measuring tape, level, and line level
Sequential installation steps
- Mark out the patio area with stakes and string. Check for square using the 3-4-5 triangle method. Add 6" beyond your finished edge on all sides for edging installation.
- Excavate to a depth of 5"–6" (to allow for 2" base + 2.5" surface layer + some room for subgrade compaction). Remove all organic material, roots, and soft spots.
- Check and establish the 2% slope across the excavated subgrade using a string line and level. The slope should run away from your house or structure.
- Compact the native subgrade with a plate compactor, making at least two overlapping passes in perpendicular directions. Fill any soft spots with crusher run and re-compact.
- Lay non-woven geotextile fabric over the entire excavated area, overlapping seams by at least 12" and running it up the sides of the excavation. Pin fabric temporarily with landscape staples.
- Install edging at the perimeter. Drive stakes every 18"–24". For steel edging, stake to the height of your intended finished surface. Check that edging follows your slope reference.
- Spread the base layer of crusher run or #57 stone in a loose lift of approximately 3" (which will compact to roughly 2"). Rake level, maintaining the established slope.
- Compact the base layer with the plate compactor using at least two full passes in perpendicular directions. The surface should feel firm and show no deflection under the compactor weight.
- Spread your finished surface aggregate (crusher fines, stabilized DG, or #57) to a loose depth of about 3" (compacting to roughly 2"–2.5"). Rake to maintain slope and a consistent depth.
- If using stabilized DG, mix in polymer binder per manufacturer instructions before spreading, or use the pre-blended product. Lightly mist with water before final compaction.
- Compact the surface layer with the plate compactor. Make two passes minimum. For crusher fines or DG, the surface should feel nearly solid. For #57, it will still have some voids but should not shift under the compactor.
- Check the finished surface for high and low spots using a long straightedge. Rake and re-compact any problem areas.
- Backfill the outside of the edging with excavated soil and tamp down to secure the edging in place.
- Allow the surface to settle for 24–48 hours, then do a final rake if needed. For stabilized DG, allow the binder to cure for at least 24 hours before placing furniture.
Step-by-step: building a compacted gravel sub-base for pavers or flagstone
Materials list (for a 12' x 16' paved patio, approximately 192 sq ft)
- Crusher run or #57 crushed stone for sub-base: approximately 2.5–3 tons (for a 4" compacted base layer; use 3.5–4 tons for a 6" base on weak subgrade)
- ASTM C33 bedding sand (or ASTM No.8 stone for permeable paver systems): approximately 0.75 tons (for a 1" uniform bedding layer at 192 sq ft)
- Pavers or flagstone: sized to your project (measure to the paver supplier's sq ft coverage spec)
- Polymeric jointing sand: per paver manufacturer recommendation (typically 50 lb per 75–100 sq ft for standard joint widths)
- Non-woven geotextile fabric: 220–230 sq ft
- ICPI-approved paver restraint edging (solid plastic or steel spike-down): 56 linear feet
- Edging spikes (10" galvanized): 1 per 12" of edging
- Plate compactor with neoprene/poly compaction pad for seating pavers (rental or separate pad): minimum 5,000 lbf centrifugal force machine
- Screed pipes (1" diameter) for setting bedding sand level: 2 x 10' sections
- Rubber mallet, hand tamper, long straightedge or screed board
- Stakes, string lines, line level
Sequential installation steps
- Lay out the patio area and mark the perimeter. Add 8"–12" beyond the planned paver edge on all sides to account for the base extension required by ICPI guidance.
- Excavate to a total depth of approximately 7"–8" for a pedestrian patio on stable soil: 4" compacted base + 1" bedding sand + paver thickness (typically 2.375"–3") plus 0.5" buffer. Excavate to 9"–10" for a 6" base on soft or clay-heavy soils.
- Establish a 1%–2% slope on the subgrade surface running away from structures. Check with a string line and level.
- Compact the native subgrade with the plate compactor using two perpendicular passes minimum. Identify and fill soft spots with crusher run, then re-compact.
- Lay non-woven geotextile fabric over the subgrade, overlapping seams by 12".
- Spread the first lift of crusher run or #57 base material to approximately 3" loose depth. Rake to maintain the slope profile.
- Compact with the plate compactor using at least two perpendicular passes. Surface should show no deflection. Add subsequent lifts of 3" loose material and compact each lift until you reach the target compacted base depth (4" or 6" depending on site conditions).
- Install perimeter edging restraints at the planned paver edge location, staked at 12" intervals. Edging should be set at final paver height to prevent lateral movement of the finished surface.
- Set 1" diameter screed pipes on the compacted base, parallel to each other and spaced to match your screed board length. Pipes establish a consistent 1" bedding sand depth.
- Pour ASTM C33 bedding sand (or ASTM No.8 stone for permeable systems) between and over the screed pipes. Pull a straight screed board across the pipes to create a uniformly level 1" bedding layer. Do not disturb or walk on screeded sand before laying pavers.
- Begin laying pavers from one corner, maintaining consistent joint spacing using spacers or the paver's integral spacer lugs. Work across the sand without standing on the screeded area.
- Check for level and alignment regularly with a straightedge. Tap individual pavers gently with a rubber mallet to seat them into the sand without disturbing neighboring units.
- Once all pavers are placed, run the plate compactor (fitted with a neoprene/poly pad to prevent chipping) over the entire surface in at least two perpendicular passes to seat pavers into the bedding layer.
- Spread polymeric jointing sand over the surface and sweep it into the joints with a push broom. Make two or three passes until joints are filled.
- Run the plate compactor (with pad) over the surface again to vibrate the jointing sand into the joints. Sweep in additional jointing sand as needed until joints are completely filled.
- Blow off excess sand from the surface. Lightly mist with water to activate polymeric binder per manufacturer instructions. Keep foot traffic off for the curing period (usually 24 hours).
Getting furniture to sit stable on gravel: practical tips that actually work
Even on a well-built compacted gravel surface, standard patio furniture legs (especially narrow ones) will eventually work their way down into the aggregate under repeated use. The solution isn't to add more gravel. It's to address the contact point between the leg and the surface.
Leg pads and rubber feet
Wide rubber or plastic leg caps (at least 1.5"–2" diameter for standard chair legs) distribute the point load across a larger surface area, reducing penetration into the gravel. Look for outdoor-rated rubber caps with a flat or slightly domed base. Felt pads disintegrate outdoors quickly; rubber or hard plastic are the only materials worth using on an exterior gravel surface. Replace them every season or when you notice legs starting to sink.
Pavers under furniture legs
This is my go-to recommendation for anyone who wants pea gravel aesthetics without the frustration. Place a 12"x12" or 16"x16" concrete stepping stone or natural flagstone under each furniture leg. The paver bridges the loose gravel and distributes load to the compacted base beneath. It looks intentional, it's cheap, and it works. For a dining table with six chairs, you're talking about eight or ten pavers total, costing maybe $30"–$60 in concrete stepping stones.
Outdoor rugs on gravel
A high-quality outdoor rug (polypropylene or recycled PET) laid over compacted gravel does double duty: it creates a stable platform for an entire seating group and it visually anchors the furniture zone. Make sure the rug is rated for exterior use and allows water to pass through or drain from underneath. Flat-weave or open-mesh constructions drain well and don't hold moisture against the gravel surface.
Furniture weight and base design
Heavier furniture with wide bases (cast iron, thick tubular aluminum, sled-base designs) performs better on gravel than light furniture with narrow four-point legs. When shopping for a patio set intended for a gravel surface, look for chairs with X-frame, sled, or wide flat-base designs rather than thin individual legs. A chair with a 16"x20" sled base distributes its weight across a much larger gravel contact area than one with four 3/4" legs.
Anchoring strategies for wind and movement
Lightweight furniture (aluminum, resin wicker) can blow around on gravel surfaces because there's no friction from a hard surface to hold it in place. Options: use furniture covers with gravel bag anchors or weighted sandbag feet in high-wind situations; connect chairs to a dining table with anti-tip straps sold for patio furniture; or stake an outdoor rug through its grommets with landscape anchors to pin the whole setup. For a more permanent solution, embedded deck anchors or surface-mounted furniture anchors can be driven into a compacted DG or crusher-fine surface and connected to table or umbrella bases.
Quick stabilization checklist
- Use compactable angular gravel (crusher fines, stabilized DG, or #57) rather than rounded aggregates
- Compact surface to a firm finish before placing any furniture
- Add rubber or wide-profile plastic leg caps to all furniture legs
- Place flat pavers or stepping stones under each furniture leg on loose-surface gravels
- Use an exterior-rated drainage outdoor rug under the seating group
- Choose furniture with wide-base, sled, or X-frame designs over narrow four-point legs
- In windy locations, use weighted base anchors or tie-down stakes through outdoor rug grommets
Freeze-thaw climates and gravel longevity
Gravel patios generally handle freeze-thaw cycles better than rigid hard surfaces because the aggregate can shift slightly without cracking. The problem isn't the gravel itself; it's water trapped in fine-particle materials or in the subgrade below. Crusher fines and stabilized DG, because of their lower permeability, are more vulnerable to frost heave if they're installed over a poorly draining subgrade or if the site doesn't slope adequately. In cold climates (USDA zones 5 and colder, or anywhere with regular ground freezing), prioritize drainage above everything else: slope the subgrade, use a layer of open-graded #57 or crusher run as your base even under a finer finish layer, and avoid laying low-permeability screenings over clay soils without a drainage layer in between.
After a frost season, a gravel surface may need light raking to level areas that heaved or shifted. This is normal and typically takes 20 minutes. It's one of the honest trade-offs of choosing gravel over a hard surface: annual maintenance is minimal but it does exist. A paver patio over a properly installed gravel base will handle freeze-thaw with essentially no maintenance, which is one of the reasons the ICPI-spec aggregate base is worth building correctly.
Gravel patios vs other patio surfaces: honest pros and cons
| Surface Type | Furniture Stability | Drainage | Installation Cost (DIY) | Maintenance | Freeze-Thaw Resilience | Aesthetics |
|---|---|---|---|---|---|---|
| Compacted gravel (crusher fines/DG) | Good | Moderate | Low ($1–$3/sq ft materials) | Low-moderate (annual raking) | Good with proper drainage | Moderate |
| Pea gravel / river rock | Poor | Excellent | Very low ($0.75–$2/sq ft) | High (frequent raking) | Good | High |
| Concrete | Excellent | Poor (unless brushed/sloped) | Moderate ($5–$10/sq ft) | Low | Moderate (can crack) | Low-moderate |
| Pavers over gravel base | Excellent | Excellent (permeable systems) | High ($8–$20/sq ft) | Very low | Excellent | High |
| Flagstone over gravel base | Excellent | Good | Moderate-high ($7–$15/sq ft) | Low | Good-excellent | Very high |
| Porcelain tile | Excellent | Poor (unless sloped) | High ($10–$20/sq ft) | Low | Poor (cracks in hard freeze) | Very high |
Sourcing and budget guidance
Gravel is sold by the ton or by the cubic yard depending on your supplier. For a concise comparison and clear recommendations on choosing the best gravel for patio, see best gravel for patio. For estimating purposes, 1 ton of crusher run covers approximately 60"–80 sq ft at a 2" compacted depth. For a 12'x16' patio (192 sq ft) with a 4" base and 2" finish layer, budget for 4"–5 tons of aggregate total. At $25"–$45 per ton for crusher run, that's $100"–$225 in aggregate, plus delivery (typically $50"–$100 depending on distance and supplier). Stabilized DG runs higher at $45"–$80 per ton, and you may pay more if it comes pre-blended with binder.
For sourcing: local quarries, landscape supply yards, and concrete/masonry suppliers almost always offer better pricing than big box stores and carry the correct aggregate grades (#57, crusher run, DG). Call ahead and ask specifically for "ICPI-grade crusher run" or "#57 crushed aggregate" to make sure you're getting a graded product, not a random fill material. Big box stores often sell bagged pea gravel and river rock, which are decorative products at 3"–5x the price of bulk material. If you need more than a half-ton, always order bulk delivery.
Plate compactor rentals typically run $75"–$125 per day from equipment rental companies. For a patio project you'll almost always finish in one day, so this is a fixed cost. Don't skip the rental and use a hand tamper for the entire base: a hand tamper cannot achieve the compaction density a plate compactor reaches, and the base will settle unevenly under load.
Decision checklist: which gravel and which approach is right for your site?
Use this checklist to identify your situation and confirm which approach makes the most sense before you order materials.
- Do you want gravel as the finished visible surface, or are you building under pavers/flagstone? (Finished surface: use crusher fines, stabilized DG, or #57 with edging. Sub-base: use crusher run or #57 compacted in lifts to ICPI spec.)
- Is furniture stability your top concern? (Yes: choose crusher fines or stabilized DG as your finish surface, and use pavers under furniture legs. No heavy furniture on pea gravel or river rock.)
- Is drainage your top concern? (Yes: use open-graded #57 as either your base or your top layer. Make sure the subgrade slopes at 1%–2% away from structures.)
- Do you live in a freeze-thaw climate? (Yes: prioritize drainage below the gravel layer, use a #57 base even under fine-finish materials, and avoid crushed fines over undrained clay subgrade.)
- Are you installing over clay or soft soil? (Yes: go to 6" compacted base depth instead of 4". Consider a geotextile fabric layer for added separation.)
- Is budget the primary constraint? (Crusher fines and crusher run are the most affordable options. Reserve pea gravel and DG for smaller accent areas.)
- Do you want the project to last 15"+ years with minimal maintenance? (Yes: invest in pavers or flagstone over a properly built ICPI-spec gravel base. A finished gravel surface requires periodic topping up and raking.)
FAQ
What are the essential gravel types and their key physical characteristics I must describe in the article?
List and define each material with particle size ranges, shape (rounded vs angular), drainage and interlock behavior, and typical uses: pea gravel (1/4"–3/8", rounded, excellent drainage, poor interlock), river rock (various sizes, rounded, decorative/drainage, poor compaction), #57 crushed stone (≈3/4" top size, angular, good interlock and drainage, common choker/base), crushed limestone (angular, often contains fines, binds when compacted), decomposed granite (screened 3/8" minus, semi‑cohesive when compacted; can be stabilized with polymer), crusher fines/screenings (3/8" minus, lots of fines, compacts very firm but less permeable). Provide photos/diagrams or close descriptions for recognition.
Which authoritative specs and standards should I cite for installation and compaction guidance?
Cite ICPI guidance/manuals (paver systems, bedding and base specs), CMHA/ICPI structural design guidance (compaction targets), ASTM standards referenced by ICPI (e.g., ASTM C33 for bedding sand), and municipal specs for decomposed granite/stabilized surfaces. Use links to ICPI manuals, CMHA tech notes, and ASTM references (or summaries) where possible.
What compaction and soil preparation specifications are required for a stable patio base (numbers to quote)?
Specify subgrade compaction ≥95% Standard Proctor (ASTM D698) where practical; compact aggregate base to ~95–98% (local spec dependent). Compact base in 2–4" lifts using a plate compactor, and make multiple overlapping passes. Quote minimum plate compactor forces (ICPI recommends ~5,000 lbf centrifugal force for seating pavers) and recommend compaction testing for critical installs.
What layer thicknesses and layer breakdowns should I include for pavers/flagstone over gravel?
Provide typical layer sequence and depths: excavate to allow for subgrade compaction + aggregate base (pedestrian patios: 4" compacted; vehicular: 6" compacted or more for weak subgrade) compacted in 2–3" lifts + 1" bedding sand (ASTM C33) or ASTM No.8 bedding stone for permeable systems + pavers/flagstone. Extend base 8–12" beyond edge. Note variations for permeable systems (No.2/No.57/No.8 layer approach per ICPI Tech Spec).
What finished-surface gravel depths apply when gravel is used as the final patio surface supporting furniture?
Give practical depth ranges: 2–3" finished aggregate over a compacted base for furniture-only patios (with contained edge); 3–4" finished layer over compacted base for furniture + regular foot traffic; where light vehicle access (mower) is expected, add a firmer compacted base (4–6" compacted base beneath surface). Note that pea gravel alone at shallow depths will shift under point loads.
Which gravel types are best for furniture stability vs. drainage/aesthetics — clear recommendations?
Recommend #57 crushed stone or crusher fines/screenings (compacted) or stabilized decomposed granite as best for furniture stability because they interlock/compact. Use pea gravel or river rock only where drainage/aesthetics dominate and furniture will be stabilized (pads/platforms) — not as the primary bearing surface for thin‑leg furniture. For permeable, attractive finishes that still work with furniture, recommend compacted screened DG with binder or crusher fines contained with edging.