Yes, patio stones can be painted, and when done correctly the results can look great and last several years. Concrete pavers and poured concrete patios are the easiest and most forgiving surfaces to paint. Natural stone like flagstone, slate, or bluestone can also be painted, but adhesion is trickier and the finish rarely lasts as long. Brick and masonry surfaces fall somewhere in between. The short version: if you prep the surface properly, use the right paint for the material, and seal it when you're done, painting your patio is a legitimate, budget-friendly refresh. Skip the prep, and you'll be peeling it all off by next spring.
Can Patio Stones Be Painted? A Practical Guide

Nolan Ellison
12 Jun 2026
Which patio stones can actually be painted (and which to avoid)
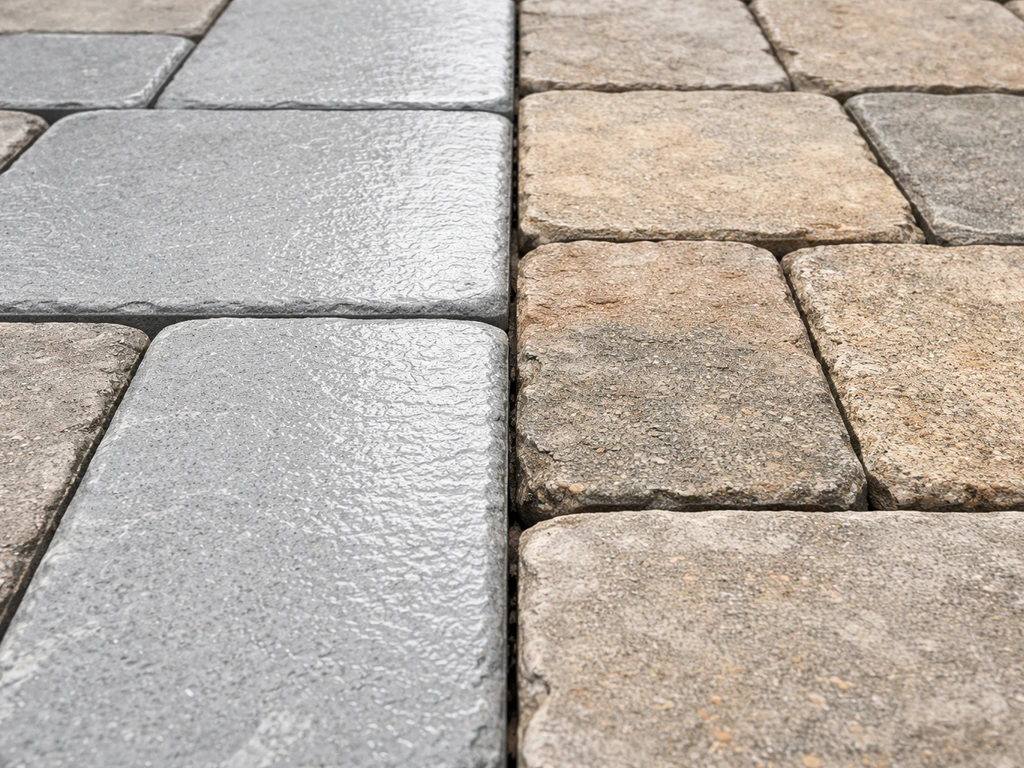
Not every patio surface takes paint equally well, so it's worth knowing what you're working with before you buy anything. The material composition matters a lot, and so does whether the surface has been sealed before.
| Surface Type | Paintable? | Key Consideration |
|---|---|---|
| Concrete pavers | Yes, best candidate | Most acrylic masonry paints bond well; check for existing sealer |
| Poured concrete patio | Yes, very paintable | Use concrete-specific acrylic latex or masonry paint; check for moisture |
| Brick / masonry | Yes, with prep | Remove efflorescence first; use masonry-rated paint or primer |
| Flagstone (natural) | Yes, but with caveats | Non-porous varieties resist adhesion; bonding primer is essential |
| Slate / bluestone | Possible, short-lived | Smooth dense surface; expect shorter finish life and more recoats |
| Porcelain / glazed tile | Generally no | Glaze prevents adhesion; specialty adhesion primer needed at minimum |
| Sealed or coated surfaces | Not without stripping first | Paint beads off sealers; water-drop test reveals whether sealer is present |
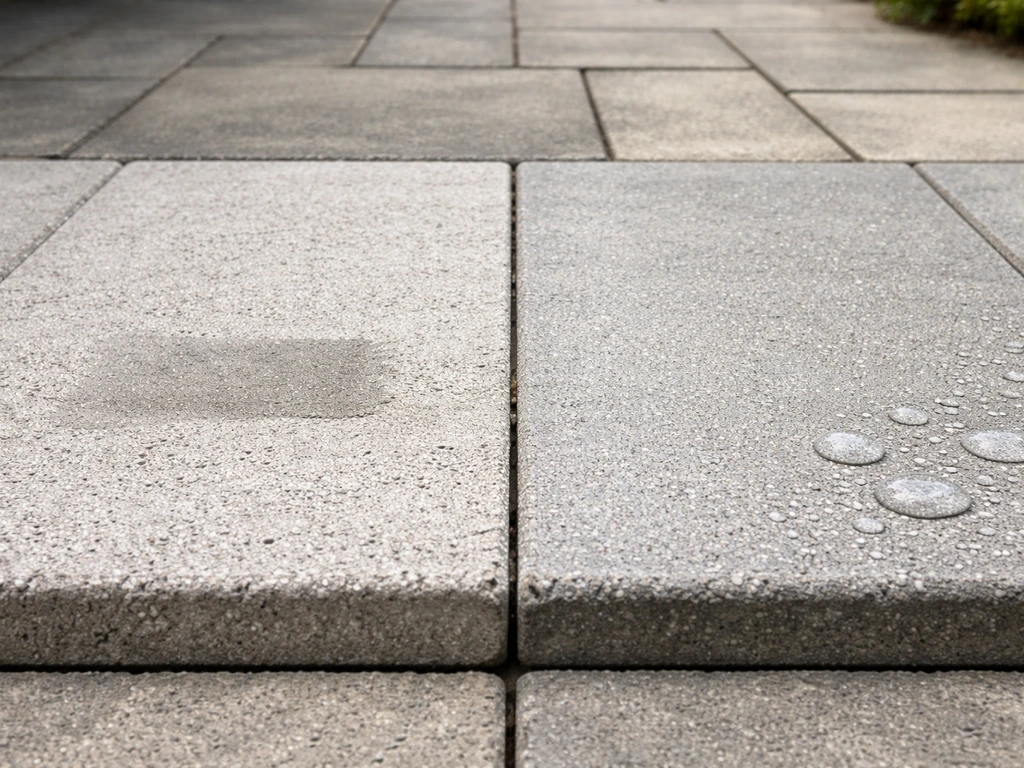
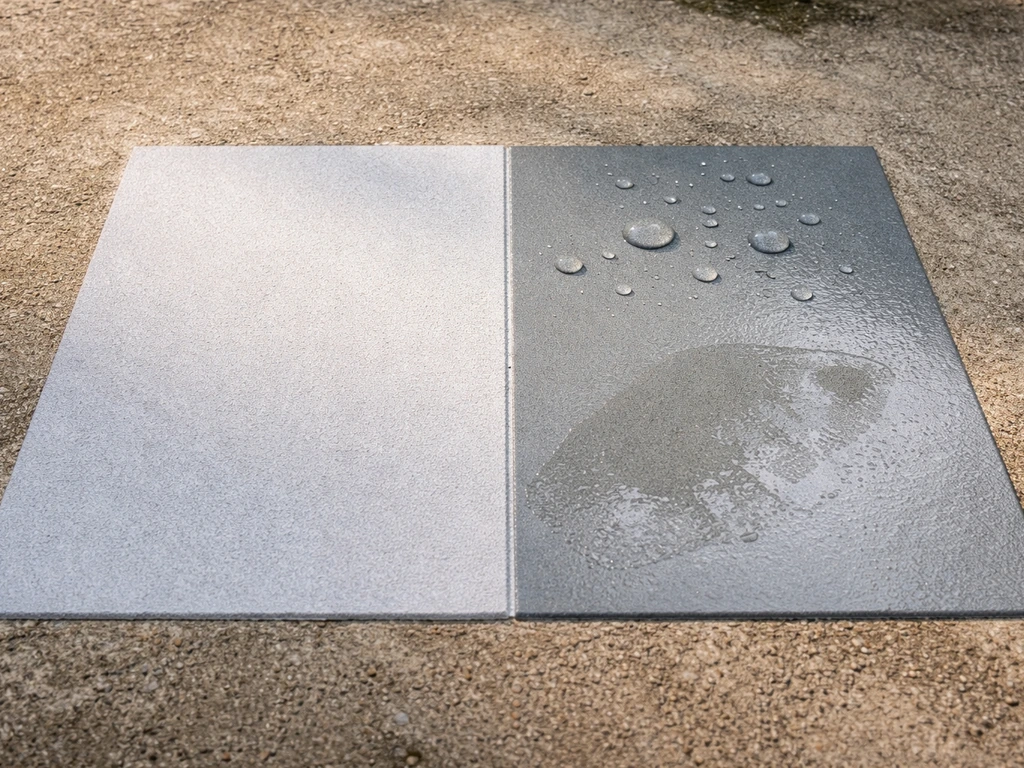
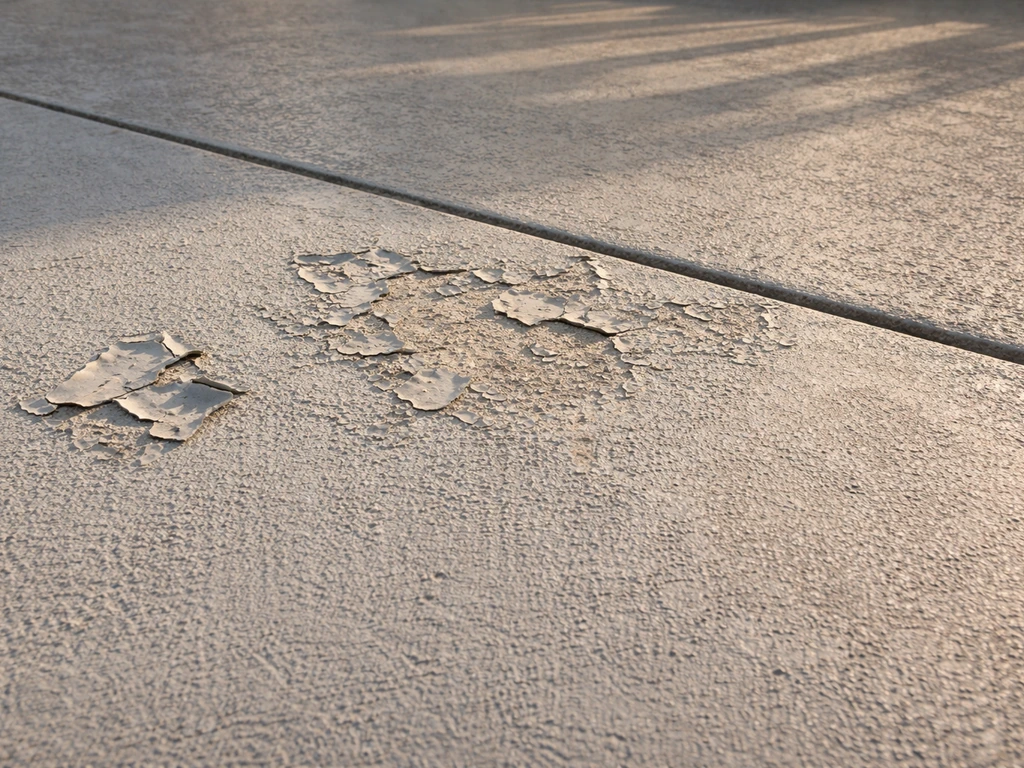
Before you do anything, do the water-drop test. Drip a small amount of water on the surface. If it soaks in, the stone is porous and paint can bond to it. blank" rel="noopener noreferrer">If water beads up, a sealer is present, and paint will not stick properly without removing that sealer first. Rust-Oleum flags this exact scenario in their concrete prep instructions, and it's one of the most common reasons painted patios fail within the first season.
Best paint and primer to use by surface type
There is no single universal patio paint. The right product depends on what your stones are actually made of, which is worth understanding before you shop. Knowing what patio stones are made of also helps you pick the right paint so it bonds and lasts outdoors. Concrete pavers, for example, are a very different material from quarried flagstone, even if they look similar once installed.
For concrete pavers and poured concrete patios
Use a 100% acrylic latex concrete and masonry paint rated for exterior use. Products in this category, like Rust-Oleum's concrete floor coatings or BEHR's Masonry, Stucco and Brick paint, are formulated to resist fading, scuffing, UV damage, and peeling. Do not substitute regular exterior house paint or epoxy garage floor coating. Concrete Network makes the point clearly: concrete porch paint and epoxy coatings are different resin systems with very different performance expectations outdoors.
Epoxy was designed for dry, controlled garage environments and tends to peel when exposed to the moisture fluctuation of an outdoor patio. For primer on concrete, use a penetrating masonry primer or a concrete bonding primer. If you see chalky white residue (efflorescence), use a stain-blocking primer like BEHR's Multi-Surface Stain-Blocking Primer and Sealer before topcoating.
For natural stone and flagstone
Natural stone surfaces need a high-quality bonding primer first, no exceptions. Without it, even the best exterior masonry paint will lift off within a season. After priming, use the same exterior acrylic masonry paint you'd use on concrete. Expect to apply more coats since stone surfaces are often more irregular and absorb paint unevenly. On smooth, dense stones like slate or polished bluestone, adhesion is genuinely difficult and you should honestly consider whether paint is the right approach or whether a pigmented stone sealer might give you better long-term results with less maintenance.
For brick and masonry joints
Brick is porous and bonds well to masonry paint, but the mortar joints are your weak point. Mortar expands and contracts at a different rate than brick, so cracks appear over time and paint follows. Use a flexible exterior masonry paint and pay close attention to any efflorescence (the white chalky salt deposits that form on brick and block).
BEHR’s masonry paint guidance also notes that if chalky residue remains after prep, you should prime with a stain-blocking primer such as its Multi-Surface Stain-Blocking Primer and Sealer (No. 436) efflorescence (the white chalky salt deposits that form on brick and block).
Sherwin-Williams recommends removing efflorescence completely with a wire brush or power brush and rinsing thoroughly before priming. If you skip this step, the paint film sits on loose salt crystals instead of the actual brick, and it will pop off in sheets.
Finish sheen: matte vs semi-gloss and slip resistance
For a patio that gets foot traffic, stick to a satin or low-sheen finish rather than high-gloss. Glossy finishes look nice but become dangerously slippery when wet. Many masonry paints come with anti-slip aggregate you can mix in, and I'd strongly recommend using it on any painted surface that could get rained on or used near a pool. Matte finishes hide imperfections better but tend to trap dirt and scuff more visibly. Satin is usually the practical middle ground.
Step-by-step prep for lasting adhesion
I've watched homeowners put good paint on a poorly prepped surface and be disappointed every single time. Prep is genuinely 80% of the job here. Rushing it is the single most common reason painted patios fail.
- Do the water-drop test first. If water beads, you have a sealer. Use a chemical sealer stripper or mechanical abrasion (floor grinder or pressure wash at high PSI) to remove it before you do anything else.
- Clear the surface completely. Move furniture, planters, and any rugs. Sweep away loose debris.
- Power wash the entire surface. Use 2,000 to 3,000 PSI on concrete pavers. Lower pressure (around 1,200 PSI) is safer for softer natural stone to avoid surface erosion. Let the surface dry fully, which takes at least 24 to 48 hours depending on humidity.
- Degrease oil stains and grill grease with a concrete degreaser or TSP substitute, then rinse. Oil contamination is invisible once the surface dries but will absolutely prevent adhesion under that spot.
- Remove efflorescence. Wire brush or power-brush any white chalky deposits off brick, block, or natural stone, then rinse thoroughly.
- Fill cracks and chips. Use a hydraulic cement or masonry patching compound for cracks wider than a hairline. Let it cure completely per the product directions, usually 24 to 72 hours before painting.
- Do the plastic sheet moisture test. Tape a 2-foot square of plastic sheeting to the concrete and leave it for 24 hours. If condensation forms under the plastic, moisture is wicking up through the slab, and you need to address drainage or use a moisture-tolerant coating. Painting over a wet slab is a recipe for bubbling and peeling.
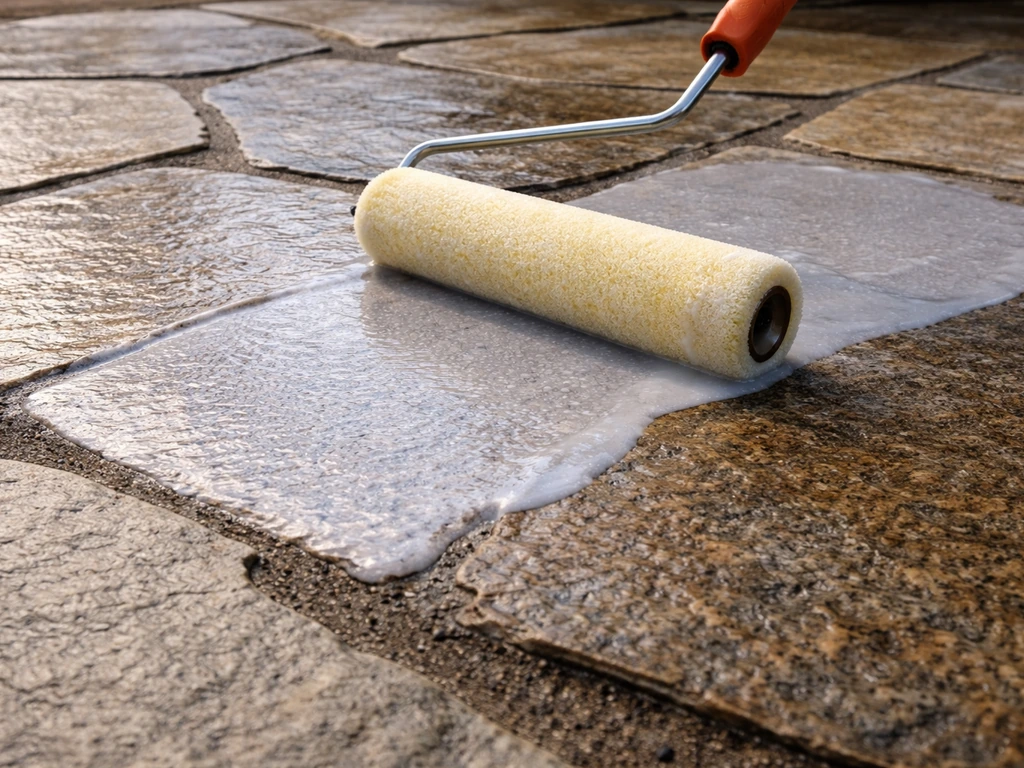
- Apply primer. For concrete, use a penetrating masonry primer. For chalky surfaces, use a stain-blocking primer. For natural stone, use a bonding primer. Let it dry fully per label directions before topcoating.
Brush and roller vs spray painting: when each works
People ask about spray paint for patio stones fairly often, and the honest answer is: it depends on what kind of spray and what kind of surface you have.
When to use a brush or roller
A 3/4-inch to 1-inch nap roller is your best tool for flat or lightly textured concrete pavers and poured slabs. It applies paint evenly, works product into the surface texture, and gives you good control over coverage. Use a brush to cut in around edges and work into joints between pavers. Brush and roller is the method I recommend for most DIY patio painting projects because it gives you the most control and minimizes waste and overspray concerns.
When spray application makes sense
An airless sprayer (not a rattle can) makes sense for large, open patio surfaces where you want to work fast and where overspray on surrounding landscaping or structures isn't a problem. Use a tip size around 0.015 to 0.021 inches for masonry paint. Keep the sprayer moving at a consistent pace to avoid runs and thick spots. You'll still want a roller or brush to back-roll immediately after spraying on textured surfaces, which works the paint into pores and prevents a weak surface-only film that peels later.
What about rattle-can spray paint on patio stones?
Aerosol spray paint designed for masonry or concrete does exist, but it's not practical for painting an entire patio. It's fine for touch-ups, stencil work, or painting a small accent feature. For a full patio surface, the cost per square foot is too high, coverage is inconsistent, and most aerosol formulas are not engineered for the long-term durability demands of an outdoor horizontal surface under foot traffic. If someone is asking whether they can use general-purpose spray paint on patio stones, the answer is: it'll look okay for a few weeks and then you'll be scraping it off.
Coats, curing, and weather timing for outdoor patios
How many coats you need depends on the surface color change and the product, but two finish coats over primer is the standard for most patio surfaces. On highly textured or porous stone, three coats may be needed to get even coverage.
- Apply the first finish coat after primer has dried fully (check the label, typically 2 to 4 hours for water-based masonry primers).
- Allow the first finish coat to dry 4 to 8 hours (check your specific product) before applying the second coat.
- Do not walk on a painted patio for at least 24 hours, and ideally 48 hours, after the final coat.
- Full cure (hardening of the paint film to its maximum durability) takes 7 to 30 days depending on the product and conditions. During this window the surface is more vulnerable to scuffing and staining.
- Temperature matters: Apply only when air and surface temperatures are between 50°F and 90°F. Rust-Oleum's concrete coating instructions specifically warn against applying if temperatures will drop below 40°F within 48 hours of application, because the paint film won't cure correctly.
- Humidity matters: Avoid painting if relative humidity is above 85% or if rain is forecast within 24 hours. Trapped moisture under the paint film causes bubbling and adhesion failure.
- Morning application in warmer months is usually ideal: surfaces have dried overnight, temperatures are moderate, and you get full daylight hours before evening dew.
Troubleshooting common failures: peeling, flaking, and fading
If a painted patio fails, it almost always comes back to one of a handful of causes. Knowing which one helps you fix it properly instead of just repainting over the same problem.
| Problem | Most Likely Cause | Fix |
|---|---|---|
| Peeling in sheets | Sealer or moisture under paint; no primer used | Strip completely, do moisture and sealer tests, reprime properly |
| Bubbling or blistering | Moisture wicking through slab or painted over wet surface | Strip affected areas, address drainage, use moisture-tolerant primer |
| Flaking at edges or joints | Movement/freeze-thaw expansion in joints; inflexible paint | Fill and stabilize joints first; use flexible masonry paint |
| Chalky white residue returning | Efflorescence not fully removed before painting | Strip paint, remove all efflorescence, use stain-blocking primer |
| Fading or color shift | Low-quality paint or no UV-resistant topcoat | Recoat with quality exterior acrylic masonry paint; add clear sealer topcoat |
| Scratches and scuffs showing quickly | Paint applied too thin or walked on before curing | Allow full 7-day cure before heavy use; add slip-resistant topcoat |
| Paint lifting in freeze-thaw climates | Paint not rated for freeze-thaw; moisture trapped beneath | Use freeze-thaw stable masonry paint; ensure surface drainage is correct |
One thing worth noting for anyone in a cold climate: freeze-thaw cycles are brutal on painted patio surfaces. Water gets under a paint film, freezes, expands, and pops the paint loose. If you're in a region that sees hard winters, use a paint specifically rated for freeze-thaw stability, make sure your patio has adequate drainage so water doesn't pool on the surface, and seriously consider a penetrating sealer over the finished paint to minimize how much water enters the film in the first place.
Maintenance and recoat expectations for painted patio surfaces
A realistically maintained painted concrete patio can look good for 3 to 5 years before needing a full recoat, assuming quality materials and correct prep. Natural stone and brick patios typically need attention sooner, often at the 2 to 3 year mark, because of the irregular surfaces and greater movement at joints. Here's what good maintenance actually looks like:
- Sweep regularly and rinse with a garden hose to prevent grit and debris from acting as sandpaper underfoot.
- Clean oil or food spills promptly with a mild degreaser so they don't penetrate the paint film and cause staining or adhesion breakdown beneath.
- Inspect the surface each spring after winter. Look for any areas of bubbling, peeling, or cracking and address them early before they spread.
- Touch up small damaged areas with matching paint rather than waiting until the whole surface needs recoating.
- Apply a clear exterior masonry sealer over the painted surface every 1 to 2 years. This protects the paint film from UV degradation, moisture, and traffic wear, meaningfully extending recoat intervals.
- When recoating is needed, clean and lightly sand or scuff the existing surface, spot-prime any bare areas, and apply one or two fresh topcoats. You don't always need to strip to bare stone if the existing paint is well-adhered.
The honest cost-benefit reality here is that painting a patio is a maintenance commitment, not a one-and-done improvement. If you're not prepared to inspect and touch up annually and recoat every few years, a painted patio will start looking worse than an unpainted one fairly quickly.
That said, if you're looking to refresh a dated or stained patio surface on a budget before deciding whether to invest in a full replacement or upgrade to a different material, a properly done paint job is a smart and practical bridge solution. Before you start work on a new stone patio, check local rules, including whether you do you need a permit for a stone patio.
Understanding what your patio stones are actually made of makes a real difference in setting the right expectations, and that knowledge pays off whether you're painting, sealing, or eventually replacing them. Knowing what is a patio stone can also help you choose the right surface prep so the finish lasts painted patios. If you’re wondering can you put a hot tub on patio stones, the surface material and load support matter just as much as the finish.
FAQ
Can I paint patio stones if they already have a sealer or previous coating on them?
Yes, but only if the existing coating is firmly bonded. Before painting, check for peeling or chalking by scraping with a fingernail or putty knife, then do a water-drop test again. If water beads, you likely have a sealer or dense coating, and you must remove it (or use the manufacturer’s recommended concrete coating stripper) before priming and topcoating.
When is it safe to paint patio stones (weather and temperature tips)?
You should avoid painting in damp or freezing conditions because moisture trapped under the film is what causes early peeling. Aim for dry weather with moderate temperatures (not direct scorching sun), keep the surface dry for the full cure time listed on the product, and don’t paint if rain is expected within that window.
How should I clean patio stones before painting, is pressure washing okay?
Be careful with pressure washing, because overly aggressive settings can erode mortar and open pores, and water can get trapped beneath the surface. Use a moderate approach, fully rinse, and let the patio dry completely, then do the water-drop test again to confirm it is ready to accept primer.
What finish should I choose so a painted patio does not get slippery?
For foot-traffic patios, skip high-gloss finishes and prioritize satin or low-sheen, then add anti-slip aggregate if rain, wet mopping, or pool splash is likely. If the patio will be very wet often, consider a textured paint system or an anti-slip additive designed for exterior concrete masonry.
Can I just do touch-ups instead of repainting the whole patio?
Touch-ups are fine, but you need spot-prime first, especially on porous areas. Feather-sand any rough edges, remove loose paint, spot-prime with a compatible bonding or masonry primer, then match the topcoat sheen. For large faded areas, plan on blending a wider section rather than painting small squares.
What if white chalky deposits (efflorescence) come back after I paint or prime?
If efflorescence keeps reappearing after you clean it, painting will not fix the underlying moisture movement. Treat it as a water-management issue, improve drainage, and address sources of rising damp or sprinkler overspray before repainting or using a stain-blocking primer.
Can I use epoxy garage floor coating on patio stones?
Epoxy is usually a bad choice for outdoor horizontal patios because it tends to fail under moisture and freeze-thaw movement. Stick to an exterior 100 percent acrylic latex concrete and masonry paint system with the correct primer, and if you want a tougher surface, look for a paint labeled for outdoor concrete flooring or masonry.
Is exterior house paint the same as masonry paint for patios?
Don’t rely on regular exterior house paint. Even when it adheres initially, it can break down faster from UV exposure, scuffing, and water cycling. Use a masonry or concrete-rated exterior paint, and follow the primer requirements based on the substrate and whether the surface is porous.
If I spray paint, do I still need to roll or back-brush?
Yes, but long-term adhesion depends on the prep and the system, not the applicator. For spray, you still need correct tip size for masonry paint, consistent pass speed to avoid thick or thin areas, and back-rolling on textured surfaces to ensure paint reaches pores evenly.
What’s the right way to fix a painted patio that is peeling or failing early?
If you used the wrong product or primer, or if moisture is getting under the film, repainting over it usually just repeats the failure. Scrape to sound edges, confirm adhesion by scraping and water-drop testing, then re-prime correctly. If adhesion is widespread or the surface is sealed and you did not remove it, full stripping is often the only reliable fix.