
A broken slab patio is fixable in most cases, and you rarely need to tear out the entire surface to get it looking and functioning well again. The right move depends on what broke it in the first place: a hairline crack from normal settling is a two-hour patch job, while a slab that has sunk four inches because the base washed out needs a more serious intervention. This guide walks you through diagnosing the damage, deciding whether to patch, relevel, rebuild, or redesign, and then doing the actual repair work on concrete, flagstone, or tile surfaces, with real cost numbers and material comparisons so you can make a confident decision.
Broken Slab Patio: Diagnose, Repair, Replace, Reuse Guide

Nolan Ellison
12 Jul 2026
Quick Safety and Damage Assessment Checklist
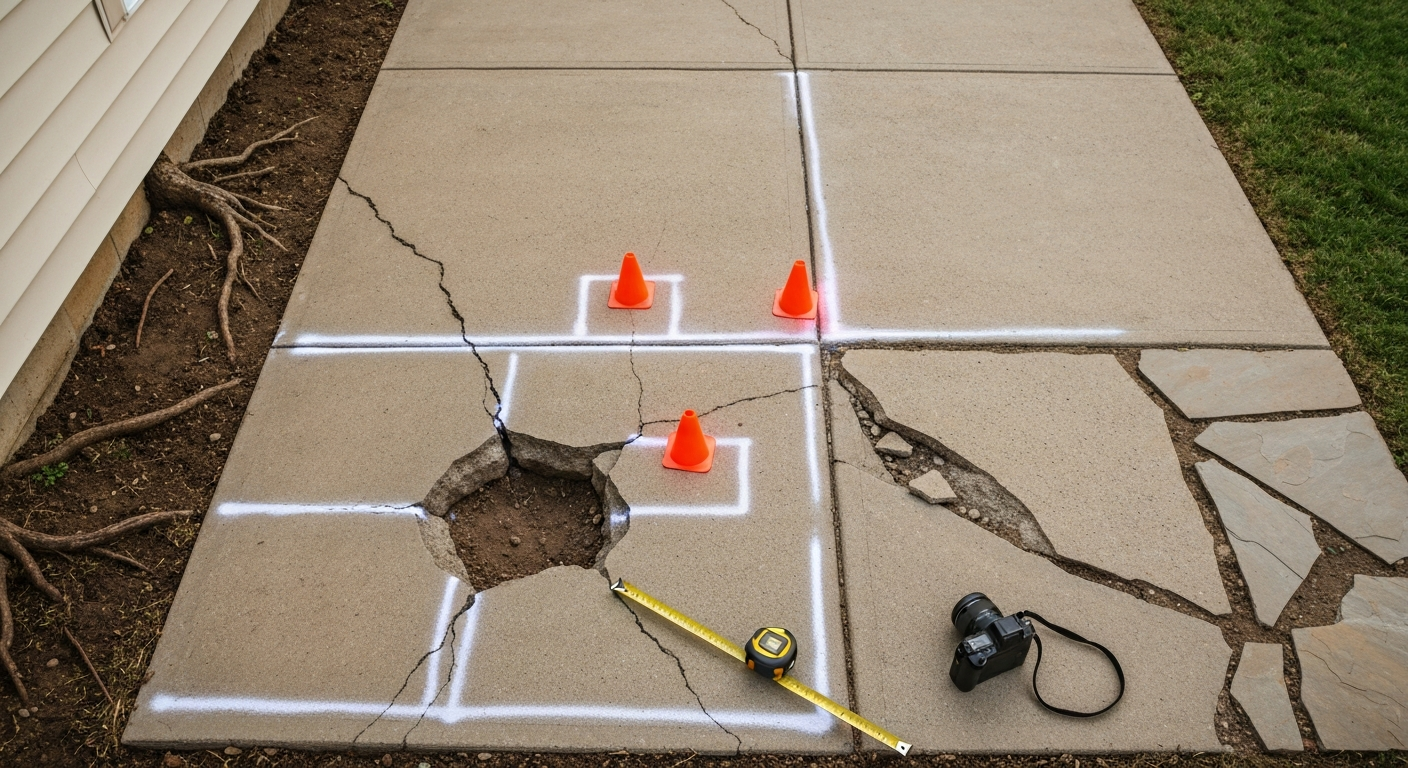
Before you pick up a tool or order materials, walk the patio systematically and answer these questions. The checklist doubles as your documentation if you later need a contractor estimate or a permit.
- Mark any tripping hazards (lips above 1/4 inch, loose stones, raised edges) with spray paint or cones and keep the area off-limits until repaired.
- Check for sharp exposed edges, spalling shards, or broken tile fragments that could cause cuts, and clear them into a bucket before working.
- If you plan any digging deeper than 12 inches, call 811 (free, national one-call service in the U.S.) to have buried gas, electric, water, and sewer lines marked before you start. This applies even to small excavations for edge repairs.
- Wear N95 or P100 respiratory protection and safety glasses when cutting, grinding, or drilling any concrete, brick, or tile. Cutting or grinding concrete generates respirable crystalline silica dust, which is a serious lung hazard regulated by OSHA (29 CFR 1926.1153). Use wet cutting methods or a HEPA-vacuum-equipped grinder whenever possible.
- Photograph every crack, sunken section, spalled area, and loose stone from multiple angles before touching anything. Date-stamp the photos.
- Measure the width of the widest cracks in millimeters (a credit card is about 0.76 mm thick for reference) and the depth of any sunken sections in inches.
- Check drainage: does water pool on the surface or run toward the house? Per IRC R401.3, grade should fall at least 6 inches within the first 10 feet from the foundation. A patio that slopes toward the house is a drainage problem and a repair priority.
- Look for signs of tree root intrusion (humped sections, cracked edges near trees), efflorescence (white salt deposits), or rust staining (reinforcing steel corrosion).
- Note whether cracks are dormant or active: put a piece of tape across a crack and mark the date; if the tape tears or gaps over two weeks, the crack is still moving and root cause work is needed before patching.
- Record total affected area in square feet so you can compare repair cost against replacement cost.
Reading the Damage: What Each Type of Crack or Problem Tells You
Not all broken slabs are broken the same way. The pattern and character of the damage is the best diagnostic tool you have, often more useful than a contractor's first glance.
Hairline cracks (under 0.3 mm wide)
These are almost always shrinkage cracks from the original pour curing too fast or without adequate control joints. They're cosmetic unless water gets in and freezes. ACI guidance puts the tolerable crack width for non-aggressive outdoor exposure at roughly 0.30 to 0.41 mm (about 0.012 to 0.016 inches), so true hairlines in a dry climate are low priority. In a freeze-thaw climate, even a hairline lets water in, which expands the crack every winter.
Structural cracks (wider than 0.5 mm, stepped, or offset)
A crack where one side sits higher or lower than the other is a settlement crack. The slab has moved, and that movement has a cause (poor base, soil erosion, roots, or frost heave) that must be addressed before any repair will last. Stepped cracks along mortar joints in flagstone or paver patios indicate the same thing: differential movement underneath.
Spalling
Spalling is surface concrete or stone flaking or popping off in layers. On concrete, it almost always means freeze-thaw damage, deicing salt damage, or both. The top few inches of a poured slab absorb the most water and take the most abuse. On natural stone like flagstone, spalling can also mean you have a frost-vulnerable stone type that was never rated for exterior freeze-thaw use.
Sinking or uneven sections
A slab that has dropped below grade while surrounding slabs remain level has lost its subbase support. That could be soil washout from poor drainage, void formation from roots decomposing, or consolidation of a poorly compacted base. A section that sinks uniformly (flat but low) is a better candidate for mudjacking or polyjacking than one that has tilted or crumbled.
Loose tiles or flagstones
A single loose flagstone or tile in an otherwise stable patio usually just means the mortar or adhesive beneath that piece failed, often from a poor original bond or water getting under the stone. If multiple stones are loose in a pattern (along an edge, in one corner, or in a low area), that suggests a base problem or drainage issue, and simply re-setting each stone individually will not solve it.
Crumbling or honeycombed concrete
If the concrete crumbles when you press it or looks porous and void-filled, the original mix was poor (too much water, inadequate cement content) or the concrete was not properly cured. This is a structural quality problem and patching the surface will not add structural integrity. Replacement is usually the better economic decision.
Common Root Causes and How to Diagnose Them
Fixing the symptom without identifying the cause is the single biggest mistake homeowners make with patio repairs. I have seen people spend $800 filling cracks in a slab that sank another inch the following spring because the drainage problem underneath was never fixed.
Freeze-thaw cycling
Water expands about 9% when it freezes. Concrete or stone that is saturated when temperatures drop below 32°F gets cracked from the inside out. Research from the U.S. Army Cold Regions Research and Engineering Lab (CRREL) shows frost heave is driven by ice-lens formation in fine-grained soils (silts and clays in particular), where capillary action keeps pulling water to the freezing front. Understanding Freeze–Thaw in Soils / research referencing ASTM D5918 and frost heave test methods (peer‑reviewed study) documents standardized laboratory frost‑susceptibility testing (including ASTM D5918) and guidance for evaluating frost‑heave risk. If you are in USDA hardiness zones 3 through 6, freeze-thaw is almost certainly a contributing factor. Diagnosis: spalling surfaces, surface flaking in thin layers, cracks that widen every winter.
Poor or inadequate base
A concrete patio poured on 2 inches of compacted gravel over native silt will sink. The ICPI (Interlocking Concrete Pavement Institute) requires a properly designed and compacted aggregate subbase under all paver installations. For a residential concrete slab, a minimum of 4 inches of compacted gravel base is standard in most regions, with 6 or more inches in cold climates. Diagnosis: uniform sinking shortly after installation, slabs that rock when walked on.
Soil settling and consolidation
Newly placed fill soil continues to consolidate for years. Patios installed over disturbed soil or fill less than two or three years old are particularly vulnerable. Diagnosis: gradual, ongoing settlement over multiple seasons rather than a single event.
Tree root intrusion
Roots from trees planted nearby, or existing trees you built around, grow under slabs and exert enormous upward pressure. Diagnosis: humped or raised sections, cracks that radiate from the direction of a tree, visible roots at slab edges.
Poor drainage
Water pooling on or draining toward the patio saturates the base and softens the subgrade. The IRC requires the grade to fall at least 6 inches in the first 10 feet from a foundation (roughly 5% or about 1/4 to 1/2 inch per foot). A patio that pitches toward the house instead of away from it is actively directing water at your foundation. Diagnosis: water pooling on the surface after rain, efflorescence on slab edges, chronically soft or muddy soil at slab edges.
Heavy or unexpected loads
A residential patio slab designed for foot traffic and outdoor furniture cracks when a loaded concrete truck or heavy equipment parks on it. Hot tubs (filled, often 3,000 to 6,000 lbs for a mid-size unit) on slabs not designed for point loads cause localized cracking. Diagnosis: cracks that radiate from a central point, often star-shaped.
Decision Framework: Patch, Relevel, Rebuild, or Redesign
Use this table as your first checkpoint. Be honest in your assessment, especially about the root cause. If the root cause is unresolved, any repair is temporary.
| Situation | Recommended Path | Why |
|---|---|---|
| Hairline cracks, no settlement, root cause is shrinkage only | Patch | Low-cost, cosmetic fix; no structural or base issue |
| Cracks wider than 0.5 mm, stable (not growing), no offset between sides | Crack repair (epoxy injection or routing and filling) | Structural bond can be restored if crack is dormant |
| Cracks that are actively widening or root cause not resolved | Diagnose and fix root cause first, then repair | Patching a moving crack wastes money |
| One or two sunken slab sections, slab structurally sound, base repair feasible | Relevel (mudjacking or polyjacking) | Cheaper than replacement if slab is intact |
| More than 30% of slab area sunken, spalled, or crumbled | Rebuild slab or sections | Widespread failure means repair costs approach replacement cost |
| Drainage or root causes cannot be corrected with current layout | Redesign | Permeable pavers, gravel, or raised decking may solve the root problem |
| Surface is structurally sound but visually outdated | Resurface or overlay | Skim coat, tile overlay, or paver overlay can transform appearance at lower cost |
A rough rule of thumb I use: if the repair cost estimate exceeds 60 to 70% of what a new comparable surface would cost, rebuild. You spend less, get a warranty on new materials, and solve the underlying issues properly rather than working around them.
Repair Options Overview
Temporary safety fixes
When you find a tripping hazard that cannot be repaired immediately, grind down a raised lip using an angle grinder with a diamond cup wheel (wet-cut to control silica dust), or use a cold chisel and hammer to knock off the high edge. A temporary bead of polyurethane caulk can close a crack temporarily to prevent water entry. These are not permanent repairs, but they make the patio safe while you plan the real fix.
Crack repair
For dormant cracks (confirmed stable over two weeks), epoxy injection is the structural repair of choice. ACI guidance on epoxy injection (documented in ACI RAP-1) makes clear that epoxy injection is appropriate for stabilized cracks only, and that root causes must be resolved first. Low-viscosity epoxy resins from manufacturers like Sika are designed to penetrate cracks as fine as 0.1 mm. For cracks over about 3 mm wide, routing and filling with a polymer-modified cementitious repair mortar or a polyurethane sealant is the practical approach. For active cracks or those that need to flex, use polyurethane sealant rather than rigid epoxy.
Releveling sunken slabs
Three methods are commonly used for lifting sunken concrete slabs. Mudjacking pumps a cementitious slurry under the slab through drilled holes; polyjacking (also called foam jacking) injects expanding polyurethane foam instead. Branded systems like PolyLevel use a similar foam approach with proprietary formulations and warranties.
| Method | Typical Cost (per sq ft) | Cure Time | Weight Added | Longevity |
|---|---|---|---|---|
| Mudjacking | $5–$15 | 24–48 hours | High (adds mass) | 5–10 years typical |
| Polyjacking (generic foam) | $8–$25 | 15–30 minutes | Very low | Often 10+ years |
| Premium foam systems (e.g., PolyLevel) | $15–$30 | 15–30 minutes | Very low | Often longer warranty |
Foam options cure faster, add minimal weight (important if poor subbase was the original problem), and often carry longer warranties than mudjacking. Mudjacking is usually the lowest upfront cost and is still a solid choice when the slab is heavy enough that added weight is not a concern. Neither method works if the slab itself is structurally compromised or if the void underneath is too large to fill reliably.
Grout and epoxy patching
Spalled surfaces and shallow voids can be patched with a bonding agent plus polymer-modified concrete repair mortar. For tile grout failures, matching and replacing grout is straightforward. For structural spalls, a bonding agent applied to the cleaned surface followed by a troweled mortar patch is the standard method.
Full slab or tile replacement
When a section is beyond patch repair, the correct move is removal and replacement. For concrete, this means saw-cutting the perimeter, breaking out the old slab, rebuilding the base to the correct depth and compaction, and pouring new concrete or installing a new surface material. This is also your opportunity to upgrade to a better material or drainage system.
Required Tools and Materials
Having the right tools before you start saves multiple trips to the hardware store and keeps the project moving. The list below covers most repairs in this guide.
- Safety gear: N95 or P100 respirator, safety glasses, heavy work gloves, knee pads, steel-toed boots
- Angle grinder with diamond cup wheel and diamond blade (wet-cut capable)
- Circular saw with diamond blade (for cutting concrete or tile)
- Cold chisel and 3 lb. hammer
- Crack router bit or oscillating tool with diamond blade (for routing cracks)
- Caulking gun and injection ports (for epoxy or polyurethane injection)
- Low-viscosity epoxy injection resin (e.g., Sika or equivalent) for fine cracks
- Polyurethane sealant for flexible or active cracks
- Polymer-modified concrete repair mortar
- Bonding agent (acrylic or epoxy-based)
- Notched trowel, margin trowel, and grout float
- Level (4-foot or longer), rubber mallet
- Pry bar and suction cups (for lifting flagstone or tile)
- Wire brush and angle grinder wire cup for surface cleaning
- Masonry drill and 1/2-inch drill bit (for injection port holes)
- Shop-vac with HEPA filter or wet vacuum
- Concrete mix or bagged sand mix for base repairs
- Compactable gravel and polymeric sand for base work
- Plate compactor or hand tamper
- Exterior tile adhesive or thin-set mortar rated for outdoor use
- Matching grout and grout sealer
- Masonry sealer (for concrete or stone surfaces post-repair)
DIY Step-by-Step: Repairing a Concrete Slab Patio
Safety patch for a tripping hazard
- Put on respirator, safety glasses, and gloves before any grinding or cutting.
- Use a wet-cutting angle grinder with a diamond cup wheel to grind down any raised edge until the lip is flush or beveled below 1/4 inch. Keep water flowing on the cut to suppress silica dust.
- Vacuum slurry and debris with a HEPA shop-vac.
- Apply a concrete repair caulk or patching mortar to any exposed void to prevent water infiltration.
- Allow to cure per product instructions before allowing foot traffic.
Routing and filling cracks
- Confirm the crack has been stable (not widening) for at least two weeks using the tape test.
- Use a crack router bit in an angle grinder or a dedicated crack router to widen the crack to a uniform 1/4-inch width and 1/4-inch depth. This gives the repair material something to bond to and prevents feathered edges that pop off.
- Vacuum out all dust and loose material with a HEPA-filtered vacuum.
- For structural re-bonding of a dormant crack, inject low-viscosity epoxy: drill 1/2-inch holes every 6 to 8 inches along the crack, insert injection ports, cap between ports with epoxy paste, and inject resin starting from the lowest port upward until resin appears at the next port. Cap and move up.
- For cracks that may flex or where waterproofing is the goal, fill with a self-leveling polyurethane sealant instead of epoxy. Tool flush with the surface.
- For wide surface cracks (over 3 mm), apply a concrete bonding agent to the routed channel, let it become tacky, then pack with polymer-modified repair mortar. Trowel flush.
- Let cure fully (typically 24 hours for mortar, several hours for sealant) before sealing the surface.
Releveling a sunken slab section
- Confirm the root cause (poor base, soil washout, drainage) and correct it if possible before lifting. Improved drainage is a prerequisite for a lasting relevel.
- For DIY releveling of a small slab section (under about 20 square feet), you can use a slab jack kit or hydraulic floor jack with temporary cribbing as a short-term fix while arranging professional mudjacking or polyjacking.
- For professional foam or mudjacking, the contractor drills injection holes (typically 1.5 to 2 inches in diameter, on a grid roughly 2 to 4 feet apart), injects the material, monitors lift with a laser level, and patches the holes once complete.
- After releveling, address the drainage issue: install a French drain, extend downspouts, or regrade soil adjacent to the slab so water runs away from it at the IRC-required minimum slope (6 inches of fall in the first 10 feet).
- Seal the lifted slab after the filler material cures (24 to 48 hours for mudjacking, 15 to 30 minutes for foam).
Replacing a damaged slab section
- Call 811 before any excavation, even shallow digging.
- Saw-cut the perimeter of the section to be removed using a circular saw with a diamond blade (wet cut). Cut to the full slab depth.
- Break out the old concrete with a cold chisel and hammer or a rented electric jackhammer. Wear full PPE including respirator.
- Excavate the base to the required depth: minimum 4 inches of compacted gravel in warm climates, 6 or more inches in freeze-thaw climates.
- Compact the gravel base with a plate compactor or hand tamper until firm. Check for level and slope (minimum 1/4 inch per foot away from the house).
- Set form boards at the correct height to match adjacent slab.
- If tying into existing slab, drill and epoxy dowel bars into the existing slab edge for continuity.
- Pour 3,000 to 4,000 PSI concrete with fiber reinforcement or place rebar/wire mesh. Screed, float, and finish to match surrounding texture.
- Cover with plastic sheeting and cure for a minimum of 7 days before light foot traffic, 28 days before heavy use.
- Seal the surface after 28 days with a penetrating concrete sealer.
DIY Step-by-Step: Repairing and Resetting a Flagstone Patio
Flagstone repairs vary depending on whether the stone is dry-laid (in sand or gravel) or mortared. The steps below cover mortared installations, which are more common for patios. Dry-laid flagstone is simpler: lift the stone, re-level the sand bed, and reset. If you are dealing with broader flagstone patio problems beyond just broken pieces, the underlying base and drainage issues usually need attention first.
Lifting and assessing individual stones
- Use a cold chisel or stiff putty knife to break the mortar joint around the stone you need to lift.
- Insert a pry bar under the stone edge and work it up carefully. For heavy flagstone, have a helper and use two pry bars on opposite sides.
- Set the stone face-down on a padded surface (a piece of old carpet works) and clean the back with a wire brush until all old mortar is removed.
- Inspect the stone for cracks. Hairline cracks in flagstone can be stabilized; a stone broken into two or more pieces can sometimes be reset as a design feature (see creative reuse section), but structurally compromised pieces should be replaced.
Base repair and cleaning
- Remove all old mortar from the substrate with a chisel and wire cup on an angle grinder.
- Check the substrate for voids, soft spots, or erosion. Fill any voids with dry-pack mortar (a stiff, near-dry mix of sand and cement) and compact firmly.
- If the stone was sinking due to a drainage problem, address that now: add gravel, install a small French drain, or regrade the surrounding soil.
- For mortared installs, dampen the substrate before applying fresh mortar.
Resetting and regrouting
- Apply a layer of dry-pack mortar (or exterior-rated tile adhesive applied in beads as described in This Old House demonstrations) to the substrate, roughly 3/4 to 1 inch thick for mortared flagstone.
- Set the flagstone into the mortar bed, pressing firmly and working the stone to eliminate voids beneath it. Use a rubber mallet to seat it fully. Check for level with adjacent stones.
- Allow the mortar bed to set for 24 hours before grouting.
- Mix a matching masonry grout or use polymeric sand for a more flexible joint. Work grout into the joints with a margin trowel or grout bag, packing it firmly.
- Wipe excess grout with a damp sponge before it hardens. Allow 24 to 48 hours to cure.
- Seal the repaired flagstone and grout joints with a penetrating stone sealer appropriate for the stone type (limestone, slate, and sandstone all have different sealer requirements).
Best edging for a flagstone patio
Edge restraint is not optional for any stone or paver patio. ICPI technical standards explicitly require continuous mechanical edge restraints for paver installations to prevent lateral spread and freeze-thaw movement. For flagstone, the best edging options depend on your aesthetic and budget. If you want a quick comparison of the pros and cons to help decide, see a short guide to the best edging for flagstone patio. Steel landscape edging (16-gauge or heavier) is nearly invisible and extremely durable. Aluminum edging is lighter and easier to work with but flexes more. Concrete mow-strip edging is the most permanent and works well at the lawn interface. Mortared soldier-course bricks or matching stone set in concrete are the most attractive option and integrate naturally with flagstone's aesthetic. Whatever you choose, anchor it with 12-inch spikes or bury it in concrete so it cannot migrate outward.
DIY Step-by-Step: Repairing Porcelain and Ceramic Tile Patios
Exterior tile repairs require attention to materials that are genuinely rated for outdoor use. For step-by-step fixes specifically for a broken tile patio, see our dedicated guide. The Tile Council of North America (TCNA) and ANSI A108 series standards specify exterior installation methods and materials. The most important selection criterion for freeze-thaw climates: porcelain tile with water absorption below 0.5% is frost-resistant; most standard ceramic tile is not and will spall in freezing weather. If you are replacing tiles in a cold climate, confirm you are using porcelain rated for exterior freeze-thaw exposure before ordering.
Removing broken tiles
- Put on safety glasses and gloves; broken tile edges are razor sharp.
- Use a grout saw or oscillating tool with a diamond blade to cut through the grout joints around the broken tile.
- Score the broken tile with a diamond blade in a circular saw, then use a cold chisel and hammer to break the tile into sections. Work from the center outward to avoid damaging adjacent tiles.
- Chisel out all tile fragments and scrape the substrate clean of old thin-set with a floor scraper or oscillating tool.
- Vacuum all dust with a HEPA vacuum.
Substrate repair
- Inspect the substrate (usually concrete) for cracks or voids where the tile was removed. Repair any cracks as described in the concrete repair section above.
- If you find the substrate is soft, spalled, or saturated, allow it to dry completely (several days minimum) before tiling. Wet thin-set over a wet substrate will not bond.
- For installations over an existing slab that cracks, consider installing an uncoupling membrane (such as Schluter Ditra or similar products referenced in TCNA exterior methods) between the substrate and tile. This absorbs differential movement and is especially valuable in freeze-thaw climates.
- Ensure the substrate is flat to within 1/8 inch over a 10-foot span. High spots can be ground down; low spots filled with floor-leveling compound.
Tile installation
- Use an exterior-rated polymer-modified thin-set mortar for outdoor tile. Do not use standard white wall tile adhesive outdoors.
- Apply thin-set to the substrate with the appropriate notched trowel size for your tile format (larger tiles need a larger notch to ensure full coverage).
- Back-butter large format tiles (over 15 inches on any side) in addition to combing the substrate for full mortar contact. Voids beneath outdoor tiles fill with water and fail.
- Set the replacement tile and use tile spacers to match existing grout joint width. Check that the tile is flush with adjacent tiles using a straightedge.
- Allow thin-set to cure fully (minimum 24 hours, 48 hours in cooler weather) before grouting.
- Mix grout to match the existing color. Apply with a grout float, working diagonally across joints to pack them fully.
- Clean excess grout with a damp sponge in circular motions before it sets. Polish the tile surface after grout hazes.
Grout and sealant tips
- Use unsanded grout for joints under 1/8 inch and sanded grout for joints 1/8 inch or wider.
- Epoxy grout is stain-resistant and extremely durable but difficult to work with; it is worthwhile in high-traffic or shaded areas prone to mold.
- Apply a penetrating grout sealer 72 hours after grout installation and reseal annually in high-rain climates.
- Install silicone movement joints (not grout) wherever tile meets a wall, column, or at changes of plane. Movement joints every 8 to 12 feet within the field are also recommended per TCNA guidelines for exterior tile.
- Do not seal tile joints with exterior latex caulk; it degrades with UV exposure. Use 100% silicone or siliconized latex rated for exterior use.
Creative Reuse: Getting Something Beautiful from Broken Pieces
If you have broken flagstone, concrete pavers, or broken tile you cannot use structurally, do not throw it all away. Crazy-paving (also called mosaic paving or random irregular paving) is exactly what the name implies: irregular-shaped pieces set in mortar with narrow joints to create a patchwork surface. It looks intentional, works beautifully with flagstone and tile fragments, and costs almost nothing in materials beyond mortar and grout. I have seen patios entirely constructed this way that people assumed were designed from the start. For using salvaged materials, see our guide on broken patio stones for tips on selecting, cleaning, and preparing fragments before resetting.
- Sort broken pieces by approximate size (large for field, small for infill) and thickness. Pieces need to be at least 3 to 4 inches across and consistent in thickness to be workable.
- Prepare the substrate as you would for any flagstone or tile installation: clean, level base with adequate drainage.
- Lay out pieces dry first to work out the puzzle before committing to mortar.
- For broken concrete slabs, consider using large pieces as stepping stone paths through gravel rather than a full paved surface. This is the easiest reuse and requires minimal material or skill.
- Broken porcelain tile fragments work well as decorative accents or small accent features within a larger flagstone or concrete design.
- Broken patio stones can also be used as edging material for garden beds, especially if pieces are fairly flat and uniform in height.
Replacement Surface Options Compared
If you have decided the old surface needs to come out entirely, you have a real opportunity to upgrade. Here is an honest comparison of the main options, evaluated for the factors that actually matter in a replacement decision.
| Material | Approximate Installed Cost (per sq ft) | Freeze-Thaw Performance | Drainage Options | Maintenance Level | Best For |
|---|---|---|---|---|---|
| Poured concrete | $6–$12 | Good if properly mixed and sealed; poor if deicing salts used without sealing | Can be sloped; not permeable by default | Low (seal every 2–3 yrs) | Simple, budget-conscious installs |
| Concrete pavers (ICPI-rated) | $10–$20 | Excellent if rated to ASTM C936 freeze-thaw criteria | Permeable options available | Low to medium | Freeze-thaw climates; easy individual piece replacement |
| Flagstone (natural) | $15–$30 | Varies by stone type; dense fieldstone and bluestone perform well; soft limestone/sandstone does not | Good in dry-laid installs | Medium (reseal; repoint joints) | Naturalistic look; dry-lay for DIY |
| Porcelain tile | $12–$25 | Excellent (absorption <0.5% if frost-rated) | Slope-dependent; not permeable | Low (very durable surface) | Modern, clean aesthetic; shade or covered patios |
| Ceramic tile | $8–$18 | Poor to moderate unless rated for exterior freeze-thaw | Slope-dependent; not permeable | Low to medium | Warm climates or covered areas only |
| Brick | $12–$22 | Good with frost-rated brick (Type SX per ASTM C216) | Permeable with sand joints | Medium (re-sand joints; reseal) | Traditional aesthetic; cold climates with correct brick grade |
| Permeable pavers / pervious concrete | $15–$30 | Good if designed with proper stone reservoir; per EPA guidance, requires underdrain in low-infiltration soils | Excellent (primary purpose) | Medium (periodic cleaning to prevent clogging) | Drainage-challenged sites; sustainability goals |
| Composite/PVC decking tiles | $10–$25 | Excellent (unaffected by freeze-thaw) | Elevated allows drainage below | Low | Over existing slab; rental properties; easy DIY |
My general recommendation: in freeze-thaw climates, concrete pavers rated to ASTM C936 or porcelain tile with confirmed frost rating are the most durable choices and the easiest to repair piece by piece later. In warm, rain-heavy climates, drainage is the primary concern, and permeable pavers or dry-laid flagstone on a compacted gravel base are excellent choices. Per EPA guidance, permeable pavements (permeable pavers, pervious concrete, porous asphalt) reduce runoff and should be installed with a stone reservoir, geotextile, and underdrain where native soils or groundwater limit infiltration; they are not recommended where infiltration could contaminate groundwater or in high‑traffic, heavily contaminated areas EPA Green Streets Handbook — Permeable Pavement section. If budget is tight and the existing concrete slab is structurally sound, a porcelain tile overlay or resurfacing coat is far less expensive than full removal and replacement.
When to Hire a Pro
Most crack repairs, individual stone resets, and tile replacements are reasonable DIY projects if you are comfortable with basic masonry tools. However, some situations genuinely warrant professional involvement.
- Any slab lifting or mudjacking: requires specialized equipment and knowledge of void sizing. A bad foam injection job can overfill and crack a structurally weak slab.
- Drainage regrading that involves altering grade near the foundation: a mistake here can direct water toward the house. An IRC-compliant slope (6 inches in the first 10 feet) is required, and errors are expensive to fix.
- Root cause is foundation movement or expansive soil: this is a structural engineering issue, not a patio repair.
- Large-scale jackhammering of thick slabs: beyond respiratory hazard management, this is physically demanding and requires proper disposal of debris.
- Permitted work: some jurisdictions require permits for significant patio construction. A contractor will know local requirements.
- Working near buried utilities even after 811 marking: if you are working within 18 inches of a marked utility line, most state laws require hand digging only.
Typical Cost Ranges and Budgeting
| Repair Type | DIY Material Cost | Professional Installed Cost | Notes |
|---|---|---|---|
| Crack routing and epoxy injection (per linear foot) | $2–$5 | $10–$30 | Professional cost varies with crack depth and accessibility |
| Mudjacking (per sq ft) | Not practical DIY | $5–$15 | Requires pumping equipment |
| Polyjacking / foam jacking (per sq ft) | Not practical DIY | $8–$30 | Higher cost but lighter, faster cure |
| Individual flagstone reset (per stone) | $5–$15 materials | $25–$75 labor + materials | Includes mortar and grout |
| Tile replacement (per tile) | $3–$20 for tile + materials | $15–$50 per tile installed | Matching tile adds cost if discontinued |
| Slab section replacement (per sq ft) | $4–$8 materials | $12–$25 installed | Includes base prep and forming |
| Full patio demo and rebuild (per sq ft) | $6–$12 materials | $15–$35+ installed | Varies widely by material choice and region |
Sourcing and Matching Replacement Materials
Matching existing materials is one of the harder parts of patio repair, especially for natural stone or discontinued tile. Here is how to approach it practically.
- For natural flagstone, take a sample piece (or a sharp photograph with a coin for scale) to a local stone yard rather than a home improvement chain. Stone yards typically carry a broader range of species and thicknesses and can often identify regional stone types.
- For concrete pavers, note the manufacturer name (usually embossed on the bottom of the paver) and contact them directly for replacement units. Many ICPI-member manufacturers keep production records.
- For porcelain or ceramic tile, photograph the tile back (manufacturer name and series are often printed there) and search by series name. If the tile is discontinued, request a sample from a tile distributor's closeout inventory, or accept that the repair will be a visible patch and choose a complementary tile intentionally.
- For concrete slabs, color-matching is possible with concrete dyes and stains if the original surface was colored. Test on a scrap piece before committing.
- Salvage yards and architectural salvage dealers are excellent sources for antique brick, reclaimed flagstone, and vintage tile that may match old surfaces better than new production materials.
- When buying replacement pavers or flagstone in freeze-thaw climates, confirm the stone meets freeze-thaw performance standards. For pavers, look for ASTM C936 certification. For stone, ask the supplier for frost-resistance documentation.
Climate and Drainage: Preventing the Same Problem from Happening Again
The most expensive repair is the one you have to repeat. These prevention measures are worth doing as part of any repair, not after.
In freeze-thaw climates
- Extend your gravel base depth to a minimum of 6 inches; 8 to 12 inches in climates with deep frost penetration (roughly zones 3 to 5).
- Use frost-resistant materials certified to relevant ASTM standards (C936 for pavers, <0.5% absorption for porcelain tile).
- Avoid deicing salts on concrete surfaces; use sand for traction instead. Deicing salts dramatically accelerate spalling.
- Use well-graded sand or crushed stone rather than native silt or clay as the bedding and base layer. CRREL research confirms silt and clay soils are the most frost-susceptible; coarse, well-graded gravel is the least. If your native soil is silty or clayey, excavate deeper and bring in select granular fill.
- Seal concrete and natural stone annually or biannually with a penetrating sealer to reduce water absorption.
In wet or humid climates
- Ensure the patio slopes away from the house at a minimum 1/4 inch per foot (and toward a drainage outlet, not just toward the lawn).
- Consider permeable pavers or a dry-laid flagstone on gravel base to allow infiltration in place. Per EPA green infrastructure guidance, permeable pavement with a stone reservoir and geotextile layer manages infiltration well where soils allow it.
- Install a perimeter French drain if your patio is in a low area or surrounded by higher grade.
- Do not allow downspouts to discharge onto or near the patio surface.
Tree roots
- If roots were the cause, remove the offending roots and install a physical root barrier (rigid HDPE sheet, 24 to 36 inches deep) along the patio perimeter facing the tree before repaving.
- Consider replacing the patio surface adjacent to trees with gravel or decomposed granite, which accommodates root movement without breaking.
- Do not plant aggressive-rooted trees (silver maple, willow, poplar) within 15 feet of any hardscaped surface.
Simple Maintenance Schedule
A consistent maintenance routine extends patio life dramatically and keeps small problems from becoming expensive ones. This schedule works for concrete, flagstone, paver, and tile surfaces.
| Frequency | Task |
|---|---|
| After every significant rain | Check that drainage is working as expected; clear any debris blocking outlets |
| Spring | Inspect all surfaces for new cracks, spalling, heaved stones, or loose tiles; photograph and document any changes from the previous season |
| Spring | Clean surface with a low-pressure wash (under 1,500 PSI for flagstone and tile; up to 3,000 PSI for sealed concrete); avoid high pressure on grout joints |
| Spring | Check edge restraints for migration or damage; re-anchor any loose edging |
| Spring | Re-sand polymeric sand joints in paver or dry-laid flagstone patios if joints are low or washed out |
| Fall (before first freeze in cold climates) | Apply penetrating sealer to concrete and natural stone surfaces; confirm sealant is intact on tile grout joints |
| Fall | Remove standing water from any low spots; ensure downspouts are directed away from the patio |
| Every 2–3 years | Reapply a full surface sealer on concrete or sealed flagstone |
| As needed | Address any crack that has opened wider than 1 mm, any stone or tile that has become loose, or any edge that has shifted before the next freeze-thaw cycle or rainy season |
FAQ
What immediate safety and damage-assessment checklist should I run when I discover a broken slab patio?
Stop use, cordon area, and inspect: note trip/fall hazards, open edges, exposed reinforcement or utilities. Look for signs of active movement (new cracks, widening), sinkage, undermining/subsidence, standing water, root intrusion, and spalling. Photograph and measure crack widths and slab offsets (vertical differential). Check for underlying causes—wet soils, poor slope/drainage, nearby tree roots, freeze‑thaw evidence. If cutting/grinding is needed later, plan controls for silica dust (wet cutting/HEPA vacuum/respirator). Before any excavation call 811 to locate utilities.
What are the common root causes of broken slab patios I should diagnose first?
Common causes: frost heave/freeze‑thaw in cold climates, soil settling or voids, inadequate or poorly compacted base, poor drainage or ponding, tree roots uplifting slabs, heavy or concentrated loads, improper jointing or edge restraints (pavers), and freeze‑thaw damage to unsuitable materials (non‑porcelain tiles). Diagnose with surface pattern of cracks, localized sinkage, drainage observations, and soil moisture checks.
How do I decide whether to patch, relevel, or fully replace my patio?
Decision checkpoints: safety (trip hazards) — patch or cordon immediately; if cracks are stable, small (<1/8 in) and non‑structural, consider crack repair; active movement, widespread settlement, badly compromised base, or repeated failures → full replacement. Use releveling (mudjacking/polyjacking) for localized sinking with intact slab and good perimeter; replace individual tiles/flagstones/pavers when isolated. Consider life‑expectancy: cosmetic vs. long‑term structural fix, climate suitability of materials, and budget.
What temporary safety fixes can I use while planning a permanent repair?
Bolt down or brace loose stones, apply a trip‑edge ramp (tuck small pieces or plywood), fill sharp gaps with exterior grade caulk or quickset concrete patch, and remove severely loose pieces to prevent injury. For open cracks, cover with high‑visibility tape and barricade. Avoid heavy loads on compromised areas.
What are the step‑by‑step DIY repair options for cracked concrete slabs?
1) Clean crack of debris and vegetation. 2) For hairline cracks: use low‑viscosity epoxy injection (if crack is inactive) per manufacturer — follow silica controls if cutting is needed. 3) For wider cracks/voids: widen with a grinder to create a V‑groove, clean, prime, and use polymer‑modified patch or concrete repair mortar. 4) For settled slabs: consider releveling — drill ports, inject polyurethane foam (polyjacking) or cementitious grout (mudjacking) with pro rental equipment. 5) For full replacement: sawcut perimeter, remove slab, verify/replace compacted base and reinforcement, pour new concrete with control joints and slope away from foundation (min 6 in drop over first 10 ft). Follow ACI/ANSI recommendations for crack control and allow proper curing.
How do I repair or reset broken flagstone patios (DIY steps and material tips)?
1) Lift broken/loose stones carefully, keeping usable fragments. 2) Remove old base material and vegetation; assess base condition. 3) Re‑compact a 4–6 in compacted aggregate base for pedestrian patios; add 1 in bedding of coarse sand or stone dust for dry‑set, or use polymeric sand for joints. 4) For mortared flagstone, clean bedding and apply suitable exterior adhesive/mortar (polymer‑modified thinset or cementitious mud) and reset stone, tapping level with rubber mallet. 5) Repoint joints with mortar or polymeric sand; seal if desired. Use a continuous edge restraint (metal/stone/installed concrete curb) to prevent lateral movement. For flagstone problems, common issues are poor base, inadequate edge, and mortar erosion from freeze‑thaw.