You can fix most broken tile patios yourself, but the right repair depends on whether tiles are cracked in place, fully broken, or lifting off the base. A single popped tile usually means 30–60 minutes of work with a cold chisel and some polymer-modified thinset. A whole section that's cracking, lifting, or rocking means you've got a subbase or drainage problem, and patching the surface without fixing the cause will just break again in a season or two. Here's how to read what you're dealing with and pick the fix that actually lasts.
Broken Tile Patio: Fix It Today With the Right Steps

Nolan Ellison
3 May 2026
Quick assessment: can you reset these tiles or do you need to replace them?
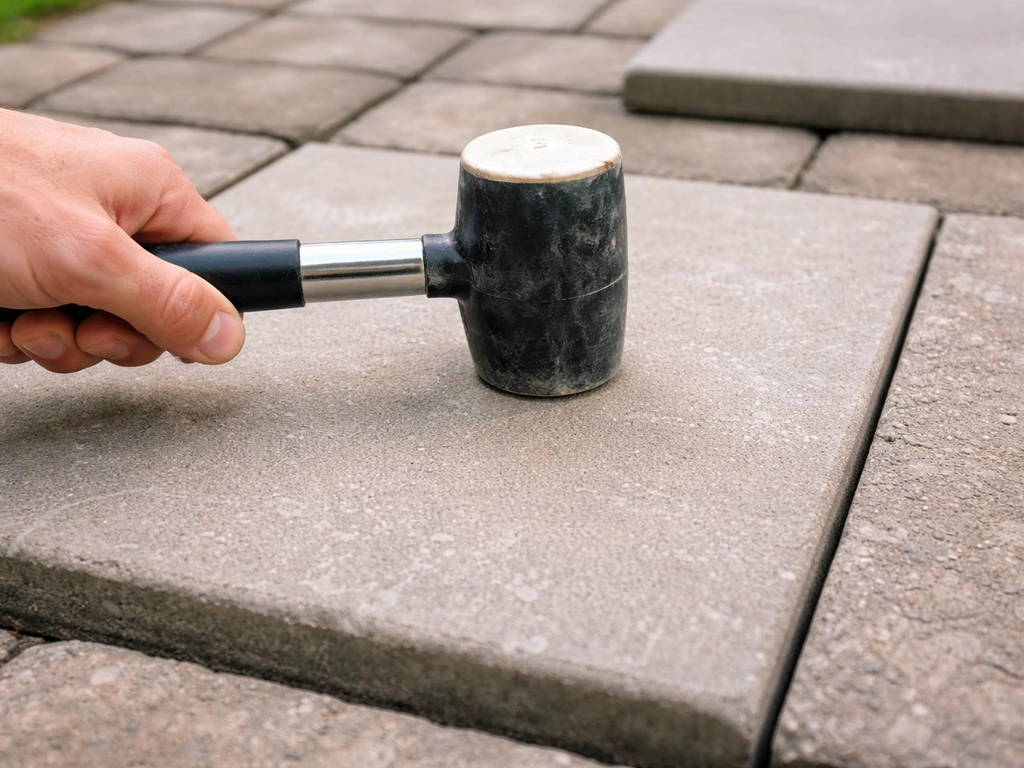
Walk the patio and tap every tile with a rubber mallet or the handle of a screwdriver. A solid tile makes a sharp, dense thud. A tile that's hollow or has lost its bond makes a dull, rattling sound, like a drum. Mark every hollow tile with a piece of painter's tape. This takes five minutes and tells you more than looking at the surface alone.
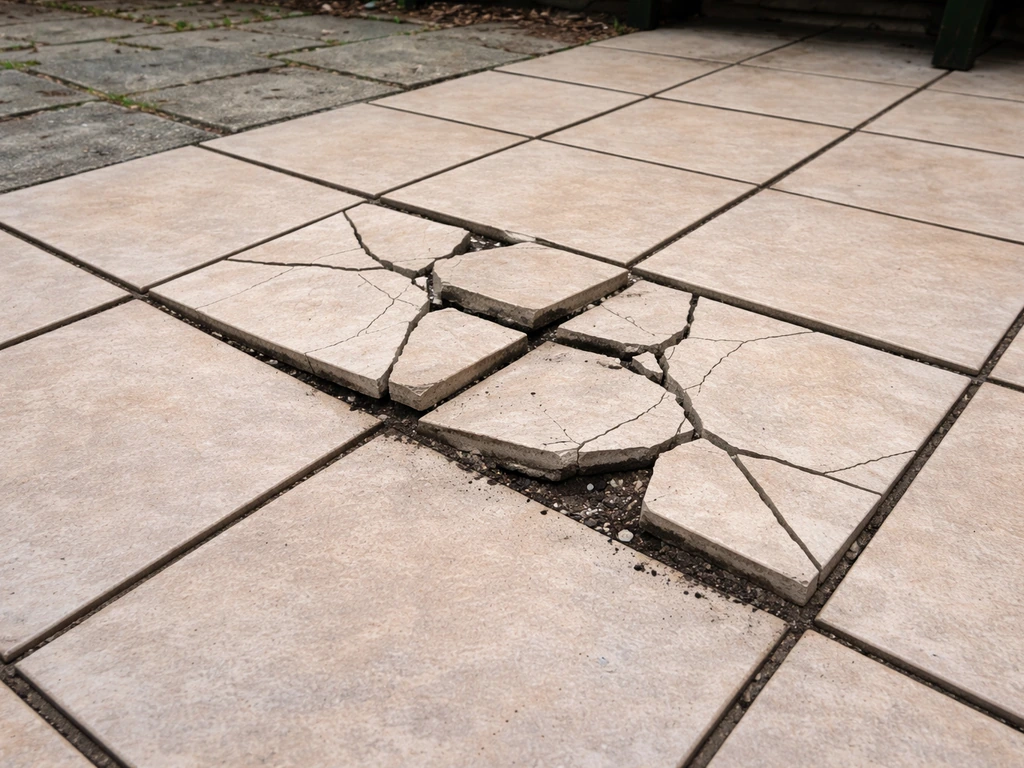
Once you've mapped out the hollow spots, sort your damage into one of three categories, because each calls for a different repair path.
- Hairline surface cracks only, tile still sounds solid: these are cosmetic. The bond is intact. You can fill them with grout or a color-matched epoxy filler and leave the tile in place.
- One or a few tiles broken or cracked through but the surrounding tiles are solid: the tile itself is the problem. Remove it cleanly, check the bed underneath, and reset with new tile.
- Multiple hollow tiles, lifting edges, or uneven areas with a lip between adjacent tiles: you have a subbase or installation failure. Resetting the tiles without diagnosing and fixing the cause is a waste of time and money.
- Large sections shifting or rocking, grout joints cracked in a pattern, or noticeable drainage toward the house: this signals settlement, drainage failure, or a breakdown of the mortar bed. Partial repairs may help, but a full section rebuild is likely needed.
One rule I follow: if more than 20–25% of the tiles in an area are hollow or damaged, stop thinking about individual tile replacement and start planning a section rebuild. Spot repairs across that much surface area rarely look right and usually fail again within a year.
Safety and prep before you touch anything
A broken or rocking tile is a trip hazard, full stop. Before you do any inspection or repair work, either cordon off the area with caution tape or cover lifting tiles with a scrap of plywood weighted down at the corners. Don't just assume no one will walk on it.
Clear the patio of furniture, pots, and anything else that creates obstacles while you're working. If you're cutting tiles, add safety glasses and a dust mask to the list. Porcelain and ceramic tile dust is very fine and irritating, and a tile saw or angle grinder will throw sharp fragments.
While the area is clear, look at the subbase condition before assuming any repair scope. Check for these things specifically:
- Standing water or damp spots under removed or lifted tiles, which points to drainage or slope failure
- Crumbling, sandy, or soft mortar underneath tiles, which means the bed itself has degraded
- Cracks in a concrete slab substrate running under multiple tiles, which usually means ground movement or settlement
- Gravel or sand base that has shifted, settled, or washed out at edges
Don't start pulling tiles until you've done this surface-level inspection. It will change what materials you buy and how much work you're actually facing.
Diagnosing why your tile patio failed
Tile patios almost never fail randomly. There's always a root cause, and if you fix the tile without fixing the cause, you're going to be back out here doing this again. Here are the most common culprits and how to spot each one.
Freeze-thaw movement
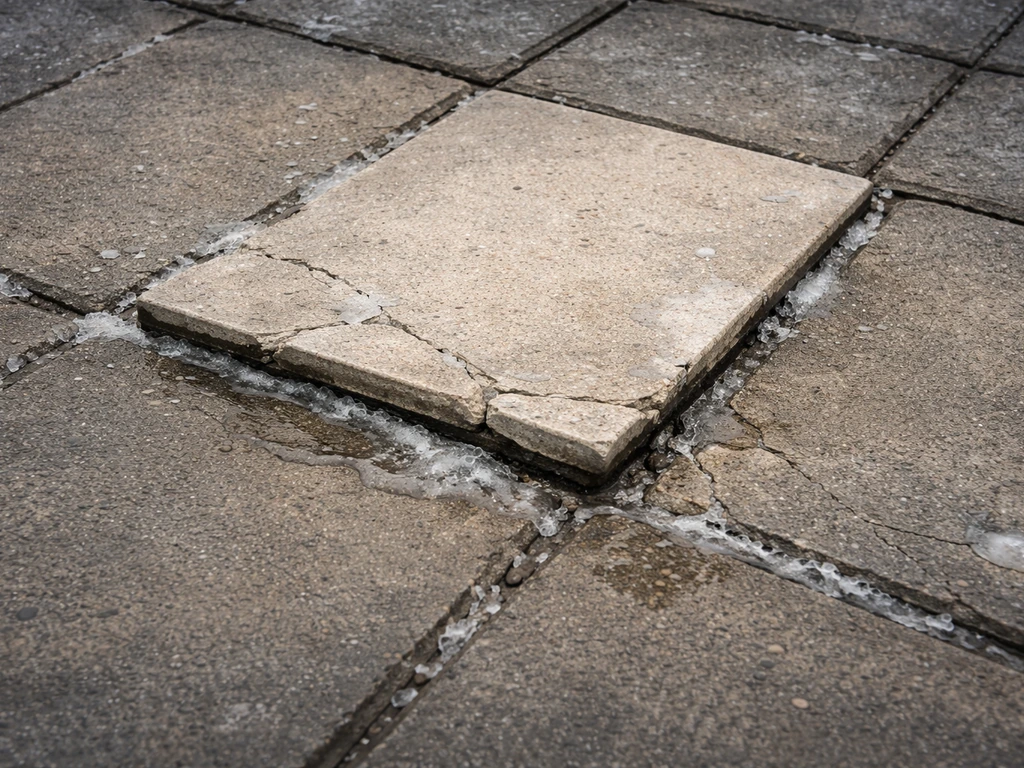
This is the single biggest killer of tile patios in cold climates. Water gets into the mortar bed or under the tile, freezes, expands, and physically lifts or cracks the tile. If you're in a climate with hard winters and you see a lot of damage concentrated around spring, freeze-thaw is almost certainly involved. You'll often see a pattern of tiles popping up near the edges or along grout lines where water entered. The fix requires not just resetting tiles but also improving drainage and sealing to stop water infiltration.
Mortar bed breakdown
Older patios were often set in a traditional thick-bed mortar mix that, over time, can soften, crack, or delaminate, especially with water exposure. If you pull up a tile and the back is clean but the bed underneath looks crumbly or sandy, the mortar cured poorly or has simply deteriorated. This usually affects large sections rather than isolated tiles.
Poor original installation
Tile set without full back coverage (less than 80% for exterior, ideally 95%+) creates voids where water pools and where the tile has no support under load. If your removed tile has thinset only in ridges or spots on the back, coverage was inadequate. Similarly, if there's no expansion gap between tile fields and walls or between sections, thermal movement has nowhere to go and tiles crack under the stress.
Drainage and slope problems
A patio that doesn't slope away from the house at roughly 1/8 to 1/4 inch per foot will pond water. That standing water works its way into grout joints and undermines the installation. If you see a pattern of tile damage concentrated in a low spot or near the house wall, suspect slope failure. This is also a problem you'll find on broken slab patios and similar hard-surface installations.
Missing or filled expansion joints
blank" rel="noopener noreferrer">TCNA guidance (EJ171) recommends movement accommodation joints roughly every 8 to 12 feet in exterior tile fields, and those joint cavities need to stay clear of mortar and grout to actually work. For tile work, the International Masonry Institute notes that movement joints are required for vertical and horizontal surfaces, both interior and exterior, when following ANSI A108 blank" rel="noopener noreferrer">movement joints are required for tile work according to ANSI A108. If someone grouted over the expansion joints, or if the original installation skipped them entirely, the tile field has no room to move with temperature changes and it cracks. Look for cracked grout lines running in a consistent direction, especially along long runs of tile.
Settlement and subbase failure
If the concrete slab under your tile has cracked, settled, or heaved, no tile repair will hold long-term until the slab is addressed. Look for diagonal cracks in your tile pattern, significant lips between adjacent tiles, or a visibly tilted section. Settlement issues are more common in clay-heavy soils or areas with poor compaction under the original slab.
Your repair options, matched to the damage
Once you know the cause, here's how the repair options stack up. These aren't mutually exclusive, and a realistic repair often combines two of them.
| Damage type | Best repair approach | DIY difficulty |
|---|---|---|
| Hairline surface crack, solid bond | Grout fill or epoxy filler, no removal needed | Easy |
| Single broken tile, subbase intact | Remove, clean bed, reset replacement tile | Easy–Moderate |
| Several hollow tiles, bed soft or crumbled | Remove section, re-prep bed, reset tiles | Moderate |
| Missing expansion joints, cracked pattern | Cut relief joints, fill with backer rod and sealant | Moderate |
| Drainage/slope failure under section | Remove section, re-grade base, rebuild with correct slope | Moderate–Hard |
| Slab crack underneath multiple tiles | Crack isolation membrane + reset, or full section rebuild | Hard |
| Large area of failure, settlement involved | Section or full rebuild; may need slab repair first | Hard–Pro |
Resetting intact tiles that have lost their bond
If the tile itself isn't broken, just hollow, you can often clean the back of the tile and the subbase and reset it. This only works if the tile is undamaged and the surrounding grout joints and tiles are solid. Carefully pry the tile up, scrape off all old mortar or thinset from both the tile back and the substrate, and reset with fresh polymer-modified thinset. Do not rush the scraping step. Any old material left behind will create voids in your new bond and the problem will repeat.
Replacing broken tiles
Score around the perimeter of the broken tile with an oscillating tool or grout saw to free the grout joint, then use a cold chisel and hammer to break the tile into smaller pieces and pry them out. Work from the center outward so you don't damage adjacent tiles. Clean the substrate thoroughly, check the bed for soft spots or voids, and fill or re-level as needed before setting the new tile.
Cutting out and rebuilding a damaged section
For larger failure zones, it's often cleaner to define a rectangular section (whole tiles only, not cut in the middle of tiles), remove everything in that zone down to the substrate, and rebuild properly. This lets you fix the root cause, re-slope if needed, apply a crack isolation membrane if the slab has minor cracking, and reinstall with correct coverage and expansion joints. It takes more time but gives you a result that actually holds.
The right tools, materials, and adhesives for outdoor tile repair
The biggest mistake homeowners make is grabbing interior thinset or basic premixed adhesive from the hardware store. Those products are not formulated for outdoor temperature swings, wet conditions, or freeze-thaw stress. Here's what actually belongs in an outdoor tile repair.
Thinset mortar for exterior patios
Use a polymer-modified thinset rated for exterior and wet applications. Look for ANSI A118.4 or A118.11 on the bag. For porcelain tile specifically (which is very low absorbency), use a medium-bed or large-format mortar or a non-sag epoxy thinset to get adequate coverage without the tile slipping. Standard thinset on a low-porosity porcelain tile set outdoors is a common failure point I've seen come back repeatedly. If you're in a freeze-thaw climate, a latex-modified thinset gives you better flexibility and bond strength under thermal cycling.
Grout for outdoor patios
Use a sanded grout for joints wider than 1/8 inch, unsanded for narrower joints. For a patio, an epoxy grout is worth the extra effort in high-traffic or wet-exposure areas: it's waterproof, stain-resistant, and handles freeze-thaw far better than cement-based grout. If you go with a cement-based grout, choose one that's polymer-modified and apply a grout sealer once it's fully cured.
Expansion joint filler
Expansion joints (movement joints) should be filled with a compressible backer rod and a flexible polyurethane or silicone sealant that matches your tile color as closely as possible. Never fill them with grout or mortar. The whole point of the joint is that it compresses and expands with movement. A grouted expansion joint is a joint that's no longer doing its job.
Crack isolation membranes
If your concrete slab has hairline cracks that aren't actively moving, a crack isolation membrane applied over the slab before thinset can prevent those cracks from telegraphing up through the tile. Sheet membranes and liquid-applied membranes are both available; follow the manufacturer's guidance on compatibility with your thinset. Note that DITRA and similar uncoupling membranes are designed primarily for interior use, so for exterior applications, look specifically for products rated for outdoor, freeze-thaw conditions.
Basic tool list
- Oscillating multi-tool or angle grinder with grout removal blade (for cutting grout joints)
- Cold chisel and hammer or electric chipping hammer (for tile removal)
- Margin trowel and notched trowel (for applying thinset; notch size depends on tile size)
- Rubber mallet (for setting tiles and tap testing)
- Level and tape measure (for checking slope and tile plane)
- Tile saw or wet saw (for cutting replacement tiles to fit)
- Grout float and bucket and sponge (for grouting and cleanup)
- Safety glasses, dust mask, and knee pads
Step-by-step: how to repair a broken tile patio
This workflow covers the most common repair scenario: removing one or several broken or hollow tiles, cleaning the substrate, and resetting with new tile. Adapt the steps as needed for a larger section rebuild.
- Score the grout joints around each damaged tile using an oscillating tool or grout saw. Cut all the way through the grout joint, not just the surface. This protects adjacent tiles from cracking when you remove the damaged one.
- Break the damaged tile into manageable pieces using a cold chisel and hammer, working from the center outward. For a large tile, score an X across it first with the angle grinder to give yourself break lines. Pry out the pieces carefully.
- Remove all old thinset or mortar from the substrate. This step takes patience. Use a floor scraper, cold chisel, or oscillating tool to get the surface as flat and clean as possible. Vacuum up all dust and debris.
- Inspect the substrate. Check for soft spots, cracks, and moisture. If the concrete slab has a crack running through the repair area, apply a crack isolation membrane now and let it cure per manufacturer instructions before proceeding.
- Check and correct slope if needed. Use a long level to confirm the area drains away from the house. If a low spot has developed, a self-leveling underlayment can correct minor slope issues before you set tile.
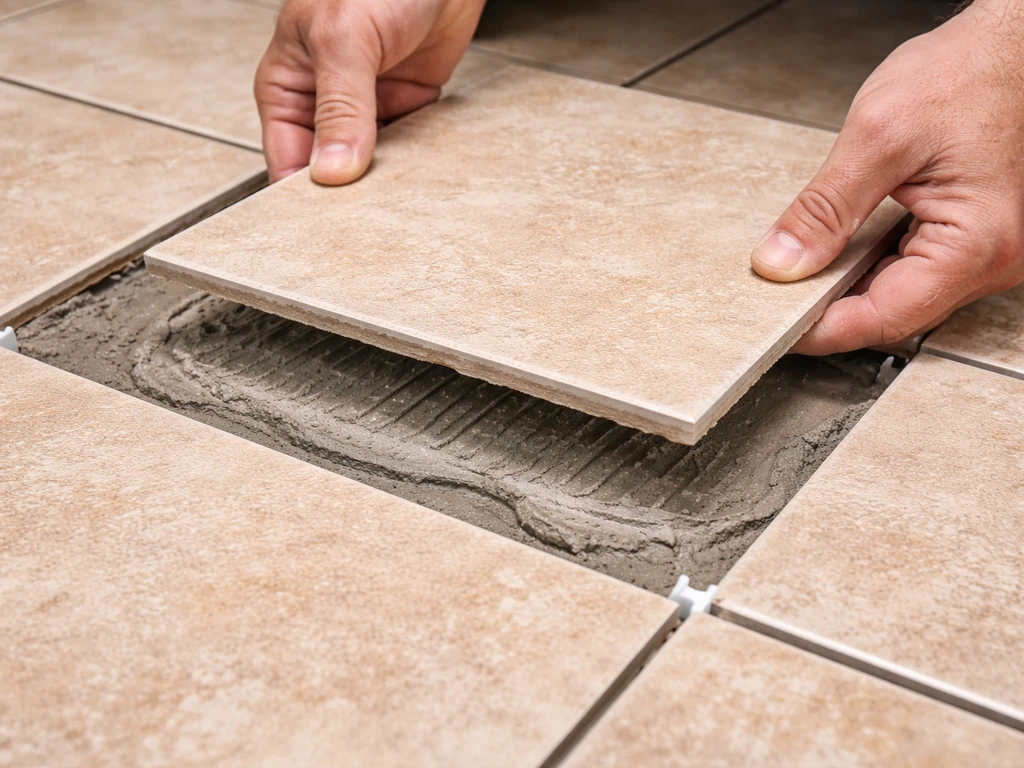
- Apply polymer-modified thinset to the substrate using the correct notched trowel for your tile size. Also back-butter the replacement tile itself to ensure full coverage. For a porcelain tile larger than 15 inches, use a medium-bed mortar and a 1/2-inch square-notch trowel.
- Set the tile in place and press firmly, using a rubber mallet to tap it level with adjacent tiles. Check with a straightedge to confirm the tile is flush. Use tile spacers to maintain consistent joint width.
- Let the thinset cure fully before grouting. In typical conditions (65–80°F), that means at least 24 hours. Don't rush this. Walking on the tile or grouting too early will weaken the bond.
- Grout the joints using a grout float held at a 45-degree angle, pressing grout firmly into the joints. Remove excess with a damp sponge before it sets. For expansion joints at 8–12 foot intervals, fill with backer rod and flexible sealant instead of grout.
- Allow grout to cure for the time specified on the packaging (typically 48–72 hours for foot traffic), then clean the tile surface thoroughly. Apply a grout sealer if using cement-based grout. Allow the full manufacturer-recommended cure time before heavy use.
Preventing the same problem from coming back
A tile repair that doesn't address prevention is just a delayed repeat of the same job. These are the things that actually make a tile patio stay intact over time.
Maintain proper slope
The target is 1/8 to 1/4 inch of slope per foot, running away from the house. If your patio was built flat or has settled into a low spot, water ponds, grout breaks down, and the freeze-thaw cycle accelerates damage. When you rebuild any section, set the slope correctly from the start. It's much harder to fix after tiles are down.
Expansion joints: add them if they're missing
If your original installation has no expansion joints, now is the time to cut them in. Using an angle grinder, cut a joint at least every 8 to 12 feet in both directions across the tile field, and at every transition to a wall, column, or other fixed structure. Fill with backer rod and color-matched polyurethane sealant. Keep those joints free of mortar and grout permanently. I've seen perfectly sound tile patios crack from edge to edge simply because there was no room for the tile field to expand on a hot summer day.
Sealing tile and grout
Not all tile needs sealing, but all cement-based grout on an exterior patio does. A penetrating grout sealer reduces water absorption into the joint, which slows both staining and freeze-thaw damage. For natural stone tile, apply a penetrating stone sealer to the tile face as well. For porcelain tile, the tile itself doesn't need sealing (it's nearly non-porous), but the grout joints still do. Reapply sealer every 1 to 3 years depending on traffic and climate exposure.
Annual maintenance habits that prevent early failure
- Tap-test all tiles once a year (spring is ideal) and mark any new hollow spots before they become broken ones
- Inspect and re-caulk expansion joints every 2–3 years; silicone and polyurethane sealants do degrade over time
- Clear leaves and organic debris from grout joints promptly; decomposing material holds moisture and accelerates grout breakdown
- Check that patio drains and gutters above the patio are clear so water isn't concentrated in one spot
- Avoid using metal snow shovels on tile patios; they chip tile edges and score grout; use a plastic blade or a rubber-edged shovel instead
- Don't use deicing salts on a tile patio; they accelerate deterioration of grout and can damage some tile finishes
How this compares to other patio surface repairs
Tile patio repair is more precise and material-specific than fixing broken patio stones or flagstone, where you have more tolerance for variation in the base and joint material. With tile, the stakes are higher because the tile itself is rigid, the required bond coverage is strict, and the consequences of skipping expansion joints or using the wrong adhesive are fairly quick to show up.
If you're evaluating whether tile is even the right surface for your situation long-term, especially in a cold or wet climate, it's worth comparing tile against flagstone or even a broken slab patio repair, both of which have different failure modes and different tolerances for DIY correction. If you’re also dealing with broken patio stones, many of the same failure causes apply, like poor drainage, movement joints, and needing the right base repair before resetting the surface.
Broken flagstone patio repairs have different failure modes than tile, so it helps to compare what usually goes wrong before you choose a DIY approach broken slab patio repair. Flagstone patio problems often come from a different set of issues, so it helps to compare those common failure modes before choosing a repair plan.
For most homeowners with a handful of broken or hollow tiles and an otherwise sound base, this is genuinely a manageable weekend project. Buy the right thinset, take your time on prep and cleaning, keep expansion joints clear, and you'll get a repair that holds for years. Where people go wrong is skipping the diagnosis step and just slapping new tiles over a bad bed, or using interior-grade materials outdoors. Get those two things right and the rest follows.
FAQ
Can I reuse a tile if it broke but didn’t chip badly?
Yes, but only if the surrounding tiles and grout joints are solid and the hollow area is small enough to keep a tight bond. Before reusing, test a loose tile by pressing it into place with thinset and letting it cure (even 24 hours). If it still rocks or the underside is dusty or contaminated, plan to replace it rather than trying to “patch” with new thinset only.
How do I know when it’s more than a single broken tile repair?
If you see cracked tile but the mortar bed is also failing, surface patching will usually fail again. A practical checkpoint is to lift one nearby tile in addition to the broken one, then look for widespread voids, crumbling mortar, or widespread debonding across grout lines. If several neighboring tiles sound hollow or the thinset has transferred poorly, switch from single-tile repair to a section rebuild.
Is it okay to leave old thinset on the slab and just add more mortar?
Avoid using a “set first, fill gaps later” approach. To prevent lippage and weak bonding, you should fully scrape both the tile back and substrate until you see clean, solid material, then use enough mortar to reach the required back-bond coverage. For thick spots or uneven bases, level the substrate first, then reset with fresh thinset, not extra-thick thinset piled on top of a bad bed.
Which thinset should I use for porcelain on an outdoor broken tile patio?
Thinset choice depends on tile type and conditions. For porcelain outdoors, prioritize a mortar method that reduces slippage and improves coverage, medium-bed or large-format mortar or an appropriate non-sag thinset system, plus a polymer or latex-modified product for flexibility in freeze-thaw areas. If your tile is lifting again soon after repair, the cure grade or bond strength is often the issue.
What happens if I accidentally grout an expansion joint?
You should not grout over movement joints. The right approach is to keep the joints clear permanently, then install a compressible backer rod and sealant made for exterior movement. If you already grouted an expansion joint, expect repeat cracking, and you’ll likely need to remove the failed grout, re-install the backer rod, and re-seal.
How long should I keep people and water off the repaired patio?
Mortar and grout should cure under outdoor conditions, but the risk is different depending on the product. As a practical rule, keep the repaired area closed to traffic until the thinset has cured fully and grout has reached its required cure time (often several days), and protect from rain for at least the first 24 hours unless the product label specifies otherwise. If freeze nights arrive early, extend protection time and avoid repair right before a hard freeze.
Can I use an angle grinder to remove and set broken tile instead of a tile saw?
Not if you want the repair to last. A tile saw can help you cut accurately with less random cracking, but an angle grinder is often louder and dustier. Use eye protection and a dust mask or respirator, keep fragments away from joints you are preserving, and vacuum dust as you cut. Also, plan cuts so you do not create a half-tile situation in the middle of a field where movement and stress concentrate.
If I rebuild a section, should I still add expansion joints?
Yes, especially with a larger failure zone, but the strategy is to rebuild while preserving the overall movement design. If you rebuild a rectangle, you still need correct slope and you must respect existing movement joints, or add new ones at 8 to 12 feet in both directions if missing. The goal is that the rebuilt area can move as a system, not just be patched on top of a rigid, jointless grid.
What should I do if water pools near my broken tile patio?
If the patio is flat or has settled into a low area, cleaning and re-setting tiles will not solve the underlying pooling. The practical test is to run water from a hose around the repair area and observe where it flows and where it stays. If water stands near grout lines or the house side, you may need a re-slope of the substrate before resetting.
Should I seal everything, or only the grout, after replacing broken patio tiles?
Seal only the grout (cement-based) and, for stone, the stone face as recommended. For porcelain, the tile face is usually not the limiting factor, grout joints are. A common mistake is sealing the wrong thing or sealing too early, which can trap moisture. Plan to seal after grout has fully cured and reapply on a schedule based on traffic and wet exposure.