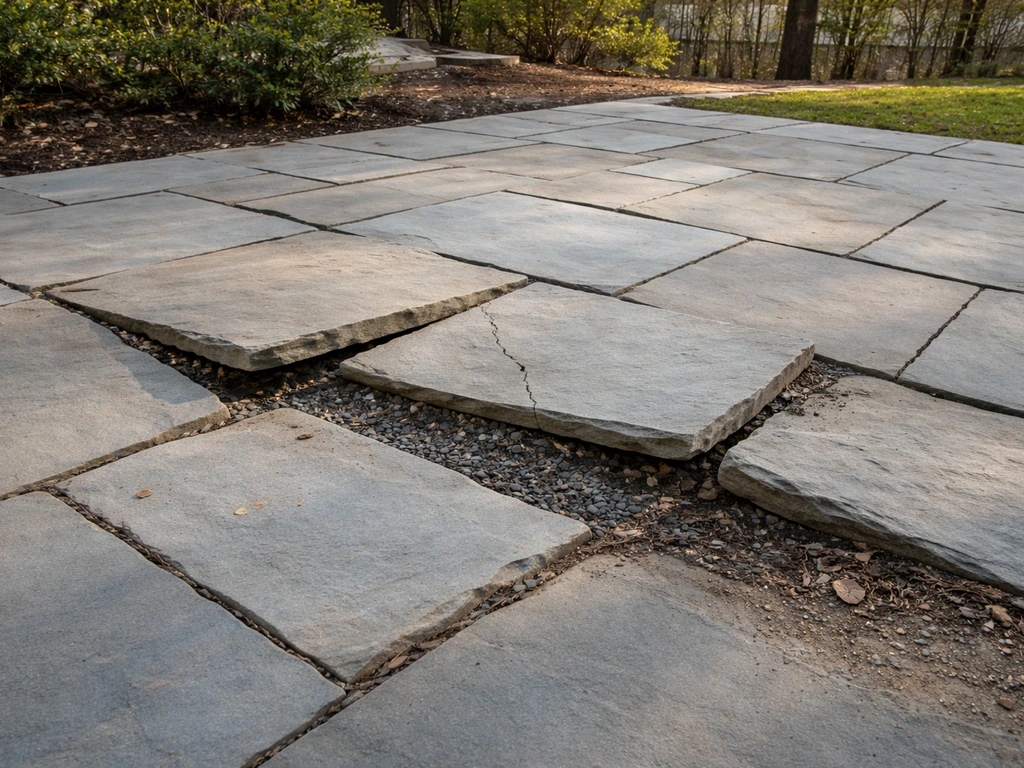
A broken bluestone patio is almost always one of four problems: a stone that cracked under stress, a stone that chipped or spalled at the surface, a paver that worked itself loose and now rocks underfoot, or a whole section that heaved or sank unevenly. Each one has a different fix, and using the wrong approach guarantees the problem comes back.
Broken Bluestone Patio Repair: Diagnose, Fix, and Prevent

Nolan Ellison
29 Apr 2026
Identify which type of damage you have first, then you can pick the right repair path, gather the right materials, and actually solve it. If you are still deciding whether you have the right material and setup, it helps to understand what a bluestone patio is and what affects its longevity what is bluestone patio.
If you decide that repairing keeps dragging on, it may be worth comparing alternatives to bluestone patio materials and layouts that better match your climate and budget.
Quick diagnosis: what 'broken' actually looks like
Before you buy anything or lift a single stone, spend ten minutes walking the patio and cataloging what you see. The symptom tells you a lot about what went wrong underneath, and that changes everything about how you fix it.
| Symptom | What it looks like | What it usually means |
|---|---|---|
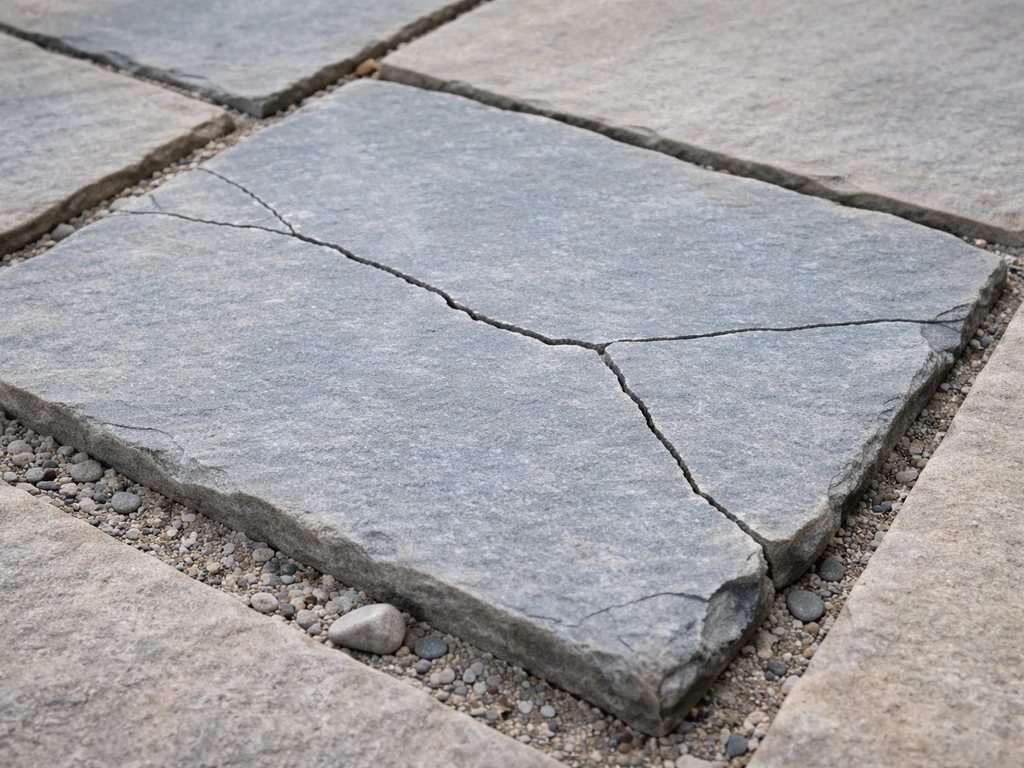
| Cracked stone | A fracture line running across or through a slab, sometimes with pieces still in place | Point load stress, freeze-thaw expansion, or a void beneath the stone |
| Chipped / spalled surface | Surface layers flaking off, pitting, or a chalky/rough texture on top | Moisture intrusion + freeze-thaw cycling; surface deterioration, not a base issue |
| Loose / rocking paver | Stone wobbles when you step on it; no visible crack | Bedding sand washed out, base settlement, or inadequate compaction at install |
| Heaving / uneven slabs | Lippage between adjacent stones; sections riding higher or lower than neighbors | Freeze-thaw heave, poor drainage causing water to sit and freeze beneath, or soft subgrade settling |
| Low spots / pooling water | Water collects on the surface after rain instead of running off | Slope was never right (less than 1/8 inch per foot) or differential settlement changed the grade |
Push on every stone in the affected area with your foot. A stone that seems fine visually but rocks slightly is a warning sign. Also check adjacent stones, damage almost never affects just one. If you find five or more loose stones clustered together, that zone very likely has a base problem, not just a bedding issue.
Why bluestone patios break: the real causes
Freeze-thaw cycling
This is the number-one culprit in northern climates. Water gets into joints, into micro-cracks in the stone, or under the slabs. When it freezes, it expands. Do that a hundred times over a few winters and you get cracking, spalling, loose pavers, and uneven heaving. The damage is especially aggressive in low spots where meltwater pools and refreezes. If you live anywhere that sees hard winters, every other problem on this list gets worse because of freeze-thaw.
Inadequate base and poor compaction
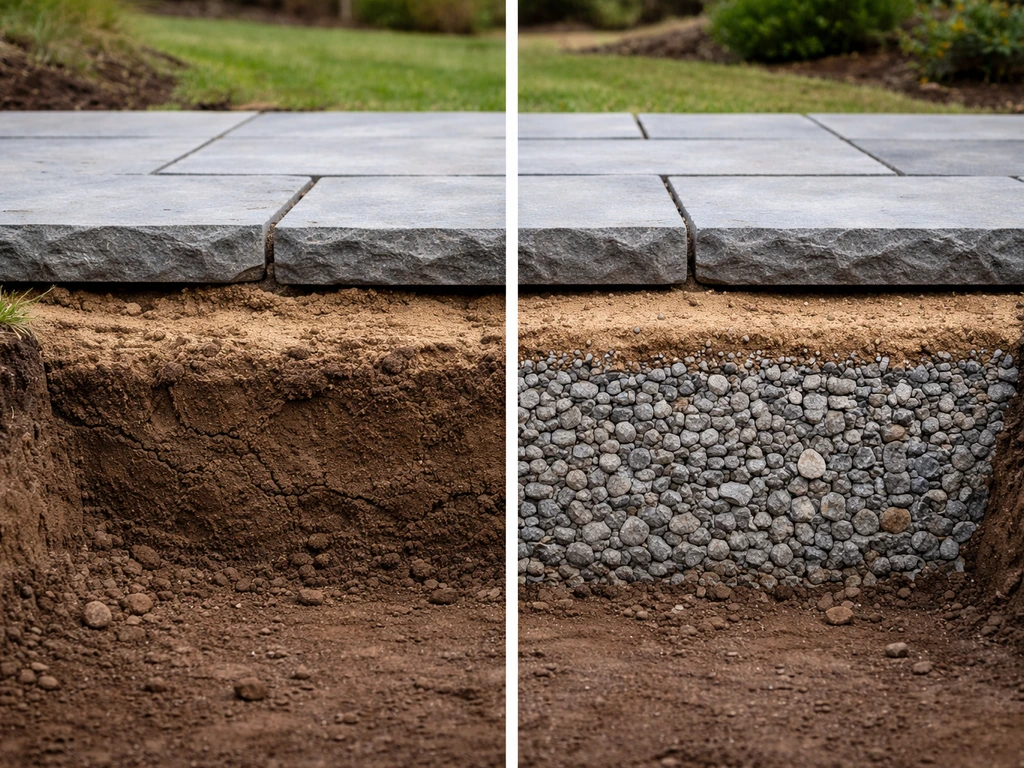
Bluestone is heavy, but it can't compensate for a soft or thin base underneath it. A properly built dry-lay patio needs at least 8 inches of compacted crushed stone base, and 12 inches is better in freeze-thaw climates or softer soils. When contractors cut corners and put down 3 or 4 inches, the base compresses unevenly under load and the stones start rocking and sinking within a few seasons. I've pulled up 'recently installed' patios and found the base was barely 4 inches deep. That's not a repair situation, that's a rebuild.
Drainage problems
The patio surface needs at least 1/8 inch of slope per foot (roughly 1%) to move water away from the house and prevent pooling. When that slope is wrong from the start, or when differential settling changes the grade over time, water sits. Sitting water feeds freeze-thaw damage and gradually erodes the joint sand, destabilizing everything. Poor drainage and freeze-thaw are rarely separate problems, they amplify each other.
Installation errors
Several common mistakes compound over time. Skipping a geotextile fabric between the subgrade and the crushed stone base allows fine particles to migrate upward, destabilizing the base. Leaving out edge restraints lets pavers creep outward at the margins, opening joints and letting water in. Using the wrong setting material, like an uncompacted concrete sand bedding instead of a screeded angular stone or high-performance bedding (HPB) layer, gives uneven support. And mortaring stones that should have been dry-set creates a rigid system that cracks when the ground moves, because there's nowhere for that movement to go.
Assessing damage: spot repair or full re-lay?
This is the most important decision you'll make. A spot repair on a compromised base will fail again, sometimes within one winter. Before committing to anything, you need to look under the stones. If the repair path sounds too involved, exploring patio stone alternatives can help you compare other paver and slab options that may better suit your climate and budget. If you are choosing a surface for a new build or a full re-lay, it can also help to compare slate vs bluestone patio to see which stone better fits your climate and maintenance tolerance.
- Lift one or two of the problem stones with a flat pry bar and a rubber mallet. Set them aside on the grass.
- Look at what's underneath. Is the bedding layer smooth and consistent, or is it rutted, compacted into solid lumps, or washed away entirely?
- Dig into the base layer with a screwdriver or trowel. Is the crushed stone loose and angular, or has it turned into fine compacted dust?
- Check for water: does the excavated area smell damp? Is there standing water in the base? Is the subgrade soil soft and spongy when you poke it?
- Look at the surrounding stones. Do they deviate more than 3/8 inch under a 10-foot straightedge? That level of lippage across a wide area means the problem is systemic.
| What you find | Right call |
|---|---|
| 1-3 isolated loose stones, base looks intact, bedding just uneven | Spot reset — lift, re-screed bedding, re-set stones |
| Cracked or chipped stone, surrounding stones stable, base solid | Individual stone replacement |
| 5+ stones loose in a cluster, bedding washed out but base looks decent | Section re-lay — re-excavate bedding, inspect and top-up base, re-set section |
| Base material dusty/degraded, soil soft, widespread heaving | Full or partial rebuild — excavate to subgrade, rebuild base from scratch |
| Low spots with pooling water, drainage slope wrong | Re-lay affected section and correct slope; may need drainage addition |
A quick rule of thumb: if the base is solid and the problem is isolated to the bedding layer or the stones themselves, DIY repair is realistic. If the base is degraded or the subgrade is soft, you're looking at a structural rebuild, and that's a job for an experienced mason, especially if the area is large or close to the house foundation.
Tools, materials, and matching replacement stone
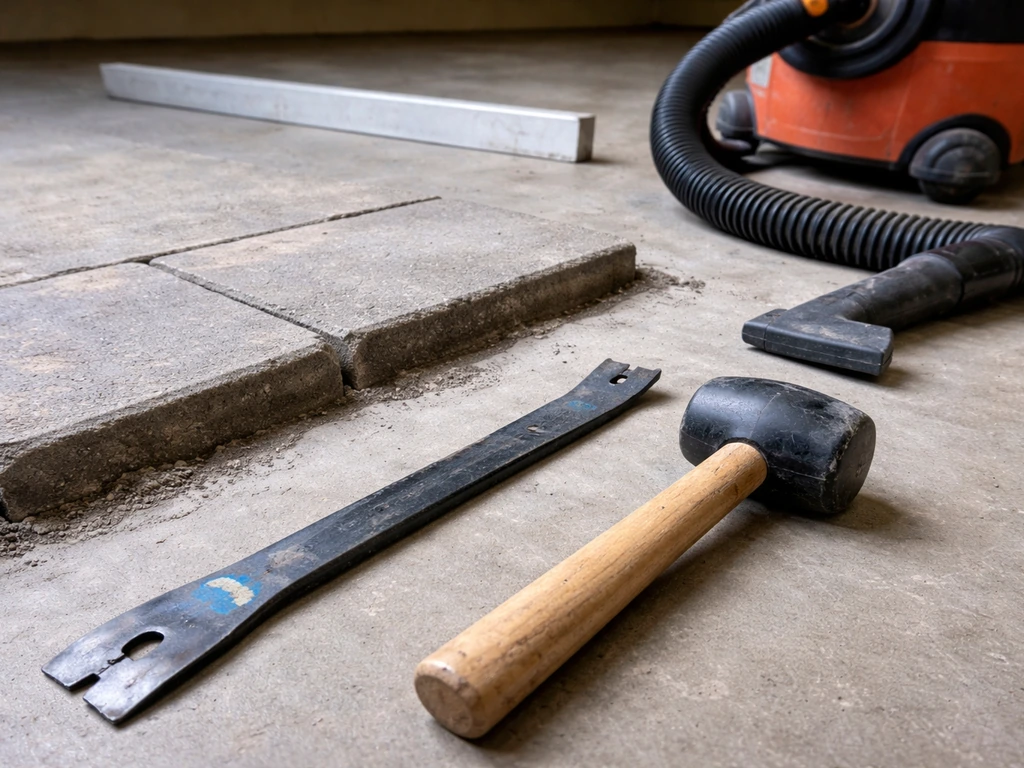
Tools you'll need
- Flat pry bar and rubber mallet (for lifting stones without chipping edges)
- Stiff-bristle brush and shop vacuum (cleaning the base before re-setting)
- Screed board and screed rails (1-inch rigid conduit works well) for leveling the bedding layer
- 4-foot level and 10-foot straightedge for checking surface tolerance
- Plate compactor or hand tamper for base compaction
- Masonry chisel and hammer or angle grinder with diamond blade (for trimming replacement stones)
- Garden hose with spray nozzle (wetting joints before polymeric sand application)
Materials
- Crushed angular stone (3/4-inch clean or crusher run) for base repair or top-up
- High-performance bedding (HPB) or coarse concrete sand for the 1-inch screeded setting layer
- Polymeric jointing sand rated for natural stone and joints up to 2 inches wide (QUIKRETE Polymeric Jointing Sand or equivalent)
- Plastic or aluminum edge restraint and spikes if edge sections are involved
- Geotextile fabric if you're excavating to subgrade
- Penetrating breathable sealer formulated for natural stone (water-borne, not film-forming)
Matching your bluestone
This is where most DIY repairs fall apart visually. Bluestone varies significantly in color (from blue-gray to greenish-brown), finish (thermal, natural cleft, honed, sawn), and thickness. You need to match all three or the replaced stones will stick out immediately. Your best bet is to take a sample of an existing stone to a natural stone yard, not a big-box store.
Stone yards typically carry multiple regional sources and can get close on color and finish. Thickness matters practically too: if your existing slabs are 1. 5 inches and you install a 1-inch replacement, it will sit low no matter how well you screed. Installed bluestone typically costs $6 to $20+ per square foot depending on thickness, finish, and source, so budget accordingly if you need multiple replacements.
Step-by-step: resetting loose stones and re-leveling a section
This process covers the most common repair scenario: stones that have worked loose or sunk slightly, where the base underneath is structurally sound but the bedding layer needs to be reset.
- Clear the area: Remove furniture, sweep the patio, and mark the stones you're going to lift. Work from the outside of the problem area inward.
- Lift the stones: Use a flat pry bar to get under the edge of each stone and lever it up gently. Slide it onto the grass or a sheet of plywood. Keep track of orientation — bluestone often has a texture direction that looked right when originally set.
- Remove and discard old bedding: Scoop out the old bedding sand or HPB from the excavated bay. Don't reuse it — it's compacted, contaminated, and uneven. Vacuum or brush the surface clean.
- Inspect and repair the base: Check the crushed stone base for depth and compaction. If it's degraded or short of depth, add angular crushed stone and compact it with a hand tamper until firm. The base surface should be level and stable before you do anything else.
- Set screed rails: Lay two 1-inch rigid metal conduits on the compacted base as rails, parallel to each other and level. These act as depth guides so your bedding layer is exactly 1 inch deep.
- Spread and screed bedding material: Pour HPB or coarse sand between the rails and pull a screed board across them to create a smooth, flat 1-inch bed. Do not compact it — the bedding layer stays loose so the stones can press down into it and seat properly.
- Set stones back in place: Lower each stone onto the screeded bed. Press firmly and check with your level. The goal is no more than 3/8 inch deviation under a 10-foot straightedge. If a stone rides high, pull it up and remove a little bedding material. If it's low, add a small amount and re-screed.
- Fill joints: Once all stones are set and level, brush polymeric jointing sand into the joints. Make sure the stone surfaces and joints are completely dry before you activate it — moisture before application causes the polymers to set prematurely and fail. Sweep, blow off the surface, compact lightly with a plate compactor or walk the area, then mist the surface with water to activate the polymers.
- Keep off it: Stay off the repaired section for at least 24 hours while the polymeric sand cures.
Step-by-step: replacing cracked or chipped bluestone slabs
Replacing an individual stone is a bit more surgical but follows the same logic. The key difference is you're cutting out one piece from a set pattern without disturbing what's around it.
- Clear the joints around the damaged stone: Use a stiff wire brush, an oscillating tool, or a grout saw to clean out the polymeric or regular joint sand from all four sides of the damaged stone. You need the edges clear to get under it.
- Break out and remove the damaged stone: For a cracked stone, use a masonry chisel and hammer to break it into manageable pieces and remove them. For a chipped or spalled stone you want to lift intact, work a flat pry bar under an edge carefully. Avoid chipping the adjacent stones.
- Clean the base cavity: Remove all old bedding material. Brush and vacuum the base surface clean. Inspect the base — if this stone cracked because there was a void beneath it, fill that void now with compacted crushed stone before continuing.
- Source and prep the replacement stone: Bring a piece of the broken stone to a stone yard to match color, finish, and thickness. If the replacement stone is slightly too large, trim it with an angle grinder fitted with a continuous-rim diamond blade. Always wear eye protection and a dust mask when cutting bluestone.
- Screed a fresh bedding layer: Set your 1-inch screed rails at the edges of the cavity, add fresh HPB or bedding sand, and screed it flat. Keep it loose.
- Set and level the replacement stone: Lower it in, press firmly, and check it against the surrounding stones with a level. It should sit flush — no lippage. Rock it gently to check for voids underneath. If it rocks, pull it up, adjust the bedding, and reset.
- Re-fill the joints: Once the new stone is seated, pack polymeric jointing sand into all surrounding joints, making sure surfaces are dry. Activate with a light water mist.
- Allow to cure fully before use: 24 hours minimum for foot traffic; keep furniture off for 48 hours.
When to call a mason instead of DIYing it
Be honest with yourself here. If you lift a few stones and find that the base has essentially disintegrated, soft, fine, wet, with the subgrade soil visible or spongy, that is not a bedding reset job. Rebuilding from subgrade up means excavating the entire section, installing geotextile fabric on the subgrade, compacting 8 to 12 inches of crushed stone base in lifts, screeding bedding, and re-setting all the stones with corrected slope. That's a significant project with real compaction equipment.
Similarly, if there's widespread heaving across 50+ square feet, or if the patio is near the house and you suspect foundation drainage issues, bring in a professional. The cost of getting it wrong twice almost always exceeds the cost of hiring a mason the first time.
Sealing, finishing, and keeping it from breaking again
Sealing the repaired surface
Seal the repaired section (or the whole patio if you can) with a penetrating, breathable, water-borne sealer designed for natural stone. Breathable sealers allow moisture vapor to escape from within the stone rather than trapping it, which matters a lot in freeze-thaw climates where trapped moisture accelerates spalling. Avoid film-forming sealers that sit on top of the stone, they can peel and trap moisture. If you're sealing a freshly set patio or newly set stones, wait at least 90 days before applying sealer to allow any residual moisture to fully escape. Apply in dry conditions, following the product's instructions for coverage and reapplication intervals. Most penetrating sealers need re-application every 2 to 5 years depending on traffic and climate exposure.
Joint and edge maintenance
Joint sand migrates over time, especially when water flows across the surface during heavy rain. Check joints every spring and fall, and top them up with polymeric sand wherever you see gaps. Apply polymeric sand in dry, appropriate temperature and moisture conditions, because moisture on the paver surface can trigger premature activation and binder sticking that leads to residue or hazing [top them up with polymeric sand wherever you see gaps](https://www. vanbeeks.
com/site/product%20pdfs/gator-supersand-g2-polymeric-sand-installation-guide. pdf). Open joints are an invitation for weeds, water infiltration, and the whole cycle of freeze-thaw damage to start again. Also walk the perimeter and check that edge restraints are still firmly in place.
A missing or lifted edge restraint spike lets stones creep outward, joints open, and the whole patio slowly unravels from the outside in.
Winter and de-icer management
Rock salt (sodium chloride) is the worst thing you can put on a bluestone patio. If a bluestone patio keeps cracking or shifting, it may be worth considering alternatives to bluestone patio materials and layouts that better handle your climate and drainage needs. It draws moisture into the stone, lowers the freezing point locally, and drives more freeze-thaw cycling right at the stone surface. Calcium chloride and magnesium chloride are somewhat less aggressive but still carry risk.
If you need to de-ice, use fine sand or kitty litter for traction, or a de-icer rated safe for natural stone. Clear snow promptly with a plastic shovel rather than a metal blade that can chip the surface. The less water you let sit and freeze on the patio surface, the longer your repair and your stone will last.
Annual checks that prevent big repairs
- Every spring: walk the entire patio and tap-test stones with your foot. Anything wobbly gets addressed before summer, not after.
- Check slope and drainage: watch the patio during a heavy rain to confirm water is sheeting off at 1/8 inch per foot or better. Any new pooling spots signal that differential settlement has changed your grade.
- Inspect and re-fill joints wherever sand has washed out or weeds have taken hold.
- Look for new cracks or spalling, especially around joints and edges where water tends to concentrate.
- Re-seal every 2 to 5 years with a penetrating breathable sealer appropriate for natural stone.
The core lesson with bluestone is that almost all repeat failures trace back to water: water in the joints, water under the base, water sitting on the surface. Solve the water problem, slope, drainage, sealing, joints, and your repair will hold. Ignore it, and you'll be lifting stones again next spring.
FAQ
How can I tell if my broken bluestone patio needs a bedding reset versus a full rebuild?
Lift a small section of stones in the problem area and check what you see at the base. If you find a compacted, firm crushed-stone layer with intact angles and the bedding sand looks disturbed but not saturated or muddy, it points to a bedding reset. If the base is soft, pumping, wet, or you can see subgrade soil, that is a structural rebuild from subgrade up, not a simple reset.
My broken bluestone patio has loose stones, but the joints look mostly intact. Can water still be the cause?
Yes. Water can enter through hairline gaps, micro-cracks in bluestone, or at the perimeter where edge restraints fail. Even if joint sand looks okay, check for rocking after rain and look for low spots that stay damp longer than the surrounding patio.
What is the right way to test slope if I suspect pooling on my patio?
Use a simple level and measure drop over distance, or string-line method, across the affected zone from the house outward. The target is at least about 1% slope, roughly 1/8 inch per foot. If measurements are close but water still pools, the patio may be settling differentially, meaning only portions may need regrading rather than spot stone swaps.
Can I repair just one cracked or spalled bluestone stone if the surrounding stones feel firm?
You can, but only if the replacement will be supported at the same height and you do not leave the underlying bedding uneven. Remove the damaged piece, reset the bedding to match the plane and slope, and ensure adjacent stones are not hollow when pressed. If adjacent stones rock or you find multiple loose stones nearby, expand the work area to address the bedding or base, not just the surface piece.
How do I avoid ending up with a “patch” that stands out visually after repairing a broken bluestone patio?
Match color, finish, and thickness, not just “bluestone.” Take a physical sample to a natural stone yard and ask for stones from similar regional sources and a closely matched thickness. Also dry-lay the replacement (without setting material) briefly to confirm it sits flush, because thin or thick slabs can look uneven even with careful screeding.
What should I do if my replaced stones settle slightly after the repair?
Wait for stabilization before assuming the base is failing. If settling happens soon after installation, it often means bedding depth was inconsistent or the bedding wasn’t screeded to a solid, even layer. If settling continues over seasons, suspect base compaction problems or drainage issues under the repaired area, then you may need a wider excavation.
Is it okay to mortar bluestone when I repair a broken bluestone patio?
In most dry-lay bluestone patio repairs, avoid mortaring stones that should be able to move slightly with ground movement. Mortar creates a rigid network that can crack when freeze-thaw or subgrade movement shifts the system. If you use any binding product, follow a natural-stone approach intended for patios where movement is expected.
How long should I wait before sealing after I repair or re-lay bluestone?
Plan on waiting at least 90 days after setting before applying a sealer, so residual moisture can escape. If the patio has been exposed to cold or frequent damp weather during that period, you may need longer to ensure the stone is fully dry before sealing.
What joint sand should I use, and how often should I re-fill joints?
Use polymeric sand intended for pavers and natural stone joints, then re-check joints in spring and fall. Add sand when you see gaps or see water staining around joints after rain. If joint sand keeps washing out quickly, it usually indicates insufficient compaction of the base, poor slope, or missing edge restraint.
How do I protect a repaired broken bluestone patio during the first winter?
Keep water off the surface early by ensuring the patio maintains the intended outward slope, and promptly clear snow to reduce freeze-thaw cycling at the stone surface. Avoid heavy traffic until the bedding and joints have set and stabilized, and monitor low spots after storms because they often become the next failure point.
What de-icer is safest for a broken bluestone patio, and what’s the safest alternative?
For safety, use a de-icer specifically rated safe for natural stone, or use fine sand or kitty litter for traction. Avoid rock salt, it draws moisture into the stone and increases localized freeze-thaw damage. Clear snow quickly with a plastic shovel to prevent chipping that can later spall under freezing conditions.