A pea gravel epoxy patio is a genuinely durable, attractive surface finish that bonds rounded aggregate into an epoxy coating system directly over a concrete slab. Done right, it looks better than plain concrete, drains reasonably well, and holds up for years with minimal fuss. Done wrong, or installed in the wrong conditions, it peels, cracks, or turns into a slipping hazard. Whether it's the right call for your patio comes down to your climate, your substrate, your budget, and how much prep work you're willing to do (or pay for). This guide walks through every part of that decision.
Pea Gravel Epoxy Patio Pros and Cons: A Buying Guide

Nolan Ellison
15 May 2026
What a pea gravel epoxy patio actually is
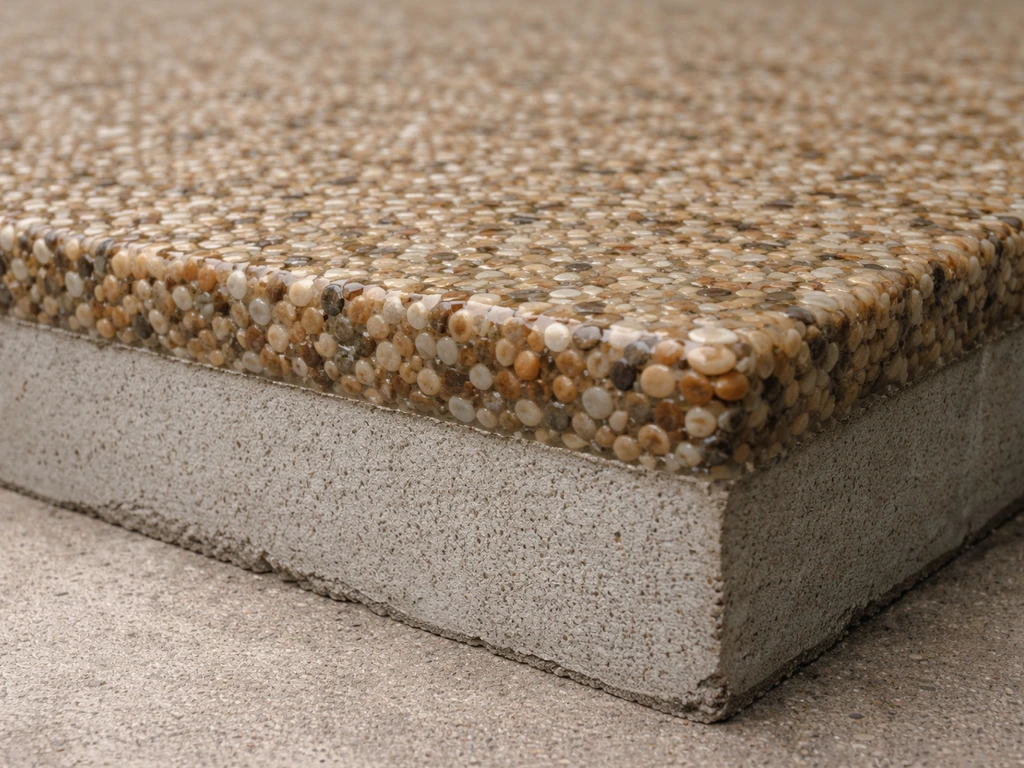
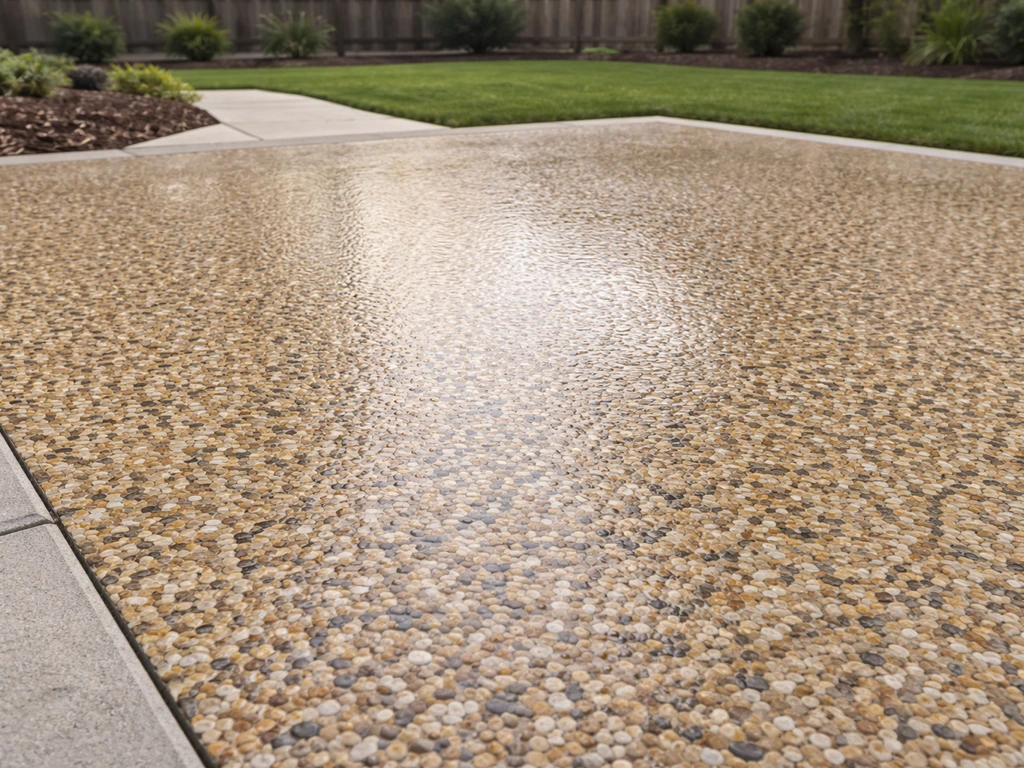
This is not loose pea gravel scattered over a slab. A pea gravel epoxy patio is a resinous coating system where rounded aggregate (usually 3/8-inch to 1/2-inch pea gravel, or sometimes quartz at 30–40 mesh for finer texture) is broadcast into a wet epoxy base coat and then sealed with a clear topcoat. The finished product looks like a textured mosaic of smooth, rounded stones embedded flush in the surface. It feels softer and more natural underfoot than plain concrete, with real traction if the topcoat is specified correctly.
The build sequence matters a lot. You start with a properly prepared concrete substrate, apply a primer or base coat of two-part epoxy, then immediately broadcast aggregate to 'rejection,' meaning you keep throwing gravel until the coating appears dry and no more stones will stick. Once cured, you scrape off the loose aggregate, sweep, and apply a clear lock coat followed by a clear topcoat. Total finished thickness for the decorative broadcast layer is typically around 1/16 inch to 1/8 inch (roughly 1.5 mm to 3 mm), not counting the primer underneath. Some systems finish with a UV-stable polyaspartic topcoat rather than a standard epoxy clear, which matters a lot for outdoor patios exposed to sunlight.
The reason for broadcasting to rejection (rather than just sprinkling a little gravel) is to fully embed the aggregate and avoid visible exposed epoxy. Any epoxy left uncovered on an outdoor surface will eventually yellow and amber from UV exposure. Burying it under aggregate, then sealing with a UV-stable topcoat, is how you protect the system's long-term appearance.
The real pros: where pea gravel epoxy earns its price
Appearance is the first thing people notice. A well-installed pea gravel epoxy patio has a natural, warm look that plain brushed concrete or a painted slab can't match. The rounded stones create visual texture and depth, and you can choose aggregate color, size, and density to customize the finish. It reads more like a natural material than it looks like a coating, which is a genuine aesthetic win for backyard living spaces.
Durability is the real selling point. Epoxy creates a chemical bond with the concrete substrate and locks the aggregate into a matrix that resists surface abrasion, staining from food and beverages, and most chemicals. This makes pea gravel epoxy patios particularly practical for BBQ areas, outdoor kitchens, or anywhere you're likely to deal with grease, rust stains from furniture, or heavy foot traffic. It significantly outperforms bare concrete for stain resistance.
Traction is another genuine advantage over smooth concrete or tile. The aggregate surface creates natural grip, and you can increase that further by adding aluminum oxide anti-slip broadcast (typically 50-mesh) at around 1 lb per 5–10 sq ft into the wet topcoat. This is especially useful around pools or in areas that get wet regularly. Compared to polished concrete or glazed tile, the pea gravel texture is meaningfully safer.
- Natural, textured appearance that looks more like stone than a coating
- Excellent stain resistance against grease, food, oil, and most chemicals
- Better grip underfoot than smooth concrete, tile, or painted surfaces
- Protects the underlying slab from moisture, abrasion, and light impact
- Customizable: choose aggregate size, color, and density to match your aesthetic
- Softer feel underfoot than bare concrete, especially appreciated for barefoot use
- Clear topcoat options let you adjust sheen from matte to high-gloss
The real cons: costs, risks, and limitations you need to know
Cost is the first reality check. Epoxy systems for outdoor use aren't cheap. Material-only costs for a quality system (primer, base coat, aggregate, lock coat, UV-stable topcoat) run roughly $3–$8 per sq ft, and professionally installed jobs in metro markets often range from $8–$12 per sq ft or higher depending on substrate condition and system build. That's well above what you'd spend on plain concrete sealer, pavers, or loose gravel, though it compares more favorably when you factor in durability and low long-term maintenance. This section covers the slate patio pros and cons so you can compare natural-stone needs like drainage, freeze/thaw tolerance, and long-term upkeep.
Surface prep is non-negotiable and difficult to shortcut. Epoxy will not bond properly to a smooth or contaminated slab. If your concrete was hard-troweled (very smooth finish), or if there's oil, curing compound, or old sealer present, the coating will delaminate. Proper prep means mechanical profiling (shot blasting or diamond grinding), not just acid etching. For anyone planning a DIY installation, renting the right equipment and understanding the prep requirements is often the part that gets skipped, and it's exactly why epoxy jobs fail.
Moisture is the biggest enemy of any epoxy system installed outdoors. Before you coat anything, you need to test the slab's moisture vapor transmission. The standard limit is around 3 lb per 1,000 sq ft per 24 hours (ASTM F1869 calcium chloride test), or you can use an in-situ relative humidity probe per ASTM F2170.
If your slab sits on grade without a vapor barrier, or if drainage is poor and water consistently pools under or against the slab, you're at high risk for blistering, bubbling, and eventual delamination. Moisture-related blistering and bubbling can progress to peeling or delamination, and Pourla Epoxy recommends addressing root causes like moisture and drainage as well as proper surface preparation blistering, bubbling, and eventual delamination.
Moisture pressure building under a non-breathable coating like epoxy will push up from below and break the bond.
Freeze/thaw cycles are particularly hard on epoxy coatings. Water trapped in the concrete or at the bond interface expands when it freezes, causing spalling, cracking, and delamination. In climates with repeated hard freezes, the risk compounds with every season. This doesn't mean epoxy patios are impossible in cold climates, but it does mean substrate quality, drainage, and vapor management become even more critical.
Yellowing is a real risk if you choose the wrong topcoat. Standard epoxy clears amber and yellow when exposed to UV, which over a patio is unavoidable. This is why outdoor pea gravel epoxy systems should always be finished with a UV-stable topcoat, typically polyaspartic or aliphatic urethane, not a standard epoxy clear. If a contractor or kit doesn't specify UV-stable topcoat chemistry for outdoor use, that's a red flag.
- Higher installed cost than plain concrete, pavers, or loose gravel alternatives
- Requires proper mechanical surface prep; skipping this step causes delamination
- Moisture vapor testing is required before installation; wet or poorly drained slabs fail
- Vulnerable to freeze/thaw damage if substrate or drainage isn't sound
- Standard epoxy clears yellow outdoors; UV-stable polyaspartic topcoat is required
- Installation is time-sensitive and temperature-sensitive (typically 50–90°F range)
- Repairs and patch work are visible if not done carefully
- Periodic re-sealing or topcoat refresh is needed every few years
Where it works well and where it doesn't: climate and site conditions
Pea gravel epoxy patios perform best in moderate climates with good drainage, especially where summers are warm to hot and winters stay above hard-freeze territory. Covered patios or structures that limit UV and precipitation exposure get the longest service life. The system also shines in high-traffic zones like outdoor kitchens, pool decks, and entertainment spaces where stain resistance and traction matter more than anywhere else.
Hot, sunny climates present a topcoat challenge but not a dealbreaker. Thermal expansion in concrete accelerates wear at the coating interface over time. Choosing a flexible topcoat chemistry and making sure expansion joints in the slab are not bridged by the coating helps manage this. Always use a UV-stable finish in these conditions.
Wet climates and areas with standing water or poor drainage are higher risk. If your patio collects water, or if the slab sits low and drains slowly, the moisture issue will eventually compromise the coating from below. Fixing grading and drainage before you coat is a much better investment than re-doing a failed epoxy job. Similarly, a north-facing patio that stays damp for days after rain is a much harder candidate than a south-facing, well-drained surface.
Freeze/thaw climates, particularly zones that see more than 20–30 hard freeze cycles per winter, are where I'd apply the most caution. If the concrete itself is sound, well-drained, and protected from moisture infiltration, a pea gravel epoxy patio can survive cold winters. But if there's any existing cracking, spalling, or poor drainage, the coating will amplify those problems rather than solve them. In the same way, decomposed granite patio problems can show up when drainage is poor and fines shift or wash out, making the surface fail sooner. In these climates, it's worth comparing directly against exposed aggregate concrete, concrete pavers, or even flagstone, all of which handle freeze/thaw movement more forgivingly.
| Condition | Pea Gravel Epoxy Viability | Key Watch-Out |
|---|---|---|
| Moderate climate, good drainage | Excellent | Use UV-stable topcoat outdoors |
| Hot/sunny climate, dry summers | Good | UV-stable topcoat required; mind expansion joints |
| Pool deck or wet-zone use | Good with anti-slip additive | Anti-slip broadcast aluminum oxide into topcoat |
| Freeze/thaw climate, sound slab | Moderate: proceed carefully | Moisture testing and drainage are critical |
| Freeze/thaw climate, cracked/wet slab | Poor | Fix substrate issues first or choose another material |
| Chronically wet/poorly drained patio | Poor | Moisture vapor pressure will cause delamination |
| Covered/shaded patio, any climate | Very good | Reduced UV and moisture exposure extends service life |
How to install it: the steps that actually matter

Substrate evaluation and prep
Before you order a single bucket of epoxy, evaluate your slab. Look for existing cracks, spalling, oil stains, old sealers, and evidence of moisture (dark patches, efflorescence, or that telltale salt-crystal bloom). Tap across the surface with a hammer or coin: a hollow sound means delaminated or weak concrete underneath, and that section will need repair or removal before coating. All cracks and holes must be repaired before the first coat, not after, because encapsulating a crack with epoxy doesn't fix it, it just hides it temporarily.
Run a moisture vapor transmission test using the ASTM F1869 calcium chloride method or an in-situ relative humidity probe per ASTM F2170. The acceptable limit for most epoxy systems is 3 lb per 1,000 sq ft per 24 hours or lower. If you're above that threshold, you'll need a moisture-mitigation primer or, in severe cases, to address the drainage and vapor source before coating.
Profile the concrete mechanically. Shot blasting is the preferred method for large areas; diamond grinding works well for smaller spaces or tight areas near edges. The goal is a surface that looks and feels like 60–80 grit sandpaper, sometimes described as a CSP 2–3 profile (Concrete Surface Profile). Acid etching alone is often not sufficient, especially for hard-troweled slabs, and is a common reason DIY epoxy jobs fail within a year.
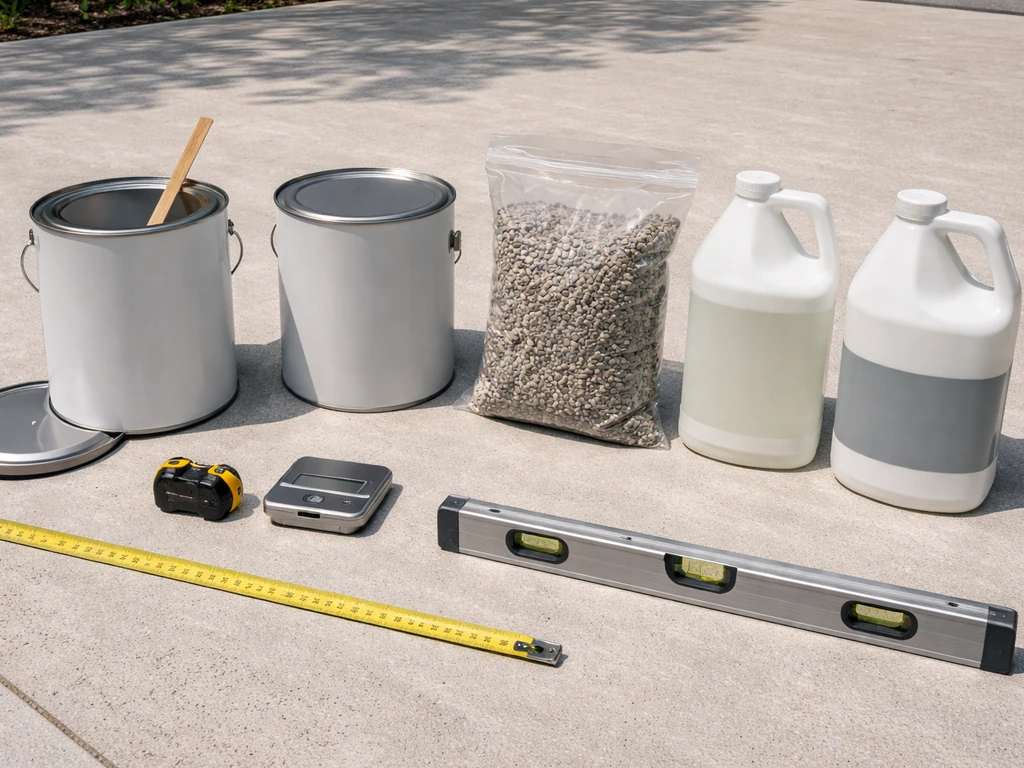
The coating application sequence
- Apply primer coat: Use a low-viscosity penetrating epoxy primer to seal the concrete and improve adhesion. Allow to cure per product specs, typically 8–24 hours at 68°F (20°C), with longer wait times in cooler conditions.
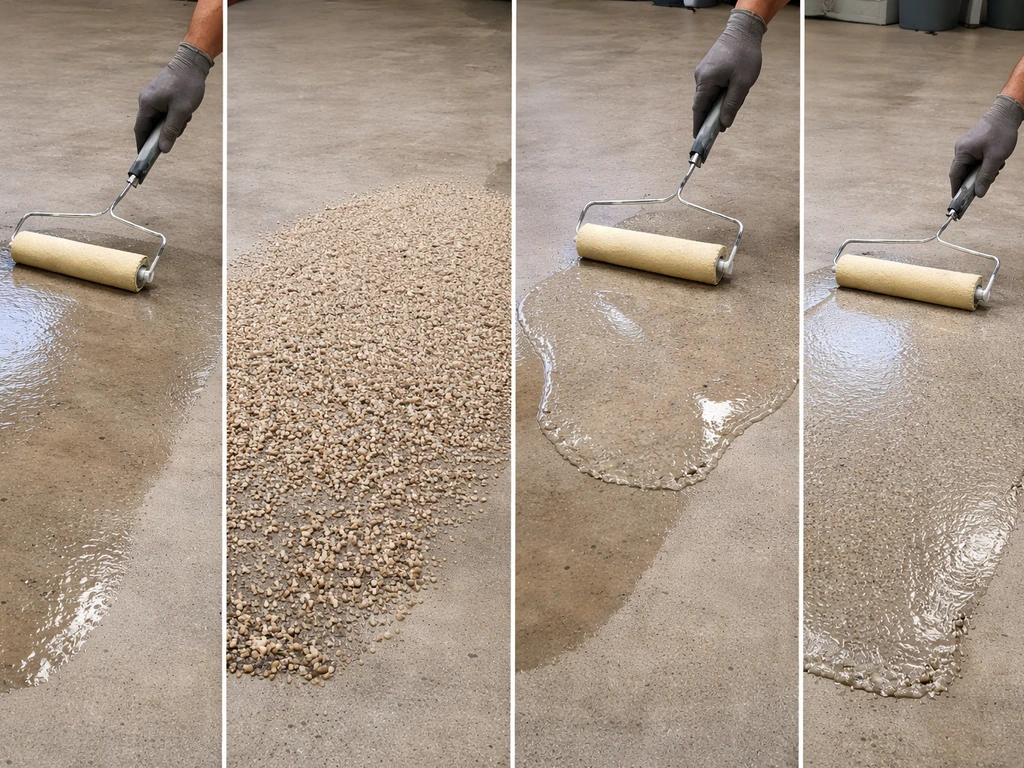
- Apply base/body coat: Mix your two-part epoxy base coat per manufacturer ratios and apply at the specified mil thickness using a roller or squeegee. Work in manageable sections so the material is still wet when you broadcast.
- Broadcast aggregate to rejection: Immediately after applying each section of base coat, broadcast pea gravel (or your chosen aggregate) by hand or with a hopper gun, throwing it across the wet epoxy until no more stones stick and the surface appears dry. This ensures full coverage without exposed epoxy.
- Let it cure, then sweep: Once the base coat has cured, sweep or vacuum all loose aggregate from the surface. What remains should be solidly bonded.
- Apply lock/seal coat: Roll or squeegee a clear lock coat over the aggregate to encapsulate the stones and create a uniform base for the topcoat.
- Apply UV-stable topcoat: Finish with a polyaspartic or aliphatic urethane clear topcoat. For better traction, hand-broadcast 50-mesh aluminum oxide at about 1 lb per 5–10 sq ft into the wet topcoat before it sets.
- Cure and wait: Keep foot traffic off for at least 24 hours and heavier use for 72 hours minimum. In cooler temperatures, extend those windows.
Temperature and humidity during installation are critical. Most epoxy systems need ambient and substrate temperatures between roughly 50°F and 90°F, with low humidity. Applying in hot afternoon sun on a slab that's been baking all day will cause the material to kick too fast and create bubbles. Early morning application on a shaded or pre-cooled surface works much better in warm climates.
Keeping it looking good: cleaning, sealing, and repairs
Routine cleaning
Day-to-day maintenance is genuinely simple: sweep loose debris regularly, rinse with a garden hose, and occasionally scrub with a mild degreaser or pH-neutral cleaner for stains. Avoid harsh acids or bleach-based cleaners, which can degrade epoxy topcoats over time. Pressure washing is fine at moderate pressure (1,500–2,000 psi) with a wide fan tip, but don't hold a narrow jet directly on the surface for extended periods.
Re-sealing and topcoat refresh
How often you need to re-seal depends on traffic, UV exposure, and what topcoat was originally used. A quality polyaspartic topcoat on a covered or lightly trafficked patio might go 5–7 years without needing refresh. A high-traffic, sun-exposed surface might need a topcoat recoat every 2–4 years. The sign it's time is when the surface starts to look dull, worn through in traffic lanes, or when water no longer beads on the surface. Recoating is much cheaper than starting over, but the surface needs to be clean, lightly abraded, and free of contamination for the new coat to bond.
Dealing with cracks, lifting, and worn spots
Small cracks that appear in the topcoat but don't reflect cracking in the concrete can usually be cleaned out and filled with a compatible epoxy filler before recoating. If the crack runs through the concrete substrate, you need to address the structural cause first, otherwise any surface repair is temporary. Lifting or delamination (areas where the coating feels hollow or starts to bubble and peel) almost always traces back to moisture, contamination, or inadequate prep. The honest fix is to grind out the affected area back to sound concrete, re-prep, and patch. Color-matching patched sections is difficult, so in practice, a large delamination often means planning a full re-coat rather than a spot repair.
Cost, sourcing, and how it stacks up against alternatives
For a ballpark, budget $3–$8 per sq ft for quality materials if you're doing it yourself (primer, base coat, aggregate, lock coat, UV topcoat). Professional installation in most markets runs $8–$12 per sq ft and can go higher in metro areas or on substrates that need significant prep work. The surface prep portion of the job, grinding, crack repair, moisture mitigation, often accounts for 20–40% of total cost, which is why getting multiple quotes and asking specifically what prep is included matters.
Pea gravel and quartz aggregate are widely available through flooring coating suppliers, tile and stone distributors, and online. Stick with aggregate sized for broadcast use (typically 30–40 mesh for finer quartz, or 3/8-inch rounded pea gravel for the chunkier look). Avoid construction-grade crushed stone, which has sharp edges that won't embed properly and create an uneven texture.
When you're comparing options, here's how pea gravel epoxy sits relative to the alternatives most homeowners consider:
| Surface Option | Typical Cost (installed) | Durability | Maintenance | Best For |
|---|---|---|---|---|
| Pea gravel epoxy over concrete | $8–$12/sq ft | High if properly installed | Low to moderate; recoat every few years | High-traffic, stain-prone, or pool-adjacent areas |
| Plain exposed aggregate concrete | $6–$10/sq ft | High; freeze/thaw durable | Low; periodic sealing | Cold climates, driveways, low-maintenance patios |
| Concrete pavers | $10–$20/sq ft | Very high; easy to replace sections | Low; re-sanding joints periodically | Freeze/thaw climates, DIY-friendly installs |
| Flagstone (natural) | $15–$30/sq ft | High with proper mortar base | Low; occasional re-pointing | Formal or naturalistic garden patios |
| Loose pea gravel (unbound) | $1–$3/sq ft | Low; displaces with use | High; raking and replenishment | Low-traffic, informal, or temporary areas |
| Porcelain tile over concrete | $12–$25/sq ft | High; UV stable | Low; grout maintenance | Modern/contemporary design, covered patios |
If you're weighing pea gravel epoxy against just leaving loose pea gravel on your patio, the epoxy-bound version wins on every performance metric except cost and reversibility. Loose gravel migrates, tracks into the house, and offers no real stain protection for the concrete below. The bound version costs more but stays put and actually protects the slab. On the other hand, if your slab has serious drainage or freeze/thaw issues, concrete pavers or flagstone are more forgiving choices because individual units can flex, settle, and be releveled without re-doing the whole surface.
The bottom line is this: pea gravel epoxy is a strong choice for a sound, well-drained concrete patio in a moderate or warm climate where you want a durable, attractive, stain-resistant surface and you're prepared to invest in proper prep and a quality UV-stable topcoat. It's a risky choice for chronically wet slabs, heavy freeze/thaw zones, or anywhere drainage hasn't been sorted first. Get those fundamentals right, and it's a surface that genuinely performs well and holds up for years.
FAQ
Can I install a pea gravel epoxy patio over newly poured concrete?
Yes, but only if the slab is already cured and sound, and the epoxy manufacturer allows application timing on new concrete. Many systems require waiting a specific curing period and verifying moisture using the same ASTM F1869 or ASTM F2170 tests, because fresh concrete can still emit moisture even if it looks dry.
If there are small cracks in my slab, can I just patch them after the epoxy goes down?
Not reliably. If you bury pea gravel into an epoxy matrix, the bond depends on a properly profiled concrete surface plus correct rejection broadcasting and immediate sealing. Filling cracks with epoxy after installation typically hides symptoms and can let moisture move under the coating.
What should I do if parts of the coating start to delaminate or feel hollow?
You should treat it as a 2-part job: fix the root cause, then recoat. If you see hollow areas, bubbling, or sections peeling, moisture or contamination is usually behind it. Spot repairs often fail because the new epoxy must bond to stable, properly abraded concrete, not to lifted edges or contaminated substrate.
What happens if my patio has old paint, sealers, or oil spots, and can I still make it bond?
If the concrete has oil, grease, or curing compound, epoxy may not bond even with excellent topcoats. The fix is removing contaminants and then mechanically profiling the surface (shot blasting or diamond grinding), plus using any system-specific primer designed for problematic substrates.
Should epoxy be applied over control joints and expansion joints?
Yes, but expansion joints require honoring the slab movement. Bridging joints with rigid coatings can cause cracking in the coating over time. Ask the installer for their joint treatment approach, often involving joint-safe detailing or specific flexible materials at those locations.
How can I tell whether a topcoat is truly UV-stable for outdoor sun exposure?
Use the correct UV-stable topcoat chemistry. Standard epoxy clears are the most common reason patios yellow and look uneven over time. If the kit or quote does not clearly state polyaspartic or aliphatic urethane (or another UV-rated system), treat that as a major red flag.
How do I know when it is time to re-seal or recoat my pea gravel epoxy patio?
Yes, if you maintain it correctly and don’t burn through the aggregate. Typical signs include the surface becoming less glossy, traffic lanes losing thickness, or water no longer beading. When recoating, the surface must be thoroughly cleaned and lightly abraded so the new topcoat can mechanically bond.
What cleaning methods and chemicals should I avoid on the topcoat?
Aggressive cleaning can dull or damage the topcoat, especially acids, solvents, or bleach-based products. Stick to a pH-neutral cleaner or mild degreaser, and avoid pressure washing with narrow tips at high dwell times, because localized pressure can erode the coating.
Can I make the patio less slippery, and how do traction additives affect the look?
Yes, surface hardness and safety depend on the topcoat and any traction additives, not just the aggregate. If you want extra grip, use the specified anti-slip broadcast rate (for example aluminum oxide) and ensure it is compatible with the system so it is locked under the clear.
Is a covered patio a safer application for pea gravel epoxy, even in humid climates?
Yes, but drainage and moisture management still drive performance. Covered patios usually extend topcoat life because UV and precipitation exposure are reduced, but the slab moisture condition can still cause blistering if vapor mitigation and grading were not handled.
Can I install pea gravel epoxy over a patio that already has patchwork or uneven concrete?
Sometimes, but sometimes it causes an uneven surface. Texture and drainage matter, and if you have to relevel or patch, it must be done before coating. Also, color matching aggregate and topcoat sheen can vary after repairs, so plan for visual differences in patched areas.
Is pea gravel epoxy a good idea for climates with frequent hard freeze/thaw cycles?
Carefully. Epoxy systems are not designed for moving, settling, or frequently wet substrates. If your slab has repeated freeze/thaw problems, spalling, or persistent dampness, the coating will often amplify those issues rather than fix them.