
The most practical patio stone examples fall into four main looks: irregular random flagstone (the classic organic, puzzle-piece style), cut/sawn flagstone in a straight grid or ashlar pattern, a dry-stacked stepping-stone layout with ground cover in the gaps, and a tight-jointed formal pattern using uniformly sized stone cut to a herringbone or running-bond arrangement. Each style suits a different budget, skill level, and yard personality. Pick the look first, then match the stone type to your climate and how much maintenance you actually want to do. The rest of this guide walks you through every step, from style concept to sourcing to long-term upkeep.
Patio Stone Examples: Style Ideas and Build Guide

Nolan Ellison
29 May 2026
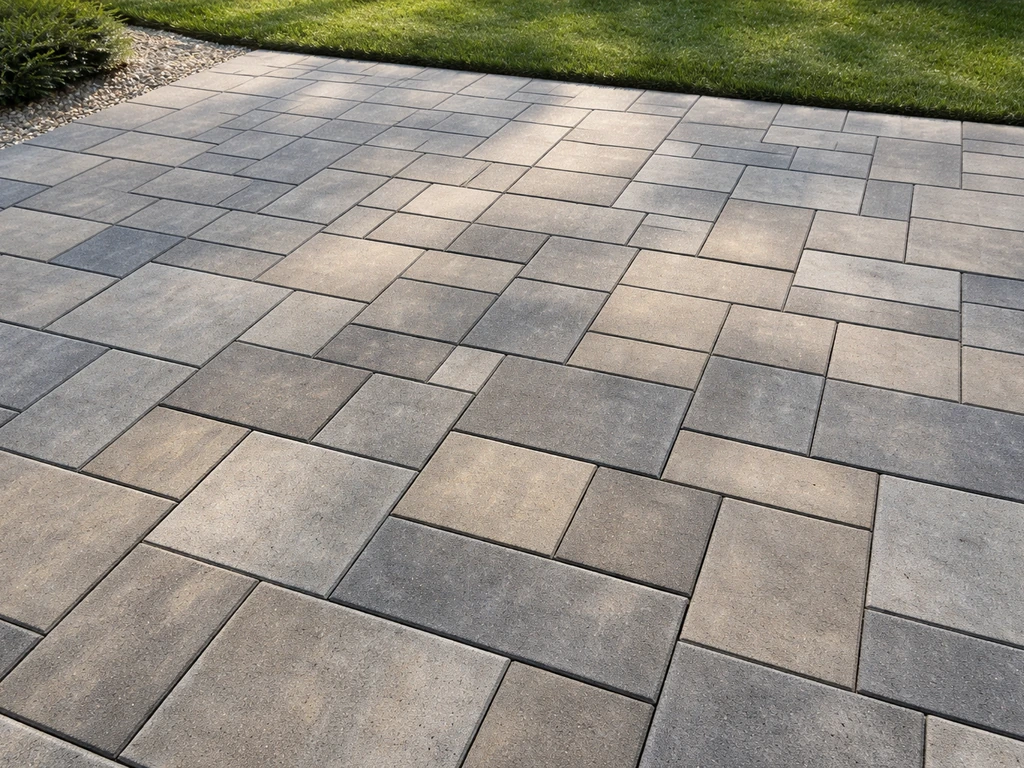
Stone patio layout examples and styles
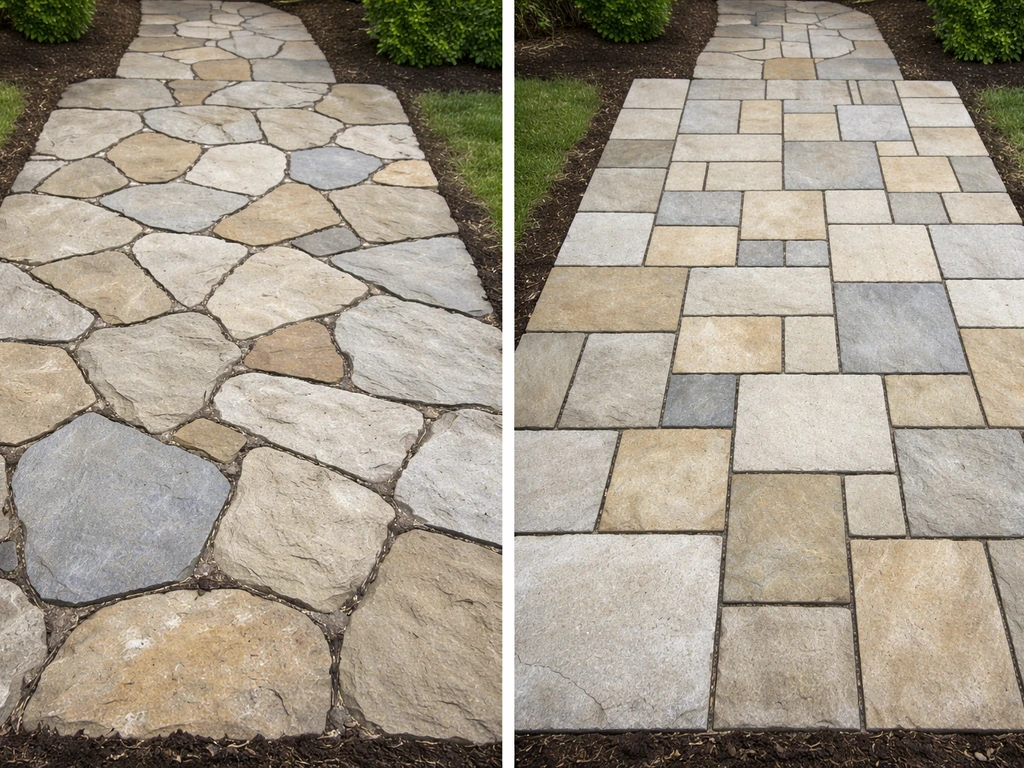
Layout choice shapes how a patio feels before you ever pick a stone species. A random or 'crazy paving' layout uses irregular flagstone pieces fitted together like a jigsaw. The organic result looks natural and relaxed, suits informal gardens, and is forgiving of slightly uneven cuts. The key to making it look intentional rather than chaotic is avoiding long continuous straight lines: a well-executed random layout deliberately breaks up any line longer than two or three stone widths so the eye keeps moving rather than tracking a crack across the entire surface.
A straight-set or grid layout uses either square-cut stones or rectangular pieces set in tidy rows with consistent joints. This reads as formal and clean, works brilliantly with modern or Mediterranean architecture, and is easier to install because you're not puzzling irregular shapes together. An ashlar pattern is a variation where rectangular pieces of two or three different sizes are combined in a staggered arrangement, which breaks the monotony of a pure grid while keeping straight edges throughout.
Herringbone is less common with natural stone than with brick, but it works with cut rectangular flags. Brick patio examples often use herringbone layouts because the pattern locks the rectangular pavers in place and looks sharp. A 90-degree herringbone (pieces set square to the boundary rather than at 45 degrees) involves less cutting at the edges and is more beginner-friendly than a 45-degree diagonal herringbone. The pattern adds visual movement and is particularly effective in narrow spaces like a side-yard passage or long rectangular patio.
A stepping-stone or open-joint layout spaces larger irregular slabs across lawn or gravel, letting ground cover or low grass fill the gaps. This style uses the least stone, costs the least, and suits casual cottage-style gardens. It works for low-traffic areas but is not ideal as a main entertaining surface. For a bolder statement, some homeowners use it as a transitional zone leading from a denser paved area to a garden bed.
- Random/crazy paving: organic, puzzle-fit irregular pieces, informal tone, works on any size patio
- Straight grid or ashlar: clean rows of cut or sawn stone, formal look, easier to install
- Herringbone: cut rectangular flags in alternating 90-degree or 45-degree orientation, adds movement
- Open stepping-stone: spaced large slabs with planted gaps, lowest cost, low-traffic use
- Circular or curved inset: random flagstone cut to radial shapes for a focal centerpiece
Comparing stone patio layouts with brick patio layouts is worth a quick note: brick patterns (running bond, herringbone, basketweave) follow strict module sizes that make pattern planning very predictable. If you are comparing materials and want the best brick for patio projects, focus on a brick format and pattern that match your climate and maintenance tolerance. Natural stone layouts are less rigid, which is part of their charm but also means more cutting time on site. If you want a similar crisp, grid-like look in your layout, brick can offer the best brick pattern for patio as a related option alongside stone patterns. If you're specifically trying to outfit a patio look, pairing these stone layout ideas with the best outdoor rug for brick patio can be a practical way to add comfort and style without changing the paving. If you want the discipline of a precise pattern with lower material cost, brick is worth a look alongside stone. If you are considering traditional paver brick, you can also compare it with whether you can use house bricks for a patio and what changes in durability and installation brick is worth a look alongside stone.
Natural stone options and what each looks like
Each stone type has a distinct appearance, and the one you choose also determines how much maintenance you're signing up for and whether your climate will cooperate. Here's a direct comparison of the main options homeowners actually use.
| Stone Type | Typical Look | Climate Suitability | Porosity/Durability | Relative Cost |
|---|---|---|---|---|
| Bluestone | Blue-grey to grey-green, sometimes warm buff tones; cleft face has natural texture | Excellent in freeze-thaw (Northeast US benchmark), handles rain and UV well | Dense, low absorption, slip-resistant cleft surface | Mid to high: $8–$14/sq ft material |
| Granite | Speckled grey, pink, or black; polished or flamed finish | Virtually impervious to frost damage when properly installed, handles all climates | Extremely low porosity, very hard | High: $10–$18/sq ft material |
| Quartzite | White, silver, or gold tones; often has a sparkle or layered grain | Excellent freeze-thaw performance, low absorption similar to bluestone | Hard and dense, long-lasting | Mid to high: $8–$15/sq ft material |
| Limestone | Creamy buff, warm beige, grey-white; smooth or honed face | Poor in freeze-thaw zones without sealing; better suited to mild or dry climates | Significantly more porous than granite or bluestone; can spall when saturated in cold | Mid: $6–$12/sq ft material |
| Sandstone | Warm reds, tans, browns; rough or sawn face | Moderate; higher porosity means freeze-thaw risk, fades with UV in hot climates | More porous than bluestone/granite; needs sealing | Lower mid: $5–$10/sq ft material |
| Slate | Dark grey, charcoal, rusty red, or multi-color; naturally cleaved layers | Variable; thinner pieces can delaminate in severe freeze-thaw; thicker pieces perform better | Moderate porosity; durable if bought thick (1.5 in+) | Mid: $7–$12/sq ft material |
If you're in a freeze-thaw climate (Zone 5 or colder, basically anywhere that sees a hard winter), bluestone, granite, and quartzite are your safest picks. I've seen limestone patios installed in the Mid-Atlantic look stunning for a couple of years and then start spalling or staining because a homeowner skipped sealing and left standing water over winter. Choosing the wrong high-absorption stone in a freeze-thaw area is one of the most common and expensive mistakes in this category.
For hot, dry climates like the Southwest, almost any of these stones work well, but darker granite and slate will absorb heat significantly. Light-colored limestone or sandstone stays cooler underfoot but needs UV-stable sealer to avoid color fade. In very wet climates (Pacific Northwest), prioritize a textured or cleft surface regardless of stone species, because smooth polished surfaces become dangerously slippery when wet.
Step-by-step: how to build a stone patio
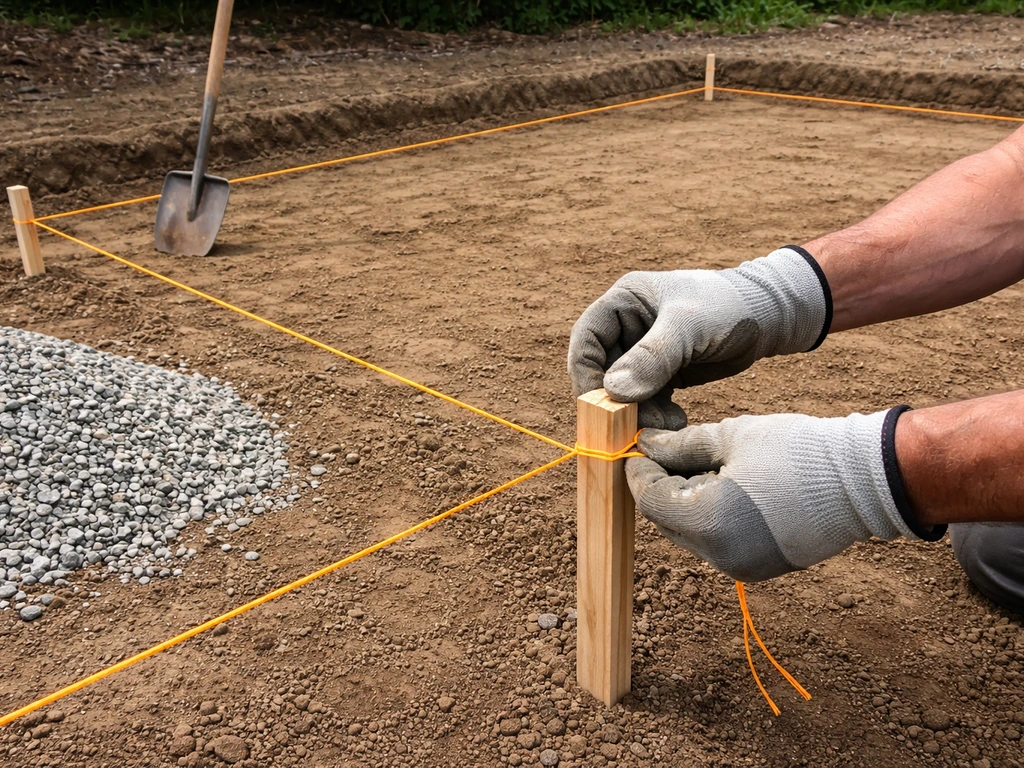
A dry-set installation (compacted gravel base + sand or stone-dust setting bed, no mortar) is the standard approach for DIYers and is what most professional residential patios use. It allows slight natural movement in freeze-thaw, is repairable without specialist tools, and drains well. Mortar-set is an option for formal cut-stone installations on a concrete slab, but it complicates repairs and is outside the scope of a typical homeowner project.
- Plan and mark your layout: Stake out the patio perimeter with string lines. Include a drainage pitch of at least 1/8 inch per foot sloping away from any structure. For a 12-foot patio running away from the house, that means roughly 1.5 inches of drop across the run.
- Excavate to depth: Dig out to approximately 10 inches total depth below finished surface level. This allows for a 6-inch compacted gravel base, a 1-inch sand/stone-dust setting bed, and roughly 1.5 to 2 inches of stone thickness. Adjust if your stone is thicker.
- Compact the subgrade: Use a plate compactor on the exposed soil. In areas with clay or moist subgrade, lay a geotextile fabric over the compacted soil before adding gravel. This prevents fine soil particles from migrating up into your gravel base and causing settling over time.
- Build and compact the gravel base: Add crushed angular gravel (not rounded river gravel) in 3- to 4-inch lifts, compacting each lift with a plate compactor. Rounded gravel does not lock together the way angular material does. Your finished compacted base should be about 6 inches deep for a typical patio.
- Install edge restraints: Set plastic or metal edging along the perimeter before adding the setting bed. This keeps the entire installation from spreading outward over time. Stake it firmly into the compacted gravel.
- Screed a 1-inch setting bed: Add a layer of coarse sand or stone dust (not fine play sand) and screed it level using pipes or screed rails as guides. The goal is a uniform 1 inch of bedding material. Do not compact this layer: it needs to stay loose so individual stones can be tapped to level.
- Lay the stone: Starting from a corner or straight edge, place each stone and press it firmly into the setting bed. Use a rubber mallet to tap it level. Check frequently with a spirit level. For random layouts, dry-fit several pieces before setting any, to avoid corner-piece problems that force small cut-in pieces.
- Cut stones as needed: An angle grinder with a diamond blade handles most flagstone cuts for random and ashlar patterns. A wet saw gives cleaner edges for tight formal cuts. Always wear eye and ear protection.
- Fill joints: For dry-set installations, sweep polymeric jointing sand into the joints. Polymeric sand is polymer-modified graded sand that, once wetted, hardens into a flexible joint that resists weeds and ant tunneling. Quikrete and Sakrete both make widely available versions that work for joints up to 2 inches wide. Follow the product's wetting instructions carefully: you stop spraying when the joints won't absorb more water.
- Final compaction and cleanup: Run a plate compactor over the finished surface (with a rubber pad or foam layer between the compactor plate and stone to avoid scratching) to fully seat the stones. Sweep off excess sand and rinse the surface.
Pattern, thickness, and base details that actually matter
Flagstone for outdoor patios typically runs 1 to 2 inches thick. For a sand-set dry-lay patio, you want pieces at the thicker end of that range, around 1.5 to 2 inches, because thinner pieces are more prone to cracking under point loads (heavy planters, furniture legs, etc.). Irregular random fieldstone that you source locally may be even thicker and heavier, which is fine for the installation but demands a properly compacted base to prevent uneven settling.
The gravel base is the part homeowners most often underdo. Six inches of compacted angular gravel is the standard for a pedestrian patio. In freeze-thaw climates or over expansive clay soils, going to 8 inches of base is worth the extra excavation cost. The base is where long-term stability lives. No amount of careful stone placement compensates for a thin or improperly compacted base that settles unevenly over the first winter.
The geotextile fabric question comes up a lot. In stable sandy or gravelly soil, it's optional. Over clay, moist subgrade, or anywhere you see soft spots in the excavated soil, use it. It sits on top of the compacted subgrade before you add gravel, and its job is to keep fine soil particles from migrating upward into the gravel over time, which is one of the most common causes of patio settling that isn't obvious until three or four years in.
For pattern-specific planning: a true random layout needs larger 'anchor' pieces (12 inches and up) to fill most of the area, with medium pieces bridging gaps and small pieces used sparingly. Avoid cutting in very small slivers to fill awkward corners; they crack easily and look patchy. A true random field should avoid obvious clustering and motif-like repeats, and it also needs to prevent overly small “cut-in” slivers that can undermine the intended randomness Avoid cutting in very small slivers to fill awkward corners; they crack easily and look patchy.. If a gap won't fill with a reasonable-sized piece, shift the surrounding stones slightly. A straight ashlar or herringbone pattern requires consistent stone thickness throughout the batch so the surface doesn't become a series of trip hazards. When ordering cut stone, specify matching thickness tolerance and ask the supplier to pull from the same quarry run.
Finish, sealing, and choosing color and texture
Finish types and what they mean for safety and looks
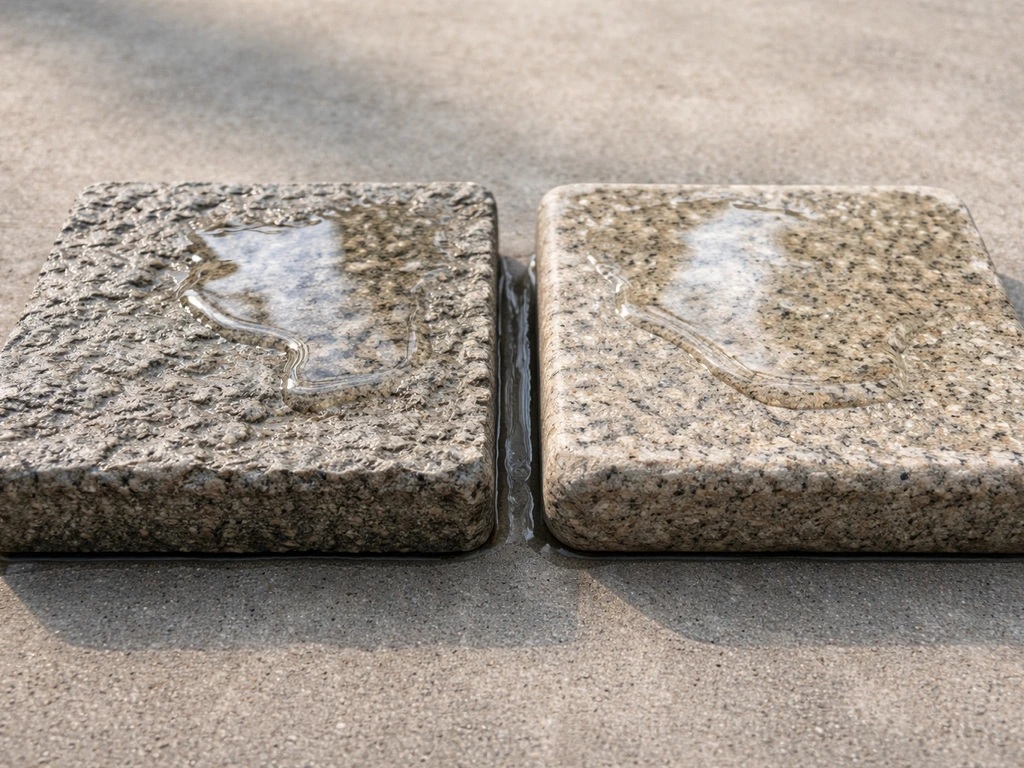
Stone finish affects both appearance and slip resistance, and it's a decision worth making deliberately. A cleft or split-face finish is the natural result of splitting stone along its grain; the surface is rough and organic-looking, provides excellent wet traction, and is the most common finish for outdoor bluestone and slate. A honed finish is ground smooth without being polished: it's flat and even, which some find more refined, and it provides safer wet traction than a polished surface. A polished finish looks stunning in photos and on indoor floors, but on an outdoor patio it becomes dangerously slippery when wet. Keep polished stone out of exterior applications unless it's in a covered space that stays dry.
Tumbled finish is achieved by tumbling cut pieces in a drum to round off edges and give a worn, aged appearance. This works well for cottage or Mediterranean styles and integrates naturally into informal random layouts. The rounded edges mean slightly wider joints, which can be an advantage if you want ground cover growing between stones.
Sealing: what to use and when
For outdoor natural stone, use a penetrating impregnator sealer rather than a surface coating or topical sealer. Impregnators penetrate into the stone pores and repel water and oil without forming a film on the surface, so they don't affect traction, don't peel or flake, and don't trap moisture that could cause freeze-thaw damage. Surface coatings look shiny but wear unevenly, can become slippery, and eventually need stripping and reapplication, which is a hassle. Professional installers almost universally recommend impregnators for paving stone.
With highly porous stones like limestone or sandstone, the first coat of sealer will be absorbed quickly and may seem to disappear. That's normal. Apply a second coat while the first is still slightly tacky, or wait the product's recommended recoat window. Two coats are typically needed to reach full protection on these materials.
Wait at least three months after installation before sealing. New stone, especially if set on a sand or cement-modified base, will effloresce (white mineral salts migrating to the surface) during the first few months. Sealing over efflorescence traps it in the stone. Let it run its course, clean the surface, then seal. After that, plan to reapply a penetrating sealer roughly every four to five years as part of your regular maintenance cycle.
If you want to enhance the color of a stone (particularly grey or dull-looking limestone or sandstone), look for a 'color enhancing impregnator.' These deepen the natural tones without leaving a glossy coating. They're worth using on stones that look flat or washed out after installation.
Maintenance, repair, and keeping it looking good long-term
Routine cleaning
For regular cleaning, a wash-down with clean water and a neutral pH cleaner (pH close to 7) is all most patios need seasonally. Avoid acidic cleaners on limestone or marble-derived stones because they etch the surface. Avoid high concentrations of soap-based cleaners too: excess residue leaves a film that makes the surface look dull and can attract dirt faster. A garden hose or controlled low-pressure wash works fine for most situations. Pressure washing is effective for removing ingrained grime, but keep the nozzle at least 12 inches from the surface and use a fan tip rather than a concentrated jet, particularly on softer stones like sandstone or slate.
Weed control and joint maintenance
Polymeric sand in the joints significantly reduces weed growth compared to plain sand or stone dust, because it hardens into a firm joint that seeds have trouble penetrating. Even so, airborne seeds occasionally establish on top of joints. Pull or spot-treat these early before roots have a chance to work into the joint material. If you used plain stone dust or sand as your joint filler, annual reapplication of sand after sweeping out old material is the simplest approach to keeping joints filled and weed growth manageable.
Dealing with efflorescence
Efflorescence shows up as a white powdery film on the stone surface or along joints, usually in the first year or two after installation. It's mineral salts being carried to the surface by moisture movement through the base and stone. It's ugly but not structurally damaging. Scrub affected areas with a stiff brush and clean water first. For persistent deposits, a diluted efflorescence cleaner (specifically formulated for masonry) works without damaging most stone. Don't use muriatic acid on limestone or marble-derived stones.
Re-leveling and resetting loose stones
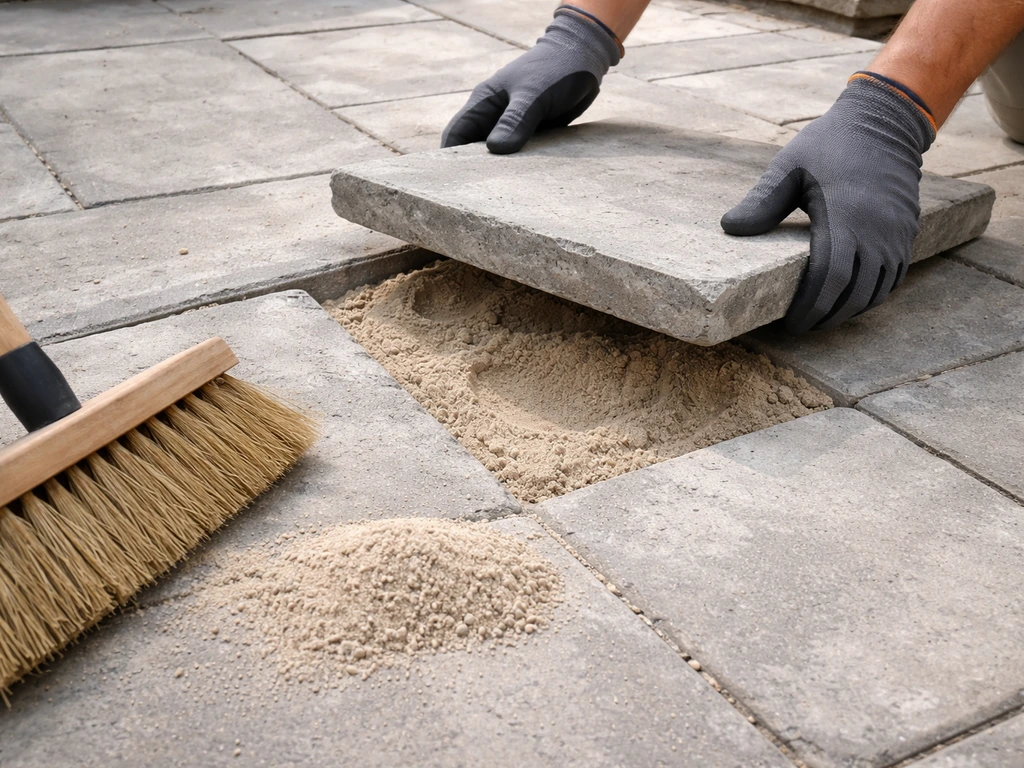
Loose or rocking stones are almost always a base or bedding problem, not a stone problem. To fix them, pull the affected stone, dig out the setting bed material beneath it, recompact if needed, add fresh sand or stone dust, and relay the stone. Tap it to level with a rubber mallet. This is one of the real advantages of dry-set over mortar-set: individual stones can be pulled and reset without grinding out hardened mortar. If you find multiple adjacent stones shifting or subsiding in the same area, the gravel base beneath may have eroded or never been properly compacted. In that case, lift a larger section and rebuild the base before relaying.
After re-leveling, sweep polymeric sand back into the joints and water it per the product instructions. This locks the surrounding stones back in place. A light surface compaction with a plate compactor (rubber pad on the plate to protect the stone) seats everything evenly.
Stain removal
Oil stains from grills or furniture respond well to a poultice (absorbent material like baking soda or diatomaceous earth mixed with a solvent like acetone, applied, covered with plastic, left 24 hours, then scraped off). For rust stains, use a non-acidic rust remover formulated for stone. Tannin stains from leaves or wood furniture are best addressed with a pH-neutral cleaner and a bit of scrubbing while still fresh. The harder a stone is (granite at the top, limestone and sandstone at the softer end), the more resistant it is to staining, which is another practical reason to choose granite or bluestone for a high-use patio.
Cost and sourcing: what to ask for and what to budget
Flagstone material costs roughly $6 to $15 per square foot depending on stone type, finish, and your region. Bluestone and granite sit at the higher end; sandstone and some limestone at the lower end. Installed cost (including base prep, labor, edging, and jointing) typically runs $15 to $27 per square foot for professionally installed flagstone patios. DIY installation can bring that down substantially on labor, but tool rental (plate compactor, wet saw or angle grinder, screed rails) adds back some cost.
| Cost Component | Typical Range (per sq ft) | Notes |
|---|---|---|
| Stone material | $6–$15 | Higher for granite/bluestone; lower for sandstone/limestone |
| Crushed gravel base | $1–$2 | 6-inch compacted base; more for deeper bases |
| Bedding sand/stone dust | $0.50–$1 | 1-inch layer |
| Polymeric jointing sand | $0.50–$1.50 | Varies with joint width and depth |
| Edge restraints | $0.50–$1 | Plastic or aluminum perimeter edging |
| Professional labor | $8–$15 | Omit for full DIY builds |
| Total (DIY) | $9–$21 | Material + base + tools/rental |
| Total (professional install) | $15–$27 | Full installed price |
When sourcing stone, visit the stone yard or masonry supplier in person if at all possible. Ask to pull from a single pallet or quarry run for your entire project. Color variation between quarry runs can be dramatic, and nothing looks worse than a patio that's clearly a mix of two different batches of the same stone type with different tones. Bring a photo of your home exterior and describe the light conditions of the patio space so the yard staff can help you choose a stone color that works in both shaded and full-sun conditions.
Ask the supplier for the stone's absorption rate or porosity class if you're in a freeze-thaw climate. Reputable stone yards can usually provide this. If they can't, stick with bluestone, granite, or quartzite and avoid the guesswork. Request a price sheet by square foot for each stone option and compare two or three alternatives side by side before committing. Local suppliers (masonry yards, landscape supply companies) often have better stock variety and lower freight costs than big-box stores. For smaller quantities, big-box stores are fine for basic flagstone, but the selection is limited and you may have to accept whatever's on the pallet.
For tools, you'll need a plate compactor (rent for one to two days), a level (4-foot minimum), a rubber mallet, a diamond blade angle grinder or a wet tile saw (rent for cut-stone patterns), and a garden hose or sprayer for the polymeric sand activation step. Most homeowners don't own a plate compactor, and rental is straightforward through any equipment rental company. Budget roughly $100 to $200 per day for equipment rental depending on your location.
Finally, order about 10 percent more stone than your square footage calculation to account for cuts, breakage, and the inevitable piece that splits wrong. For random flagstone with lots of cutting, bump that waste factor to 15 percent. Running out of stone mid-project and needing a second delivery is both expensive and risky if the new batch doesn't match your first. A small surplus stored in the garage also gives you a repair source years down the road.
FAQ
Can I use patio stone examples on a sloped site, or will the pattern shift?
For patio stone examples on a sloped yard, build the base with a consistent drainage grade, then keep the stone tops level by packing under low spots rather than relying on thick sand. If the slope is more than about 1 in 4 (roughly 1 foot drop over 4 feet), plan on extra edging and underdrain options, otherwise joints can open or stones can drift downhill over time.
What if I want two colors of stone for patio stone examples, will it look natural?
Yes, you can combine two stone colors in many patio stone examples, but only if you treat it like an intentional design. Keep each quarry run separate, blend pieces during placement (not by laying all of one color in a block), and limit the contrast to similar undertones, otherwise you can end up with a “patchwork” look even when both stones are from the same species.
What’s the best way to troubleshoot rocking or loose stones in patio stone examples?
If stones rock, the fix is usually under the stone, not the stone itself. Pull the affected pieces, rework the setting bed (sand or stone dust), then re-lay and tap level with a rubber mallet. If several adjacent stones move together, lift a larger area to rebuild the compacted gravel base, because polymeric sand in joints cannot correct a settling base.
How do I choose edging for different patio stone examples (straight grid vs random flagstone)?
For edging in patio stone examples, choose an edging type that can resist outward pressure from expansion and traffic. Typically, use rigid edging set on firm base (not just buried in sand), and leave the stone interface tight enough to prevent joint material from washing out. Flexible edging can work for curves, but it must still be anchored and supported so the joints do not erode.
When should I use polymeric sand versus plain sand for patio stone examples?
Use polymeric sand when you want fewer weeds and more joint stability, but you should avoid it if you expect frequent reconfiguration of the patio. It can “lock” stones in place, so changing the layout later is harder. For stepping-stone/open-joint patio stone examples with grass or ground cover, plain sand or a purposely designed open-joint system is usually a better match.
Which patio stone examples hold up best where rain and standing water are common?
In wet climates, skip smooth-polished finishes for patio stone examples and lean toward cleft, split-face, or a honed surface. Also plan your joint width so rain can drain through rather than pooling on the stone surface, and be extra careful to keep the patio grade away from the house to prevent persistent wetting at entry points.
How do patio stone examples hold up to heavy furniture or big planters?
If you have heavy planters or regularly drag furniture, pick thicker flagstone pieces and avoid very thin flagstones in random layouts. Even in dry-set installations, point loads concentrate stress at small spots, so choose the thicker end of the typical 1.5 to 2 inch range and ensure the base is fully compacted before placement.
What’s the right approach if cut-stone patterns have thickness variation?
If your patio stone examples include cut patterns like ashlar or herringbone, confirm thickness before installing the whole batch. Ask the supplier for tolerance range, then dry-lay a test area and check for trip hazards, if the stones vary, you may need selective sorting or a different setting bed thickness strategy.
Can I speed up sealing patio stone examples, or is waiting important?
Don’t seal too early because trapped moisture can worsen efflorescence and stain appearance. A safer workflow is to complete installation, wash off dust, wait until the surface stops whitening, then seal using a penetrating impregnator, apply two coats for porous stones, and follow with reapplication every several years based on exposure to rain and sun.
What’s the safest way to deal with common stains on patio stone examples?
For oil, rust, and tannin stains in patio stone examples, test in an inconspicuous area because some cleaners can lighten or darken porous stones. Also act quickly, and for oil, a poultice works best when the stone is dry and the stain is fresh, for rust use a stone-safe non-acidic remover to avoid etching.