For most patios, a dense concrete paving brick (also called a concrete paver or interlocking paver) that meets ASTM C936 is the best starting point: it hits a minimum 8,000 psi compressive strength, keeps water absorption under 6%, and is sized at least 2-3/8 inches (60 mm) thick so it handles real foot traffic and freeze-thaw cycles without spalling.
Best Brick for Patio: How to Choose and Install

Nolan Ellison
5 May 2026
When comparing a brick vs stone patio, focus on how each option handles moisture, freeze-thaw, and the long-term stability of its base. If you want the warmer look of traditional clay brick, choose a genuine paving brick rated SW (Severe Weathering) per ASTM C902, not a standard wall or face brick. The difference matters a lot, especially if you live somewhere with hard winters.
Choosing the right brick type for a patio
The first thing to sort out is the difference between bricks made for patios and bricks made for everything else. Wall bricks, house bricks, and thin veneers are not the same product as paving bricks, even when they look similar at the garden center. Paving bricks are denser, fired at higher temperatures (for clay), or mixed to higher compressive strength specs (for concrete), precisely because they sit flat on the ground and take direct impact, moisture from below, and UV from above all at once.
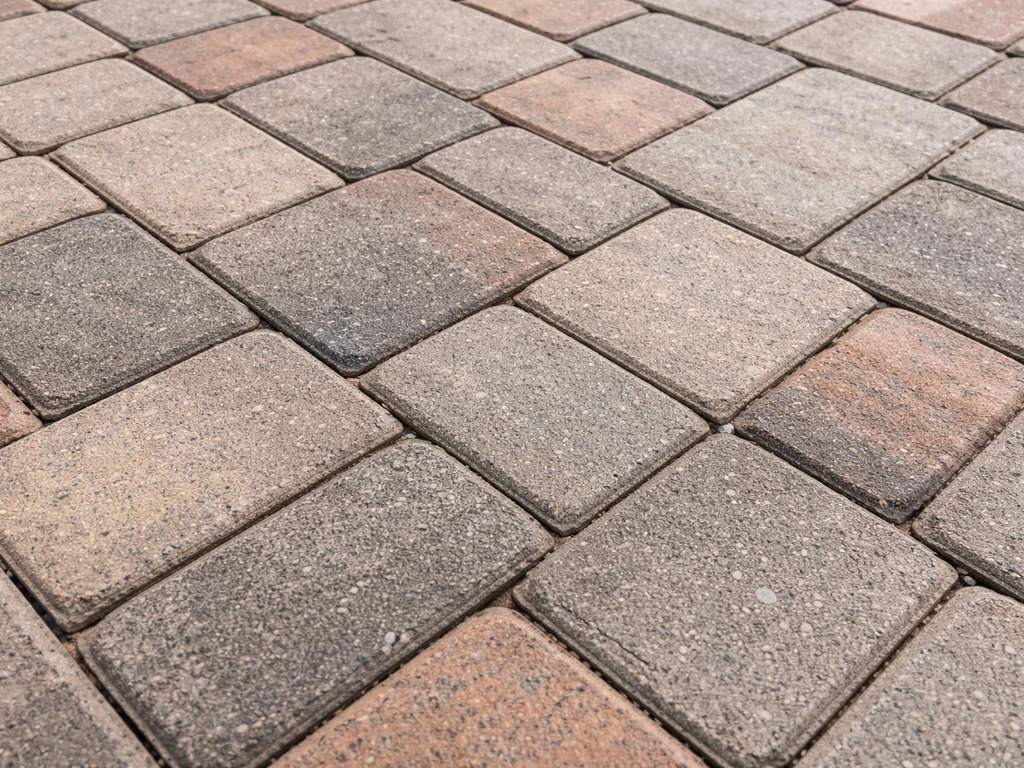
There are three main categories worth knowing about: clay paving bricks, concrete pavers, and reclaimed or tumbled bricks. Each has a different performance profile and a different sweet spot on the cost-vs-durability curve.
| Type | Material | Strength / Durability | Freeze-Thaw Rating | Best For | Notes |
|---|---|---|---|---|---|
| Clay paving brick (SW grade) | Fired clay/shale | High; dense vitrified surface | SW = Severe Weathering rated | Cold climates, traditional look | Must be ASTM C902 SW, not MW or NW |
| Concrete paver / interlocking paver | Portland cement + aggregate | 8,000 psi min (ASTM C936) | ASTM C1262 freeze-thaw tested | All climates, high-traffic areas | Most consistent specs; widest size range |
| Reclaimed / tumbled brick | Fired clay (age varies) | Variable; depends on original grade | Unknown unless tested | Low-traffic, aesthetic charm patios | Check for spalling before buying |
| Thin brick | Clay/shale veneer | Max 6% absorption (ASTM C67) | 300 freeze-thaw cycles (ASTM C666) | Vertical faces, steps, borders | Not a standalone paving unit; used as facing |
One mistake I see a lot: someone buys reclaimed bricks because they look great, then discovers within two winters that they were originally interior wall bricks that never saw ground contact. They spall, absorb water, and crack. If you go the reclaimed route, look for units with a tight, smooth surface (not porous or sandy), and test a few by soaking them in water for 24 hours. If they flake or show surface crumbling, walk away.
Best brick options by use case
Not every part of your outdoor space has the same demands. A shaded seating area where two adults have morning coffee is a very different environment from a side path where the lawn tractor crosses twice a week, or a driveway apron where a car parks every night. Getting specific about use case will narrow your choice quickly.
Seating areas and low-traffic patios

This is where you have the most flexibility. Clay paving bricks in an SW grade are a great pick here because the aesthetic payoff is high and the traffic demands are low. Tumbled or antique-finish concrete pavers also work well and give a softer, more irregular look. Thickness can be standard 2-3/8 in. (60 mm) for concrete pavers. For clay, anything 1-1/2 in. or thicker in a true paving grade is fine for foot traffic only.
Walkways and moderate-traffic areas
For walkways that see daily foot traffic, including children, bikes, and occasional hand trucks, a concrete paver meeting ASTM C936 is the most reliable choice. The 8,000 psi compressive strength spec and sub-6% water absorption mean the units resist both impact and freeze-thaw damage year after year. Wet slip resistance matters here: look for a textured or lightly brushed surface finish that hits a wet coefficient of friction of at least 0.50 (as measured by ASTM C1028), which is the recognized threshold for safe walkway surfaces. Smooth-face bricks look beautiful but can become slick when wet or covered in algae.
Driveway-adjacent or high-load areas
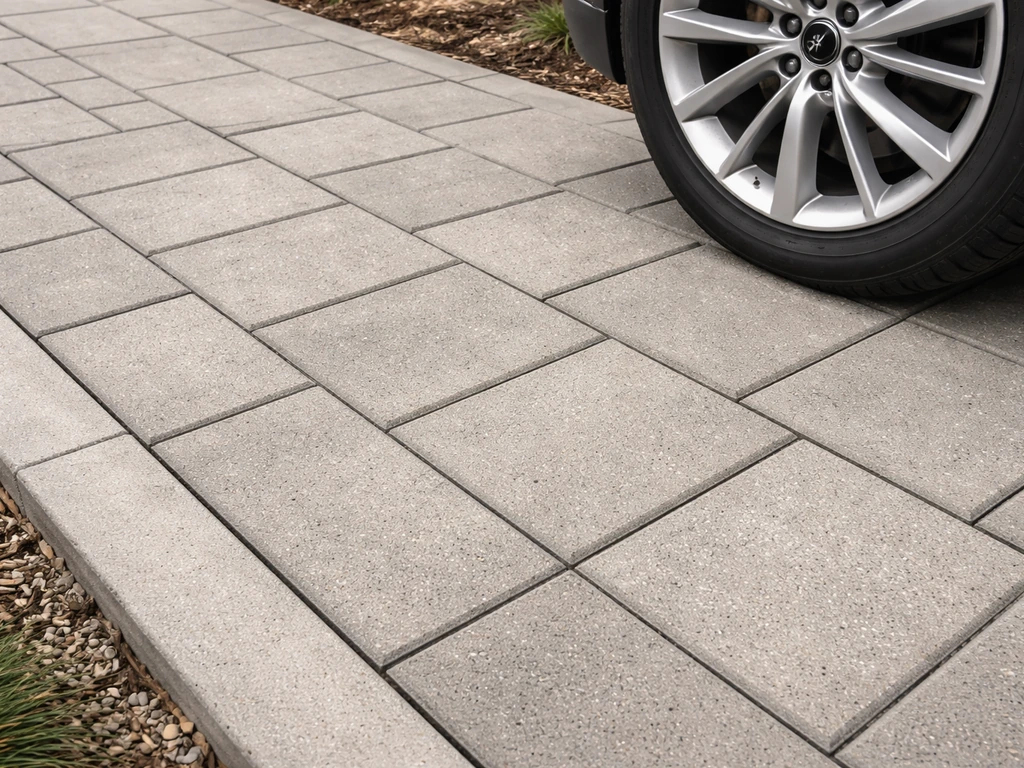
If a car will ever park on or near the surface, go thicker. Concrete pavers designed for vehicular traffic are typically 3-1/8 in. (80 mm) or 4 in. (100 mm) thick. The same ASTM C936 strength spec applies, but the added thickness distributes load across the base more effectively. Clay bricks are generally not recommended for vehicular areas unless they are purpose-made paving bricks with verified load ratings, because even dense clay can crack under point loads from tire contact. If your patio runs right up to a driveway apron, use the heavier concrete pavers throughout the transition zone rather than switching materials mid-surface.
How to assess durability: freeze-thaw, moisture, and staining resistance
Freeze-thaw damage is the number one failure mode for outdoor brickwork in cold climates. In FHWA’s durability report for segmental retaining wall blocks, specimens tested under ASTM C1262 are compared using plain water versus a 3 percent NaCl solution, with saline increasing damage during freeze-thaw cycling plain water versus 3 percent NaCl (saline) testing in ASTM C1262. Water gets into the brick or joint material, freezes, expands, and physically pries the surface apart. This is called spalling, and once it starts it accelerates fast. The key protective factors are compressive strength, water absorption rate, and the saturation coefficient of the brick.
- Compressive strength: Concrete pavers should meet the ASTM C936 minimum of 8,000 psi. Clay paving bricks should be graded SW (Severe Weathering) under ASTM C902.
- Water absorption: Look for 24-hour cold water absorption at or below 6% (ASTM C67 for clay, ASTM C140 or C936 for concrete). Lower absorption means less water trapped inside during a freeze.
- Freeze-thaw test results: Concrete pavers should be tested per ASTM C1262, evaluated in both water and 3% saline solution. Clay brick should show no detectable deterioration after 300 cycles per ASTM C666. Ask manufacturers for test data if it's not on the spec sheet.
- Efflorescence rating: Look for 'not effloresced' per ASTM C67 testing. Efflorescence (white mineral deposits on the surface) is not just cosmetic. It signals water migration through the material, which is a precursor to deeper moisture and freeze-thaw damage.
- Slip resistance: For any patio or walkway, aim for a wet coefficient of friction of 0.50 or higher per ASTM C1028. Textured, brushed, or tumbled finishes perform better than polished or smooth-face finishes in wet conditions.
On staining: concrete pavers are more porous by nature than dense-fired clay and tend to pick up oil, leaf tannins, and fertilizer stains more readily. If your patio is under a large tree or near a grill, consider a penetrating sealer applied after installation and renewed every two to three years. It does not change the surface appearance much but dramatically reduces how deeply stains can penetrate. More on that in the maintenance section below.
Brick size, thickness, and layout considerations
Brick sizing affects how the pattern lays out, how the joints align, and ultimately how stable and drainable your surface is. Standard U.S. paving brick dimensions are roughly 4 x 8 inches in plan view (with slight variation by manufacturer), but concrete pavers come in a much wider range: squares, rectangles, cobbles, and irregular shapes. Consistency within a batch matters more than the exact dimension, because mixed sizes create uneven joint widths that are hard to fill properly.
Thickness is not optional in cold climates. Concrete pavers should be at least 2-3/8 in. (60 mm) for pedestrian use and at least 3-1/8 in. (80 mm) for driveway-adjacent or vehicular loads. Thicker units also allow deeper joints, and deeper joints hold jointing sand more securely. ICPI guidance ties joint-width tolerances directly to paver thickness: for 3-1/8 in. and 4 in. thick pavers, typical acceptable joint width is 1/16 to 3/16 in. (2 to 5 mm), with no more than 10% of joints exceeding 5 mm.
Joint depth matters for polymeric sand performance too. Most polymeric sand products require a minimum joint depth of 1.5 inches (38 mm) to cure and bind properly. If your pavers are thin and your bedding layer is high, you may not have enough joint depth. Plan for this before you order materials.
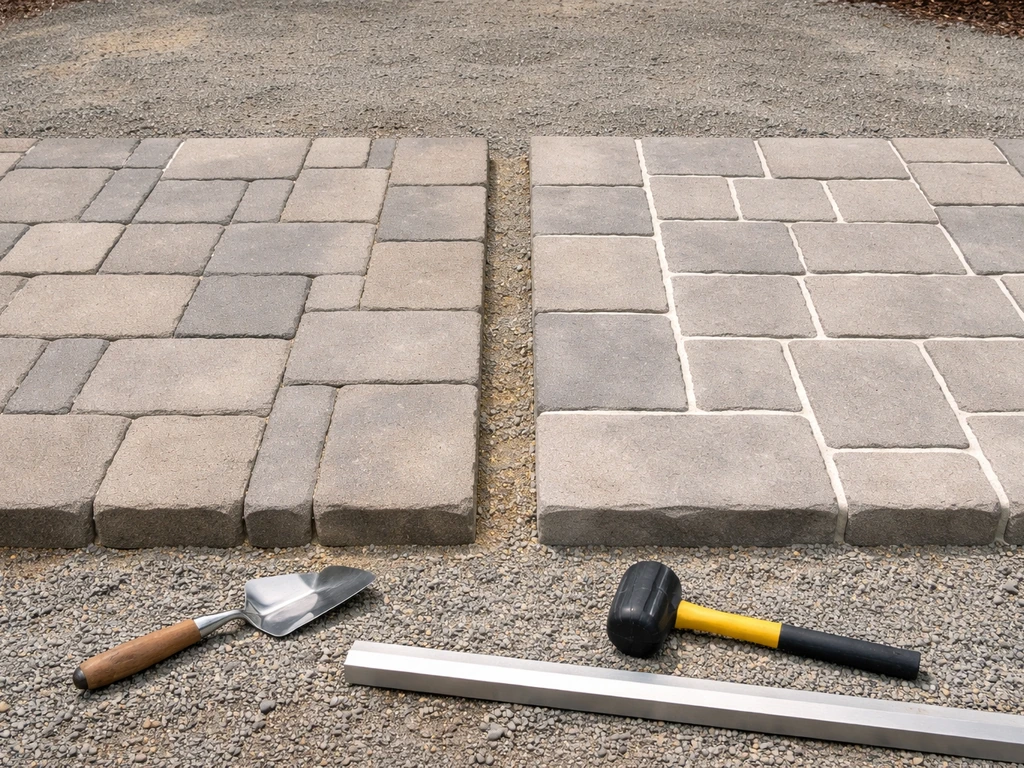
Layout pattern is connected to structural stability, not just looks. Running bond (offset rows like standard brickwork) and herringbone patterns interlock the units so they resist spreading under load. A simple grid or jack-on-jack pattern where all joints line up continuously is the weakest layout structurally and should be avoided on any surface that sees regular traffic.
If you want pattern ideas to match a specific aesthetic, exploring different brick patio layouts and brick patio examples can help narrow down what works visually and structurally for your space. If you are comparing the best brick pattern for patio results, focus on how the layout locks the units together and how it matches your traffic level brick patio layouts.
Adding an outdoor rug on top of your brick patio can soften the look and make the space more comfortable underfoot. Brick patio examples like pattern diagrams can also help you choose patio stone examples that fit your space and durability needs.
Installation overview: base prep, edging, mortar vs pavers, and leveling

The base is where most patio failures actually start. A beautiful surface laid on a bad base will heave, sink, and gap within a few seasons regardless of how good the bricks are. Do not shortcut this part.
Excavation and base layer
Excavate down to stable subgrade. For a typical residential pedestrian patio, that means removing 8 to 10 inches of material to leave room for a 4 to 6 inch compacted granular aggregate base, a 1 inch bedding sand layer, and the paver thickness itself. In areas with heavy clay soils, poor drainage, or freeze-thaw cycles, go to the deeper end of that range. Install compacted aggregate base material in lifts, not all at once: compact in 4 to 6 inch layers using a plate compactor until the surface is firm and no longer deflects visibly under your feet.
If your subgrade is sandy or silty and might allow the base material to migrate downward over time, lay a geotextile fabric between the subgrade and the base aggregate. This separation layer prevents contamination of the clean crushed stone without blocking drainage. It is especially useful along the perimeter where soil can migrate inward from the sides.
Bedding sand
Bedding sand goes on top of the compacted aggregate base at a nominal uncompacted depth of 1 inch (25 mm). Screed it flat and consistent. This is critical: bedding sand is not there to fix bumps in your base. If the base is uneven, those bumps will telegraph right through the sand layer to the finished surface. Use coarse concrete sand that conforms to ASTM C33 gradation. Do not use masonry sand (too fine, compacts poorly) and do not use limestone screenings or stone dust, which can inhibit lateral drainage and compact unevenly over time. Never lay bedding sand when it is frozen or saturated.
Edging
Edge restraints keep the perimeter bricks from spreading outward under load, which would open up joints and destabilize the whole surface. Use rigid plastic or metal edging spiked into the base aggregate, or pour a concrete edge beam if the patio meets a structure. Without proper edging, even a perfectly laid patio will drift over time. Set your edging before you screed the bedding sand so you have a fixed boundary to screed against.
Mortar-set vs dry-laid (paver) installation
You have two main installation methods. Dry-laid (paver-on-sand) is more forgiving, allows for easier repair, and accommodates natural frost movement better. Mortar-set brick on a concrete slab looks very tight and clean but is rigid: when the slab moves (and all slabs eventually move), mortar joints crack, and individual bricks can pop loose. In freeze-thaw climates, mortar-set installations require properly placed expansion joints and a well-drained slab underneath, or you will be repointing joints every few years. For most homeowner patios, dry-laid concrete pavers on a compacted base with polymeric sand joints are the more practical and durable long-term choice.
Leveling and jointing
Lay bricks on the screeded sand, tapping each unit level with a rubber mallet as you go. Check frequently with a long straightedge. Once all units are down, run a plate compactor over the surface (with a rubber pad protector) to seat the bricks into the sand. Then sweep jointing material into the joints.
Standard dry sand works for low-traffic areas; polymeric sand is better for higher-traffic surfaces because it binds together and resists washout. Follow the manufacturer's minimum joint width and depth requirements for the polymeric sand product you choose, and make sure the surface is fully dry before activating. Polymeric sand that cures on a damp surface can leave a residue or uneven color on the paver face for months.
Maintenance, sealing, and repair to keep it looking good
Routine cleaning
Regular sweeping and annual rinsing with a garden hose or low-pressure washer handles most dirt and organic buildup. Avoid high-pressure washing on brick patios, especially early in their life. High pressure forces water into pores and can actually drive salt deposits deeper into the material, making efflorescence worse rather than better. If you see white salt deposits (efflorescence) on the surface, start with dry brushing to remove loose crystals, then rinse with low-pressure water. For stubborn efflorescence, a pH-neutral masonry cleaner works well. Never use muriatic acid on brick or pavers: it permanently etches clay surfaces, dissolves mortar, and opens the material up to faster water intrusion and long-term deterioration.
Sealing: when it helps and when it does not
Sealing is not mandatory for all brick patios, but it is genuinely useful in specific situations: patios under trees (leaf tannins stain concrete pavers fast), near grills or cooking areas, or in climates with frequent rain and freeze-thaw exposure. Choose a penetrating silane/siloxane sealer rather than a film-forming acrylic sealer. Penetrating sealers allow the brick to breathe (critical for releasing moisture vapor) while reducing liquid water absorption. Film-forming sealers can trap moisture beneath the surface and actually accelerate spalling in freeze-thaw conditions. Allow new masonry to fully dry before sealing: a rough rule of thumb is one month of drying time per inch of material thickness. Reapply penetrating sealers every two to three years depending on traffic and weather exposure.
Joint maintenance
Joints are the most maintenance-intensive part of a brick patio. Check them annually after winter. Polymeric sand can erode in high-traffic areas or where surface water concentrates. If you see gaps deeper than about an inch, sweep in fresh jointing sand and recompact lightly. Do not let bare gaps persist through a wet season: without joint material, water channels directly to the bedding sand layer below and can undermine individual units.
Replacing damaged units
One of the biggest advantages of dry-laid paver installations over mortar-set brick is how easy individual unit replacement is. To replace a spalled or cracked brick, use two flat pry bars to lift the damaged unit out (working from a joint, not the brick face). Remove and level the bedding sand underneath, drop in a new matching unit, tamp it level, and refill the joints. Keep a small stash of matching bricks from your original order for this purpose: brick colors and textures change between production runs, and a unit from a new batch may not match the weathered patina of your existing surface.
Quick selection checklist before you buy
- Confirm the brick grade: SW-rated clay paving brick (ASTM C902) or concrete paver meeting ASTM C936 (8,000 psi, max 6% absorption).
- Check freeze-thaw test results: ASTM C1262 for concrete, ASTM C666 for clay. Ask the supplier if the spec sheet does not list results.
- Match thickness to use: 2-3/8 in. minimum for pedestrian areas, 3-1/8 in. or thicker for vehicular or driveway-adjacent loads.
- Choose a textured or brushed surface finish for walkways and steps to achieve a wet COF of 0.50 or higher.
- Plan your base depth: 4 to 6 inches of compacted aggregate base plus 1 inch bedding sand plus paver thickness.
- Order 5 to 10% extra units for cuts, breakage, and future repairs. Store a few extra after installation for color-matched replacements.
- Decide on jointing material: polymeric sand for higher traffic and better weed resistance; confirm minimum joint depth requirement matches your paver thickness.
- If sealing, choose a penetrating breathable sealer and wait for full drying before application.
FAQ
What is the best brick for a patio in a freeze-thaw climate, clay or concrete?
In cold regions, the safest default is a concrete paver that meets ASTM C936 because it combines high compressive strength with low water absorption. Clay can work well too, but only if you buy true paving brick with SW (Severe Weathering) rating and verified patio suitability, then ensure the base is well-drained and properly compacted to limit water in the system.
Can I use regular wall brick or facade brick on my patio if it looks like paving brick?
Avoid it. Wall or veneer brick is often made for an above-grade, not-ground-contact environment, so its density, absorption behavior, and strength are not designed to take impact and freeze-thaw stress. Even if it survives one season, it commonly spalls once moisture cycles begin, especially where water can reach the joints from below or from the surface.
How do I tell whether reclaimed bricks are actually suitable for outdoor patio use?
Look beyond appearance. Choose reclaimed units with a smooth, tight surface (not sandy or porous), and soak test a few for 24 hours. If you see surface crumbling, flaking, or noticeable breakdown after soaking, do not use them for patio paving, because those failure signs indicate poor durability and higher water uptake.
What minimum thickness should I buy for a patio versus a driveway-adjacent area?
For typical pedestrian patios, choose at least 2-3/8 in. (60 mm). For areas where a car parks nearby or the surface experiences vehicular loads, go to 3-1/8 in. (80 mm) or 4 in. (100 mm). Thicker pavers also support deeper joints, which helps jointing materials stay in place.
Is polymeric sand required for every brick patio?
No, but it is a strong choice when traffic is higher or when joint washout is a concern. Standard dry sand can work for low-traffic areas, while polymeric sand resists erosion better and helps lock the surface. If you use polymeric sand, confirm the product’s minimum joint depth requirement so it can cure correctly.
How can I avoid a “wavy” patio surface after installation?
Make the base correct first, then screed bedding sand flat. If the compacted aggregate base has high and low spots, those irregularities will telegraph through the 1-inch bedding layer. Also keep bedding sand consistent, since it is not meant to correct base defects.
Why do some mortar-set patios crack or bricks pop loose?
Mortar-set brick over a slab is rigid, and slabs move over time. When the slab shifts, mortar joints can crack and individual bricks can loosen. If you choose mortar-set in freeze-thaw regions, you must use proper expansion joints and a well-drained slab, otherwise maintenance (repointing and reset work) becomes recurring.
What is the safest way to address efflorescence on pavers?
Start with dry brushing to remove loose white crystals, then rinse with low-pressure water. If it persists, use a pH-neutral masonry cleaner. Avoid muriatic acid, because it etches surfaces, can damage mortar, and increases future water intrusion and deterioration.
Do I need to seal my brick patio, and what type of sealer should I choose?
Sealing is situation-dependent. It is most useful for patios under trees (leaf tannins), near grills (oil staining), and in climates with frequent rain and freeze-thaw exposure. Use a penetrating silane/siloxane sealer (breathable) rather than a film-forming acrylic, and only seal after the masonry has fully dried.
How should I choose joint widths for the pavers I buy?
Joint widths are tied to both paver thickness and the jointing material. For example, with thicker pavers (like 3-1/8 in. and 4 in.), acceptable joint widths are typically in a narrow range (often around 1/16 to 3/16 in.), and only a small portion should exceed the upper limit. Use the manufacturer’s guidance for polymeric sand and do not assume wider joints are always better.
What’s the quickest way to repair a single spalled or cracked brick?
Plan for unit replacement during the design stage. Keep a small stash of matching bricks from your original order, because production runs can vary and the weathered color match may not be exact. For repair, lift the damaged brick from the joint, remove and level bedding sand underneath, set the new unit, tamp it level, and refill and clean the jointing material.