The best resin grout for most patios is a two-part epoxy or resin-based jointing compound: it absorbs zero water, resists freeze-thaw cracking, shrugs off stains, and outlasts cement-based grout by years in outdoor conditions. For tiled or porcelain surfaces with narrow joints (2–10 mm), a 100% solids epoxy grout like Bostik EzPoxy EzClean or SikaTile-825 is the top choice.
Best Patio Grout Resin: Buyer Guide and How-To Install

Nolan Ellison
14 Jun 2026
For natural stone, flagstone, or block paving with wider joints (up to 25 mm or more), a polymer-based jointing compound like EASYJoint or EASYJoint PRO from Azpects hits the sweet spot of flexibility, ease of application, and weather resistance. The right pick depends on your surface, joint width, climate, and how hands-on you want to get, and this guide walks through all of it.
If you are deciding between brands, this Sika patio grout review can help you compare real-world performance, finish, and ease of cleaning. Sika’s product SikaCeram® RSG 705 is stated by the manufacturer to comply with ANSI 118.3 and EN 13888 (class RG), and its tile-setting adhesive side meets ANSI 118.3 / EN 12004 class R2T (source) SikaCeram RSG 705 (Sika) – Resin tile grout / adhesive-grout compliance.
What resin grout actually is (and why it matters outside)
Traditional cement grout is porous. Water gets in, freezes, expands, and over a few winters you end up with crumbling, cracked joints that let weeds through and undermine the bed underneath. Resin-based grout solves that problem at the chemistry level. Instead of a cementitious binder, it uses a polymer or epoxy resin system, either a one-part polymer-modified mortar or a two-part mix where a resin base and a chemical activator combine to form a hard, near-impermeable joint.
For patios specifically, that impermeability is the headline feature. A 100% solids epoxy grout like Bostik EzPoxy EzClean has a documented water absorption rate of 0%. Compare that to standard sanded cement grout, which can absorb 5–10% water by weight, and you understand why the joints fail first in a wet or cold climate. Beyond water resistance, resin grouts resist oil, moss, algae, and most cleaning chemicals, which matters a lot on a patio that sees barbecue grease, leaf tannins, and general outdoor grime.
There are two broad families you'll encounter: full epoxy grout systems (100% solids, two-part, no water in the mix) and polymer-modified jointing compounds (resin-enhanced, often single-bag or pre-bagged, applied damp). Products like EASYJoint PRO from Azpects fall into a third sub-category: a two-part epoxy jointing compound specifically engineered for wider paving joints, using an oxygen-curing mechanism rather than a water-activation cure. Knowing which family a product belongs to tells you immediately what joints it suits, how tricky installation is, and what temperature windows you have to work in.
How to choose the best resin grout for your patio
"Best" is meaningless without context. A product that's perfect for a porcelain tile terrace in a mild climate is completely wrong for a limestone flagstone patio in a freeze-prone northern region. Here are the criteria that actually matter, in order of importance.
The criteria that separate good from great
- Water absorption: Aim for 0% or as close as possible. Any resin grout worth using outdoors should be at or near zero. This is the single biggest differentiator from cement grout.
- Freeze-thaw resistance: Look for products that explicitly pass freeze-thaw cycle testing or meet EN 13888 class RG (Reaction Grout) — that classification confirms the product has passed chemical and mechanical resistance standards.
- Joint width compatibility: This is non-negotiable. Epoxy tile grouts typically work in joints from 1/16 inch (1.5 mm) up to about 1/2 inch (12 mm). Paving jointing compounds like EASYJoint work in much wider joints — sometimes 3–25 mm or more.
- Installation temperature range: Most resin grouts have a defined working window. Bostik EzPoxy EzClean specifies 50°F to 90°F (10°C to 32.2°C). Bostik TruColor with EzClean extends that to 40°F–100°F (4°C–38°C). Working outside these limits will ruin the cure.
- Pot life: Two-part epoxy systems set up fast. EzPoxy EzClean has a pot life of 45 minutes at 70°F (21°C). Hotter conditions shrink that window. You need to know this before you start mixing.
- Stain and chemical resistance: True epoxy systems (100% solids) resist almost everything. Polymer-modified systems are good but not equivalent. If you're grouting around a kitchen outdoor area or around a pool, go full epoxy.
- Traffic and cure timeline: Bostik TruColor is ready for light foot traffic in 24 hours and heavy traffic in 3 days. Water exposure should wait at least 3 days at temperatures above 70°F and humidity below 50% RH.
- Ease of application and cleanup: 100% solids epoxy grout is notoriously hard to clean off tile faces if it sets — products with built-in cleanup technology (like Bostik's EzClean formulation) are meaningfully easier to work with on large patio areas.
A quick comparison of the main product types
| Product / Type | Best For | Joint Width | Water Absorption | Install Temp Range | Relative Difficulty |
|---|---|---|---|---|---|
| Bostik EzPoxy EzClean (100% solids epoxy) | Porcelain, ceramic, dense tile patios | 1.5–12 mm | 0% | 50°F–90°F (10°C–32.2°C) | Moderate — fast pot life, EzClean helps |
| Bostik TruColor with EzClean (polymer-modified epoxy hybrid) | Natural stone, mixed tile, interior/exterior | 1.5–12 mm | Very low | 40°F–100°F (4°C–38°C) | Moderate — wider temp window, easier cleanup |
| SikaTile-825 (100% solids epoxy) | Moisture-sensitive substrates, resin-backed tile | 1.5–12 mm | 0% | Per TDS (typically 50°F–90°F) | Moderate to hard |
| SikaCeram RSG 705 (resin grout, ANSI 118.3 / EN 13888 class RG) | Tile, porcelain, stone — where standards compliance matters | 2–15 mm | Very low | Per TDS | Moderate |
| EASYJoint PRO (two-part epoxy paving compound) | Flagstone, block paving, wide-joint natural stone | 3–25+ mm | Near zero (water resistant) | Per product guidance — temperature sensitive | Easy to moderate — but strict mixing rules apply |
| EASYJoint (polymer jointing compound) | All paving types, wide joints, general outdoor use | 3–25+ mm | Low (water tolerant) | Standard outdoor temps | Easy — most beginner-friendly option |
If you're comparing products more closely, the brand-specific review content on EASYJoint, Bostik, and Sika patio grouts goes deeper on real-world performance, but the table above gives you the decision frame. For a quick sanity check before you commit, look up patio pointing resin reviews to compare real-world performance, cleanup results, and longevity.
Matching your grout to your patio surface and joint width
This is where most people go wrong. They pick a grout they've heard of without checking whether it's physically compatible with their joint size and surface type. Here's how to match them properly.
Porcelain tile patios
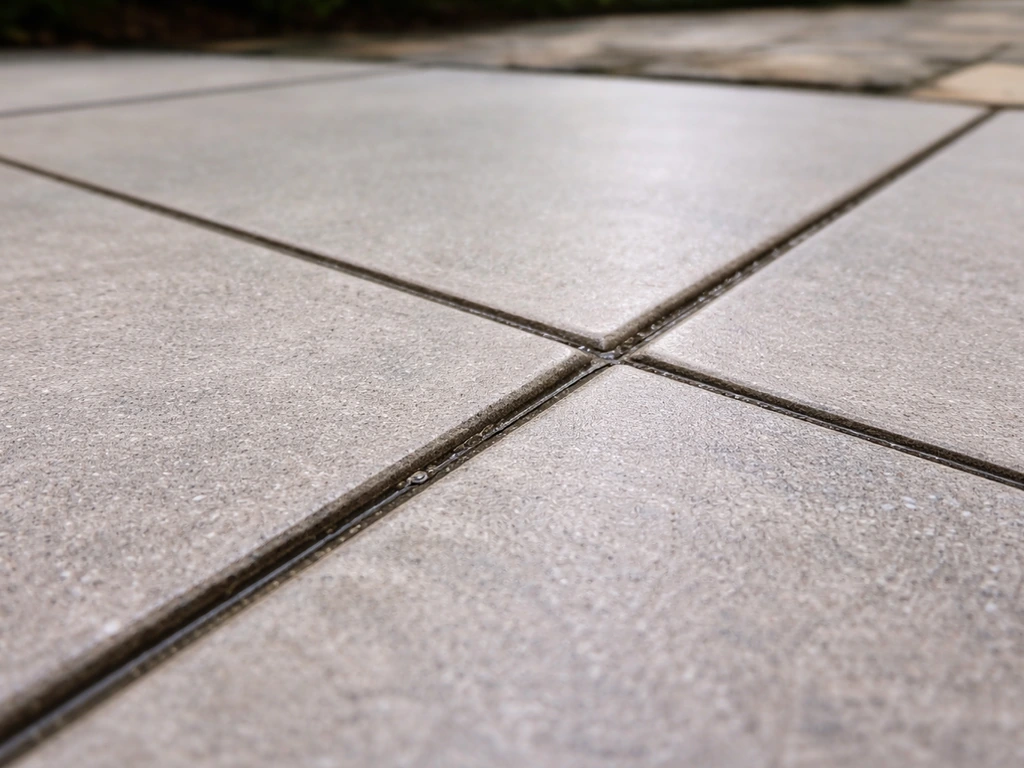
Porcelain is the most demanding surface for grout because the tile itself is nearly impermeable, so any moisture trapped in the joint has nowhere to go, it just cycles through freeze-thaw stress in the joint itself. A 100% solids epoxy like EzPoxy EzClean or SikaTile-825 is the right call here. Joint widths on porcelain are typically 3–10 mm. The EzClean technology matters on porcelain because the surface is easy to see haze on, it shows up badly on large-format grey or charcoal tiles, which are extremely popular for contemporary patios right now.
Natural stone and flagstone
Limestone, sandstone, slate, and granite flagstones usually have irregular joints ranging from 5 mm to 25 mm or more. Full epoxy tile grout won't fill those joints effectively and can also react badly with some porous stones (etching or staining the face). For flagstone, EASYJoint PRO is one of the most practical solutions available, it's a two-part epoxy compound designed specifically for this use case. For softer, more porous stones, test any resin product on a hidden section first, as the activator chemistry can occasionally mark sensitive materials.
Brick and block paving
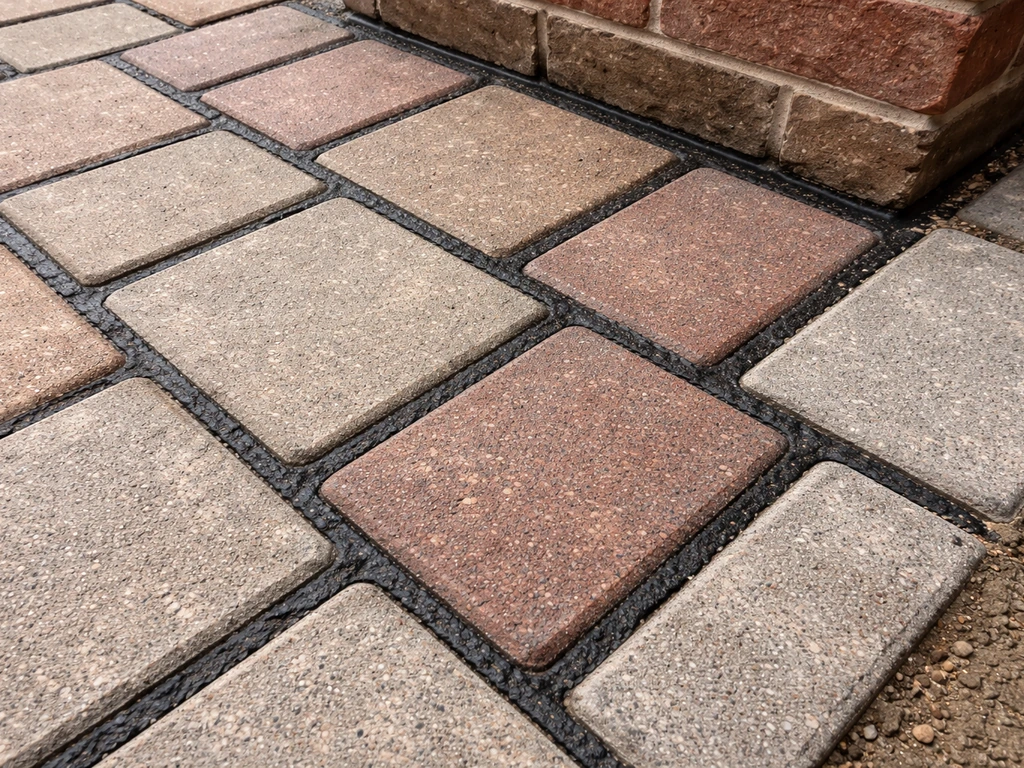
Brick and concrete block patios have wide joints, often 8–20 mm, and high foot and vehicle traffic. Polymer jointing compounds and two-part epoxy paving compounds both work well here. EASYJoint (the standard version, not PRO) is marketed for all paving types and is the most beginner-friendly option if this is your first time grouting a patio. For a more durable, stain-resistant result in a high-traffic area, step up to EASYJoint PRO or a comparable two-part epoxy compound. If you are specifically looking for honest easyjoint patio grout reviews, compare what people report about mix consistency, haze removal, and cure reliability.
Joint width reference guide
| Joint Width | Surface Type | Recommended Grout Type |
|---|---|---|
| 1.5–5 mm | Porcelain tile, ceramic tile | 100% solids epoxy tile grout (EzPoxy, SikaTile-825) |
| 5–12 mm | Natural stone tile, larger format porcelain | 100% solids epoxy grout or resin grout (SikaCeram RSG 705, TruColor) |
| 8–20 mm | Brick, block paving, irregular flagstone | Epoxy jointing compound (EASYJoint PRO) or polymer jointing compound (EASYJoint) |
| 20–40 mm | Reclaimed stone, cobbles, very irregular paving | Wide-joint epoxy compound or dry-brush kiln-dried sand + sealer (not resin grout) |
How to prep and install resin grout on your patio (step by step)
I'll be honest: the prep work determines 80% of your result. Resin grouts are less forgiving than cement grout when it comes to contaminated joints, wet surfaces, or incorrect mixing. Get the prep right and the installation is actually straightforward.
Step 1: Surface and joint preparation
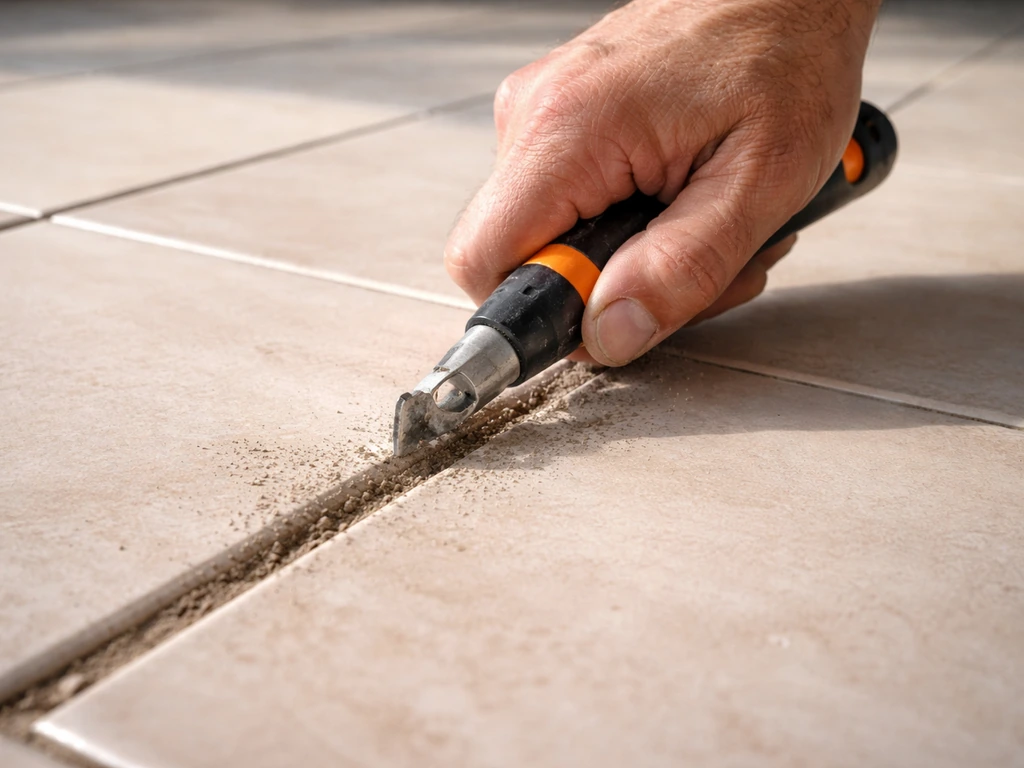
- Clear all existing joint material to a depth of at least 15–20 mm. Use a grout rake, oscillating tool, or angle grinder with a grout removal disc. Loose, crumbly old grout left in the joint will undermine the new material.
- Brush and vacuum out all debris, dust, and loose particles from the joints. Compressed air works well here.
- Check for moisture in the joints. Resin grouts generally need a dry or surface-dry substrate. If you've had rain recently, wait at least 24–48 hours (or longer in cold weather) before proceeding.
- Clean the patio surface of any oil, algae, moss, or chemical residue. A patio cleaner or diluted acid wash (appropriate to your stone type) followed by a thorough rinse and dry is standard practice.
- For epoxy tile grouts on porous stone surfaces, apply a grout release or sealer to the tile face before grouting. This prevents the epoxy from bonding to the stone face, making cleanup far easier.
Step 2: Mixing the resin grout
Two-part systems require precise mixing. With EASYJoint PRO, the instruction is to mix for a maximum of 6 minutes until the compound reaches a creamy, consistent texture. Under-mixing leaves unmixed activator pockets that won't cure properly. Over-mixing can introduce air and affect the final set. Use a slow-speed drill with a paddle mixer, not manual stirring, you won't get consistent results by hand on a two-part epoxy compound.
For 100% solids epoxy grouts like EzPoxy EzClean, the pot life at 70°F (21°C) is 45 minutes. Mix only what you can place and finish in that window. On a hot summer day (say 85°F / 29°C), that window shrinks significantly, mix smaller batches and keep the unmixed components in the shade or a cool box until needed.
Step 3: Application
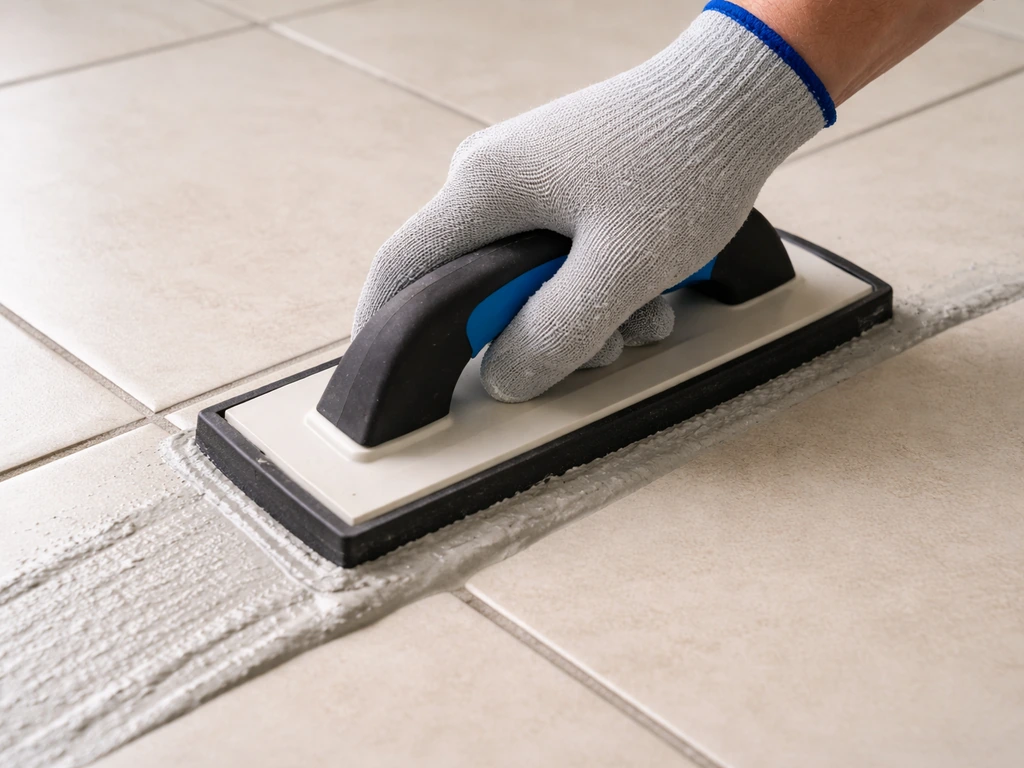
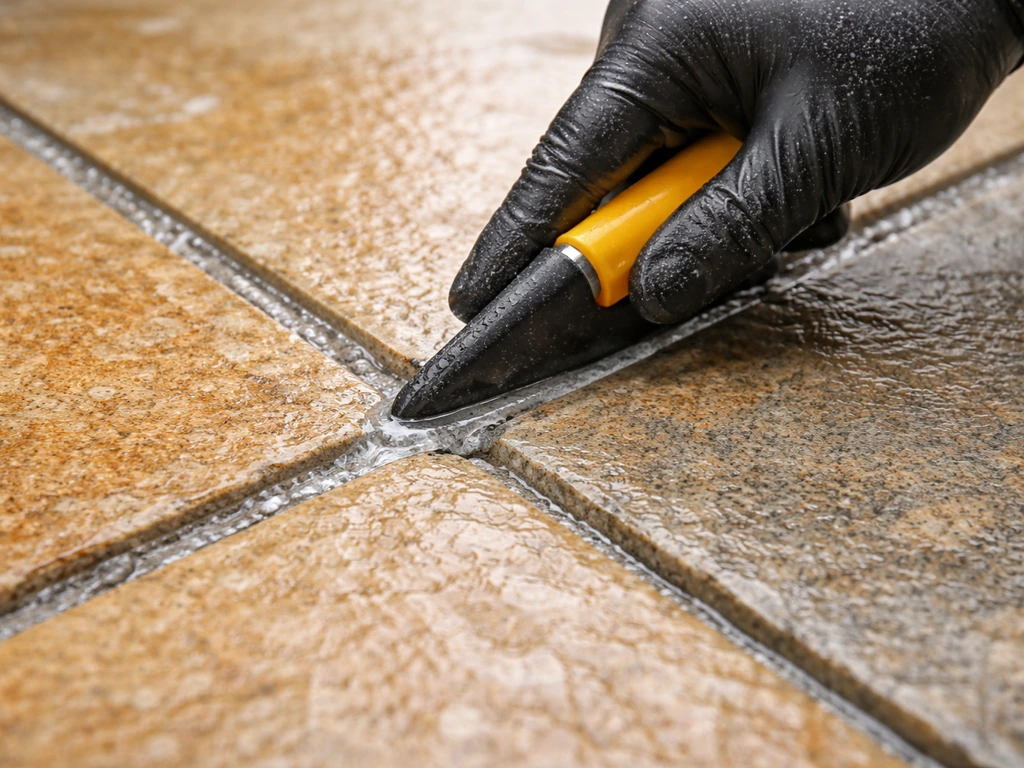
- For epoxy tile grout: apply with a rubber float at a 45-degree angle to the joints, working diagonally across the tile surface to pack the joints fully. Remove excess from the tile face as you go.
- For paving jointing compounds (EASYJoint style): pour or brush the compound across the paving surface and work it into the joints using a soft brush, broom, or plate compactor (on block paving). Work in manageable sections.
- Do not flood the surface with water during installation of epoxy paving compounds — this is a specific warning from Azpects for EASYJoint PRO. Excess water can cause a sticky surface residue, affect setting time, and reduce final strength.
- Tool the joints to a slightly recessed finish (2–3 mm below the surface face) using a jointing tool or the edge of the float. This helps channel water away and reduces the risk of surface edge chipping.
Step 4: Cleaning the surface
This is the step that catches people out with epoxy grout. You have a limited window to clean the epoxy film off the tile or stone face before it hardens into a haze that's very difficult to remove. With products featuring EzClean technology (Bostik TruColor, EzPoxy), the film is designed to lift more easily with a damp sponge in the initial cleanup window. Work in small sections, rinse your sponge frequently, and change the cleaning water often. If haze remains after initial cleanup and the grout has begun to firm up, Bostik's documentation recommends using Blaze Urethane as a dedicated haze-removal product rather than risking mechanical abrasion on the tile surface.
Curing, temperature, and weather, what you actually need to know
Resin grout curing is chemistry, not just drying. Temperature and humidity directly control how fast and how well the reaction completes. This is the section most DIY guides gloss over, and it's the reason a lot of patio re-grouting jobs fail in the first season.
Temperature windows during installation
Stick within the product's stated installation temperature range, no exceptions. Bostik EzPoxy EzClean specifies 50°F to 90°F (10°C to 32. 2°C). Bostik TruColor with EzClean gives you a slightly wider window: 40°F to 100°F (4°C to 38°C).
Bostik’s TruColor with EzClean Technology TDS also specifies a 40°F, 100°F (4°C, 38°C) installation temperature range and notes readiness for light foot traffic in 24 hours, with cure time before intermittent water exposure of 3 days at >70°F/21°C and <50% RH 40°F to 100°F (4°C to 38°C).
Azpects warns explicitly that temperatures outside the product's limits can damage the resin product, not just slow it down, actually damage it. If you're working in early spring or late autumn, monitor the overnight low as well as the daytime high, because a cold night immediately after installation can compromise a product that was applied in acceptable daytime conditions.
Cure time before traffic and water exposure
Bostik TruColor's TDS gives you the clearest reference points for planning: light foot traffic is safe at 24 hours, heavy foot traffic at 3 days, and intermittent water exposure should wait 3 days at temperatures above 70°F (21°C) with relative humidity below 50%. These figures assume ideal conditions. In cooler or more humid weather, add time. I'd always recommend erring on the side of a longer cure before exposing outdoor joints to rain, one overnight downpour on a 12-hour cure can undo a lot of work.
Freeze-thaw performance after curing
Once a true epoxy resin grout is fully cured, its freeze-thaw performance is excellent because it contains no water to absorb and expand. This is the fundamental advantage over cement grout in cold climates. However, the grout must be fully cured before the first freeze, a partially cured joint that gets hit by a hard frost can crack or delaminate. If you're installing in autumn, make sure you have enough warm days left in the forecast to reach full cure before overnight temperatures drop below freezing consistently.
Hot and dry climates
In hot conditions, your enemy is the pot life clock. At 90°F (32°C) or above, two-part epoxy systems set up much faster than the 45-minute figure quoted at 70°F. Mix smaller batches, keep materials in shade, and consider working in the early morning when temperatures are lower. In very high heat, some polymer jointing compounds can also cure unevenly if the surface is too hot, wet the surface lightly first to bring the temperature down, then allow it to dry to surface-dry before application.
Keeping resin-grouted joints looking good long-term
One of the genuine selling points of resin grout is reduced maintenance compared to cement grout. But "low maintenance" doesn't mean "no maintenance." Here's what the ongoing care actually looks like.
Regular cleaning
For routine cleaning, a stiff brush and warm soapy water is usually all you need. Fully cured epoxy grout resists most common patio contaminants: oil, food, algae, and leaf stains. Avoid using bleach-based cleaners on coloured resin grouts, they can fade pigment over time. For stubborn algae or moss, a diluted patio cleaner or a purpose-made biological cleaner applied with a brush is a better choice than pressure washing at high pressure, which can erode joint edges on some paving compounds over time.
Sealing, do you need it?
True 100% solids epoxy grout does not need sealing, it's inherently non-porous. Polymer-modified jointing compounds, particularly the water-tolerant versions like standard EASYJoint, benefit from a joint sealer applied 28 days after installation, once fully cured. This adds a layer of UV and stain protection and extends the compound's effective life. Check the manufacturer's guidance for your specific product: some resin grout systems are designed to accept a compatible sealer, while others are not formulated for topical sealing and won't bond correctly.
When to re-grout
A well-installed epoxy resin grout on a patio should last 15–25 years in typical residential use. If you want to see how different products perform in real patios, resin patio grout reviews can help you compare results, haze behavior, and long-term durability. Warning signs that you need to act are: joints that have become soft or spongy (the resin has degraded or never cured correctly), visible cracking through the joint body (not just surface crazing), joints that are pulling away from the edge of the paving unit, or persistent weed growth through the joints (meaning the joint has failed to the base). Surface discolouration alone is not usually a reason to re-grout, clean the joints first.
Mistakes, troubleshooting, and when you've got a real problem
The most common mistakes
- Using tile epoxy grout in paving joints that are too wide: the material slumps, doesn't bond to both sides of the joint, and fails within a season. Always check joint width compatibility before buying.
- Applying in wet conditions or over damp joints: resin systems are far less tolerant of moisture in the substrate than cement grout. A surface that looks dry can still be wet 5–10 mm down.
- Flooding with water during installation of epoxy jointing compounds: specifically flagged by Azpects for EASYJoint PRO — it can create a sticky residue on the surface and reduce final strength.
- Missing the cleaning window on epoxy tile grout: once epoxy haze sets, it's a serious problem to remove without risking damage to the tile face. Work in small sections and clean as you go.
- Grouting in temperatures outside the product's specified range: this is the number one cause of resin grout failures that look like product defects but are actually application errors.
- Not mixing two-part systems thoroughly or for long enough: undermixed epoxy leaves weak, uncured pockets in the joints. Follow the mixing time exactly — for EASYJoint PRO, that's up to 6 minutes with a mechanical mixer.
- Exposing newly grouted joints to foot traffic or rain too early: even if the surface looks set, the cure hasn't completed. Wait the full recommended time.
Troubleshooting specific problems
| Problem | Likely Cause | Fix |
|---|---|---|
| Sticky surface residue on joints | Water flooded during installation (epoxy compounds) or installed in high humidity | Allow extended cure time; lightly scrub with warm water and a stiff brush once fully cured |
| Epoxy haze on tile face | Cleanup delayed past the working window | Use a purpose-made epoxy haze remover (e.g., Bostik Blaze Urethane); do not use abrasive pads on polished tile |
| Joints crumbling within first season | Installed in wrong temperature range, or moisture in joints at time of application | Remove and re-do; prep joints more carefully and check weather forecast before starting |
| Colour inconsistency across joints | Mixing ratio off, or batches mixed differently | Consistent mechanical mixing and same ratio per batch prevents this; no fix once cured except re-grouting |
| Weeds growing through joints | Joint hasn't fully filled or has cracked to the base | Remove weeds, clear joint, and re-apply — also check if the sub-base has moved |
| Joints pulling away from paving edge | Paving movement, thermal expansion, or adhesion failure due to dirty joint faces | Re-point affected areas; on large-scale movement, the base may need investigation |
When to call a professional
If more than 20–25% of your joints have failed, if you're seeing the paving units themselves rocking or shifting, or if water is pooling in areas it didn't before, the problem is likely in the base layer rather than the grout. Re-grouting over a failing sub-base is wasted money. Get a professional to assess the base before committing to a full re-point with premium resin grout.
Your quick-reference checklist before buying
- Measure your joint width — this determines which product family you can even use.
- Identify your paving material (porcelain tile, natural stone, brick, block) and check for any surface sensitivity to chemical activators.
- Check your climate: if you get hard frosts, prioritise a fully cured 0% water absorption product and plan installation timing to allow full cure before first freeze.
- Note your local temperature forecast for the installation window and confirm it falls within the product's stated range (for example, 50°F–90°F for EzPoxy EzClean, or 40°F–100°F for TruColor with EzClean).
- Decide on DIY skill level: if you're a first-timer, a polymer jointing compound (like standard EASYJoint) is more forgiving than a 100% solids two-part epoxy tile grout.
- Factor in cleanup: on large tiled areas, products with built-in EzClean technology or equivalent are worth the premium — epoxy haze removal on a full patio without cleanup-aid chemistry is a painful experience.
- Buy enough product to complete the job in one session — colour consistency across batches isn't guaranteed if you add a second lot from a different production run.
- Read the TDS (Technical Data Sheet) for your chosen product before you start: pot life, mixing ratios, temperature range, and cure windows are all in there.
FAQ
Can I use the same best patio grout resin for every patio surface (porcelain, flagstone, brick)?
No, resin grout systems are formulated around joint width and surface porosity. Porcelain typically needs a 100% solids epoxy to prevent trapped moisture from cycling through freeze thaw, while wider and irregular paving joints often require a resin jointing compound built for flexible filling. If you are unsure, measure several joints across the patio, because the “worst” sections (widest gaps or most irregular stone edges) usually determine the correct resin type and success.
Is it safe to apply resin grout over existing old grout lines?
Usually not. Resin grout performance depends on bonding to clean, sound joint walls. If the old joint material is crumbling, contaminated with algae residue, or has been previously sealed, the new resin may fail to cure properly or can delaminate. Remove loose old material first, then verify the joint is dry and free of dust, curing inhibitors, and polymer film before mixing.
How do I know my joint is actually dry enough for epoxy or polymer resin grout?
A simple rule is to avoid application after rain or when the paving is still holding moisture, but also check for trapped moisture in sheltered areas (under overhangs, near walls, and in low spots). If you can press a dry cloth into the joint and it comes away damp, wait. Resin grout is far less forgiving than cement when it comes to moisture and contaminated joint walls, because it can interfere with the resin chemistry and adhesion.
What happens if I mix epoxy grout slightly wrong, for example too much activator or too long?
Two-part epoxy systems rely on correct stoichiometry and mixing time, under-mixing can leave unmixed activator pockets that never cure in those areas, and over-mixing can increase air and change flow, which can lead to uneven filling and weaker cured edges. Follow the stated maximum mix time for your specific product, and mix with a paddle on a slow-speed drill to keep proportions consistent.
How thick should the grout be in the joint, can I overfill and “squeegee flat”?
For resin grouts, overfilling is generally not the goal. Aim to pack the joint fully without leaving a heavy ridge that you must later scrape and clean aggressively, because cleaning haze is hardest near the end of the pot life. Make sure you can achieve full joint contact to the sidewalls, then strike it to the recommended profile so the film cleanup remains manageable.
My porcelain tile shows haze after cleanup, should I scrape it off mechanically?
Avoid aggressive abrasion, especially on porcelain where thin edges and surface coatings can be damaged. If haze remains after the initial cleanup window, use a dedicated haze remover recommended for your system rather than sanding, steel wool, or pressure washing. Mechanical removal often makes things worse by scratching the surface and creating spots that look permanently dull.
Do resin grout products need sealing, and is there a “one sealer fits all” rule?
Not all resin grouts behave the same. True 100% solids epoxy grout is typically non-porous and usually does not require sealing, while polymer-modified jointing compounds often benefit from a compatible sealer after full cure (for example, around 28 days for some systems). Don’t seal with any random patio sealer, some resins are not formulated to bond with topical sealers and can cause peeling or uneven sheen.
How long should I wait before walking on the patio or getting it wet?
Use the product’s temperature-based cure guidance, because rain exposure and foot traffic timing change a lot with weather. The article notes examples where light foot traffic can be safe at 24 hours and heavy traffic at 3 days, with intermittent water exposure typically waiting 3 days above 70°F (21°C). If conditions are cooler or more humid, extend the timeline rather than relying on the minimum values.
What if it gets cold at night soon after installation?
Cold nights right after grouting can compromise cure even if daytime temps were within spec. Track overnight lows, and if frost is likely before full cure, postpone outdoor exposure or delay the install. A partially cured joint hit by a hard frost can crack or delaminate, which may later show up as soft joints or widening gaps.
Can I apply resin grout in very hot weather, and how do I prevent it from setting too fast?
Heat shortens pot life and accelerates cure, so plan smaller batches and work in cooler hours (early morning is often best). Keep resin components in shade or a cool box until mixing. For hot surfaces, some polymer systems may require pre-cooling steps like lightly wetting and then allowing to dry to surface-dry before application, but follow the product instructions to avoid uneven curing.
How do I troubleshoot failure, when is it the grout versus the base layer?
Look beyond the joint surface. Resin grout failure often shows as joints turning soft or spongy, curing issues, cracking through the joint body, or persistent weed growth indicating the joint did not properly isolate the substrate. If a large portion of joints have failed, paving units are rocking or shifting, or water pools where it previously did not, the base layer or drainage is likely the problem, and re-grouting alone usually wastes money.
What are early warning signs that I should stop and fix the job immediately?
Act quickly if you notice incomplete filling, visible uncured spots soon after cleanup, joints that smear or erode when lightly brushed days later, or repeated haze problems that you cannot remove with gentle methods. Early issues are usually fixable by adjusting cleaning windows, mixing technique, and prep, while late-stage failures after full cure often require partial or full removal and re-pointing.