For most patios with joints between 5 mm and 50 mm wide and at least 20 mm deep, a polymeric resin jointing compound is the right call. It suppresses weeds, handles freeze-thaw cycles better than sand-cement, and won't leave the grey staining that wet mortar does on natural stone. The catch is that product choice matters a lot: the wrong resin for your joint width, substrate, or climate is the single biggest reason these products fail. This guide cuts through the marketing so you can pick the right one, apply it properly, and avoid the classic mistakes.
Patio Pointing Resin Reviews: Best Options and How to Apply

Nolan Ellison
2 May 2026
What patio pointing resin actually is (and what it's doing in your joints)
Patio pointing resin is a binder-based jointing material used to fill the gaps between paving units: flagstone, porcelain tiles, brick, natural stone, or concrete slabs. It's not the same as the mortar bed your slabs sit on. The resin addresses the joints only, while the slabs themselves typically still sit on a cement-based bed underneath.
There are two main formats. Two-component resin grouts (like epoxy-based products) come as a resin and hardener, both pre-blended into sand, and you combine them on site. One-part polymeric compounds (like Sika FastFix or Bostik All Weather) are pre-mixed and ready to brush in. Polymeric products use a polymer binder that glues the sand grains together inside the joint, setting either on air contact or through moisture reaction depending on the formulation. Epoxy versions cure through a chemical reaction between resin and hardener and tend to be harder and more chemically resistant once set.
Both beat traditional sand-cement pointing on one key metric: staining. Wet cement grout smeared across Indian sandstone or porcelain can leave permanent marks. Resin products are designed to be brushed or squeegeed in dry (or near-dry), dramatically reducing surface contamination risk. The trade-off is that they're more sensitive to application conditions, especially temperature and moisture, and less forgiving if you rush.
What to look for when reading patio pointing resin reviews
When you're scanning reviews, most negative experiences trace back to a handful of specific failures: washing out, haze, cracking, or weeds returning. If you have ever looked up resin patio grout reviews, focus on whether each review describes rain resistance, haze, cracking, and weed return rather than only the brand name. Here's what to actually evaluate before you buy. If you want a quick starting point, this Sika patio grout review approach helps you compare what matters for real-world joints, not just packaging claims patio pointing resin reviews. When you read best patio grout reviews, focus on how each resin handles staining, rain exposure, and joint size.
| Property | Why It Matters | What to Look For |
|---|---|---|
| UV resistance | Prevents colour fade and surface chalking in exposed patios | Explicit UV-stable claim or polyurethane/epoxy chemistry |
| Flexibility | Allows micro-movement without cracking in freeze-thaw climates | Described as 'flexible once cured' or polyurethane-based |
| Water behaviour | Permeable (draining) vs sealed; affects drainage compliance | Whether product allows water to permeate or seals the joint |
| Weed suppression | Determines whether you'll be pulling weeds again in a year | Solid set joint, not just compacted sand |
| Cure/set time | Affects how quickly rain can ruin fresh joints | Walk-on time and full cure time at 20°C; temperature caveats |
| Minimum joint geometry | Wrong width/depth = cracking or incomplete fill | Stated minimum width (typically 3–5 mm) and depth (12–20 mm) |
| Ease of application | Some products require precise mixing ratios | One-part vs two-part; brush-in vs trowel-in |
| Stain resistance | Especially important for light-coloured or porous stone | Stain-repelling claims backed by chemistry, not just marketing |
| Coverage/yield | Affects cost calculation | Square metres per bag at a stated joint width and depth |
| Temperature range | Critical for application in autumn/winter or hot summers | Minimum application temperature and freeze-thaw performance |
For beginners, one-part brush-in compounds are the safest choice. There's no mixing ratio to get wrong and the application method is forgiving. For more experienced DIYers or commercial-grade results, two-part epoxy products deliver harder, more durable joints but require careful preparation and timing.
Best patio pointing resin products by type
Rather than ranking products one to ten, it's more useful to match product type to your specific situation. Here's how the main products break down across the categories that actually affect your outcome.
Best all-rounder for DIY: Sika FastFix All Weather

Sika FastFix is a ready-to-use, self-setting compound that works across a wide joint range: 5 mm to 50 mm wide, minimum 20 mm deep. It's designed for all-weather application, including cool and wet UK conditions, though you should expect longer setting times at 4-15°C. Joints need to be free of standing water, dirt, and weeds before you start. It's not truly frost-proof during application, so avoid it when temperatures are hovering around freezing. The self-setting chemistry makes it genuinely forgiving for a first-time user.
Best for controlled application and clean finish: Bostik All Weather Jointing Compound
Bostik's compound cures on air contact and stops curing when wet, which is an important detail: if rain hits it before it's set, the curing process pauses rather than being immediately ruined, but prolonged rain on fresh joints will still compromise the result. Working time is around 30 minutes, blank" rel="noopener noreferrer">walk-on time is 24 hours at 20°C, and full load-bearing takes around 6 days. The 24-hour residue-removal step is non-negotiable: a stiff brush at that point clears any surface film before it hardens into a haze. It's permeable to water, making it drainage-friendly. If you want a real-world comparison point before buying, you can also look up bostik patio grout reviews to see how Bostik All Weather performs on different joint widths and application conditions.
Best for porcelain and ceramic paving: Azpects EASYJoint Select
EASYJoint Select is specifically developed for ceramic and porcelain paving, which has near-zero porosity and needs a product that bonds to a non-absorbing surface. Standard EASYJoint works across most paving materials and has all-year-round credentials, but the Select version is the one to reach for if your patio is porcelain tile. It can be applied in wet conditions with some method adjustments, and below freezing the recommended approach shifts to a dry application method.
Best for maximum weed suppression and UV resistance: Resiblock Ultra Matt
Resiblock Ultra Matt is a pre-polymer urethane jointing sand stabiliser rather than a traditional jointing compound. You sweep it over kiln-dried sand that's already in the joints, and the stabiliser binds the grains together in-place. It has a high-order UV resistance claim and specifically targets weed and grass growth in joints. It's worth noting the application-rate requirement: too thin and you won't get full penetration or the weed/UV benefits. The Superior Matt variant adds stain repellency for oil, water, and food, making it a good option for areas near outdoor kitchens or dining.
Best for demanding or high-traffic areas: Pavestone Pointfix (epoxy)
Pointfix is a two-part epoxy product: both resin and hardener come pre-blended into sand, and you combine the two parts on site. Minimum joint width is 3 mm and minimum depth is 12 mm, which is shallower than some polymeric products, making it accessible for tighter or shallower joints. It can be applied to wet paving, and cure time is around 12 hours at 15-20°C. One critical warning from Pavestone's own installation guide: don't try to reduce joint depth by packing with ordinary sand to stretch coverage. The epoxy needs the full joint volume to perform correctly. Epoxy joints are harder and more resistant than polymeric once cured, but they're less forgiving of movement, so in active freeze-thaw climates a more flexible polyurethane compound may serve you better long-term.
How to apply patio pointing resin: step by step
Application is where most problems start. I've seen perfectly good resin products fail because the joints weren't dry enough, the residue wasn't brushed off in time, or rain arrived within the curing window. Follow this sequence and you'll avoid the most common errors.
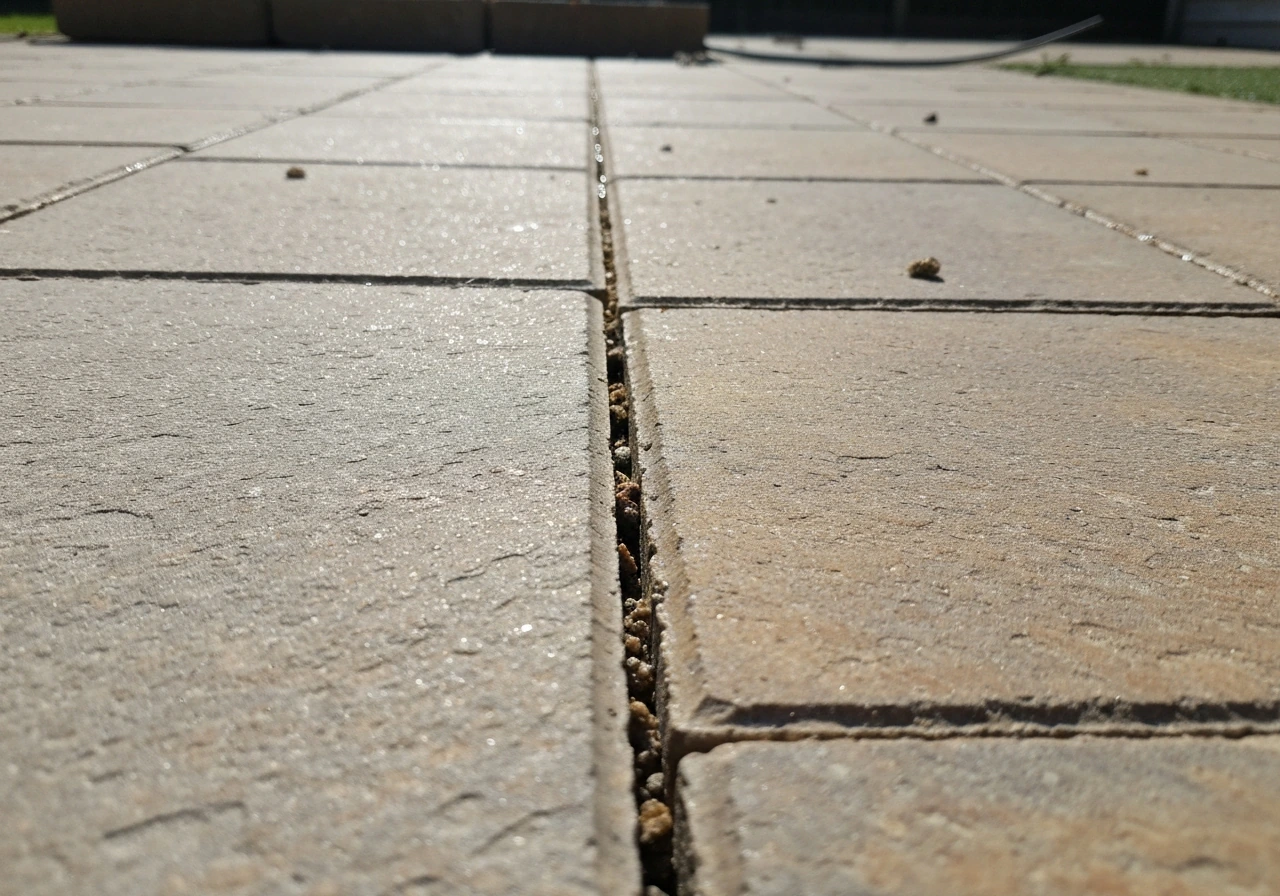
- Clean the joints thoroughly. Remove all existing sand, weeds, roots, moss, and debris. A stiff wire brush, pressure washer, or oscillating multi-tool works well. Weeds must be removed at the root level, not just cut back.
- Let the joints dry. This is the step people skip. Most resin products require joints to be dry or 'surface dry' before application. For polymeric brush-in compounds, damp joints slow curing; for two-part epoxy some products tolerate wet paving, but check your specific TDS.
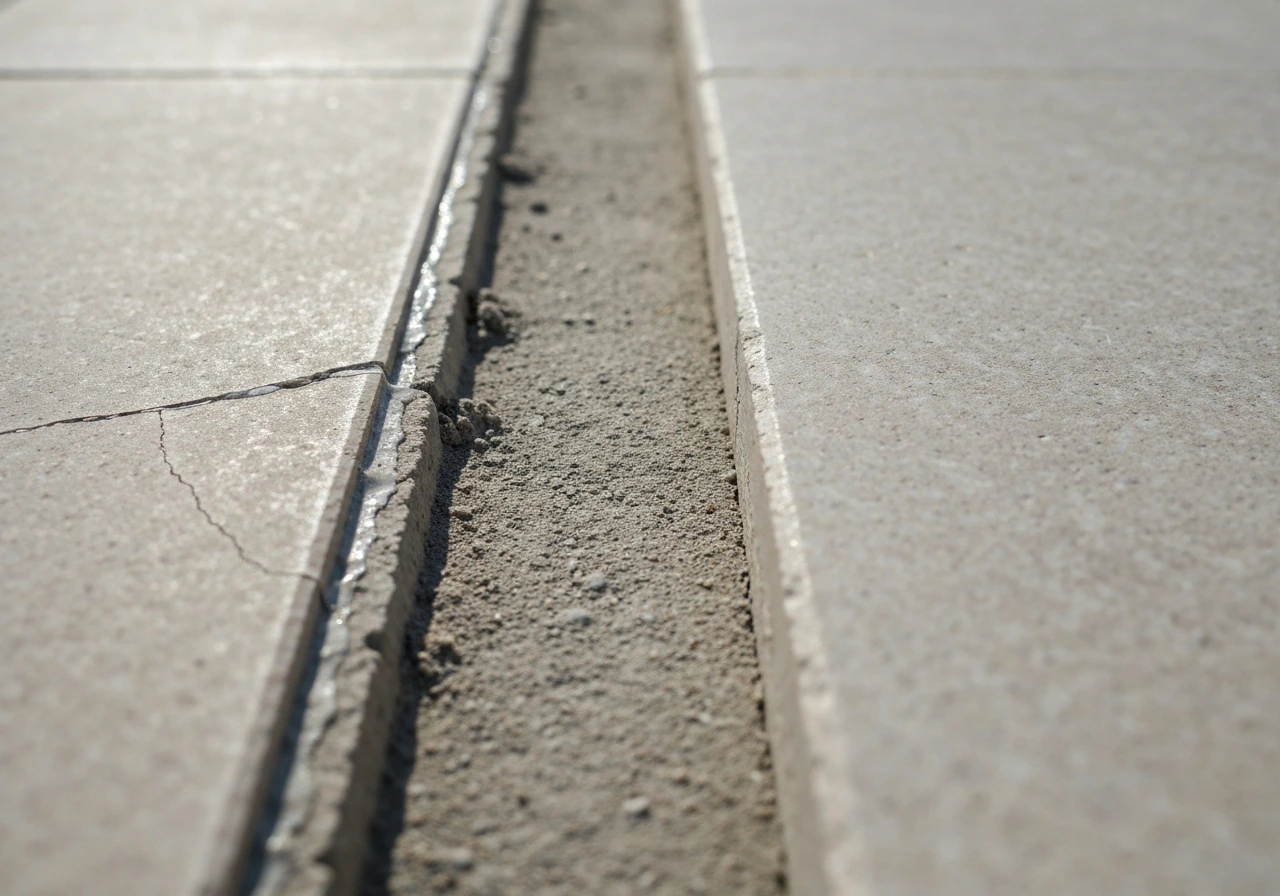
- Check joint geometry. Measure width and depth before you buy. If your joints are narrower than 3-5 mm or shallower than 12-20 mm (depending on the product), some products won't perform. Shallow joints may need the old material cleared out to achieve adequate depth.
- Mask or tape any sensitive edges. For porous stone like sandstone or limestone, masking adjacent surfaces reduces the risk of staining from resin bleed-over.
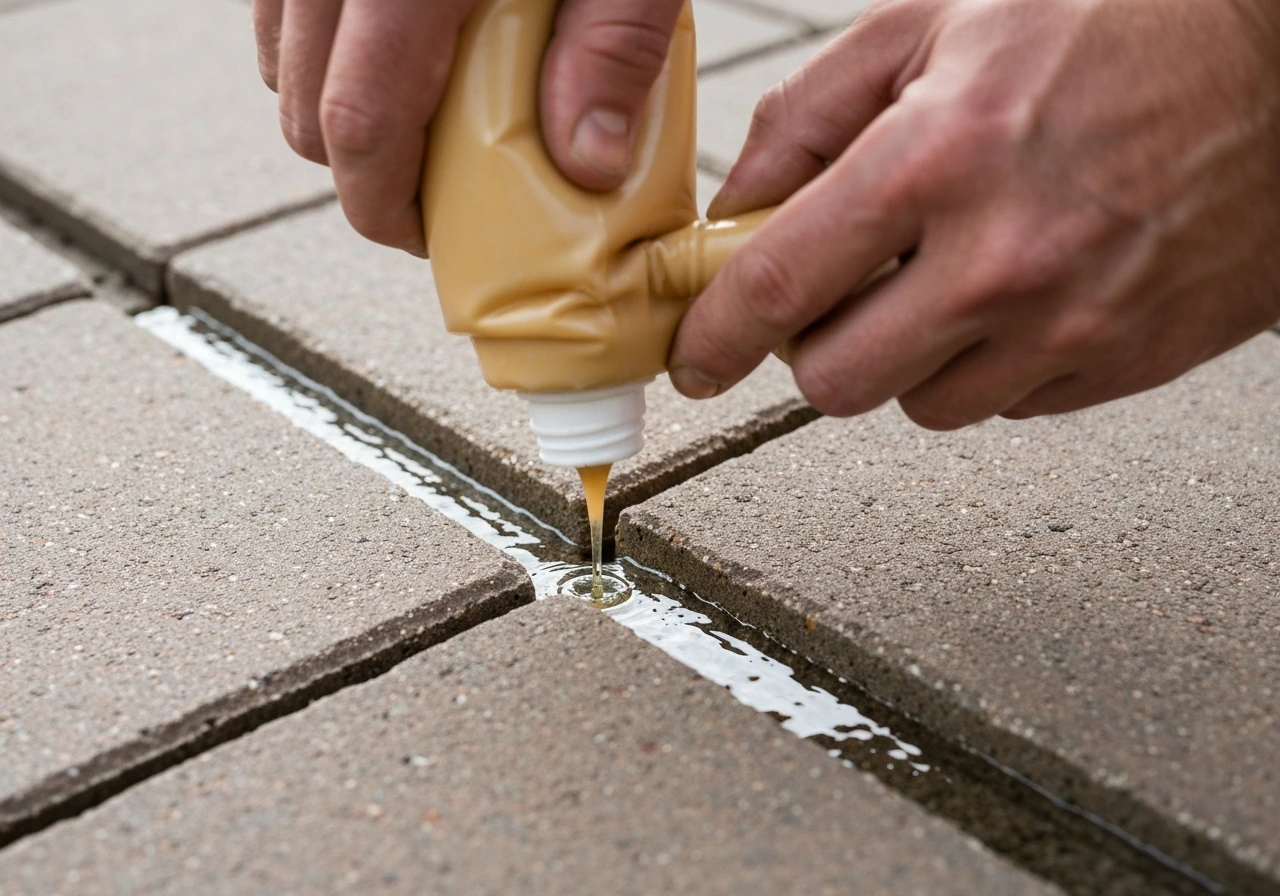
- Pour and brush in sections. Work in 2-3 m² sections at a time. Pour the compound over the paving, then use a soft broom or squeegee to push it into the joints. Compact lightly to ensure no voids. The compound should sit slightly below the surface level.
- Remove excess from the surface. Don't leave resin sitting on the slab surface for longer than your product's working time (typically 30 minutes for brush-in products). Sweep or brush off surface material before it begins to cure.
- Protect from rain. Most products need at least a few hours of dry conditions after application. Bostik stops curing when wet; Sika FastFix needs standing water out of joints. Check your product's specific rain-fast time.
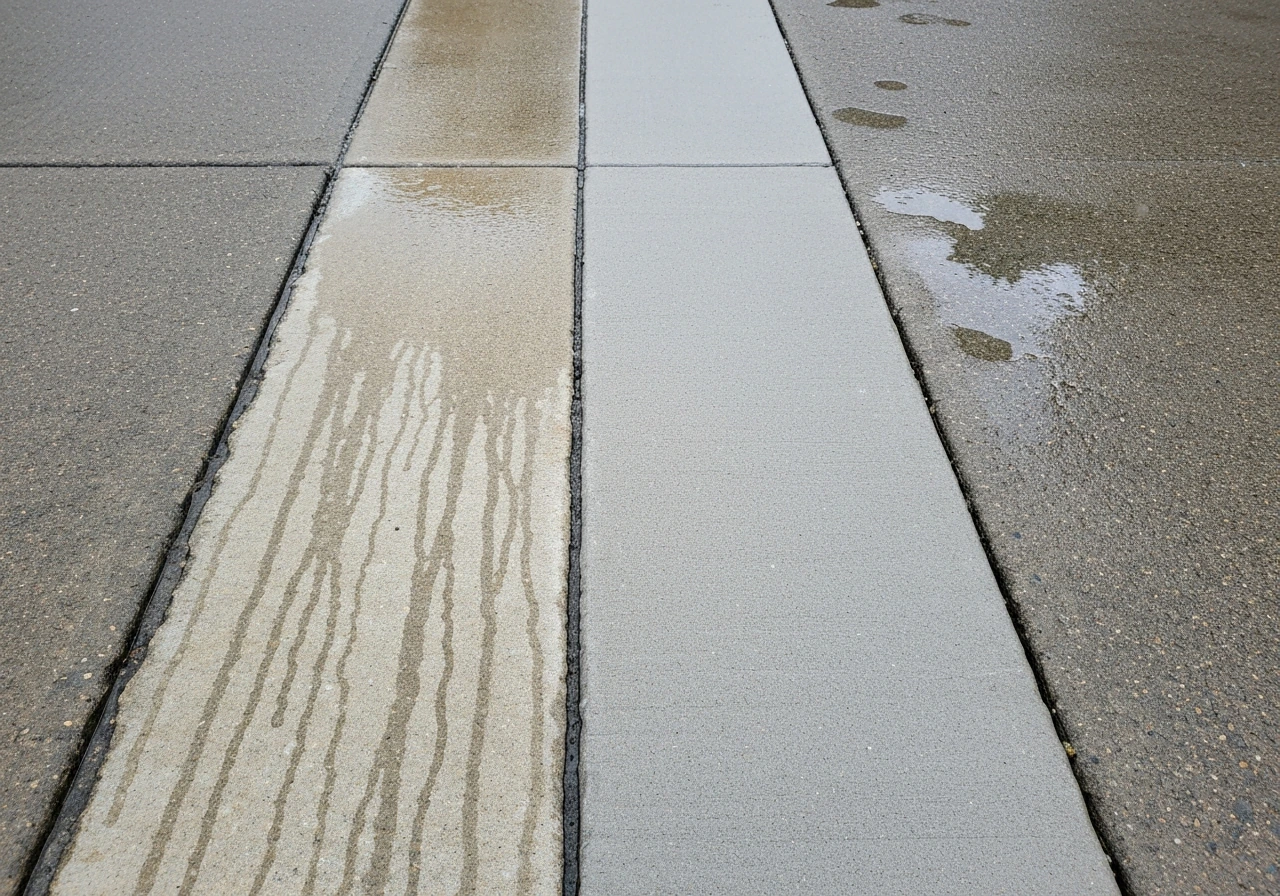
- Remove residue at 24 hours. Use a clean, stiff brush to sweep off any surface film or haze before it hardens fully. This is the step that prevents the whitish film complaints you see in reviews.
- Allow full cure before loading. Walk-on time is typically 24 hours at 20°C, but full load-bearing (furniture, vehicles) takes longer, often 5-7 days. In cooler conditions, both times extend significantly.
Common failures and how to avoid them
The most useful thing you can get from reading other people's reviews is understanding where things went wrong. Here are the failures that appear repeatedly, and what's actually causing them.
Washing out after rain
This is the number one failure, and it's almost always a timing problem. If a downpour hits within a few hours of application, uncured resin compound can be displaced or diluted. The fix is simple but inconvenient: check a three-day forecast before you start. If rain is likely within 24 hours, wait. Some products are more rain-tolerant than others (Bostik pauses curing rather than washing out), but none are completely immune to a heavy downpour on the same day.
Surface haze or whitish film
Haze is caused by resin residue drying on the slab surface instead of inside the joint. It happens when you don't remove excess material within the working time, or when you skip the 24-hour residue-removal brush. The solution is to work in small sections so you can clear the surface before curing begins, and to set a reminder to return at 24 hours with a stiff brush regardless of how clean it looks.
Cracking joints
Cracking usually comes from one of three causes: joint geometry that's too shallow (the cured compound has insufficient thickness to resist movement), a rigid epoxy product in a patio that experiences significant thermal or frost movement, or joint edges that weren't clean before application. If you're in a freeze-thaw climate, a flexible polyurethane-based product is almost always a better choice than a hard epoxy.
Poor bonding or joint pulling away from edges
This happens when the joint walls are dusty, damp, or contaminated with old sand or biological growth. Resin products need a clean, stable surface to bond to. If you rush the cleaning stage, the joint may look fine for a season and then fail at the edges as movement works it loose.
Weeds returning
If weeds come back after using a product that claims weed suppression, the most likely cause is incomplete fill. Voids in the joint below the cured surface give seeds somewhere to germinate. Make sure you compact the compound thoroughly during application. Also, if the original weeds weren't fully removed at the root level, they can push through a freshly filled joint within a season.
Staining on porous stone
Indian sandstone is notorious for this, and several user reports echo the experience: resin products on sandstone can leave marks that don't brush out. The best prevention is to seal the stone surface before applying any jointing compound, work quickly in small sections, and avoid the compound sitting on the surface. On very porous stone, test a small area first.
Product 'just doesn't last' on certain substrates
One recurring theme in user reviews is a product that sets fine but deteriorates within a year. This almost always comes down to a mismatch between product type and conditions: a standard polymeric compound on a high-drainage, very open joint structure, or a product applied too thin in a deep joint. Always match the product to the stated joint geometry, and don't dilute coverage by trying to stretch a bag further than the manufacturer recommends.
Maintenance and re-application: what to actually expect
Resin jointing compounds are not permanent. A well-applied product in a sheltered UK garden might last 8-12 years. The same product on a south-facing, exposed patio with heavy foot traffic might need attention after 4-5 years. UV exposure is the biggest accelerator of degradation in polymeric products, which is why UV-stable formulations (urethane or epoxy-based) are worth the premium for fully exposed patios.
For routine maintenance, cleaning is simple: a stiff brush, mild detergent, and water handle most surface dirt. Avoid pressure washing at high pressure directly along joints, as this can dislodge even well-cured compound over time. If you use a pressure washer, use a fan nozzle at moderate pressure and work across the paving surface rather than directly into joint lines.
Don't use bleach-based cleaners on polymeric jointing. Bleach can break down the polymer binder over time and accelerate joint degradation. For moss and algae, a patio-specific biocide applied annually is more joint-friendly than repeated bleach treatments.
| Exposure Level | Typical Lifespan | Re-application Trigger | Maintenance Frequency |
|---|---|---|---|
| Sheltered, low traffic | 10-12 years | Visible cracking or weed ingress | Annual brush and biocide |
| Moderate, part-shaded | 7-10 years | Joint edge pullback or surface chalking | Annual brush; biocide as needed |
| Fully exposed, high UV | 4-7 years | Colour fade, surface friability, weed return | Twice yearly; UV-stable product recommended |
| Freeze-thaw climate | 5-8 years (flexible product) | Cracking at joint edges after winter | Post-winter inspection each spring |
Re-application doesn't always mean stripping out the old material entirely. If the existing joint is structurally sound but shallow or friable at the surface, you can often brush the surface clean and apply a stabiliser product like Resiblock over the top. If the joint has cracked, pulled away, or has significant weed ingress, full removal and re-filling is the more reliable approach.
Compatibility: which patio surfaces work and which don't
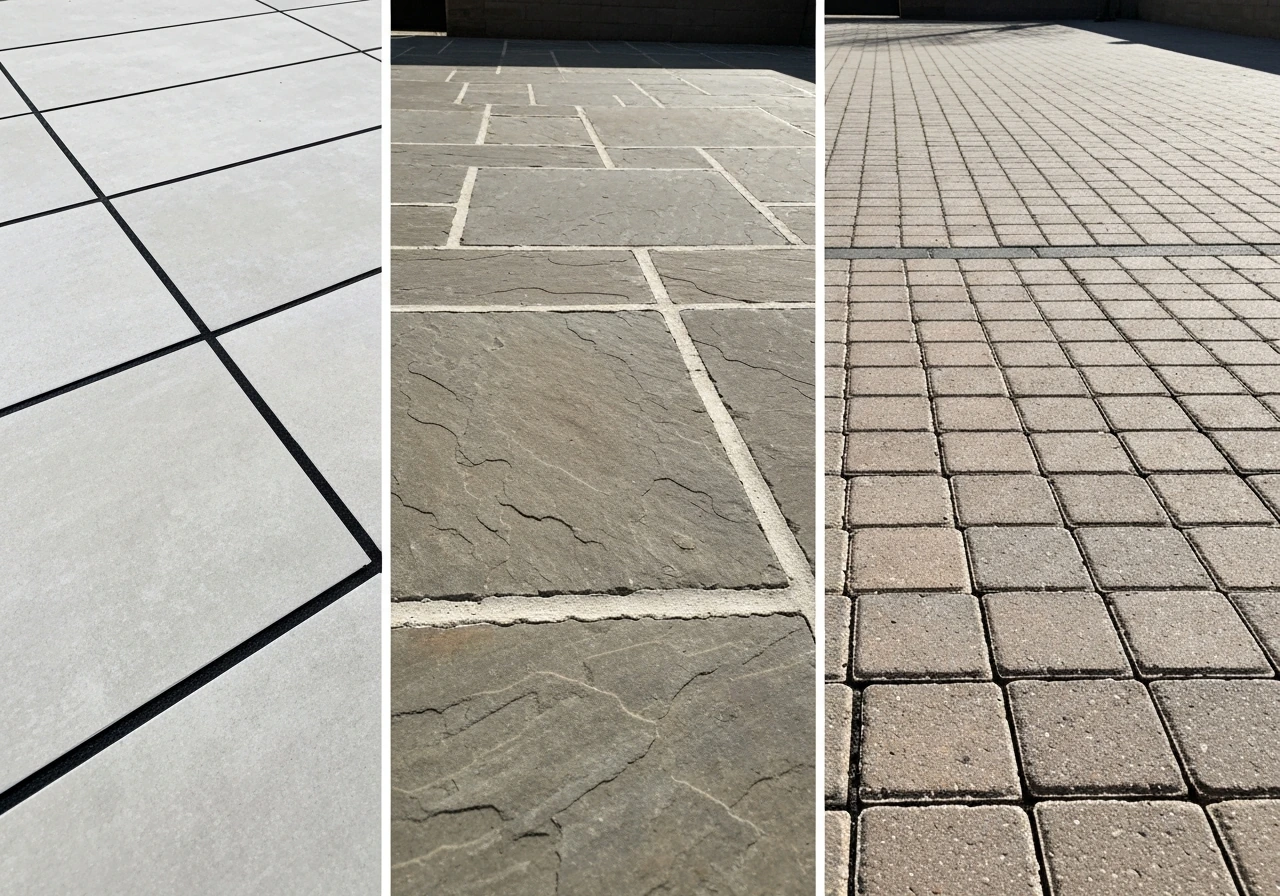
Resin jointing works well on most paving surfaces, but there are important differences in how you approach each one, and a couple of situations where it's genuinely the wrong tool.
| Patio Surface | Resin Jointing Compatibility | Key Considerations |
|---|---|---|
| Porcelain tiles | Good, but needs specific product | Use EASYJoint Select or equivalent porcelain-rated compound; non-porous surface requires good mechanical bond |
| Natural stone (sandstone, limestone) | Good with care | Seal stone surface before application; test for staining; porous surfaces absorb resin if not sealed |
| Indian sandstone | Moderate risk | High porosity increases staining risk; pre-seal and work quickly in small sections |
| Concrete flags/slabs | Excellent | Most compatible substrate; porous enough for good adhesion without staining risk |
| Brick paving | Good | Mortar-joint tradition still works, but resin reduces maintenance; check joint width suits product minimum |
| Flagstone (irregular) | Good if joints are uniform enough | Irregular joint widths common; check product handles the width range; avoid wide joints over 50 mm |
| Gravel / loose aggregate | Not applicable | Resin jointing is for fixed paving units only |
Joint geometry is the compatibility issue that most people overlook. A joint narrower than 3-5 mm (depending on product) won't accept enough material to form a durable fill. A joint shallower than 12-20 mm won't give the cured compound enough thickness to resist movement. Flagstone and hand-laid natural stone often have both problems: variable widths and shallow joints where slabs are thin. In those cases you may need to grind out joints to achieve adequate depth before any resin product will perform as advertised.
Resin pointing is also not appropriate as a substitute for slab re-bedding. If slabs are rocking, hollow-sounding, or unevenly settled, no jointing product will fix that. The bedding mortar underneath needs attention first.
Your next steps: measuring, estimating, and deciding
Before you buy anything, take five minutes to measure your joint dimensions. Use a steel rule to check width (the gap between slab edges) and a thin probe or skewer to check depth. Write down the range of both, since irregular laying often means joints vary. Compare your minimum and maximum measurements against the product specifications: minimum joint width and depth are hard limits, not guidelines.
To estimate coverage, use the formula provided on most product datasheets: coverage is typically expressed in square metres per bag at a stated joint width and depth. If your joints are deeper or wider than the reference, your actual coverage will be lower. Don't assume one bag covers the stated area if your joint geometry differs.
For product selection, run through this decision checklist in order: Is your surface porcelain? Go for a porcelain-rated product. Is your climate exposed to hard freezes? Choose a flexible polyurethane-based product over epoxy. Are your joints in a UV-exposed area? Prioritise UV-stable formulations. Are you a first-time DIYer? Stick to one-part brush-in compounds. Do you need maximum durability for a high-traffic or commercial-grade finish? Consider a two-part epoxy and allow the full cure time.
Professional installation is worth considering if your patio is large (over 50 m²), if you have a mix of joint widths that complicate product selection, or if the surface is high-value polished porcelain or premium natural stone where staining mistakes are expensive. For a typical 20-30 m² residential patio with consistent joints, a confident DIYer with the right product and a dry weather window will get a result that matches professional work. The difference is usually preparation quality, not the product itself. If you want the best patio grout resin for your exact joints, the right product type and application conditions matter more than brand hype.
FAQ
How can I tell if my joints are deep and wide enough for patio pointing resin reviews to match my patio?
Use measurements at multiple points. Measure width at the tightest and widest gaps, then check depth with a thin skewer or probe. Minimum depth matters because many failures are “it set, but it cracked,” which is usually insufficient thickness for movement. If your joints vary, choose a product based on the worst-case minimum depth and minimum width, not the average.
Can I use patio pointing resin on wet joints, or should everything be completely dry before starting?
Treat “wet application” as conditional, not an excuse to start on soggy joints. Most one-part polymeric systems and some epoxy products tolerate damp paving only if there is no standing water and the joint walls are not coated with moisture film or loose sediment. If you can see water sheen in the joint after sweeping, wait, because resin bond along the edges is what often fails first.
What’s the safest way to avoid haze when applying polymeric jointing compound?
Plan to work in small sections, apply only what you can finish, and then remove excess before it begins to skin. At the end of each section, do a controlled brush sweep to drive material off the slab face while leaving it in the joints. Then do the dedicated return step at 24 hours with a stiff brush, even if the surface looks clean, because residue can dry into an invisible film.
If rain starts, does it completely ruin the job, or can I recover it?
It depends on how soon it rains. Heavy downpour within the early curing window is the biggest risk, because uncured material can be displaced or diluted. If rain is light or happens after partial set, some products are more forgiving, but you still may need to inspect for voids and wash-off spots after drying. The practical recovery step is to check joint fill depth once cured, and re-pack any low areas before the end of the cure window.
Why did my weeds return after using a resin jointing product that claims weed suppression?
Weed regrowth usually means the joint was not fully filled to a consistent surface, leaving voids below where seeds can germinate. It can also happen if root-level weed removal was incomplete before pointing. The fix is not just “more resin,” it’s ensuring the joint is cleaned to a stable edge, filled without gaps, and compacted thoroughly so the cured compound reaches full depth.
Can I use bleach or strong cleaners to clean my patio pointing resin joints before maintenance?
Avoid bleach-based cleaners on polymeric jointing. Bleach can degrade the binder and accelerate joint breakdown, especially in joints that stay damp. For moss or algae, use a patio-specific biocide applied as directed and repeat only if required by the product label, rather than repeated bleach treatments.
Is it okay to pressure wash near joints to remove dirt from resin pointing?
Generally no for direct jetting along joint lines. Even when cured, high-pressure water can erode surface film and dislodge loosely seated material, which later becomes weed or moisture entry points. If you must use a washer, use a fan nozzle at moderate pressure and keep the spray mostly across the paving surface, not straight into the joints.
What should I do if the joint resin cracks but the patio slabs are still solid?
Cracking typically points to product-type mismatch or joint geometry. First confirm joint depth and whether the cured layer has enough thickness for movement resistance. If you’re in a freeze-thaw climate, rigid epoxy is more likely to crack than flexible polyurethane-based options. Also check whether joint edges were clean before application, because contaminated edges can create a weak bond that fractures.
Can I apply resin pointing over old resin or stabiliser, or do I have to strip everything out?
Partial re-application can work when the existing joint is stable but just needs surface consolidation. If the old joint is shallow, friable at the surface, or has minor residue, brush-clean and then apply a stabiliser over the top. If the joint is cracked through, pulled away, or has significant weed ingress, full removal and re-filling is usually the more reliable route.
Do patio pointing resin products work on sandstone and natural stone, or are there special steps?
Sandstone is a common staining problem area. If you want to reduce the risk of permanent marks, seal the stone surface before pointing, work quickly in small sections, and prevent compound from sitting on the stone face. On very porous or high-absorption stone, do a small test patch first to confirm the look after curing.
What’s the right product choice if my patio has porcelain tiles and near-zero porosity?
Porcelain needs a product designed to bond to non-absorbing surfaces. In practice, that means choosing a porcelain-rated or porcelain-specific jointing formulation, not a generic all-purpose polymeric sand grout. If your joints are also wide, verify the stated joint width range, because “porcelain compatibility” still won’t fix an out-of-spec joint geometry.
Do two-part epoxy resin joints require full joint depth, and what happens if I try to stretch coverage with extra sand?
Yes, epoxy products depend on the full joint volume. Don’t reduce depth by packing ordinary sand to “make it last longer,” because the epoxy needs enough thickness and consistent volume to perform. This mistake can lead to weak cured sections that crack or wear quickly even when the resin looks fine initially.
How long does patio pointing resin last, and what conditions shorten its lifespan most?
Lifespan varies mainly with UV exposure and foot traffic. Polymer-based products degrade faster under strong sun, so fully exposed south-facing patios often need earlier attention. If you notice chalking, thinning, or frequent joint edge failure, that’s a sign the binder has aged, not just dirt buildup.
Where do I find meaningful comparisons in patio pointing resin reviews beyond brand names?
Look for review details that match your conditions: joint width and depth, whether rain hit within the first day, freeze-thaw experience, and whether the surface developed haze or lasting staining. Reviews that mention “how long it stayed looking good,” plus whether weeds returned, are more predictive than those that only state the product brand or color.