Polymeric sand is the best joint filler for most flagstone patios. It locks stones in place, resists weeds, handles rain without washing out, and stays flexible enough to survive freeze/thaw cycles when installed correctly. That said, the right choice depends on your joint width, how your stones are set, and your climate. Wide joints (over 1 inch), very irregular flagstone, or stones set in a rigid mortar bed each call for a slightly different approach. This guide walks you through every option, how to pick the right one, and how to install it so it actually lasts. If you're comparing options for the best mortar for flagstone patio, your joint width and base type will determine which filler category is actually appropriate how to pick the right one.
Best Joint Filler for Flagstone Patio: Options, Fit, Steps

What joint filler actually does on a flagstone patio
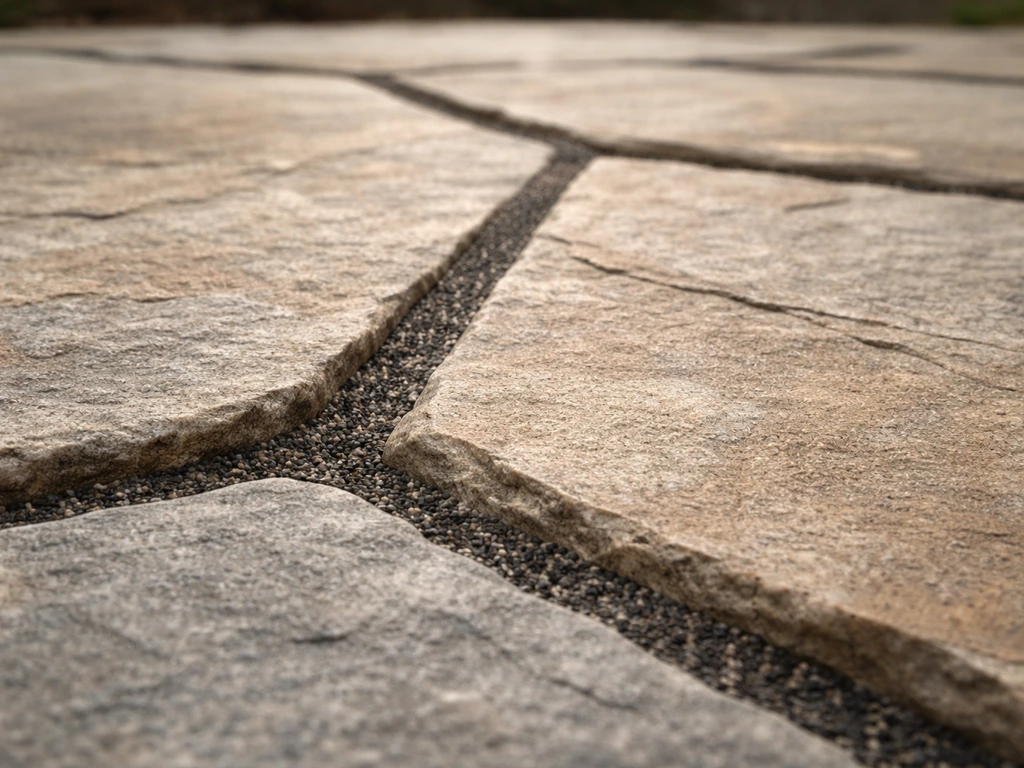
Joint filler is the material packed into the gaps between your flagstones. A flagstone patio is an outdoor surface built from irregular stone slabs, and the joints need the right filler to keep everything stable and weed-resistant. On paper it sounds minor, but it does a lot of work. It stabilizes the stones so they don't rock or shift underfoot, prevents weeds and grass from rooting in the joints, controls where water goes (drainage matters a lot on a patio), and limits the amount of soil or sand that migrates out from under the stones over time. Without a proper filler, your patio becomes a weed garden with wobbly stones within a season or two.
The term 'joint filler' is sometimes used interchangeably with 'jointing sand,' 'pointing material,' or 'grout' depending on who you're talking to. For flagstone specifically, the joint material also has to accommodate the irregular shapes and varied joint widths that come with natural stone. That's different from filling perfectly uniform joints in a brick or interlocking concrete paver system. It's worth keeping that distinction in mind when reading product labels, because some polymeric sands are rated only for narrow, uniform joints and won't perform well if your flagstone joints are 2 inches wide and jagged.
Your main filler options compared
There are five real categories of joint filler for flagstone: polymeric sand, sand/cement mixes, straight mortar, loose sand or gravel, and flexible polymer-modified mortars or epoxy-style products. Each has a real use case. Here's an honest look at all of them.
Polymeric sand
Polymeric sand is graded sand coated with polymer binders that activate when you wet them. Once cured, it hardens enough to resist erosion and weed growth while staying slightly flexible. Quikrete's HardScapes Polymeric Jointing Sand (No. 1175-56) handles joints up to 2 inches wide and covers interlocking pavers, brick, natural stone, and concrete slabs. Techniseal's SmartSand is rated for joints up to 1 inch wide with a minimum joint depth of 1.5 inches. Their NOCO product is specifically engineered to handle freeze/thaw cycles without cracking or breaking apart, which is a meaningful advantage if you're in a cold climate. For very wide flagstone joints (up to 4 to 6 inches), Alliance Gator's Gator Dust Bond is designed for natural stone joints from half an inch up to 6 inches wide, and it retains flexibility after curing. Always match the product to your actual joint width. Using a narrow-joint sand in wide flagstone gaps is one of the most common and frustrating mistakes.
Sand/cement mixes
A dry sand/cement mix (typically 4 or 5 parts sand to 1 part Portland cement) swept into joints and misted to cure is a traditional, low-cost approach. It creates a firm joint that handles foot traffic well and is easy to source. The downside is rigidity. In climates with significant freeze/thaw movement, rigid mortar joints crack and spall. Once they crack, water gets in, the freeze/thaw damage accelerates, and you're pulling out crumbled joint material within two to three seasons. For warm climates with stable soil and minimal temperature swings, this can be a fine budget option.
Straight mortar
Wet-set mortar joints are typically used when flagstone is set on a concrete slab with mortar as the bedding material. In that case, the joints are usually pointed with a similar mortar mix (often Type S mortar) applied with a grout bag or trowel. This gives a hard, finished look but has zero flexibility. It's the right call when your stones aren't going anywhere because they're bonded to a rigid concrete base, but it's inappropriate for sand-set or gravel-base patios where the stones will settle and shift with the seasons. Using mortar joints on a sand-set patio almost guarantees cracking within a year.
Loose sand or fine gravel
Plain mason's sand, decomposed granite, or fine gravel swept into joints is the most permeable, most natural-looking, and easiest-to-install option. Polymeric sand is often the best filler for a flagstone patio because it stabilizes stones while helping control weeds and movement in typical outdoor conditions. It drains freely, requires no special tools, and is easy to top off when it settles. The trade-off: it washes out in heavy rain, allows weed and moss growth, and does little to stabilize stones against rocking. It works well in dry climates or in casual garden stepping-stone settings where a loose, informal look is the goal. For a formal patio that gets regular foot traffic or rain, it's a short-term solution.
Polymer-modified mortar and epoxy-style products
These are a step up from basic mortar. Products like Gator Dust Bond use a polymer-modified formula that retains some flexibility after curing, making them better suited to natural stone installations where slight movement is expected. Some systems are 'wet-brushed' into joints, which helps compact the material and ensures good penetration. Epoxy-based grouts are used in high-end or commercial installations where maximum joint strength and chemical resistance are needed, but they're expensive, less forgiving to install, and overkill for most residential patios. If you want the finished look of mortar with better freeze/thaw performance, a polymer-modified product is the middle ground worth considering.
| Filler Type | Best For | Joint Width Range | Freeze/Thaw Rating | Weed Resistance | Relative Cost |
|---|---|---|---|---|---|
| Polymeric sand (standard) | Sand-set patios, moderate climates | Up to 1–2 inches | Good (product dependent) | Excellent | Moderate |
| Polymeric sand (wide-joint, e.g., Gator Dust Bond) | Irregular flagstone, wide gaps | Up to 4–6 inches | Good | Excellent | Moderate–High |
| Polymeric sand (freeze/thaw rated, e.g., NOCO) | Cold climates, seasonal movement | Up to 2 inches | Excellent | Excellent | Moderate–High |
| Sand/cement dry mix | Warm, stable climates, budget installs | Any | Poor–Fair | Good | Low |
| Wet mortar (Type S) | Concrete-slab-set flagstone | Narrow to medium | Poor (rigid) | Good | Low–Moderate |
| Loose sand or gravel | Informal stepping stone, dry climates | Any | Excellent (no bond) | Poor | Very Low |
| Polymer-modified mortar | Formal patios, moderate movement | Medium to wide | Good | Good | Moderate–High |
Picking the right filler for your specific situation
Your climate and base type are the two biggest factors. Here's how to think through the decision quickly.
Freeze/thaw climates (zones 6 and colder)
Rigid joints crack. Full stop. If you're in a climate that goes below freezing regularly, stick with a polymeric sand specifically rated for freeze/thaw performance, like Techniseal NOCO. Avoid dry mortar mixes and wet-set mortar for any sand-set installation. Even with polymeric sand, make sure your base has good drainage so water isn't pooling under the stones and creating ice pressure from below.
Warm and wet climates
Weed growth and washout are your main enemies here. Polymeric sand handles both. A standard polymeric jointing sand rated for your joint width works well. If you're in a region with intense, frequent rainstorms, consider a wide-joint formula and make sure your patio has a slight slope (at least a quarter inch per foot) to move water off the surface rather than letting it sit and erode joints.
Narrow vs. wide joints
This matters more than most people realize. Techniseal EZSand, for example, is limited to joints no wider than half an inch. Using it in 2-inch flagstone gaps means the polymer can't bridge the joint properly and the surface will fail. For wide, irregular flagstone joints (anything over 1 inch), use a wide-joint polymeric product like Gator Dust Bond or Quikrete's HardScapes Polymeric Jointing Sand, which handles up to 2 inches. Quikrete describes its HardScapes Polymeric Jointing Sand (No. 1175-56) as polymer-modified graded sand for filling joints up to 2 inches wide that hardens as it dries to resist erosion, weed growth, and insects Quikrete's HardScapes Polymeric Jointing Sand. For even wider joints, Gator Dust Bond's 6-inch maximum is about as wide as polymeric products go.
Sand-set vs. concrete-slab base
If your flagstone is set on a compacted gravel and sand base, use polymeric sand. The base will move slightly with seasons, and a flexible joint filler is what keeps things looking intact over time. If your stones are mortared onto a concrete slab, use wet mortar for the joints. The rigidity is appropriate because the whole system is rigid. Mixing a flexible joint filler with a rigid base system, or vice versa, creates a mismatch that leads to premature failure.
Sloped patios
Slope increases the risk of joint material washing downhill, especially during curing. On sloped surfaces, wet-brush-style polymer mortars that are worked into the joints and compact in place tend to outperform standard swept-and-watered polymeric sand. If you do use polymeric sand on a slope, use a gentle misting rather than a hard spray during activation to avoid dislodging the material before it bonds.
How to install joint filler the right way
The installation process is where most DIY projects go wrong. Haze, cracking, and washout are almost always installation errors rather than product failures. Here's how to do it correctly for the two most common scenarios.
Installing polymeric sand (the most common approach)
- Clean the joints thoroughly. Remove old sand, weeds, debris, and any standing water. A stiff brush, a pointed tool, or a compressor work well. Joints need to be completely dry before you start, and the stones themselves need to be dry. High humidity or damp pavers cause white haze, so avoid installing on humid days or right after rain.
- Check your joint geometry. Confirm your joint width matches the product you're using. Measure a few representative gaps. If you have a mix of narrow and wide joints, choose the product rated for the widest ones.
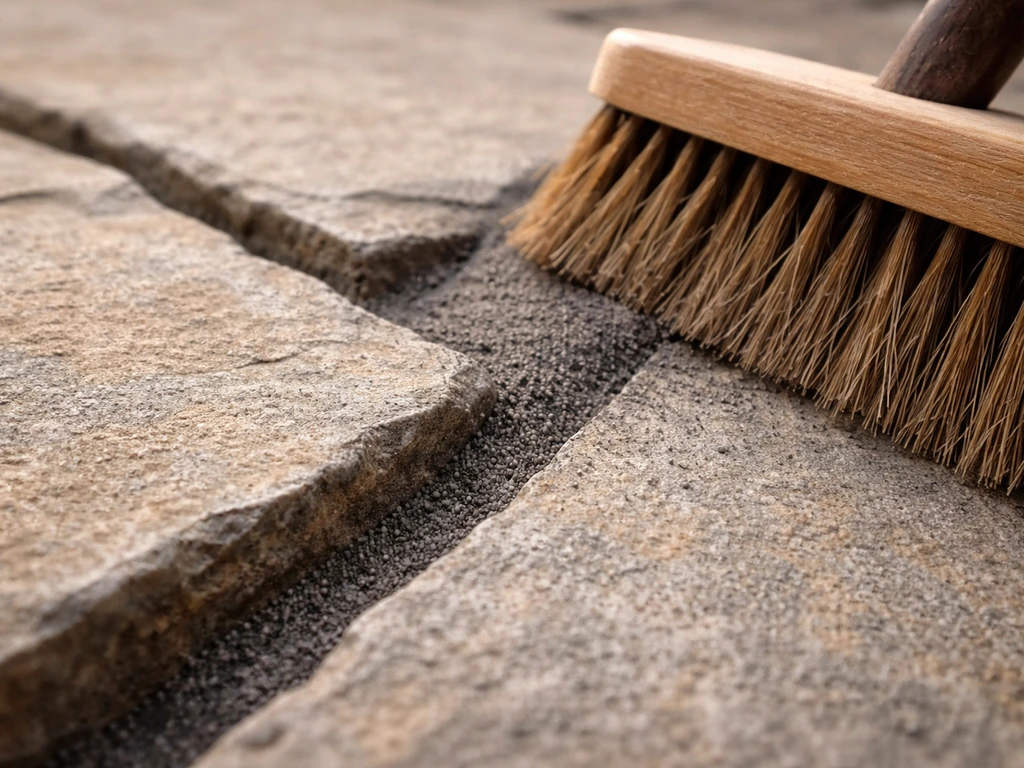
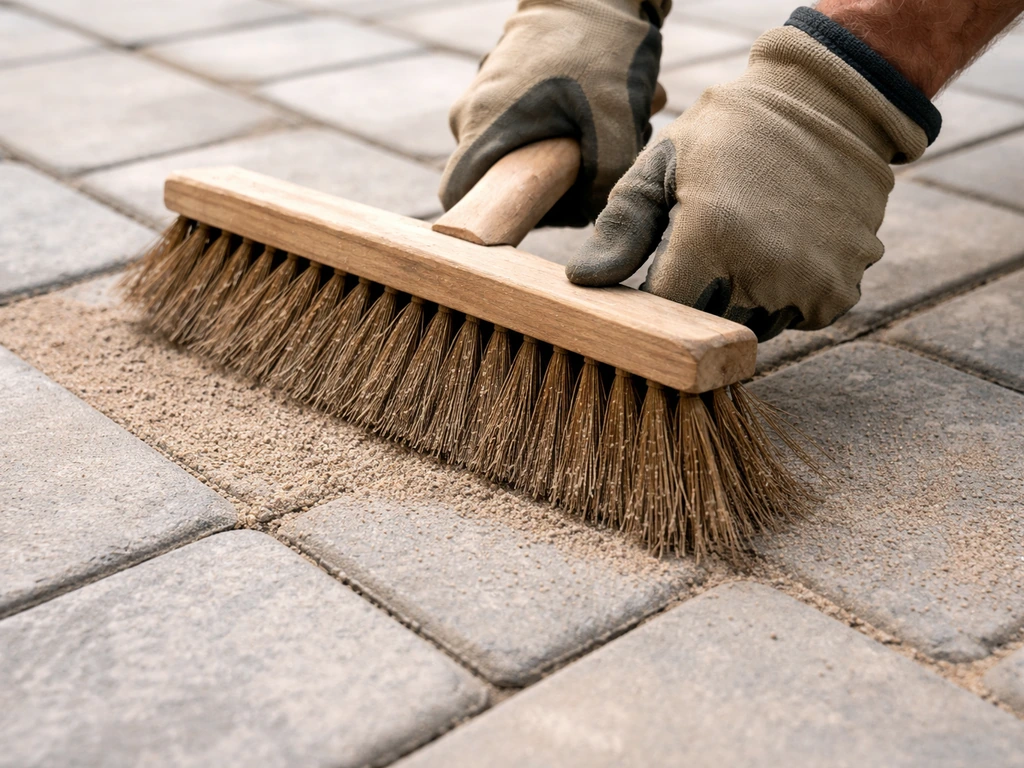
- Pour and sweep the polymeric sand across the surface. Work it into the joints with a stiff broom. Sweep diagonally to the joint lines to push material down into the gaps rather than along them.
- Compact lightly. For large areas, a plate compactor with a rubber pad or a rubber mallet tapped across a board helps settle the sand deeper into the joints. Repeat the sweep-and-compact cycle until joints are filled to within about an eighth of an inch of the top surface of the stones. Gator Dust Bond specifically calls out leaving a 3mm (1/8 inch) recess below the stone surface to prevent edge erosion.
- Blow off all excess. This is critical. Use a leaf blower set to low to remove every trace of polymeric sand from the stone surface. Any residue left on the stones when you water will turn into a polymer film (white haze) that's very difficult to remove. Take your time here.
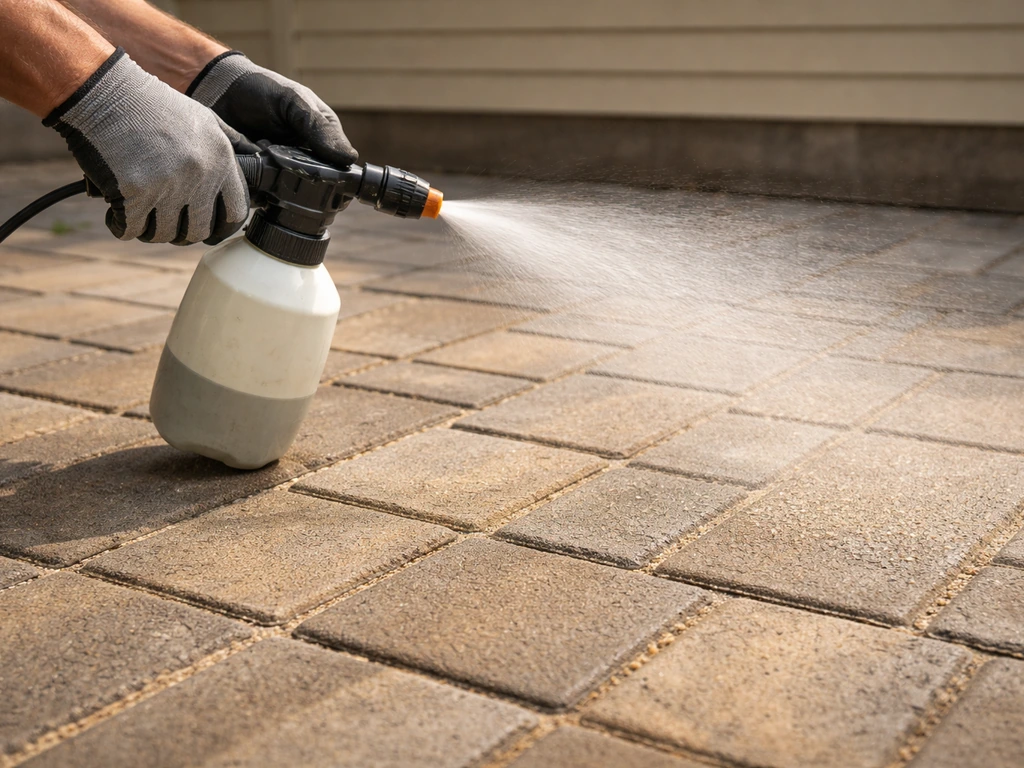
- Water the joints. Use a gentle mist setting, never a jet. Wet the joints slowly so water penetrates through the full depth of the material. Sakrete instructs to stop spraying when joints will no longer take water. Don't flood the surface. Techniseal's flagstone guidance says to stop watering when activation reaches about 75% of the joint depth, then let capillary action finish the process, to avoid pushing polymer binder to the surface.
- Let it cure. Under typical conditions (around 70°F and 50% relative humidity), the surface is firm within 24 hours. Sakrete's PermaSand is rated for foot traffic in 24 hours and light vehicle traffic in 72 hours. In hot, dry weather it cures faster. Keep foot traffic off during cure and protect from rain for at least 24 hours.
- Check and top off. After the first heavy rain, inspect joints for any low spots and add more polymeric sand if needed. This is normal and expected.
Installing mortar joints (concrete-slab-set flagstone)
- Clean joints down to the concrete base. Use a cold chisel or grinder to remove any old crumbled mortar. Blow out dust and debris. Dampen the joint (not soaking wet) so the mortar doesn't dry too fast.
- Mix Type S mortar to a firm, toothpaste-like consistency. Too wet and it slumps; too dry and it won't bond.
- Pack the mortar into joints using a grout bag, a margin trowel, or a pointing tool. Work it firmly into the joint to eliminate voids.
- Tool the joint surface. Run a jointing tool or the edge of a trowel along the joint to create a slightly concave finish. This sheds water and looks intentional rather than slapped on.
- Clean excess mortar off stones immediately with a damp sponge before it sets. Mortar haze on natural stone is a serious problem, especially on sandstone or limestone. Work in sections so you're always cleaning while the mortar is still fresh.
- Mist-cure for 2 to 3 days. Keep the joints damp (not wet) by misting with water in the morning and evening. This prevents the mortar from drying too fast and cracking.
- Stay off for 48 to 72 hours minimum for foot traffic.
Drainage, weeds, settling, and expansion
Joint filler is only as good as the system it's installed in. A few big-picture considerations that affect long-term performance:
Drainage
Polymeric sand hardens the joint but doesn't fully waterproof it. Some water still passes through, which is fine, but water needs somewhere to go underneath. If your base isn't well-drained, water will pool under the stones, saturate the bedding sand, and cause heaving or sinking. A properly installed base with compacted gravel drainage layer is as important as the filler choice. Sand-set flagstone on a poorly drained clay base is a recipe for perpetual resetting. The joint filler can't fix a drainage problem. Relatedly, your patio surface should have at least a quarter inch per foot of slope away from the house or toward a drain.
Weed control
Polymeric sand is excellent at blocking weed seeds from germinating in joints, but it's not a herbicide. Seeds blown onto the surface can still sprout on top of the joint if they find enough organic debris to root in. Keeping the surface swept clean goes a long way. If weeds are a recurring problem, a pre-emergent herbicide applied to the joints in early spring (before germination season) helps, but read labels carefully because some pre-emergents can stain or degrade certain joint materials. Under the stones, a geotextile fabric layer in the base helps prevent rhizome-type weeds from pushing up through the base, though it doesn't affect surface-germinating seeds.
Settling and expansion
Flagstone on a sand or gravel base will settle slightly in the first year, especially after a wet season or the first freeze/thaw cycle. This is normal. It means joints may open slightly or the surface level may shift. That's exactly why polymeric sand (and not rigid mortar) is the right call for sand-set patios. The flexibility absorbs minor movement without cracking. Larger expansion gaps, like those around a concrete slab perimeter or near a house foundation, should be filled with a compressible backer rod and urethane caulk, not joint sand. Trying to fill a 1-inch expansion joint with polymeric sand will result in cracking because the movement there is simply too much for any sand product.
Maintenance, re-filling, and common failures
How joint filler degrades over time
Even well-installed polymeric sand has a lifespan. UV exposure, foot traffic, and seasonal freeze/thaw cycling gradually break down the polymer binder. Most quality polymeric sands last 3 to 7 years before joints start to hollow out, crack, or wash away. Signs it's time to re-fill: joints look visibly sunken or hollow when you tap on them, weeds start appearing in previously clean joints, or you see sand washing out after rain that didn't used to do that. Don't wait until joints are completely empty, because open joints allow soil migration under the stones and then you have a settling and leveling problem on top of the joint problem.
How to re-fill existing joints
You don't always need to remove all the old material. If the existing joint sand is firm and intact but just low, you can sweep new polymeric sand over the top, compact it in, blow off excess, and re-activate with water. If the existing material is crumbling, hollow, or contaminated with organic debris, clean it out to a depth of about 1.5 inches and refill from scratch. Trying to activate new polymeric sand over old degraded material doesn't work well because the water can't penetrate through the old layer to bond the new one.
White haze
This is the most common complaint with polymeric sand installs. It's caused by polymer residue being left on the stone surface when water is applied. The residue floats to the surface and bonds to the stone face as it dries. Prevention is far easier than removal: blow off every particle from the stone surface before any water touches it, and work on dry pavers on low-humidity days. Alliance Gator specifically warns that high humidity or damp pavers cause white haze and recommends working in dry conditions. If haze happens, catch it within a few hours while it's still soft. A mild acid wash (carefully diluted) can help on some stones, but test on a hidden spot first. On porous limestone or sandstone, polymer haze can be very difficult to fully remove.
Cracking
Cracks in joints are usually caused by one of three things: using a rigid filler on a flexible base, insufficient joint depth (less than 1.5 inches of depth means the filler can't anchor well), or poor drainage causing frost heave. Match your filler to your base type, make sure joints are deep enough, and fix drainage issues before they cause heaving.
Washout
If polymeric sand washes out in the first rain after installation, the polymer didn't fully activate. This usually means the watering step was skipped or done incorrectly, or rain hit the joints before they had 24 hours to cure. Sakrete’s PermaSand TDS notes that watering is critical and that water will not allow the sand to harden through the full depth, so improper watering can prevent full-depth joint hardening watering step was skipped or done incorrectly. Re-install on a dry day when no rain is forecast for at least 24 hours, and follow the watering steps carefully.
Where to buy, what tools you need, and what to expect to spend
Reading product labels before you buy
Before buying any polymeric sand, check the product's Technical Data Sheet (TDS) for three things: maximum joint width, minimum joint depth, and whether it's rated for natural stone. Some products are formulated for interlocking concrete pavers and may not be suitable for the irregular shapes and more porous surfaces of flagstone. Products like Gator Dust Bond, Techniseal NOCO, and Quikrete HardScapes Polymeric Jointing Sand all explicitly list natural stone compatibility. Also check whether the product is rated for pedestrian use only versus vehicular traffic, since some polymeric sands aren't hard enough for driveways. Techniseal actually emphasizes always using the current TDS before installation since formulations update and limits can change.
Where to buy
Home Depot, Lowe's, and local masonry suppliers all carry polymeric sand. If you're also wondering where to buy flagstone for patio materials beyond joint filler, check the same local masonry suppliers and hardware stores mentioned below. Big box stores typically stock Quikrete and Sakrete lines. For Techniseal and Alliance Gator products, you're more likely to find them at hardscape specialty suppliers, masonry yards, or contractor supply houses. Specialty suppliers often give better product advice and sometimes offer job-site delivery for bulk orders, which is worth it for larger patios. For mortar and sand/cement mixes, any hardware store or concrete supply yard works fine.
Tools you'll need
- Stiff bristle push broom (for sweeping sand into joints)
- Leaf blower (essential for removing excess before wetting)
- Garden hose with adjustable nozzle set to a fine mist (not a jet)
- Pointed tool or stiff brush for cleaning out old joint material
- Rubber mallet and a scrap board (for tamping, optional but helpful)
- Plate compactor with rubber pad (for large areas)
- Margin trowel and pointing tool (for mortar applications)
- Safety glasses and gloves
- Kneeling pad
Cost expectations
Polymeric sand runs roughly $25 to $45 per 50-pound bag at retail. Coverage depends on joint width and depth. For a 200-square-foot patio with average 1-inch joints, expect to use 3 to 6 bags. Wide-joint products like Gator Dust Bond run toward the higher end of that range. Dry sand/cement mix is much cheaper at $8 to $12 per bag but requires more bags for wider joints. Mortar and pointing work on a slab-set patio will cost more in time and finishing effort, though materials are inexpensive. If you're hiring out the joint filling portion of a flagstone install, expect to add roughly $1 to $3 per square foot for labor, depending on joint complexity. Doing it yourself saves real money, but only if you follow the steps correctly. A botched polymeric sand job that needs re-doing costs more than getting it right the first time.
FAQ
What’s the single best joint filler for a typical sand-set flagstone patio in most climates?
For most sand-set flagstone patios, the best choice is a polymeric sand that is specifically rated for natural stone and for your actual joint width. The “natural stone compatible” rating matters because some polymeric products are formulated for uniform paver joints and do not bond as well in irregular, wider flagstone gaps.
How deep do flagstone joints need to be for polymeric sand to work?
Most quality polymeric sands require at least about 1.5 inches of joint depth to anchor properly. If your joints are shallow, the polymer cannot form a strong, bonded “bridge,” so you may see rapid washout or hollow spots even when the product is correct for width.
Can I use polymeric sand in very wide flagstone joints, like 2 to 4 inches?
You can, but only if the product is rated for that width range. For example, some wide-joint formulas are designed for joints up to 2 inches, and others are engineered for natural stone joints as wide as 6 inches. Trying to fill wide gaps with a narrow-joint product is a common cause of cracking and premature failure.
What should I do if my patio is on a slope?
Slope changes curing behavior and runoff risk. If you use polymeric sand, activation should be a gentle mist rather than a strong spray, and you should avoid heavy watering that can move uncured material downhill. For steeper areas, “wet-brushed” polymer mortar systems that are worked into joints and compacted tend to outperform swept-and-watered sand.
Will polymeric sand kill weeds in the joints?
It helps block germination by tightening and stabilizing the joint fill, but it is not a herbicide. Weed seeds can sprout on top of the joint if they land on organic debris, so routine sweeping and debris removal still matter. If you use a pre-emergent, confirm it is compatible with your joint filler, since some products can stain or degrade certain materials.
Why do my joints crack, even though I used polymeric sand?
Cracking usually points to a system mismatch or poor anchoring, not the brand. Common causes are insufficient joint depth, poor drainage leading to frost heave, or using a rigid filler approach on a base that moves. Check base drainage first, then confirm the joint depth and the product rating for natural stone.
How long should I wait to let polymeric sand cure before expecting rain?
Plan to keep foot traffic and rainfall off the joints for at least 24 hours after activation. If a heavy rain hits before the polymer fully cures, you can get washout and weak bonding. Re-install on a dry day if washout happens early, rather than trying to “top off” immediately over washed-out joints.
Is it necessary to remove old joint sand before adding new polymeric sand?
Not always. If the existing material is firm and intact but just low, you can often sweep in new polymeric sand, compact it, remove excess, and re-activate. If the old fill is crumbling, hollow, or contaminated with organic debris, you should clean it out to the required depth (often about 1.5 inches) and refill so the new product can bond properly.
What causes white haze on the stone after using polymeric sand, and can it be prevented?
White haze usually occurs when polymer residue is left on the stone surface while you wet the joints. It can bond to the stone as it dries, especially under damp or high-humidity conditions. Prevention is to blow off all residue before any water is applied and work with dry pavers on low-humidity days, then address haze promptly while it is still soft.
How do I handle expansion gaps at the perimeter of the patio or next to a house?
Expansion gaps should not be filled with joint sand. Use a compressible backer rod and an appropriate urethane caulk designed for movement, because polymeric sand is not meant to accommodate large directional expansion. Filling a wide expansion joint with sand can lead to cracking and loss of joint material.
How do I choose between polymeric sand, sand-cement mix, and polymer-modified mortar for flagstone?
Start with your base type and climate behavior. If the patio sits on sand or gravel and you expect seasonal movement, polymeric sand or a flexible polymer-modified joint system is typically the better match. If the stones are bonded to a rigid concrete slab, mortar joints are more appropriate. Avoid using rigid mortar on sand-set installs, because movement will create cracks.
How can I tell when it’s time to re-fill polymeric sand joints?
Look for three practical indicators: joints that look sunken or hollow when you tap them, weeds returning in previously clean joints, and sand washing out after rain that used to stay put. Re-filling sooner is usually cheaper, because once joints open enough for soil migration, you often end up correcting settling and leveling in addition to re-jointing.
Can I use polymeric sand on limestone or other porous flagstones without staining or haze issues?
Porous stones like limestone and some sandstones can hold polymer residue more stubbornly, making haze harder to remove fully. If you have these stone types, do a small test patch, blow off residue thoroughly, and be extra strict about dry-working conditions during activation.