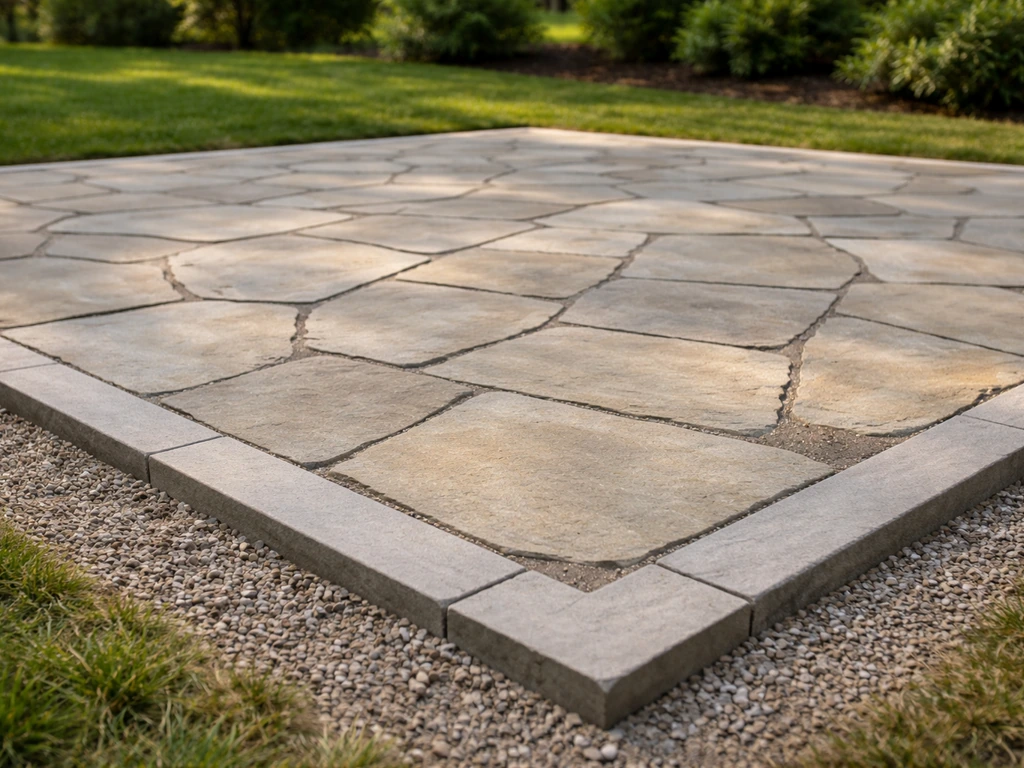
For most homeowners, the best base for a flagstone patio is a compacted gravel sub-base (6 to 8 inches of 3/4-inch crusher-run gravel, compacted to 98%) topped with a 1-inch screeded coarse sand bedding layer. That combination handles drainage, gives you enough flexibility to survive freeze-thaw cycles, and is forgiving enough for a DIY build. If you're in a warm climate with stable soil and you want a locked-in, rigid surface, a mortared thin-bed over a concrete slab is a solid alternative. But for most backyards, the gravel-plus-sand dry-set approach wins on practicality, repairability, and long-term performance. A flagstone patio is an outdoor surface made by setting stone pavers over a properly built base for stability and drainage.
Best Base for Flagstone Patio: Dry-Set vs Thin-Bed Guide

Nolan Ellison
17 May 2026
What 'base' actually means for a flagstone patio

When people talk about a flagstone base, they're usually lumping together two or three distinct layers that each do a different job. Understanding those layers separately makes the whole project much less confusing.
- Subgrade: The native soil you're building on. It gets excavated, graded for drainage, and compacted before anything else goes down.
- Sub-base (aggregate base): The thick layer of compacted crushed gravel that sits directly on the subgrade. This is the structural workhorse. Standard depth is 6 to 8 inches of 3/4-inch crusher-run gravel.
- Bedding (setting) layer: A thinner layer of coarse sand or stone dust screeded to a consistent 1-inch thickness. This is what the flagstones actually sit on and where fine adjustments happen.
- Setting method: Whether the stones are dry-set into sand or mortared onto a rigid base. This affects flexibility, permanence, and maintenance.
- Jointing material: Whatever fills the gaps between stones. This is a separate decision but it connects directly to which base you choose.
Total excavation depth for a typical dry-set flagstone patio runs 8 to 10 inches below finished grade: roughly 6 to 8 inches for gravel, 1 inch for bedding sand, plus the thickness of the flagstone itself (usually 1.5 to 2.5 inches for standard flagging). That adds up fast, which is why skimping on excavation is one of the most common mistakes I see.
The best overall base setup (and the main alternatives)
The dry-set gravel-and-sand system is the industry-standard recommendation for residential flagstone patios and the one that most contractor specs (including Unilock's Natural Stone Installation Guide and ICPI Tech Spec 4) point to. It's flexible, drains well, and tolerates seasonal ground movement without cracking. Here's how the three main approaches stack up:
| Base Type | Best For | Durability | DIY Difficulty | Repairability | Weed Control |
|---|---|---|---|---|---|
| Gravel + sand (dry-set) | Most climates, DIY builds, any budget | Excellent if installed right | Moderate | Easy (lift and reset) | Fair (needs polymeric sand or plants) |
| Concrete slab + mortar thin-bed | Warm/stable climates, professional installs | Excellent on stable ground | High | Difficult (demo required) | Excellent (no gaps) |
| Gravel + stone dust | Informal look, budget builds, mild climates | Good | Low to moderate | Easy | Poor without topping |
Dry-set sand bedding is the recommendation I'd give a friend in almost any climate. The one clear exception: if you're mortaring flagstone over an existing concrete slab and you're in a frost-free zone (or the slab extends below the frost line), a mortar thin-bed is perfectly appropriate and gives you a cleaner, more locked-in result. Irwin Stone also contrasts this mortared-on-concrete approach with a simpler dry method using stone dust or sand spread to match the stone thickness below the finished level blank" rel="noopener noreferrer">mortaring flagstone over an existing concrete slab. Mutual Materials also lists a blank" rel="noopener noreferrer">Natural Flagstone Installation Mortar Set installation category, reflecting that mortared thin-bed methods are an option distinct from dry laying.
Picking the right base for your specific situation
The 'best' base depends heavily on three factors: your climate, your soil, and how much maintenance you're willing to do down the road. Here's how to think through each.
Freeze-thaw climates
Frost heave is the enemy of rigid patio systems. When soil freezes, ice lenses form and push upward with enormous force, and a mortared slab on a shallow, poorly drained base will crack and shift. Flexible, unbonded systems (stone on compacted aggregate with sand bedding) are specifically recommended for cold climates because they move with the ground and settle back into place without permanent damage. The Beacon Hill flagstone tech spec from Unilock makes this explicit: the base must be designed so the area below the concrete is not subject to frost movement. That means your gravel sub-base needs to be deep enough and free-draining enough to prevent water accumulation and ice lens formation.
Soil type: clay vs. sandy vs. loam
Clay soil retains water, drains poorly, and shifts seasonally. On clay, go deeper with your gravel (aim for 8 inches minimum) and use a geotextile separator fabric between the subgrade and your gravel base. This keeps fine clay particles from migrating up into your aggregate over time, which would eventually compromise drainage and create soft spots. Sandy or well-drained loam soils are far more forgiving and may allow you to get away with 4 to 6 inches of base in mild climates, though more is always safer.
Drainage and slope
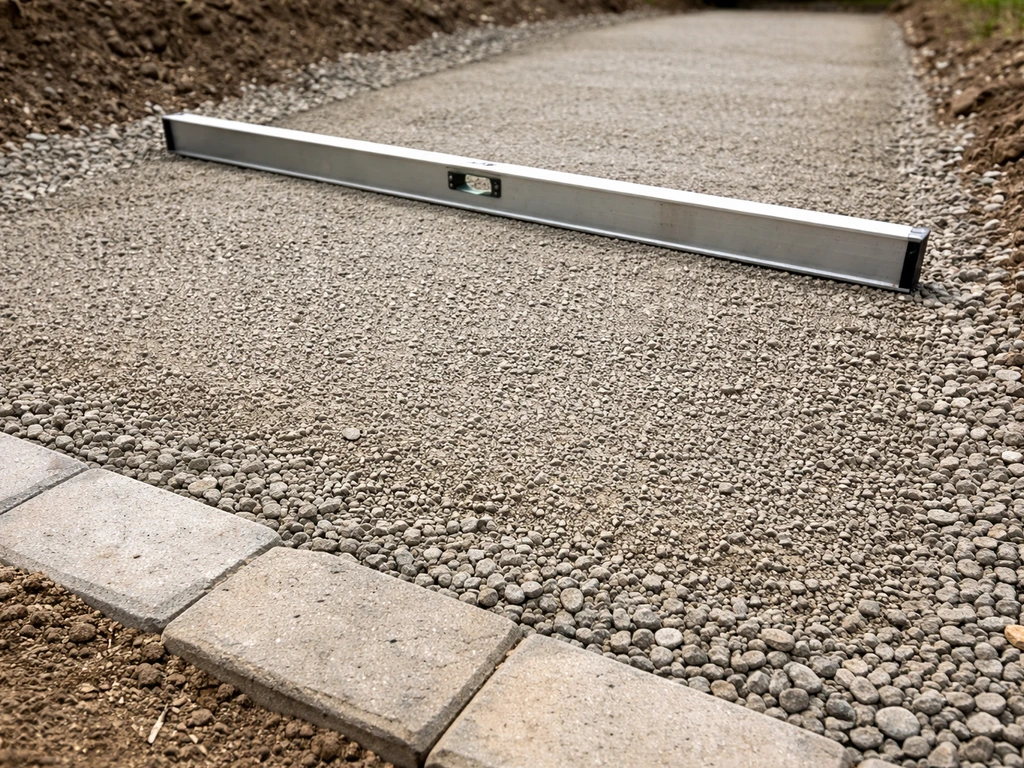
Drainage falls need to be built into the sub-base level, not corrected with thicker or thinner sand later. If you try to create slope by varying your sand bedding thickness, you end up with an uneven, unstable setting layer. The right approach is to grade the subgrade and sub-base to a minimum slope of 1/8 inch per linear foot away from your house and any structures, then keep subsequent layers at consistent thickness. This is one of those details that separates a patio that performs well for a decade from one that turns into a puddle after two years.
How to build the base layers: step by step
- Mark out the patio area with stakes and string lines, adding 6 inches on each side to allow room for edge restraints.
- Excavate to the correct depth: 6 to 8 inches for gravel base, plus 1 inch for sand bedding, plus the thickness of your flagstone. Total is typically 10 to 12 inches below finished grade.
- Grade and compact the subgrade. Remove all organic material, roots, and loose soil. Use a plate compactor to firm up the native soil.
- If the soil is clay or fine-grained, roll out a geotextile separator fabric (ASTM D6525-compliant) across the subgrade, lapping up the sides 6 inches. This prevents aggregate contamination over time.
- Add crusher-run gravel (3/4-inch minus crushed rock) in lifts of no more than 4 inches. Compact each lift with a plate compactor before adding the next. Aim for 6 to 8 inches total compacted depth.
- Check for grade and drainage slope at the sub-base level. Adjust now before anything else goes down.
- Install edge restraints on all sides using rigid plastic or aluminum paver edging spiked into the sub-base at least every 12 inches. This locks the entire system together.
- Add 1 to 1.5 inches of coarse concrete sand (ASTM C33 or equivalent) over the compacted gravel. Screed it to a consistent 1-inch nominal thickness using rails or screed pipes pulled across with a straightboard.
- Do not walk on or disturb the screeded sand before setting stones. Only screed what you can cover with flagstone in a single day.
- Set flagstones into the sand, pressing firmly and checking level as you go. Leave consistent joint gaps (typically 1/2 to 2 inches) between stones.
- Once all stones are set, sweep joint filler into the gaps and compact lightly with a rubber mallet or plate compactor fitted with a rubber pad.
Dry-set sand vs. mortar: the real trade-offs
Both approaches work. The right one depends on your climate, your expectations, and your appetite for future repairs. Here's an honest comparison:
| Factor | Dry-Set Sand Bedding | Mortar Thin-Bed (on concrete) |
|---|---|---|
| Initial cost | Lower (no concrete slab needed) | Higher (slab pour adds cost) |
| Freeze-thaw performance | Excellent (flexible, self-correcting) | Poor to fair without deep frost footings |
| Stability underfoot | Very good when compacted correctly | Excellent (rigid, no movement) |
| Weed control | Moderate (needs polymeric sand or planting) | Excellent (sealed mortar joints) |
| DIY-friendliness | Moderate (requires good compaction) | Low (requires concrete work and mortar skill) |
| Repairability | Easy (lift stone, add/remove sand, reset) | Difficult (demo mortar and possibly slab) |
| Risk of cracking | Low (stones move independently) | Higher in freeze-thaw without proper footings |
| Longevity | 20+ years with good base prep | 20+ years in right climate, less in cold zones |
If I had to summarize the decision: use dry-set sand in any climate that sees freezing temperatures, on any site where drainage is uncertain, or anywhere you want the ability to lift and reset individual stones without major work. Use mortar over a proper concrete slab if you're in a warm climate, working with a contractor, and you want an ultra-stable surface with no joint maintenance required. The mortar also integrates well with the approach covered in more detail in the article on best mortar for flagstone patio if you go that route.
Edge restraints and jointing: the details that hold everything together
Edge restraints
Edge restraints are non-negotiable for a dry-set system. Without them, the entire patio slowly spreads outward over time as stones migrate toward the edges, opening up joints and creating tripping hazards. Use rigid plastic paver edging or aluminum landscape edging on all four sides, installed flush with or just below the top of the flagstone. Spike into the sub-base every 10 to 12 inches. Curve pieces work for curved edges. This single step probably does more to preserve a dry-set patio than anything else.
Joint fillers and width
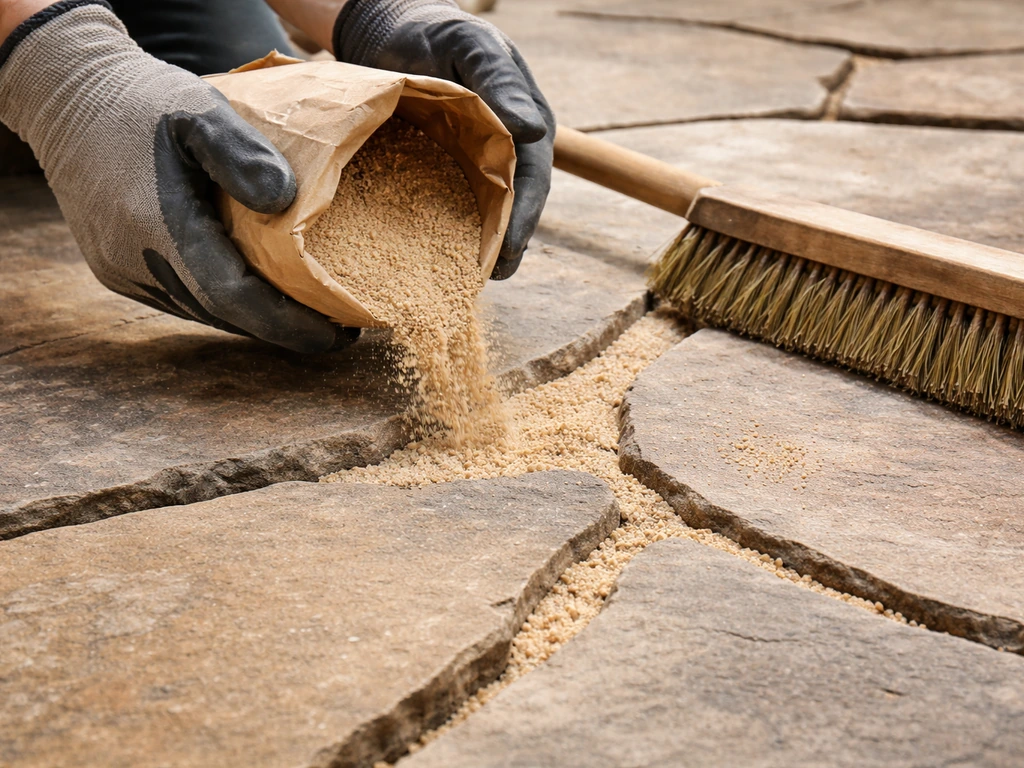
The joint material you choose should match your joint width. For joints up to 2 inches wide, polymeric sand products like QUIKRETE HardScapes Polymeric Jointing Sand or Alliance Gator Maxx G2 are the go-to option. They harden after watering, resist washout, inhibit weed germination, and block ants. Keep the joint sand at least 1/8 inch below the top of the stone surface (or below the chamfer edge) so it doesn't track onto the patio.
For wider, more naturalistic joints (up to 6 inches), products like Gator Dust Bond are formulated for larger gaps. Polymeric sand does require a minimum slope of 1/8 inch per foot to drain properly, which is another reason to build that slope into the sub-base from the start.
The joint filler choice also connects to the overall look you're going for. Wide joints filled with creeping thyme or moss create a more naturalistic feel, while tight joints with polymeric sand look cleaner and more formal. If you're weighing these options, the deeper dives on best joint filler for flagstone patio and best grout for flagstone patio cover each approach in more detail.
Common mistakes and how to fix them
Stones sinking or rocking
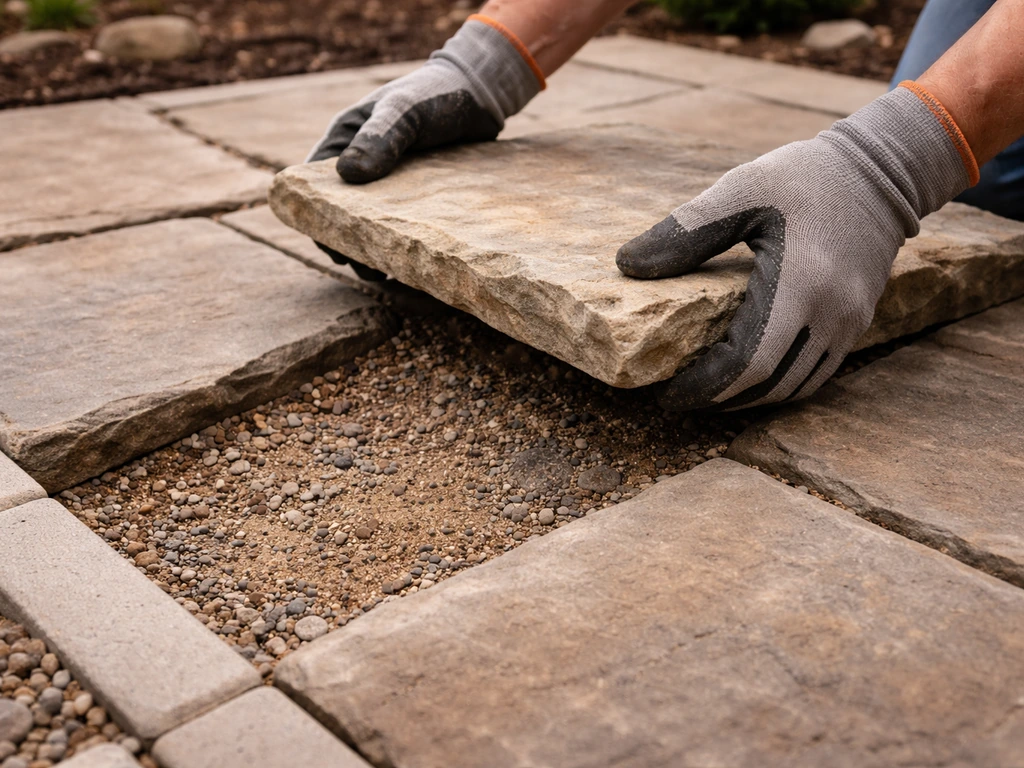
This almost always comes back to inadequate compaction or too little gravel. If one corner of a stone sinks, the gravel base under that spot wasn't compacted enough or the bedding sand is too thick and inconsistent. Fix: lift the stone, remove sand, check for soft spots in the gravel, compact if needed, re-screed the sand to 1 inch, and reset. If you're seeing widespread sinking across the patio, the base depth was probably insufficient for your soil conditions.
Poor drainage and standing water
If water pools on the patio surface, the drainage slope either wasn't built into the sub-base or it's been compromised by uneven settling. The short-term fix is to lift problem areas and re-grade the underlying gravel. The prevention is doing it right at the sub-base stage: grade the native soil before laying any gravel, confirm the slope with a level and tape measure, and maintain that slope consistently through every layer.
Weeds coming up through joints
Most joint weeds germinate from seeds that blow in from above and root into whatever is sitting in the gap, not from roots pushing up from below. The best prevention is polymeric sand, which creates a firm, inhospitable surface for seed germination. Choosing the best grout for a flagstone patio often comes down to whether you’re using polymeric sand or mortar in your specific joint widths and climate best grout for flagstone patio. A geotextile layer at the subgrade won't stop joint weeds but it does prevent underground roots from exploiting the porous base. If weeds are already established, pull them, clean out the joints, and refill with polymeric sand before they go to seed.
Sand washing out of joints
Regular construction sand washes out quickly in rain, especially on a sloped patio. If you're not using polymeric sand, you'll need to refill joints regularly. This is one case where polymeric sand pays for itself fast. Also check that your edge restraints are solid: once the perimeter is breached, material migrates out from the edges and the whole base system gradually degrades.
Frost heave cracking (mortared systems)
If you mortared flagstone onto a slab that wasn't engineered for your frost depth, heaving is the likely culprit when cracks appear. Unfortunately, the repair here is significant: demo the affected area, address the drainage or footing issue at the source, and either re-pour a deeper slab or switch to a dry-set approach in that zone. This is exactly the kind of expensive lesson that makes me recommend dry-set systems in cold climates almost across the board.
Matching base thickness and materials to your climate and budget
Here's a quick decision guide based on the most common homeowner scenarios:
| Scenario | Recommended Gravel Depth | Bedding Layer | Geotextile? | Setting Method |
|---|---|---|---|---|
| Warm climate, sandy soil | 4 to 6 inches compacted gravel | 1 inch coarse sand | Optional | Dry-set or mortar on slab |
| Cold climate, any soil | 6 to 8 inches compacted gravel | 1 inch coarse sand | Recommended | Dry-set (flexible system) |
| Clay soil, any climate | 8 inches compacted gravel (minimum) | 1 inch coarse sand | Required | Dry-set |
| Existing concrete slab, warm climate | N/A (slab is the base) | Mortar bed (3/4 to 1.5 inches) | N/A | Mortar thin-bed |
| Budget DIY, mild climate | 4 to 6 inches compacted gravel | 1 inch coarse sand or stone dust | Optional | Dry-set |
One final thing worth saying: the base is the one place in a flagstone patio project where you genuinely cannot cut corners without paying for it later. Spending an extra $50 on a deeper gravel base or a geotextile fabric is almost always cheaper than lifting and resetting a patio that's sinking three years in. Get the base right and the rest of the project (the flagstone sourcing, the jointing, the mortar choices if you go that route) becomes a lot more forgiving. If you still need to source flagstone for the patio, a quick search for where to buy flagstone for patio can help you compare local suppliers and delivery options.
FAQ
Can I use a thinner gravel base (for example, 4 inches) if my yard has sandy soil?
You may get away with less in mild climates, but 4 to 6 inches only works when drainage is reliable and the subgrade is properly graded to slope away from the house. If you see any soft, springy areas during excavation, increase depth and add geotextile separation so the bedding sand does not migrate into fines over time.
Do I really need geotextile fabric under flagstone on clay soil, or is deeper gravel enough?
Deeper gravel helps, but geotextile is the safeguard that reduces pumping and migration of clay fines into the base. On clay, a common failure mode is “the patio looks fine at first,” then later you get soft spots and joint sand loss. Using geotextile between subgrade and gravel is a low-cost way to prevent that progression.
What’s the correct way to build slope if I’m using dry-set sand, and how do I verify it?
Slope must be created at the graded subgrade or sub-base level, not by varying sand thickness. Before laying bedding sand, confirm drainage slope with a level plus tape measure (and check multiple points), then keep gravel and sand layers uniform at the specified thickness.
Is polymeric sand okay if my patio is near grass, planters, or irrigation overspray?
It can be, but avoid direct, repeated overwatering that can weaken many jointing materials. Keep poly sand below the stone surface (or below any chamfer edge) so it does not track out onto the patio when joints get wet. If irrigation runs across the patio, adjust heads or install barriers to prevent constant washdown.
How tight should the flagstone joints be if I want polymeric sand to work well?
For polymeric sand performance, the article’s guidance of joints up to about 2 inches is the practical limit. If your stone pattern leaves wider, irregular gaps, plan on a different jointing product designed for larger joint widths, otherwise you may get inconsistent locking and faster washout.
Can I install a dry-set flagstone patio without an expansion gap near the house or walls?
No, you still need a controlled separation at fixed edges. Even in dry-set builds, leave proper clearance at the perimeter and ensure edging is tight and supportive, so stone movement does not push against rigid structures and open joints later.
What’s the best way to handle a patio area that crosses existing soil that settled after digging?
Treat the settled zone as suspect subgrade. Remove the compromised material down to firm, stable soil, then rebuild the base to the full specified depth and recompact in lifts. Skipping this step often shows up later as corner sinking or uneven settling that you then have to re-grade.
If a single stone sinks, should I just add more sand under it?
Better not. The correct fix is to lift the stone, remove the old bedding sand, inspect the underlying gravel for soft spots, compact if needed, then re-screed to the target bedding thickness before resetting. Adding sand on top can disguise the void temporarily, but it usually returns as the base continues to compress.
How can I prevent weeds from coming back if polymeric sand was installed before they fully establish?
Polymeric sand helps reduce germination, but it only works if joints are kept properly filled and not washed out. After any heavy rain event, recheck joint areas for erosion, ensure slope is functioning, and top off joints before seeds get a chance to settle and take hold.
What should I do if my mortar thin-bed is cracking, but I’m not sure it’s frost-related?
First confirm drainage and frost exposure conditions, because slab heave is only one cause of cracking. If cracks coincide with freeze cycles, the fix is typically to address the engineered depth and drainage at the source, then consider switching that zone to a dry-set system where appropriate.
How do I choose between dry-set and mortar if my climate has mild winters but occasional freezes?
If freezing temperatures occur at all, dry-set is usually the safer bet because it tolerates seasonal movement without cracking. Mortared thin-bed over a shallow or poorly drained base can fail when freeze-thaw cycles are uneven, especially if water can accumulate under the slab or within the foundation edge zone.