For most patios made of interlocking pavers or brick, polymeric jointing sand is the right call. For flagstone, natural stone, or large-format tile and porcelain, you want a cement-based or polymer-modified mortar mix instead. The choice really comes down to whether your patio is built to flex (sand-set base) or stay rigid (mortar bed), how wide your joints are, and how much freeze-thaw or rain your climate throws at it. Get that match right and your joints will last years. Get it wrong and you're re-doing the work in one season.
What to Use for Patio Grout: Best Options by Patio Type

Nolan Ellison
22 Jun 2026
Sand-set vs mortar joints: which system are you working with?
Before you buy anything, you need to know which type of patio you have, because the two systems are fundamentally different and they do not share the same jointing products.
A sand-set or flexible patio sits on a compacted aggregate base topped with a layer of bedding sand. The pavers or bricks rest on top and can shift slightly without cracking. These systems need a jointing material that can move with them, which is why you use polymeric sand or a dry sand-based compound rather than rigid cement mortar. Locking a flexible patio down with hard mortar almost guarantees cracked joints within a year or two, especially anywhere freeze-thaw cycles are common.
A mortar-set or rigid patio is bonded to a concrete slab or mortar bed. Flagstone, natural stone slabs, and porcelain or ceramic tile are almost always installed this way. Here the joints need to be filled with something equally rigid: a cement-based grout, a sand-and-cement mortar mix, or a polymer-modified tile grout depending on the surface. Using plain polymeric sand in a mortar-set tile joint will not give you the bond or durability the system needs.
The right grout for your specific patio surface
Concrete pavers and interlocking paving systems
Polymeric jointing sand is the gold standard here. Products like Techniseal EZSAND, QUIKRETE HardScapes Polymeric Jointing Sand, Pavestone PolySand, and Sakrete PermaSand are all polymer-modified graded sands designed specifically for paver joints. QUIKRETE's product, for example, handles joints up to 2 inches wide and works across pavers, brick, natural stone, and concrete slabs. These products harden as they dry but retain just enough flexibility to handle minor paver movement without cracking. They also resist weed growth, ant penetration, and the washout that plain kiln-dried sand suffers after a few heavy rains.
Brick pavers
Brick paver patios are usually flexible sand-based systems, and polymeric sand is again the correct jointing material. When re-sanding older brick paver joints, the process involves sweeping out loose material, refilling with polymeric sand, compacting, and misting to activate the polymer binder, then allowing a full cure before traffic. The flexibility of polymeric sand suits brick well because brick pavers can heave slightly with temperature and moisture changes, and a rigid mortar joint would crack under that movement.
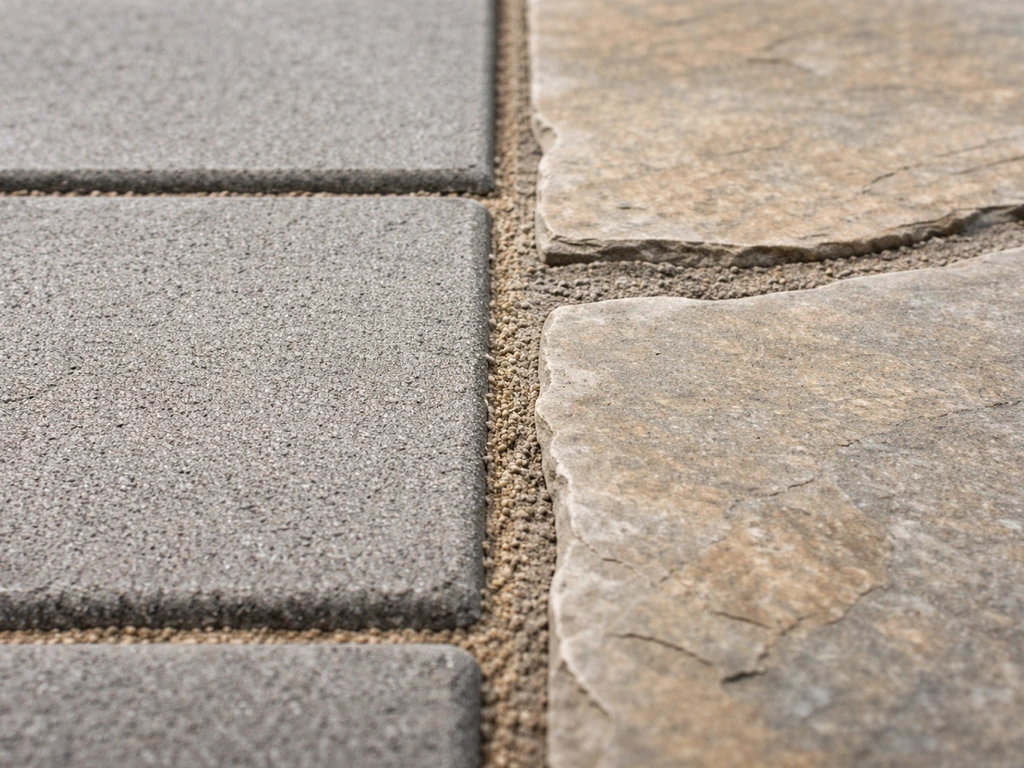
Flagstone and irregular natural stone
Flagstone is where the decision gets more nuanced. Choosing the best grout for a slate patio depends on whether you have a sand base or a mortar bed and how much freeze-thaw your area gets Flagstone and irregular natural stone. If your flagstone is set in a sand or decomposed granite base with no mortar bed, a dry-laid approach using coarse sand or even a dry 4:1 sand-to-cement mix brushed into joints (with no added water) can work well. Pavingexpert describes this dry mortar approach where the mix is swept in and moisture from the ground and air slowly cures it. If your flagstone is set on a mortar bed or concrete slab, however, you need a proper mortar mix for the joints, typically a sand-to-cement ratio between 3:1 and 5:1 depending on joint width, mixed to a stiff consistency. Wide, irregular gaps in flagstone often need a compressible mortar with some flexibility, so polymer-modified versions are worth the extra cost in freeze-thaw climates.
Porcelain tile and ceramic tile patios
Outdoor tile patios on a concrete slab need a proper unsanded or sanded tile grout, and the setting mortar underneath must be polymer-modified. This is non-negotiable in any climate with frost. The National Tile Authority is clear that unmodified thinsets are not acceptable for exterior tile installations in freeze-thaw zones because water gets into the setting bed and the expansion from freezing shatters the bond. Use a polymer-modified grout matched to your joint width: unsanded for joints under about 3mm, sanded for joints 3mm and wider. For heavy outdoor exposure, epoxy-based tile grout is also an option and offers excellent stain and moisture resistance, though it is harder to work with and more expensive.
Polymeric sand vs cement-based mortar: when each one wins
| Situation | Best Choice | Why |
|---|---|---|
| Sand-set paver or brick patio | Polymeric jointing sand | Flexible, handles minor movement, resists weeds and washout |
| Flagstone on sand/DG base, narrow joints | Dry sand or dry 4:1 sand-cement brushed in | Allows drainage and movement without cracking rigid joints |
| Flagstone or stone on mortar/concrete bed | Sand-cement mortar (3:1 to 5:1) or polymer-modified mortar | Rigid base needs rigid but durable joints; polymer mod helps in cold climates |
| Porcelain or ceramic tile on concrete slab | Polymer-modified sanded or unsanded tile grout | Only type that survives freeze-thaw in bonded tile assemblies |
| Wide joints 5–30mm on any surface | Wide-joint compound (e.g. Bostik Cementone type) | Standard polymeric sand can fail in very wide joints; use a purpose-made wide-joint product |
| Re-jointing existing flexible paver patio | Polymeric sand (same product as original) | Matches existing system flexibility; easy sweep-in application |
The main failure mode for cement-based joint compounds in outdoor settings is freeze-thaw damage. NCC Streetscape's data on this is worth heeding: when water gets into a cement joint and then freezes, the expansion causes premature joint failure, especially if the material was installed in cold or wet conditions in the first place. In the UK and northern US climates especially, that risk is real every winter. If you’re looking for the best patio grout options in the UK climate, focus on products and mixes that handle rain and freeze-thaw without failing quickly. Polymer-modified products and properly installed polymeric sand both handle freeze-thaw significantly better than plain sand-cement mixes.
Color, finish, and sealing outdoors
Polymeric sands come in a handful of neutral colors, typically beige, tan, gray, and charcoal. The color you choose should complement your pavers rather than compete with them. Lighter sands tend to show staining more over time, and in shaded areas where algae or moss can grow, a mid-tone gray often ages better. For mortar joints on flagstone or tile, standard gray cement grout blends in well with most stone tones, but you can use a buff or off-white grout to highlight the stone rather than recede into it. Just know that light-colored grout in an outdoor setting will need more cleaning attention.
Sealing is a separate decision from grouting, but they are connected. For polymeric sand joints, most manufacturers do not require a sealer and some actually advise waiting at least 30 days after installation before applying any sealer or paver restorer product (Techniseal specifically calls this out). Sealing too early traps moisture and can cause a white haze to form on the surface. For mortar joints on stone and tile, a penetrating sealer applied after the grout fully cures (typically 28 days for cement-based products) will help repel water and staining, and it is especially worthwhile in freeze-thaw climates. Avoid surface-coating sealers that sit on top of the grout as they can peel and trap moisture underneath.
How to apply patio grout: prep, place, and clean it right
For polymeric jointing sand (pavers and brick)

- Make sure the paver surface is completely dry and clean before you start. Any moisture on top will cause the polymer to activate prematurely and haze.
- Check your joint depth. The sand level must sit at least 1/8 inch (3mm) below the top of the paver surface or below the chamfer edge. Techniseal EZSAND is explicit about this minimum depth requirement. Do not fill joints flush with the top of the pavers.
- Confirm joint width is at least 1/8 inch (3mm) minimum for most polymeric sand products. Very thin slivers between pavers may not work with standard products.
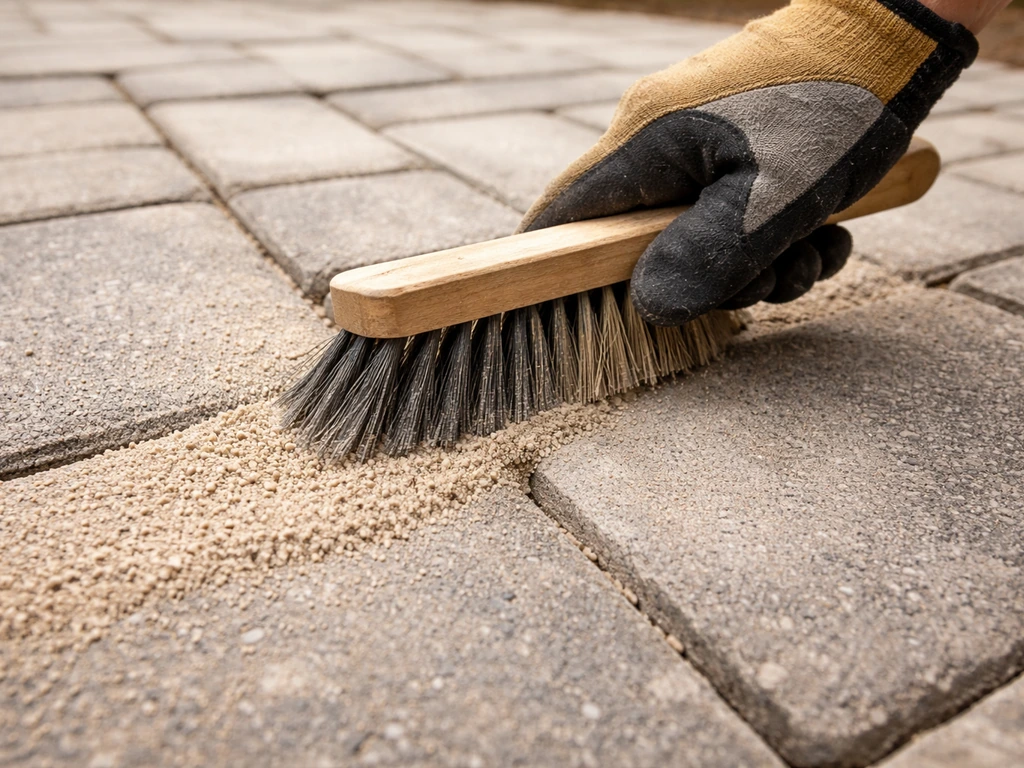
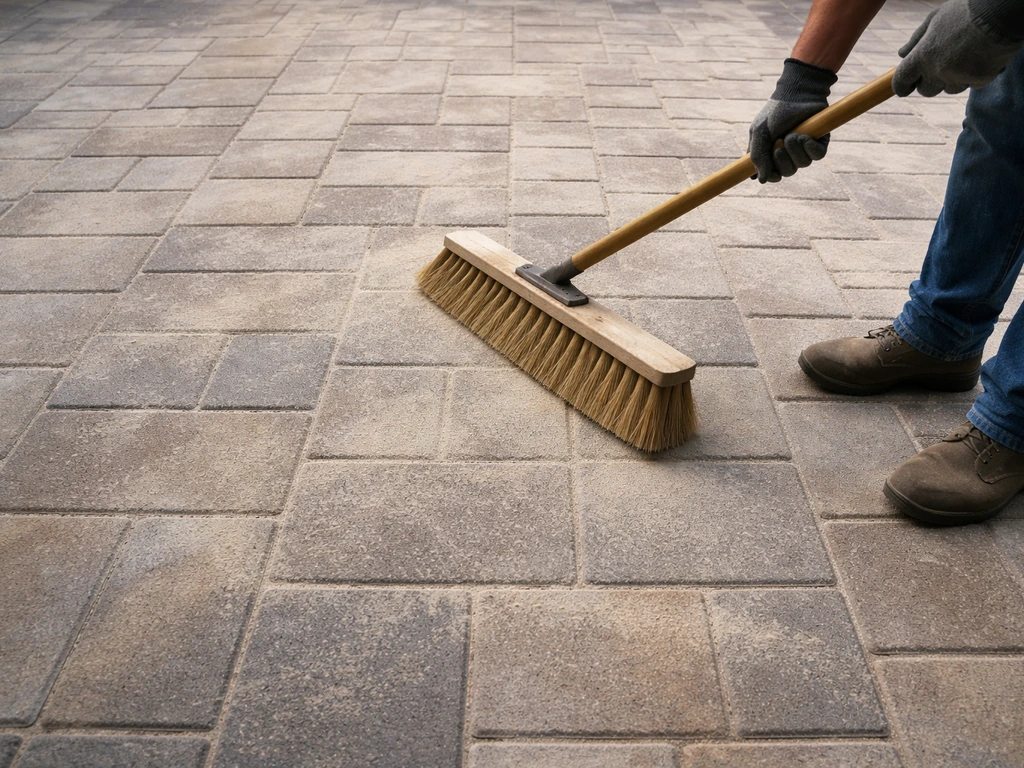
- Pour the dry sand across the surface and sweep it into the joints using a stiff broom. Work in multiple directions to fully pack the joints. After sweeping, run a vibratory plate compactor over the surface with a rubber mat or protective pad underneath to avoid scratching pavers. Compact the sand down, then sweep in a second pass to top up any joints that settled.
- Blow off excess sand from the paver surface with a leaf blower before wetting. Leftover sand on the surface when you mist is the number-one cause of haze.
- Mist the surface with a gentle spray. Do not use a high-pressure hose or power washer during activation. Too much water or force can wash the polymer binder out of the joints and cause a white film to appear on the surface (Sakrete PermaSand's TDS warns about exactly this).
- Allow at least 24 hours of dry weather before rain exposure. Most products including Techniseal EZSAND require roughly 24 hours of cure time before the surface can handle rain. Check the specific product sheet.
- Keep foot traffic off for 24 hours and vehicle traffic for longer, typically 48 to 72 hours depending on the product.
For mortar joints (flagstone, natural stone, tile)
- Clean out joints thoroughly. Remove loose debris, old failing mortar, and any organic matter. For tile, use a grout saw or oscillating tool to cut out cracked or hollow grout cleanly without chipping the tile edge.
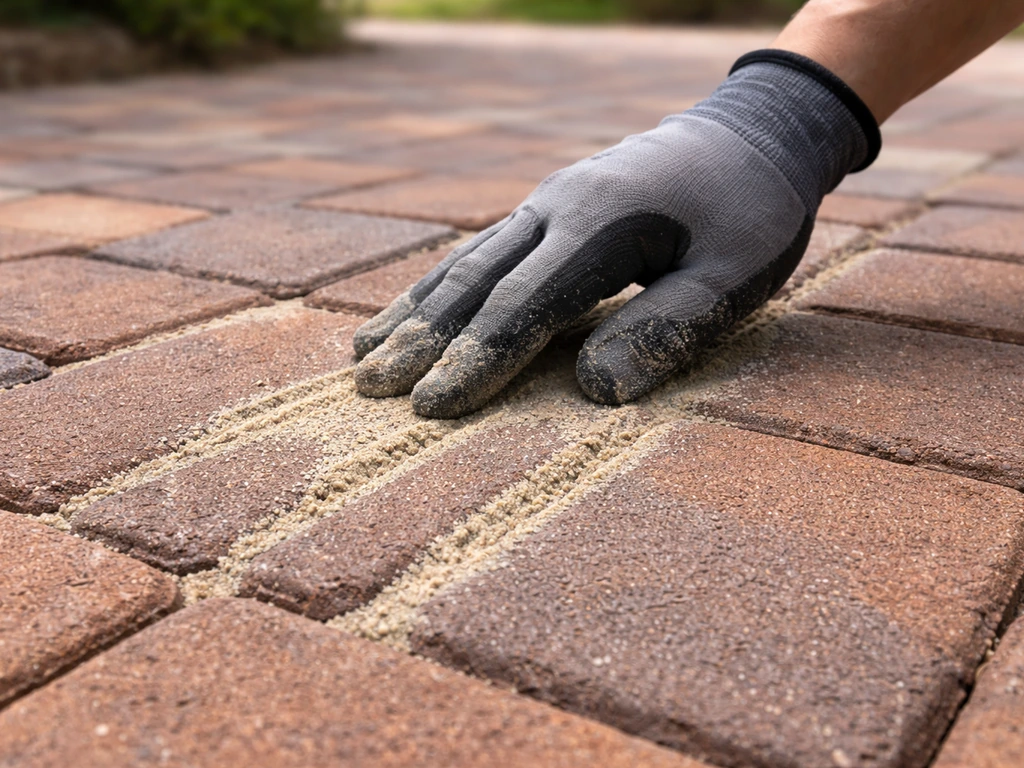
- Dampen the joint area lightly before applying mortar or grout. This prevents the substrate from drawing water out of the mix too fast, which weakens the joint. Do not saturate.
- For flagstone on a mortar bed, mix your sand-cement pointing mortar to a stiff, crumbly consistency, not wet. A wet mix slumps, stains the stone face, and is harder to clean up.
- If you are pointing flagstone set with buttered mortar, Pavingexpert advises doing it within 4 hours of laying while the base mortar is still fresh. Waiting longer means the base has hardened and you lose the bond continuity.
- Pack mortar firmly into joints using a pointing trowel or a stiff brush for dry mix applications. Keep mortar off the face of the stone or tile as much as possible.
- For tile grout, follow the manufacturer's water-to-powder ratio exactly. Too much water weakens the grout and increases shrinkage cracking.
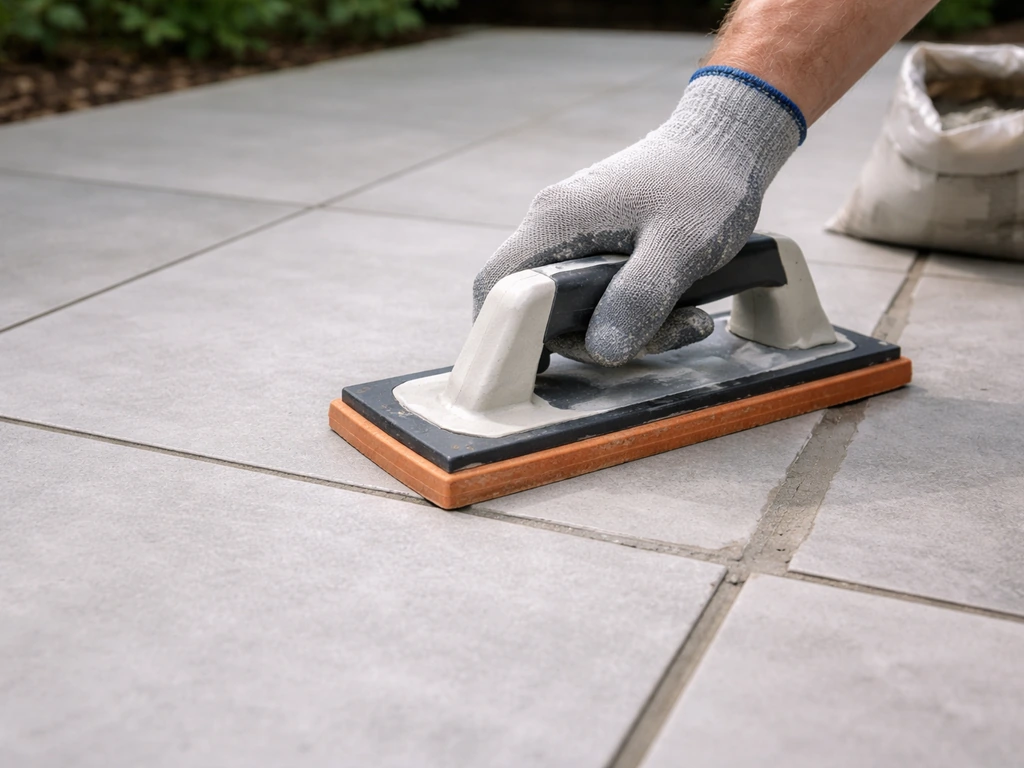
- Remove excess grout with a damp sponge before it sets. Work diagonally across the joints to avoid pulling grout back out. Change your rinse water frequently.
- Allow grout to firm up (usually 15 to 30 minutes depending on temperature), then do a second light clean with a barely damp sponge to remove the remaining haze. A dry microfiber cloth buffed over the surface after this second clean picks up the last residue.
- Cure cement-based grout for at least 28 days before applying any sealer.
Maintaining and repairing your patio joints
Preventing cracking, washout, and weed growth
Polymeric sand does degrade over time, especially in high-traffic areas or anywhere standing water sits regularly. Check your joints every spring after winter freeze-thaw cycles. If joints look hollow, sandy, or you can push your fingernail into them easily, it is time to top up. Catching this early prevents weeds from establishing roots in the joint and makes the repair much simpler.
For mortar joints on flagstone or tile, small hairline cracks are often cosmetic and caused by normal thermal movement. Cracks wider than 1mm, or ones that go all the way through the joint depth, need attention. Water gets in, freezes, and makes the crack worse every winter. Seal small cracks with a flexible, paintable exterior caulk matched to your grout color if the crack spans a movement area. For larger sections, re-grouting is the better fix.
How to re-grout or re-sand a section without damaging your patio
For polymeric sand repairs, the process is straightforward. If you are looking for the best patio grout repair for pavers, start by choosing the right polymeric jointing sand and then follow a careful re-sanding process Polymeric jointing sand repairs. Sweep or blow out loose and degraded sand from the affected joints. A stiff brush or a low-speed joint cleaning tool helps clear debris without disturbing adjacent good joints. Then follow the same installation steps as a new application: dry surface, fill joints to 1/8 inch below the paver top, compact, blow off the surface, and mist carefully. You do not need to re-do the entire patio for a localized repair.
For mortar joint repairs on stone or tile, use an oscillating multi-tool with a grout removal blade to cut out the failed section cleanly. Go to a depth of at least 6mm (about 1/4 inch) to give the new material something to bond to. Brush out dust and debris, dampen the joint, and pack in fresh mortar or grout. Feathering new mortar right at the surface level with old grout gives a cleaner look and better adhesion than just filling the void from the top.
One mistake I see often is mixing new grout or mortar too wet when doing small repairs because it feels easier to work with. Wet mixes shrink more as they cure and almost always crack again within a season. Keep your mix stiff and pack it firmly rather than running it in thin.
Dealing with haze after the job
If polymeric sand haze appears on your pavers after installation, do not try to clean it immediately with a power washer. Let the joints fully cure first. Techniseal recommends waiting at least 30 days after installing polymeric sand before using a haze remover or paver restorer product. Before applying any cleaner, wet the surface to saturate the joints, then let it dry back before treating. Applying cleaner to dry joints can pull the polymer binder out along with the haze. For mortar or grout haze on stone or tile, a diluted sulfamic acid cleaner works well on cement residue, but always test in an inconspicuous area first, especially on limestone or marble which reacts badly to acids.
Quick-reference guide: what to use based on your setup
| Patio Type | Base Type | Joint Width | Recommended Material | Climate Note |
|---|---|---|---|---|
| Concrete or clay pavers | Sand/aggregate base | 1/8 in to 2 in | Polymeric jointing sand | Works in freeze-thaw; do not install before rain |
| Brick pavers | Sand/aggregate base | 1/8 in to 1/2 in | Polymeric jointing sand | Flexible system; avoid rigid mortar |
| Flagstone | Sand or DG base | Up to 1 in irregular | Dry 4:1 sand-cement brushed in | Allows drainage and slight movement |
| Flagstone | Mortar or concrete bed | Variable, often wide | Stiff sand-cement mortar (3:1 to 5:1) or polymer-modified | Polymer-modified strongly preferred in frost climates |
| Porcelain or ceramic tile | Concrete slab | 3mm to 10mm typical | Polymer-modified sanded or unsanded tile grout | Polymer-modified is the minimum standard outdoors in frost zones |
| Wide joints any surface (5–30mm) | Any | 5–30 mm | Purpose-made wide-joint compound (e.g. Bostik Cementone type) | Check product freeze-thaw rating for your climate |
The best patio grout for your situation is the one that matches your base system, your joint width, and your climate, not just whichever product is easiest to find at the hardware store. The topics of which specific polymeric sand products perform best for paving slabs, how to handle grout on slate patios, and how to approach patio grout repairs in more detail each deserve their own deeper look, and the guidance above is designed to sit alongside that more targeted information. But if you take one thing away from this: match the jointing material to the patio system, prep and dry conditions correctly, and do not rush the cure. For Techniseal EZSAND, the cure guidance stresses letting the joints dry/settle properly, ideally 24 hours before exposing them to rain blank" rel="noopener noreferrer">do not rush the cure. That combination alone will save you more repeat work than any specific product choice.
FAQ
Can I use polymeric sand in mortar-bed flagstone or on a concrete slab patio?
No, polymeric sand is meant to work in flexible, sand-set systems where movement is expected. On a mortar bed or concrete slab you need a cement-based or polymer-modified mortar or grout system, matched to the surface type, so the joint stays bonded and resists freeze-thaw damage.
What should I do if my patio has both pavers and areas of tile or flagstone?
Treat each section by its setting system. Even if they sit on the same yard, use polymeric sand only on the flexible sand-set paver zones, and use the appropriate grout or polymer-modified tile grout on the rigid mortar-set areas. Mixing systems in the wrong zones is a common cause of cracked or failing joints.
How do I choose between sanded and unsanded grout for outdoor tile joints?
Use joint width as the deciding factor. For outdoor tile, unsanded grout is typically for joints under about 3 mm, and sanded grout is for joints 3 mm and wider. If you are unsure of the measurement, measure the narrowest and widest spots, then choose the category that fits your widest joints.
Is it okay to add extra water to grout or mortar to make it easier to spread during repairs?
Avoid it. Wet mixes are more likely to shrink and crack as they cure, which can bring the failure back within a season. Keep the mix stiff and pack it in firmly, especially for small patch jobs where the depth you cut out is critical for bonding.
My polymeric sand looks washed out after a heavy rain, what’s the next step?
First confirm whether it has fully cured. If it washed out soon after installation or you had heavy rain before the polymer had time to set, you may need a localized re-sand using the correct dry conditions, careful compaction, and misting per the product instructions. Don’t try to keep adding sand if the underlying bedding is saturated.
What’s the correct depth to fill patio joints when re-sanding or re-grouting?
For polymeric sand, fill the joints to about 1/8 inch below the paver surface so the material can be compacted and finished without overflowing. For mortar repairs, cut out to at least around 6 mm (about 1/4 inch) so the patch has enough depth to bond, then feather the surface to match the existing line.
How long should I wait before walking on the patio after grouting?
For polymeric sand, plan for a full cure before traffic, and follow the manufacturer’s minimum cure guidance. As a practical rule, don’t hurry the haze cure process, and avoid power washing for at least 30 days if haze removers or paver restorer products are involved.
Can I seal polymeric sand joints right away to keep weeds out?
Usually no, many polymeric sand manufacturers advise waiting before sealing, and sealing too early can trap moisture and lead to haze. If you want extra protection, wait the stated cure time and use only products the manufacturer approves for polymeric joints.
My joint cracks are small, should I seal them or re-grout?
Hairline cracks that are cosmetic may not require full re-grouting. If the crack is wider than about 1 mm, or it goes through the joint depth, address it. A flexible, paintable exterior caulk matched to the grout color can work for movement areas, while wider or extensive failures are usually best fixed by re-grouting.
Why does haze appear after polymeric sand installation, and how do I prevent damage while cleaning?
Haze can come from residue that remains on top while the polymer is curing. Don’t power wash immediately. Wet the surface to avoid pulling binder out, let it dry back appropriately, and follow cure timing before using haze remover or paver restorer products.
What can I do if I used the wrong grout or sand for my patio type?
Assess the setting system first, then correct the joint material in the affected areas. For example, if rigid mortar was used in a flexible paver installation, you will likely see recurring cracking and will need to remove and redo joints using the correct polymeric approach. If it’s a tile or slab zone, you may need to cut out the incorrect material and reapply a polymer-modified grout system matched to the joint width.
When is epoxy grout worth it for an outdoor tile patio?
Epoxy-based grout can be a good choice for heavy exposure because it offers strong stain and moisture resistance, and it can be especially useful where freeze-thaw cycles are severe. The tradeoff is that it is harder to work with and more expensive, so it is best when you can execute clean installation and joints accurately.