For most patio projects, the best crushed stone is a 3/4-inch crushed stone with fines (also called 3/4-inch minus or dense-graded aggregate) for your base, topped with either a 1-inch bedding layer of coarse concrete sand or a layer of 3/8-inch crushed stone if you want a loose-stone surface. The fines in dense-graded stone lock together under compaction to form a solid, stable platform that resists shifting, sheds water, and won't sink under foot traffic. If you're setting pavers, flagstone, or any solid surface on top, 3/4-inch minus base plus sand bedding is the combination that ICPI, Belgard, and most professional hardscape installers recommend. If you want a decorative crushed-stone surface you walk on directly, 3/8-inch angular crushed stone (no fines) gives you the best balance of drainage, compaction, and underfoot comfort. For help choosing the right stone for a patio specifically, see what stone is best for patio and match the type to your surface and drainage needs 3/8-inch angular crushed stone (no fines).
Best Crushed Stone for Patio: Sizes, Types, and Setup

Picking the right crushed stone size for your patio
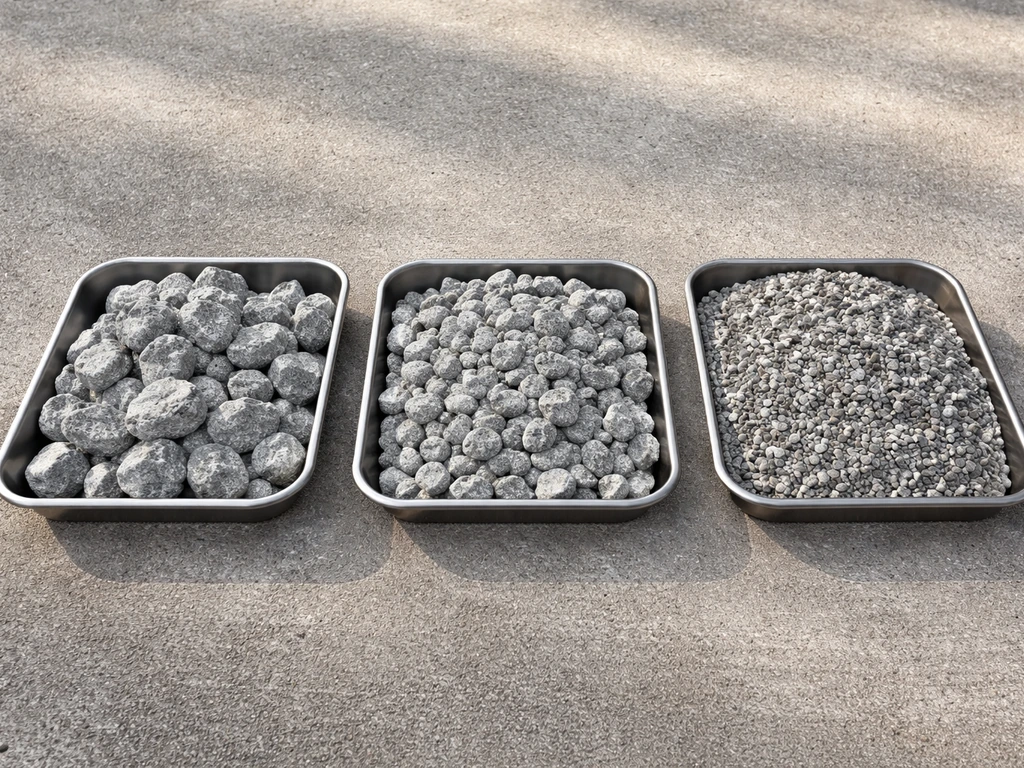
Stone size changes everything about how your patio performs. Too large and stone won't compact or stay put underfoot. Too small and it turns to dust or clogs drainage. Here's how the common sizes break down in practice:
| Size / Type | Best Use | Drainage | Compaction | Walking Comfort |
|---|---|---|---|---|
| 3/4-inch minus (dense-graded) | Base layer under pavers, flagstone, slabs | Moderate (fines reduce void space) | Excellent — locks tight | Not a surface material |
| 3/8-inch crushed stone (clean) | Surface layer, pathways, loose-stone patios | Excellent | Good | Very good — small, angular pieces stay stable |
| 1/2-inch crushed stone (clean) | Decorative surface, drainage beds | Excellent | Fair | Acceptable but shifts slightly more |
| #57 stone (3/4-inch clean) | Drainage layer, under permeable systems | Excellent | Poor — too many voids | Poor — rolls underfoot |
| Pea gravel (3/8-inch rounded) | Decorative fill, seating areas with edging | Good | Poor | Soft but shifts constantly |
| Crusher run (varies, with fines) | Base and sub-base for heavy-traffic areas | Low | Exceptional | Not a surface material |
The key distinction to keep in mind is 'clean' vs. 'minus.' Clean stone has been washed and screened so it contains almost no fine particles. Minus stone (like 3/4-inch minus or crusher run) deliberately includes fines that act like glue when compacted. For a base layer you always want minus. For a drainage or surface layer you usually want clean. Mixing these up is one of the most common and costly mistakes I see on DIY patio projects.
Best crushed stone by how you're actually using your patio
Under pavers or flagstone

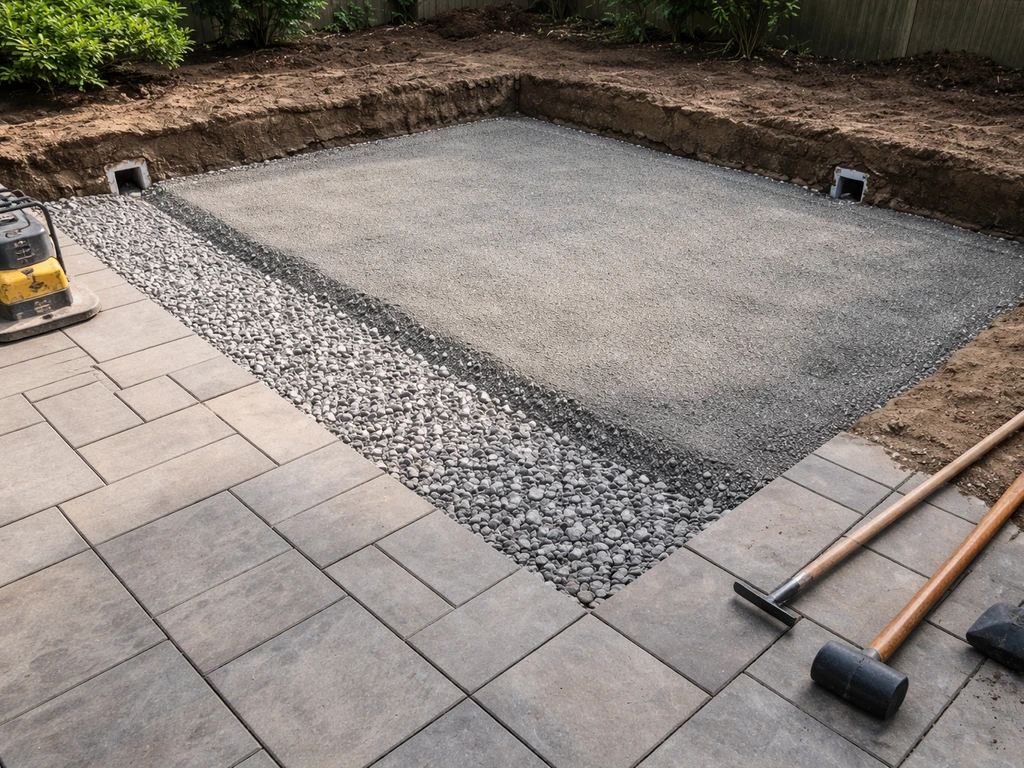
If you're setting interlocking concrete pavers, natural flagstone, or any solid paver unit, your base needs to be dense-graded 3/4-inch minus crushed stone, compacted in 4-inch lifts. County Materials' installation guidelines specifically call for 0-to-3/4-inch crushed stone base material installed in 4-inch lifts, wetted, and compacted with a vibrating plate. Belgard specifies a compacted granular aggregate base between 4 and 6 inches deep for standard pedestrian patio use, going up to 8 to 12 inches for driveways or heavy-load areas. On top of the compacted base goes a 1-inch-thick layer of bedding sand (coarse concrete sand meeting ASTM C33 gradation), which is screeded flat and receives the pavers. You do not compact the bedding sand before placing pavers. The paver weight and the final compaction pass together set the bedding layer, which typically settles about 3/8 inch during that process.
Loose crushed stone surface patios and seating areas
For a gravel-style patio where crushed stone is the finished walking surface, 3/8-inch angular crushed stone (clean) is the sweet spot. It's small enough to feel stable underfoot, angular enough that pieces interlock rather than roll, and large enough to drain quickly without migrating through a geotextile fabric. Apply 2 to 3 inches of this material over a prepared and compacted base. Rounded pea gravel is a common alternative you'll see at garden centers, but it's genuinely uncomfortable to walk on for any extended stretch and shifts under furniture legs. If you're comparing loose stone options more broadly, topics like best loose stone for patio go deeper on decorative surface choices including pea gravel trade-offs.
Pathways and light-traffic areas
Garden paths and low-traffic walkways give you the most flexibility. Either 3/8-inch or 1/2-inch clean crushed stone works well here, with 3/8-inch being slightly more stable for bare feet. Use a 2-inch depth minimum, edged on both sides to prevent spread. A layer of geotextile fabric underneath is strongly worth it on pathways where soil is soft or has more than 10 to 15 percent clay content. US Fabrics also recommends installing geotextile fabric under pavers in clay soil applications to prevent soil migration from the subgrade into the base and causing paver-system failure A layer of geotextile fabric underneath is strongly worth it. The fabric keeps fines from migrating up into your clean stone over time, which is exactly the mechanism that turns a crisp pathway into a muddy, weedy mess within a couple of seasons.
Drainage areas and water management zones
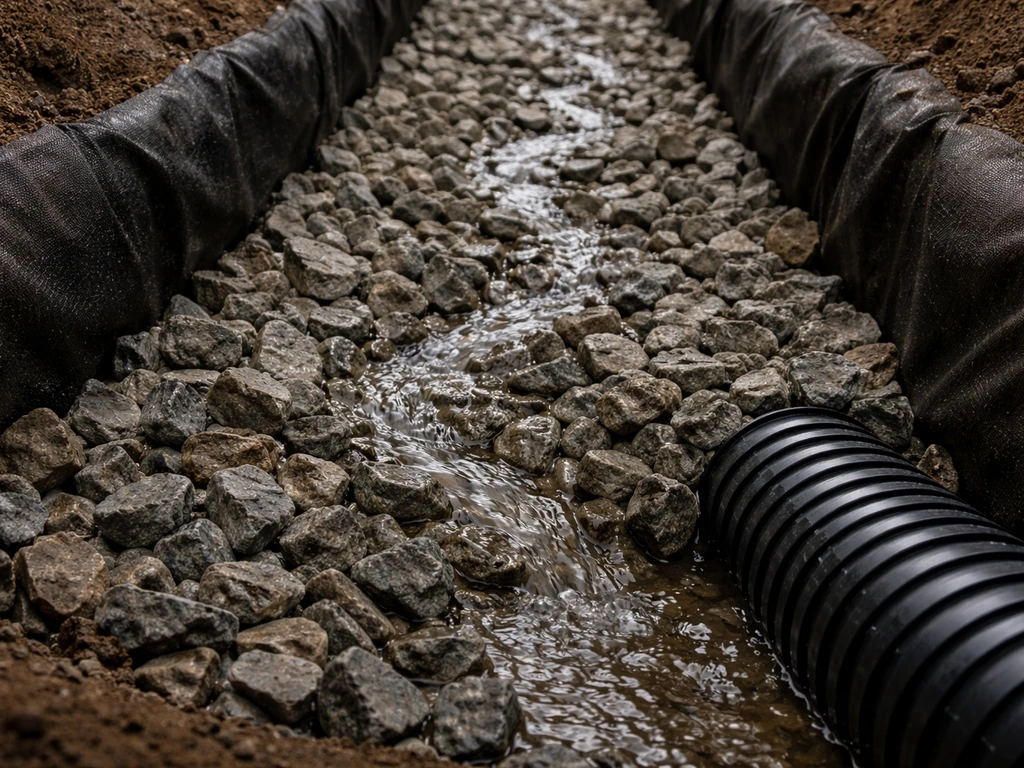
If your goal is drainage, use #57 stone (clean 3/4-inch) or a similar open-graded aggregate. Its large void ratio lets water move quickly through and away. The FHWA flags a real trade-off here: open-graded crushed rock with high void ratios is prone to 'piping,' where fine soil particles from the surrounding subgrade migrate into the stone and eventually clog it. The solution is always a non-woven geotextile wrapped around or placed beneath the drainage stone. This is non-negotiable if your soil has significant clay or fine-sand content.
Base prep, layering, and compaction
Getting the base right matters more than any choice of surface material. A beautiful paver patio on a bad base will wobble, sink, and crack within a few years. Here's the full sequence for a standard pedestrian patio: If you're choosing the best stone for a backyard patio, start by matching the material to how you will use the surface and whether it needs to drain well best stone for backyard patio.
- Excavate to depth: For a pedestrian patio with pavers, plan for 6 to 8 inches of total depth below finished grade (4 to 6 inches compacted base + 1 inch bedding sand + paver or stone thickness). For heavy loads like vehicle access, go 10 to 14 inches total.
- Prepare subgrade: Remove all organic material, roots, and soft spots. If subgrade soil is clay-heavy or contains more than about 10 to 15 percent fines, lay a non-woven geotextile fabric across the entire excavated floor before adding any aggregate. This prevents soil migration up into your base over time.
- Install base in lifts: Add 3/4-inch minus crushed stone in 4-inch layers, not all at once. Wet each lift lightly, then compact with a vibrating plate compactor. Compaction target for pedestrian areas is at least 95 percent Standard Proctor density (ASTM D698). Skipping lifts and dumping all the stone at once leads to uneven compaction and future settling.
- Check for level and grade: The compacted base should mirror the finished surface grade. Plan for a minimum 1 percent slope (about 1/8 inch per foot) away from any structure for drainage.
- Install bedding layer: Spread 1 inch of coarse concrete sand (ASTM C33) evenly across the compacted base. Screed it flat. Do not compact it. Do not walk on it before placing pavers.
- Set surface material: Place pavers, flagstone, or other units from one corner, working outward. Avoid stepping on screeded sand.
- Final compaction pass: Run the plate compactor over pavers with a rubber pad or foam protector to vibrate them into the bedding layer. Sweep dry polymeric sand into joints and compact again if using interlocking pavers.
One thing I've seen go wrong more times than I can count: homeowners install the base material all in one shot, compact it once, and call it good. The problem is that 6 inches of loose stone can't compact uniformly in a single pass. The bottom stays loose, and you get differential settling a season or two later. Always do lifts.
Crushed stone vs. gravel vs. paver sand: what goes where and why
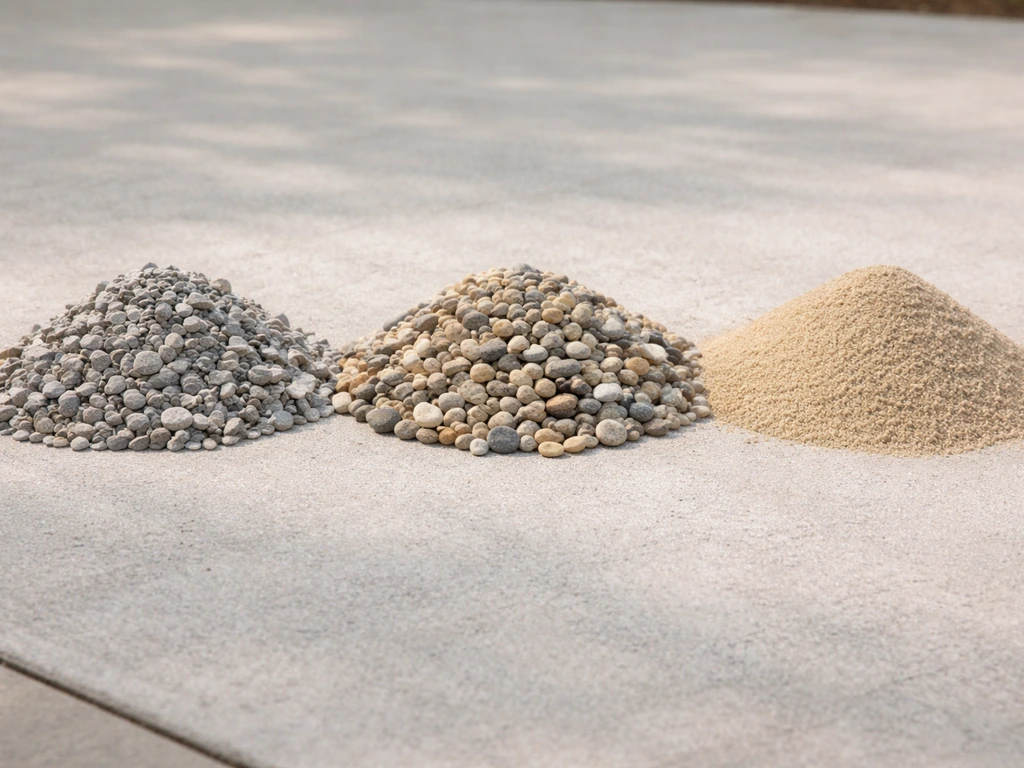
These three materials get confused constantly, and using the wrong one in the wrong layer creates real problems. They serve different roles in the same system.
| Material | Role in Patio System | Key Property | Where It Goes |
|---|---|---|---|
| 3/4-inch minus crushed stone | Structural base | Compacts to a rigid, load-bearing layer | Bottom layer, below bedding |
| Coarse concrete sand (ASTM C33) | Bedding layer | Screeds flat; lets pavers settle evenly | 1 inch directly under paver units |
| Clean crushed stone (3/8-inch) | Drainage or surface layer | High void space; drains fast; walkable | Surface of loose-stone patio or drainage bed |
| Rounded pea gravel | Decorative fill | Attractive but unstable | Contained decorative areas only |
| #57 stone (3/4-inch clean) | Sub-base drainage | Maximizes water infiltration | Below base in wet/clay soil sites |
| Polymeric sand | Joint filler for pavers | Hardens slightly to resist weed/ant intrusion | Swept into paver joints after compaction |
The reason you use dense-graded crushed stone (minus) rather than clean gravel for the base is stability. Clean gravel, including rounded pea gravel and clean #57 stone, has too many voids to develop the interlock that holds a paver system rigid. Wikipedia's overview of paver flooring systems makes this explicit: minus crushed stone bases prevent sand from sinking through the voids, which is a real failure mode when clean stone is used as a base. If you want to compare how crushed stone stacks up against other aggregate options, the topic of best aggregate for patio covers this trade-off in more depth. If you need a quick recommendation, the best aggregate for patio projects is the one that matches your layer purpose, like minus crushed stone for a stable paver base or clean stone for drainage and surface comfort.
Color, finish, and edging: making your patio look the way you want it
Crushed stone comes in more color variety than most people expect. The color depends almost entirely on the parent rock type, so availability varies by region. Common options include:
- Limestone: pale gray to off-white, the most widely available crushed stone in much of the US, clean and neutral-looking
- Granite: speckled gray, pink, or white, harder and more angular, holds its appearance well over years
- Trap rock (basalt/diabase): dark gray to near-black, very dense and angular, excellent for a modern or contemporary look
- Quartzite: white to light tan, bright and reflective, popular for decorative loose-stone patios
- Pea gravel: gold, tan, rust, and mixed tones depending on the river source, rounder and softer looking
When crushed stone is your finished surface, color and size both affect the vibe of the space. A coarser gray trap rock reads as utilitarian and functional. Fine white quartzite or warm tan crushed limestone reads as softer and more relaxed. Wet stone always looks darker and more saturated than dry stone, so look at samples both wet and dry before committing to a full load.
Edging is non-negotiable for any crushed-stone patio or pathway. Without containment, angular stone migrates outward under foot traffic and furniture movement within one season. Solid aluminum or steel landscape edging (stake-pinned every 12 to 18 inches) is the most reliable and least visible option. Plastic edging works for lightweight applications but tends to bow outward over time under lateral stone pressure. Concrete curbing, treated timber, or natural stone borders are heavier alternatives that also work visually as design elements. CMHA's edge restraint guidance reinforces that edging prevents bedding sand migration from paver edges, which applies equally to any crushed-stone system where fines need to stay contained.
Installation steps and mistakes worth avoiding
Step-by-step installation for a loose crushed-stone patio
- Mark the patio area and excavate 4 to 5 inches below desired finished grade (3 inches base + 2 inches surface stone, accounting for natural settling).
- Install steel or aluminum edging around the perimeter before adding any material. Pin stakes every 12 to 18 inches.
- Lay non-woven geotextile fabric across the excavated floor, overlapping seams by at least 12 inches and running it up the inside of edging. In clay or silty soils this is required, not optional.
- Add 3 inches of 3/4-inch minus crushed stone or crusher run. Wet and compact in a single lift for shallow installations; use two lifts for deeper ones.
- Spread 2 to 3 inches of 3/8-inch clean crushed stone as the surface layer. Rake level and check grade for slope away from structures.
- Add edging caps or finishing detail if using decorative border material.
- Allow the stone to settle naturally over the first few weeks before adding heavy furniture.
Common mistakes that cause early failure

- Skipping the geotextile on clay or silty soil: fines migrate up through the stone within two years, creating a muddy, weedy, uneven surface
- Using rounded gravel instead of angular stone for the base: it won't compact into a stable layer regardless of how many passes you make with the plate compactor
- Installing all base material in one thick lift instead of 4-inch compacted layers: the bottom of the layer never reaches adequate compaction density
- Laying bedding sand on a base that isn't fully compacted: pavers sink unevenly and create trip hazards
- Forgetting to slope for drainage: even 1 percent slope (about 1/8 inch per foot) is enough to prevent water from ponding, but zero slope means puddles after every rain
- Installing edging after the stone is already in place: the edging stakes can't be driven properly and the stone has already started spreading
- Using fine-grained sand (mason sand or play sand) instead of coarse concrete sand for paver bedding: fine sand is too compressible and too prone to migration
Keeping your crushed stone patio looking good for years
Crushed stone patios are genuinely low maintenance compared to poured concrete or tile, but 'low maintenance' doesn't mean zero maintenance. Here's what actually needs attention over time.
Weed control
Weeds in crushed stone grow from seeds blowing in and settling on the surface, not from below if your geotextile is intact. The geotextile handles soil-side growth; you handle the surface. A pre-emergent herbicide applied in early spring (and again in late summer in warm climates) is the most efficient approach. Avoid post-emergent herbicides as a first line because by the time weeds are visible, their roots are anchored and you'll need to physically remove them anyway. For a low-chemical approach, boiling water or a propane torch weeder works well on isolated weeds in stone without disturbing the surface.
Regrading and leveling
Expect some settling in the first full year, particularly in freeze-thaw climates. Low spots where water pools are the main thing to address. Simply add fresh crushed stone to low areas, rake to level, and tamp lightly with a hand tamper. Don't try to dig up and regrade the entire surface unless the base itself has failed. For paver systems, re-leveling typically means lifting the affected pavers, adding or removing bedding sand, and resetting them without replacing any base material.
When to replenish surface stone
Surface stone on a loose-stone patio gradually gets displaced by foot traffic, especially near entrances and furniture landing zones. Plan on adding a fresh half-inch to 1-inch top-up layer of the same stone every 3 to 5 years. Order the same stone type and color from the same supplier if possible, and mix the fresh stone into the existing surface with a rake rather than simply layering it on top. This blends the weathered and fresh stone visually and prevents a two-toned look. If the surface stone has become significantly contaminated with soil fines from foot tracking or wind, it may be worth raking the top 1 inch off, screening it to remove fines, and putting it back.
Freeze-thaw and climate considerations
In cold climates with repeated freeze-thaw cycles, drainage is the single most important factor in long-term stability. Water that can't drain away from the base freezes, expands, and heaves everything above it. A well-sloped patio surface, a base of compacted crushed stone (which drains better than compacted clay backfill), and a geotextile separating the base from the subgrade all work together to minimize heaving. If you're in a particularly wet or frost-prone region, consider adding a layer of #57 clean stone beneath your compacted minus base to improve vertical drainage. This is most relevant on sites where the subgrade is dense clay that holds water near the surface. For pool-area patios where drainage and surface texture around water are extra concerns, the topic of best stone for pool patio addresses those specific requirements. For pool-area patios where drainage and surface texture around water are extra concerns, the best stone for pool patio helps you choose the right mix for comfort and stability.
FAQ
Can I use the same crushed stone for both the patio base and the top layer?
Yes, but only if you keep the role of fines straight. Use a minus (dense-graded) material for the compacted base, then keep the top layer clean if it is meant to be the walking surface or to protect a bedding layer. If you accidentally use clean stone with too few fines in the base under pavers, you can get sand migration, loss of interlock, and more settling at joints over time.
Should I compact the 1-inch bedding sand before installing pavers?
Don’t. Bedding sand should be screeded and left un-compacted before you set pavers or flagstone. Let the paver installation and the final vibration/compaction pass set it, because pre-compacting sand can create a harder, less conforming layer that increases wobble and unevenness when pavers settle.
Do I need geotextile fabric under every crushed stone patio?
Geotextile should be used based on site conditions and the stone type. For most paver patios over stable subgrade, it may not be necessary, but it becomes important where you have soft soil, high clay, or fine sand that can migrate upward. For drainage stone (like #57/open-graded), non-woven geotextile is non-negotiable to prevent “piping” and clogging.
Is pea gravel a good substitute for crushed stone on a patio surface?
You can, but it changes what “crushed stone” behaves like. For a patio you walk on directly, choose angular stone with minimal fines for the surface. Rounded pea gravel can look fine at first, but it tends to shift under point loads (table legs, chairs) and can feel unstable, especially on longer barefoot stretches.
How thick can each compacted lift be, and how should I water it?
Do it in 4-inch lifts for dense-graded minus base, and add water until the layer is uniformly damp, not muddy. If you compact all at once, the bottom layer stays loose and you get differential settling later. After compaction, check for “give” under your foot and for consistent density before adding the next lift.
What’s the difference between using “minus” stone and “clean” stone as the walking surface?
If your stone is intended as the finished surface, ensure it is angular and “clean” (washed) when you want drainage without turning to a dusty mix. If you use a minus product on top, it can compact into a more cement-like surface but it may also reduce drainage and can create a mess if fines trap water, particularly after rain.
How often should I add more crushed stone to keep a gravel-style patio looking level?
Plan for a top-up because angular loose stone migrates, especially near doors, downspouts, and furniture legs. In most cases, adding a matched top dressing every 3 to 5 years works, and mixing it into the existing surface with a rake helps prevent a visible “patch.” If the stone looks uniformly dark and dirty, you may have windblown or tracked-in soil fines that need screening.
What should I prioritize for crushed stone patios in freeze-thaw climates?
For frost-prone sites, treat drainage and separation as your primary design. Make sure the base is sloped away from structures, use compacted minus base with geotextile separating it from subgrade, and avoid any clay backfill that can hold water. If your subgrade is dense clay and you see water lingering, consider an added #57 clean drainage layer beneath the minus base.
What edging works best, and how do I prevent crushed stone from spilling over the edges?
Edging is what keeps the system from spreading, but you still need to build the patio so the edge has support. Use rigid metal edging (stake-pinned every 12 to 18 inches) for best performance, and make sure stakes are on firm ground after excavation. If you install plastic without enough rigidity and anchoring, stone pressure can bow it outward and eventually create gaps.
If my patio starts to sink or wobble, how do I troubleshoot what to fix first?
If the patio is failing, start by identifying the layer that did the damage. Wobble and sinking on paver patios often means the base settled or bedding was off, while standing water suggests poor drainage slope or clogged drainage stone. Only replace bedding sand during re-leveling, if the base is sound, and lift and reset the affected pavers rather than disturbing the entire patio.