For most homeowners, sandstone is the more forgiving, slip-resistant, and budget-friendly choice, while limestone gives you a cleaner, more refined look that suits formal or modern outdoor spaces. Neither is universally better. The right pick comes down to your climate, how much foot traffic you're dealing with, how much maintenance you want to do, and what aesthetic you're after. This guide walks through every real-world difference so you can make the call with confidence. Indian sandstone can be a great option for patios when you pick the right quarry grade and plan for the right sealing routine Indian sandstone good for patios.
Sandstone vs Limestone Patio: Which Stone Lasts Longer?

Nolan Ellison
4 May 2026
Color, texture, and look: how they actually differ
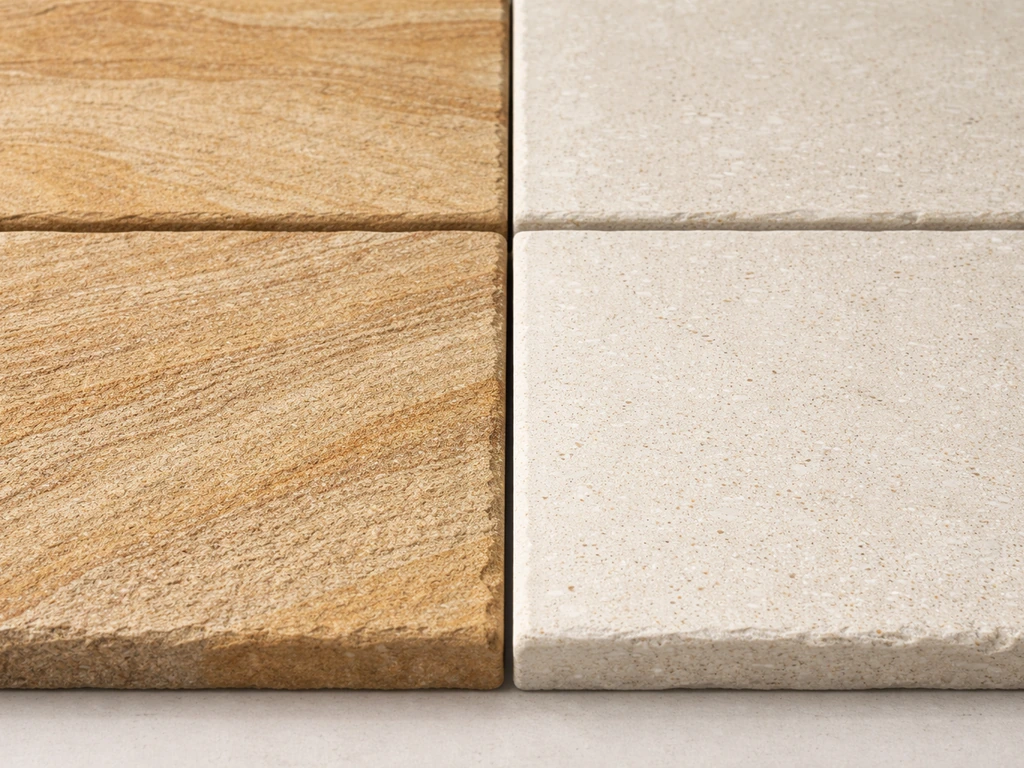
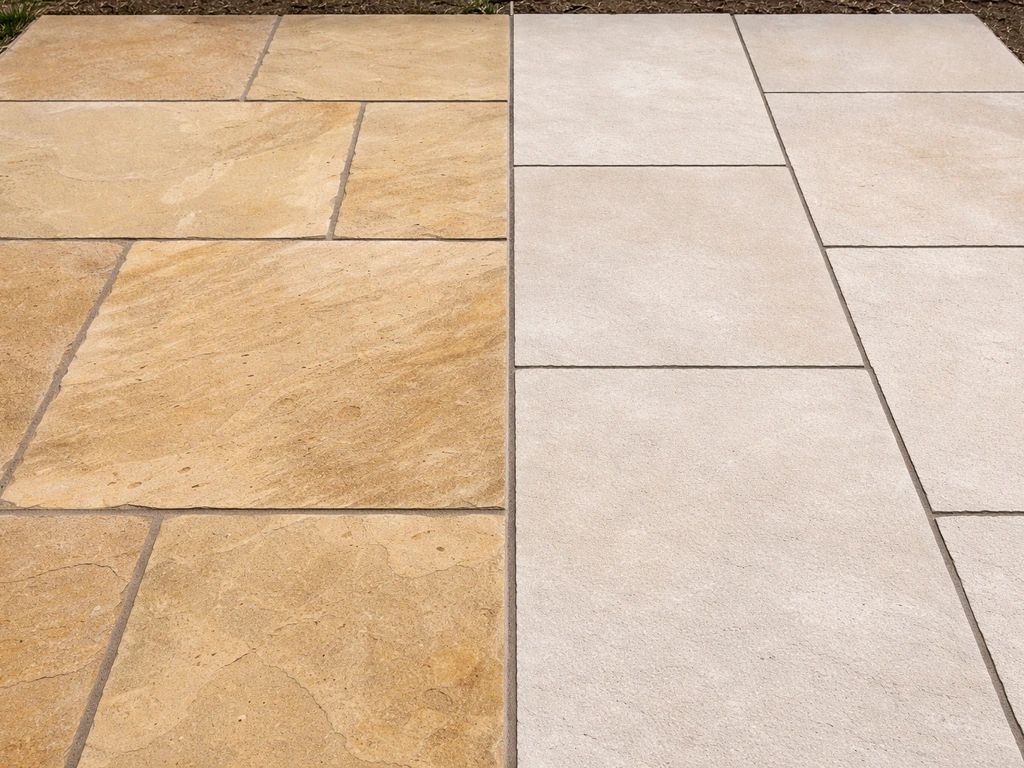
Sandstone reads as warm and natural. Its sedimentary origin gives it a layered, textured surface with visible grain and variation from slab to slab. Colors run from buff and honey through rich rust, terracotta, and grey-green depending on the mineral cement content. Indian sandstone in particular is popular precisely because of that varied, hand-crafted character. If you want a patio that looks like it belongs in a cottage garden or a relaxed outdoor living space, sandstone gets you there without much effort.
Limestone is smoother and more consistent. The color palette skews toward creams, greys, blues, and soft whites, and the surface finishes available, including honed (smooth and matte), brushed (lightly textured via wire brushing), tumbled, and polished, give you a lot of control over the final look. That consistency is a feature if you want a sleek, contemporary patio or a formal entertaining area. It is a limitation if you want organic variation. One thing to know: polished limestone can look darker and more reflective when wet, while honed stays closer to its dry appearance.
Both stones are sedimentary, and both weather to develop a natural patina over time. Limestone tends to lighten slightly as it weathers; sandstone can deepen in tone. If you are mixing either stone with brick or rendered walls, test a sample slab against your existing materials in daylight before committing to a full order.
Durability and weather performance by climate
Freeze-thaw cycles are the biggest durability concern for outdoor stone, and this is where the two materials genuinely diverge. The failure mechanism is simple: water gets into the stone's pores, freezes, expands, and the resulting internal pressure fractures the surface over repeated cycles. This is called spalling, and it progresses with each winter. Dense, low-absorption stone handles this far better than porous stone. For exterior pavers in cold climates, a water absorption rate under 0.5% and strong flexural strength (tested to ASTM C1026) are the benchmarks to ask your supplier about.
Limestone, particularly the denser varieties, can perform well in freeze-thaw conditions if you source it correctly. Soft, high-porosity limestone (common in cheaper imports) is a real risk in climates that regularly dip below freezing. Sandstone varies enormously by quarry origin. Some sandstones are dense and tough; others are soft and will spall within a few winters. The honest answer is that neither stone is uniformly freeze-thaw proof. You need to ask for specific absorption and density data for the exact product you're buying, not just a general category assurance.
In warm, wet, or coastal climates, the dynamic shifts. Both stones handle heat and rain well in general, but coastal salt spray is a factor. Salt weathering is driven by how much moisture a stone absorbs and how often it cycles through wet-dry exposure. Limestone is also mildly vulnerable to acid rain and acidic cleaning products because it is calcium carbonate based, so even in non-freezing coastal environments, chemical weathering is a long-term consideration. Sandstone is silica-based and generally more acid-resistant, which gives it a small but real advantage on the chemical weathering front.
| Climate | Sandstone Performance | Limestone Performance |
|---|---|---|
| Cold / freeze-thaw (Zone 5 and below) | Variable: dense quartzite-rich types perform well; soft grades risk spalling | Variable: dense limestone OK; high-porosity grades at serious risk |
| Mild / temperate (Zones 6–8) | Excellent: durable with minimal weathering | Excellent: low maintenance, weathers gracefully |
| Hot and dry | Good: minimal thermal stress; watch for surface fading in direct sun | Good: dense grades hold up well; honed finish reduces glare |
| Coastal / humid | Good: acid-resistant silica base helps; seal regularly | Fair: vulnerable to salt and acid weathering; seal and rinse often |
| High rainfall / waterlogged | Fair: drain well and use dense grades; porous types stain easily | Fair: efflorescence risk increases with wet subbase; drainage is critical |
Slip resistance, comfort underfoot, and heat
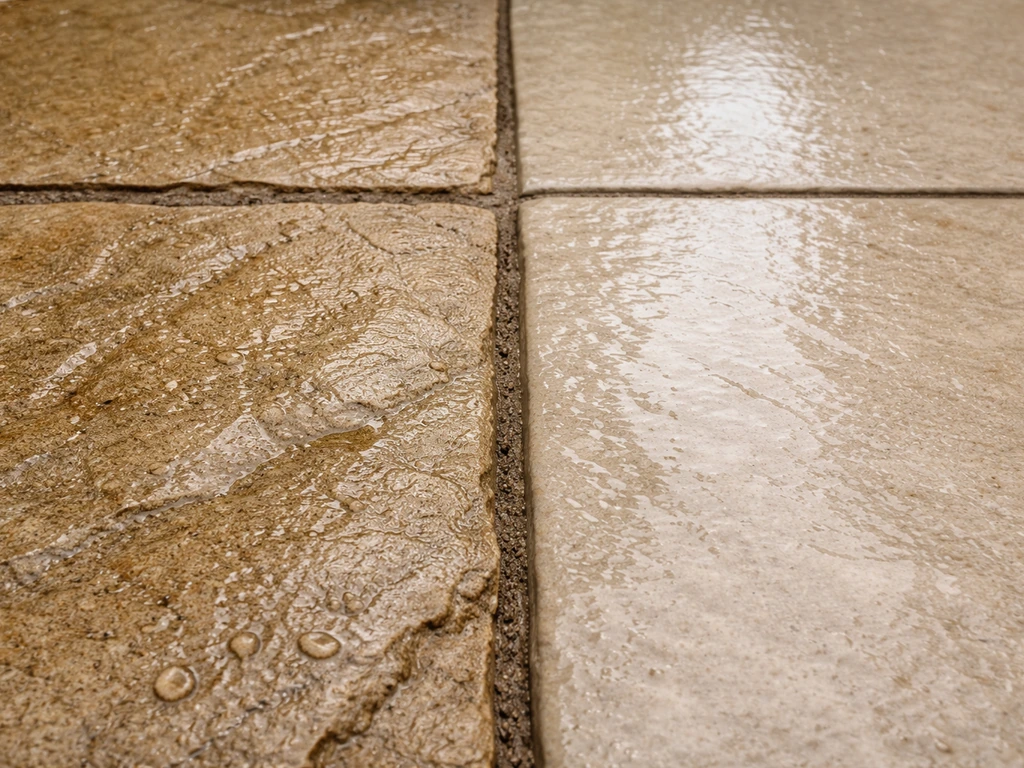
Sandstone with a natural cleft or riven finish is inherently slip-resistant in both dry and wet conditions. The texture is built in; you are not relying on a surface treatment that wears off. This matters a lot around pools, in shaded areas that stay damp, and anywhere kids or elderly family members are walking. Sawn or polished limestone, on the other hand, can be slippery when wet, especially in a smooth honed finish. A brushed or tumbled limestone finish closes that gap significantly, and you should specify one of those finishes if you are going with limestone in a wet-prone area.
Comfort underfoot on a hot day is a function of heat retention. Sandstone has a higher thermal conductivity (k value around 1.83) compared to limestone (around 1.26), which means sandstone actually conducts heat away slightly faster. In practice, both stones can get uncomfortably hot in direct afternoon sun in a hot climate, but light-colored limestone tends to reflect more heat than a dark sandstone, so color matters as much as stone type here. If barefoot comfort is a priority in a hot climate, pick the lightest color option available in either material and orient the patio to limit peak afternoon sun exposure.
For texture underfoot, sandstone's riven surface is slightly rougher, which some people love and others find uncomfortable for bare feet over a long evening. Honed or brushed limestone strikes a balance: enough texture to be safe, smooth enough to be comfortable. If you have young children who play and run on the patio, the rougher sandstone texture is forgiving if they fall; honed limestone is less forgiving on knees and palms.
What you will actually spend: materials, installation, and upkeep
Sandstone material typically runs $5 to $15 per square foot depending on grade, origin, and thickness. Professional installation labor adds roughly $9 to $17 per square foot on top of that, putting a fully installed sandstone patio in the $14 to $32 per square foot range. Limestone material is in a similar ballpark at $6 to $15 per square foot, with installed totals commonly landing between $16 and $25 per square foot. A 10x20-foot limestone patio (200 sq ft) installed typically costs between $3,200 and $6,400 depending on your region and the complexity of the job.
On paper, the two stones are priced similarly, so the real cost difference shows up in long-term upkeep. Limestone in a harsh climate or coastal setting may need resealing every 1 to 2 years and careful monitoring for acid damage and efflorescence. Sandstone in a wet climate needs regular sealing too, but it is generally more forgiving of missed maintenance cycles. Factor in sealer costs ($30 to $80 per container, covering 200 to 500 sq ft depending on porosity) and plan to spend $100 to $300 every couple of years on routine maintenance for a mid-size patio with either stone.
| Cost Category | Sandstone | Limestone |
|---|---|---|
| Material only (per sq ft) | $5 – $15 | $6 – $15 |
| Installed total (per sq ft) | $14 – $32 | $16 – $25 |
| 200 sq ft patio installed (approx.) | $2,800 – $6,400 | $3,200 – $5,000 |
| Sealing frequency | Every 1–3 years | Every 1–2 years (sooner in harsh climates) |
| Repair cost (cracked slab replacement) | Moderate: matched slabs often available | Moderate: colour matching can be tricky as limestone weathers |
Installation: base prep, thickness, jointing, and sealing
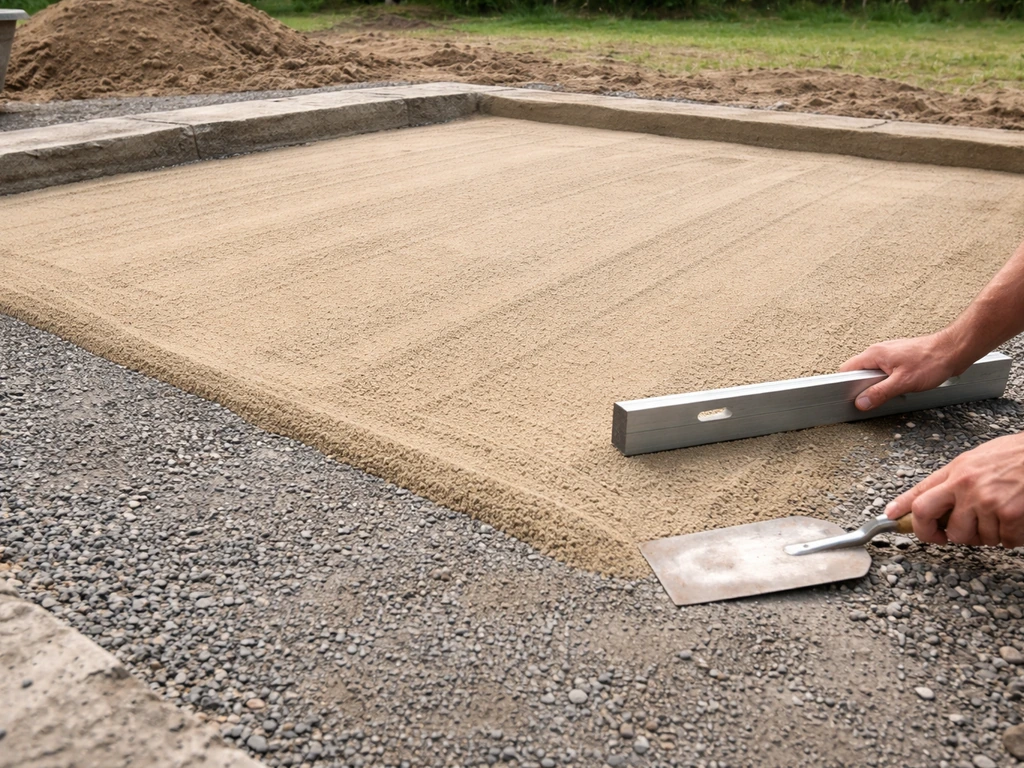
Both stones need a solid, well-drained base. The standard approach is 4 to 6 inches of compacted Class II or Class V aggregate base, followed by a maximum 1-inch washed sand bedding course for leveling. Skimping on the base is the single most common mistake I see; it leads to settlement, cracking, and drainage problems regardless of which stone you use. The bedding layer should be sand only, not a thick mortar bed, unless you are doing a full mortar-set installation with a concrete slab beneath.
Slope is non-negotiable for both stones. Aim for 1.5 to 2% drainage fall away from the house or any adjacent structure. That is roughly a 3/8-inch drop per foot. Get this wrong and you will be fighting efflorescence and freeze-thaw damage for the life of the patio. A string line and a simple level during layout catches this before it is set in stone, literally.
For jointing, keep gaps at least 3 to 5 mm for smaller tile-format slabs. For larger format flagstone or irregular layouts, wider joints of 10 to 15 mm are common and easier to work with. Use polymeric jointing sand or a lime-based mortar jointing mix rather than standard cement grout on natural stone; standard cement can stain and is too rigid, leading to cracking. For mortar-set work on a concrete slab, use a flexible polymer-modified mortar to accommodate movement from thermal expansion.
Expansion joints matter more than most homeowners realize. For runs longer than 8 feet, plan a 3/8-inch movement joint; for runs over 12 feet, increase to 1/2 inch. Fill these with a flexible silicone-based joint compound, not grout. This is especially important for limestone in climates with big temperature swings.
Sealing: apply a penetrating impregnator sealer to both stones after installation and before grout or jointing, and again after jointing is complete. Do not seal before the stone has fully dried and cured (allow at least 48 to 72 hours after any wet work). Limestone benefits from a sealer with an acid-inhibiting formula specifically labeled for calcareous stone. Sandstone is more tolerant but still benefits from a good penetrating sealer to reduce staining. Test the sealer on a sample piece first; some sealers darken sandstone noticeably.
Key installation differences between the two stones
- Sandstone is often thicker (30–50 mm) in natural riven form, which means more weight per slab and a slightly higher base requirement; limestone tiles are often cut to a more consistent 20–30 mm and are easier to lay level.
- Limestone is calcium carbonate based: never use acid-based cleaners or cement residue removal products during installation. Rinse all grout and mortar off immediately.
- Sandstone can leach iron (especially Indian sandstone), so use a white or grey mortar to avoid rust staining bleeding up through the joints.
- Both stones need at least one dry run (dry lay) before bedding to check colour distribution and flag any defective pieces before they are mortared in.
- In freeze-thaw climates, a full mortar bed on a concrete slab is more freeze-thaw resistant than a sand-set system; the sand-set approach is fine in temperate climates.
Maintenance and repairs over time
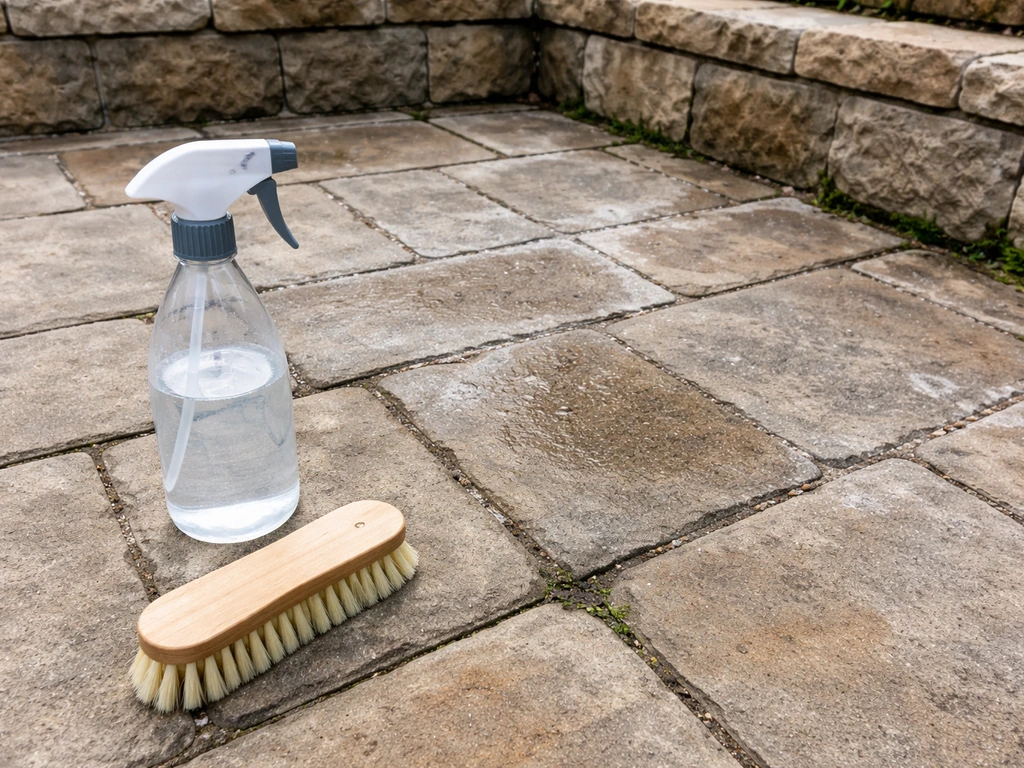
Routine cleaning for both stones should use a neutral pH cleaner specifically formulated for natural stone. Products marketed as 'natural stone and tile cleaner' with a confirmed neutral pH are safe for both limestone and sandstone. Avoid anything acidic (vinegar, citrus-based cleaners, bleach-containing products) especially on limestone, where acids etch and dull the surface permanently. For regular upkeep, a diluted neutral cleaner, a stiff bristle brush, and a rinse with clean water is all you need.
Efflorescence, the white powdery film that appears on stone or along joints, is one of the most common complaints with both materials. Laticrete provides technical guidance and materials for addressing efflorescence and moisture-related issues in masonry and stone installations Efflorescence, the white powdery film.
It forms when dissolved salts are carried to the surface by moisture and left behind as water evaporates. Repeated wet-dry cycles can eventually cause the salt crystals to develop enough pressure to cause pitting and flaking at the surface, so address efflorescence early rather than letting it cycle. For light efflorescence on sandstone, dry brushing followed by a neutral rinse often works.
For limestone, do not use an acid-based efflorescence remover; instead, use a poultice approach with a diluted alkaline cleaner covered with plastic sheeting left for 24 to 48 hours, then brush and rinse. Fixing the underlying drainage problem is always the real solution. Laticrete’s efflorescence technical sheet notes that efflorescence can occur when Portland cement products are used and is tied to moisture movement through tile fixing and materials [Fixing the underlying drainage problem is always the real solution. ](https://cdn-global.
laticrete. com/-/media/project/laticrete-international/australia/product-documents/tds/tds-1159-0225-efflorescence. pdf).
Resealing schedules: for sandstone, reseal every 2 to 3 years in most climates, annually in coastal or high-rainfall areas. For limestone, reseal every 1 to 2 years, especially in any climate with acid rain, coastal salt, or significant temperature variation. The water bead test tells you when it is time: pour a small amount of water on the stone surface. If it beads up, the sealer is still working. If it soaks in within 30 seconds, reseal.
For cracked or spalled slabs, replacement is the most reliable fix. Both stones can chip at the edges if struck hard, and mortar-set slabs that crack under point loading (heavy planters, BBQ trolleys) need individual slab replacement rather than surface patching. Keep 10 to 15% extra material from your original order specifically for future repairs. Matching colour after several years of weathering is very difficult with either stone, so having original material is worth its small storage cost.
Which one to pick for your specific situation
Here is the honest breakdown for the scenarios that come up most often. If you have kids and pets running around and want low-maintenance, go sandstone with a riven finish. The natural texture handles wet conditions, forgives the barefoot slip test, and does not show scuff marks or soil the way honed limestone does. If you are building a formal entertaining space or a modern outdoor room and cleanliness of look matters more than texture, honed or brushed limestone is the better aesthetic fit, just commit to the sealing and cleaning routine it needs.
In a freeze-thaw climate (think northern US or northern Europe), source density and absorption data before buying either stone. Do not take 'suitable for outdoor use' on a product sheet at face value. Ask specifically for water absorption percentage and whether the stone meets ASTM C1026 freeze-thaw testing. Both stones have grades that pass and grades that fail; the difference between a 10-year patio and a 3-year patio in a cold climate often comes down to this single spec.
On a coastal property, lean toward sandstone for its acid and salt resistance advantage. Seal it well twice in year one, then annually after that. If you prefer limestone for the look, budget for a premium penetrating sealer and commit to rinsing salt spray off the surface regularly after storms. If your existing patio drainage is poor, fix that first before laying either stone; no amount of good material overcomes a waterlogged base.
- Family with kids and pets, moderate climate: sandstone riven finish, mortar or sand set, reseal every 2 years.
- Formal/modern entertaining space, temperate climate: brushed or honed limestone, mortar set on concrete slab, reseal annually.
- Cold climate (freeze-thaw): either stone if absorption is under 0.5% and freeze-thaw tested; get the spec sheet in writing.
- Coastal or humid climate: sandstone preferred; if limestone, seal twice in year one and rinse after salt spray events.
- Tight budget, large area: sandstone is marginally more forgiving on value-grade material; avoid bargain limestone, which is often high-porosity.
- Drainage issues on existing site: fix the base and slope first, then lay either stone; do not use the stone choice as a workaround for a drainage problem.
What to check before buying slabs
- Ask for water absorption percentage (want under 3% for general outdoor use; under 0.5% for freeze-thaw climates).
- Request freeze-thaw test data (ASTM C1026) if your climate regularly drops below freezing.
- Check slab thickness consistency: variation over 5 mm across a batch makes laying level much harder.
- Look for laminations or visible bedding planes in sandstone that run parallel to the face; these can delaminate in wet/freeze conditions.
- Inspect limestone for open fossils, voids, or shell inclusions that can trap water and become freeze-thaw failure points.
- Order 10–15% overage for cuts, defects, and future repairs.
- Wet a sample slab to see the saturated colour before committing; some sandstones go very dark when wet.
How to talk to your installer or mason
When getting quotes, ask any installer these specific questions: What subbase depth do you spec for this application? (Answer should be 4 to 6 inches compacted aggregate. ) What mortar or bedding system will you use? (Polymer-modified for mortar set; washed sand for dry lay.
) How do you handle expansion joints? (They should mention placement at 8 to 12-foot intervals and flexible filler. ) Will you seal the stone, and with what product? (Look for a penetrating impregnator labeled for calcareous stone if limestone, or a general natural stone impregnator for sandstone.
) An installer who cannot answer these questions confidently is a risk regardless of price. Travertine and granite installations follow many of the same base and jointing principles, so a contractor experienced with any natural stone outdoor paving should be comfortable with the full spec conversation. If you are comparing travertine to sandstone or limestone for patios, the same base prep and sealing basics apply.
Both sandstone and limestone can make a genuinely beautiful, long-lasting patio. The ones that fail almost always fail because of a poor base, wrong stone grade for the climate, or skipped sealing, not because one stone is inherently inferior to the other. Get the base right, buy the right grade for your climate, seal it properly, and either choice will serve you well for decades. If you're considering granite, the key is to match the specific grade to your climate and make sure it is properly sealed for patio use granite for patios.
FAQ
Can I use sandstone or limestone patio pavers if my area has regular freeze-thaw cycles?
Yes, but only if you buy the right grade. Ask the supplier for water absorption percentage and confirm the stone meets freeze-thaw performance testing such as ASTM C1026. Also make sure your installer targets a fully compacted base and correct slope, since trapped water speeds up spalling regardless of stone type.
Which stone is better for a patio near the ocean or with frequent salt spray?
Sandstone is often the safer default because it is generally more resistant to acid-driven and salt-driven deterioration. If you choose limestone anyway, budget for a higher-end penetrating sealer and plan to rinse salt residue after storms, because salts left behind can contribute to surface haze and long-term breakdown.
What finish is safest for limestone if the patio gets wet often (shade, poolside, rainy climate)?
Choose brushed or tumbled limestone rather than polished or very smooth honed. A rougher finish improves wet traction without relying on a surface treatment that can wear away. If you already bought smooth honed pavers, consider improving traction with finish changes rather than trying to “seal harder” to fix slipperiness.
How do I prevent efflorescence instead of just cleaning it off later?
Treat drainage and moisture control as the root fix. Before laying stone, confirm the base is well-drained and that the patio has the specified slope away from the house (about 1.5 to 2%). During construction, avoid over-wetting the bedding and keep jointing materials consistent, because repeated wet-dry cycles pull salts to the surface.
Should I seal sandstone or limestone before jointing, after jointing, or both?
Both, usually. The typical approach is a penetrating impregnator on the stone after installation and before jointing, then again after joints are fully installed. Wait for full cure and dry time after any wet work (at least 48 to 72 hours), and test the sealer on a sample because some products darken sandstone noticeably.
What cleaning products are safest for limestone versus sandstone?
Stick to neutral pH cleaners formulated for natural stone. Avoid vinegar, citrus-based cleaners, and bleach-containing products, especially on limestone, since acids etch and permanently dull the surface. For routine cleaning, a diluted neutral cleaner plus a stiff bristle brush and clean water rinse is usually enough.
Is polymeric jointing sand or mortar required for both stones?
Polymeric jointing sand is commonly preferred for dry-laid pavers because it helps lock joints and reduces moisture cycling, but the exact product should be matched to the stone and joint width. If you use mortar joints, choose a lime-based or suitable jointing mix rather than standard cement grout, which can stain and be too rigid for natural movement.
Do expansion joints matter for short patios?
Yes, especially for longer runs and when you have big temperature swings. Plan movement joints for runs longer than about 8 feet (and larger amounts for longer lengths), using a flexible silicone-based joint compound rather than grout. If your contractor avoids expansion joints entirely, it raises the risk of cracking and movement-related joint failure.
My patio cracked under a heavy grill or planters, what should I do?
If the cracking is from point loading or individual slabs shifting, surface patching usually fails. The most reliable fix is replacing the affected slabs and reviewing the base depth and bedding method. Also consider placing heavy items on wider, load-distributing pads so you do not concentrate stress on small slab areas.
How much extra stone should I buy for future repairs and color matching?
Order about 10% to 15% extra and store it somewhere dry. Matching color years later is difficult for both sandstone and limestone because quarry lot variation and weathering change appearance. Having the original material saves you from blending mismatched slabs.
If I’m doing a wet-area patio, can I rely on sealing alone to stop staining and slip issues?
Sealing mainly reduces staining and slows some moisture absorption, it does not replace traction choices or base drainage. For slip risk, select an appropriate finish (riven/cleft for sandstone, brushed/tumbled for limestone). For staining, use a penetrating sealer and maintain routine neutral pH cleaning, and if efflorescence appears, address drainage rather than escalating chemical cleaners.
Which should I choose for barefoot comfort on a hot day?
For heat and glare, prioritize light-colored stone in either option, because color influences surface temperature. For bare-foot feel, sandstone’s riven texture can be rougher for some people, while honed or brushed limestone often feels more balanced. If barefoot comfort is your top priority, choose the lightest available color and test the finish with a small sample under sun exposure before ordering.