For most patios, you want two different sands doing two different jobs: coarse concrete sand (also called bedding sand, graded to ASTM C33) laid 1 inch deep as a screeded base under your pavers or stones, and polymeric sand swept into the joints between them. Get those two right and your patio stays level, drains properly, and the joints don't wash out every time it rains. Knowing what sand to use under patio stones usually means choosing the right bedding sand for the base layer before you address joint sand. Use the wrong sand in either spot and you'll be releveling slabs or repointing joints within a season or two.
Best Sand for Patio: Which Type to Use and How Much

Nolan Ellison
23 May 2026
What patio sand actually does (and where it goes)
Sand in a patio build serves two completely separate purposes, and they require two completely different products. The first is bedding sand, which sits between your compacted crushed-stone base and the bottom of your pavers or flagstones. Its job is to provide a thin, screeable layer you can fine-tune for level and height before laying your surface material. The second is joint sand (or pointing sand), which you sweep into the gaps between pavers or stones once they're laid. Its job is to lock the units together, resist weeds, and shed water out of the joints rather than letting it pool under the surface.
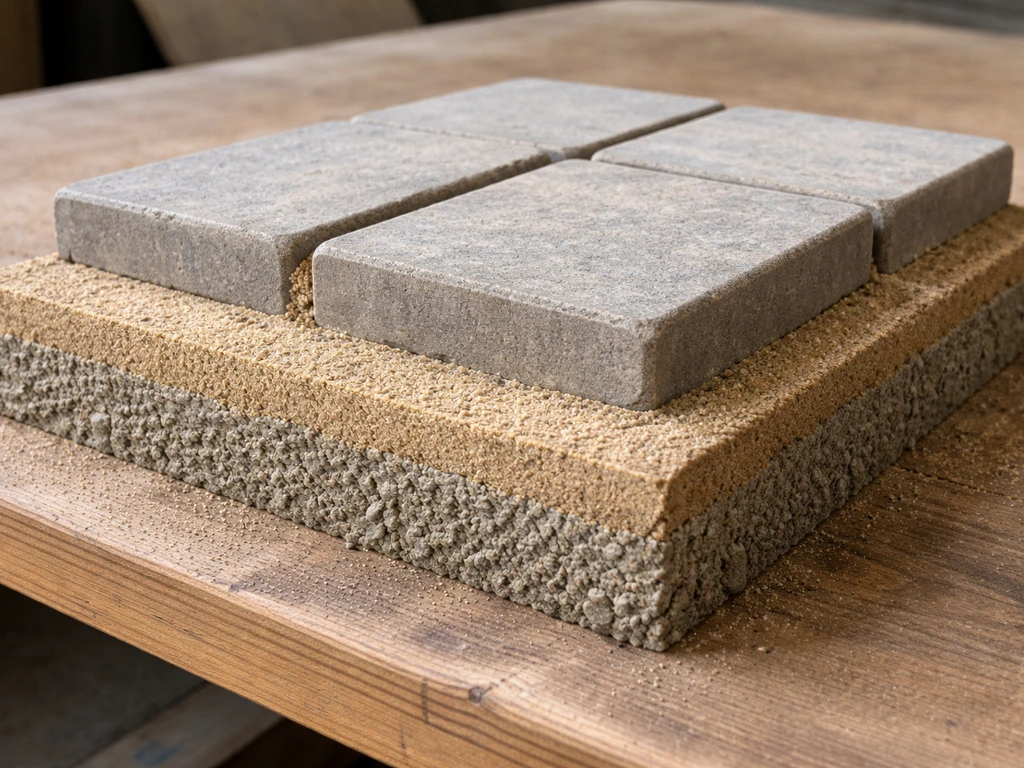
Neither of these is the base layer itself. Before any sand goes down, you need a compacted crushed-stone base, typically 4 to 6 inches of compacted 3/4-inch minus (also called quarry process or road base). That base carries the load and handles drainage. Sand is not a structural layer. Confusing sand with base material is one of the most common reasons DIY patios fail.
Choosing the right sand type for your patio base layer
When people say 'patio sand' or 'paver sand,' they usually mean bedding sand. The best option here is coarse concrete sand graded to ASTM C33, sometimes sold simply as 'concrete sand' or 'bedding sand' at landscape supply yards. The particle size distribution in ASTM C33 sand is coarser and more angular than play sand or mason's sand, which means it compacts firmly, screeds flat, and doesn't shift around under load. The angular particles interlock slightly instead of rolling over each other, which is exactly what you want under a stone or paver surface.
Avoid using fine mason's sand or play sand as bedding. If you’re comparing patio sand vs play sand, the key difference is that play sand is too fine and round-particle to stabilize a paver base Avoid using fine mason's sand or play sand as bedding.. Both are too fine-grained and round-particled. They behave more like a fluid under vibration and load, which means pavers will settle unevenly over time. Play sand is also often too clean and uniform, which ironically makes it less stable as a base layer. It's worth spending a few extra minutes at the supply yard asking specifically for 'concrete sand' or 'bedding sand' rather than just 'sharp sand' or 'coarse sand,' since terminology varies by region.
| Sand Type | Best Use | Particle Size | Use as Bedding? | Use in Joints? |
|---|---|---|---|---|
| Concrete sand (ASTM C33) | Bedding layer under pavers/stones | Coarse, angular | Yes, ideal | No |
| Polymeric sand | Paver/flagstone joints | Fine, with polymer binder | No | Yes, best option |
| Mason's sand | Mortar mixing, pointing mortar base | Fine, rounded | Not recommended | In mortar mixes only |
| Play sand | Sandboxes | Very fine, rounded | No | No |
| Coarse washed sand | Concrete mixing | Coarse, washed | Acceptable | No |
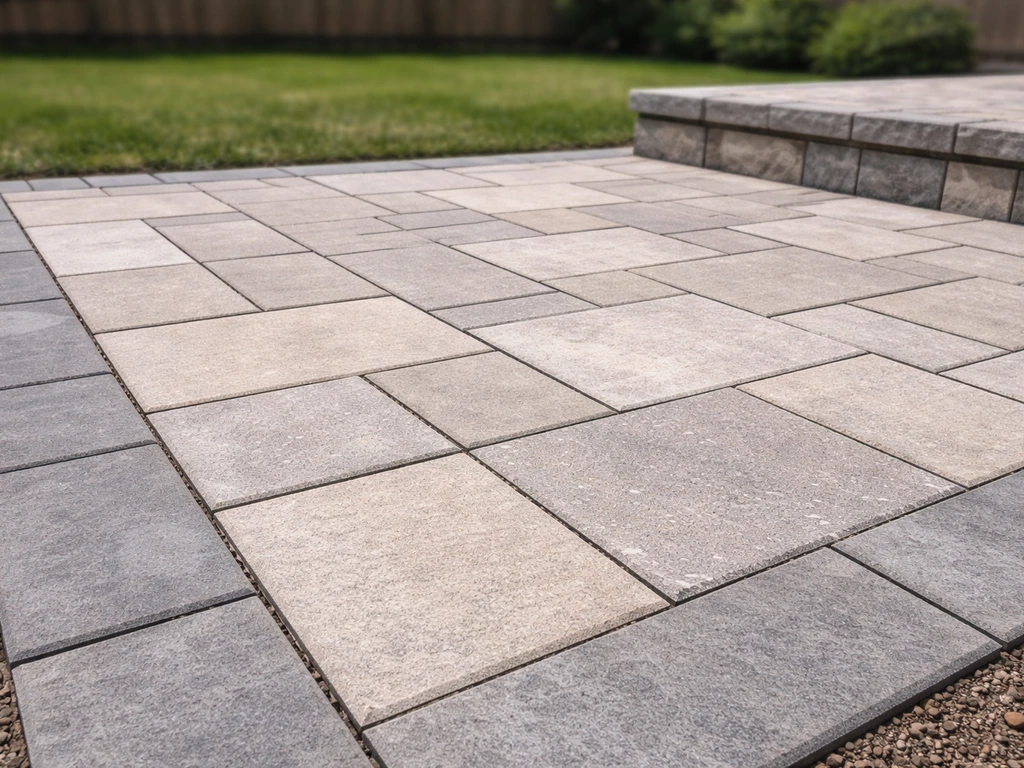
Best sand for stone patios and patio pavers: bedding vs joints

Bedding sand under flagstone and pavers
Whether you're laying concrete pavers, flagstone, natural stone, or brick, the bedding sand recommendation is consistent: ASTM C33 concrete sand at 1 inch thick after compaction. The ICPI (Interlocking Concrete Pavement Institute) recommends a bedding layer between 1 and 1.5 inches before compaction, which settles to roughly 1 inch once the pavers are vibrated into place. Don't go thicker than 1.5 inches before compaction. A thicker sand layer seems like it gives you more adjustment room, but it actually makes the surface less stable and more prone to rocking pavers over time.
For irregular flagstone, the same principle applies. You want a consistent, screeded bed of coarse concrete sand at that 1-inch depth. The temptation with flagstone is to use thicker or thinner sand in different spots to compensate for varying stone thickness. A better approach is to sort your stones by thickness first and use your screed to set a consistent elevation, adjusting for thick vs thin stones by tweaking the screed rail height rather than piling on extra sand in some areas.
Joint sand between pavers and stones
For joints, polymeric sand is the clear winner for most homeowners. It's a fine sand blended with polymer binders that activate when wet. Once it cures, it becomes semi-rigid in the joint, resisting washout from rain and irrigation, suppressing weed germination, and discouraging ants from excavating the joints. The fill target is about 1/8 inch below the top of the paver or just below the chamfer edge, not flush with the top surface. Pavestone and Techniseal both specify this same 1/8-inch-below target in their installation instructions.
For best performance, your joints need to be at least 1.5 inches deep (meaning paver or stone thickness matters). Thinner stones with shallow joints don't hold polymeric sand as well. If you're working with thinner flagstone and very tight joints, a dry-brushed fine stone dust or regular joint sand can work, but expect to top it off annually. Polymeric sand also requires a dry installation window: no rain forecast for 24 hours, temperatures above 32°F, and a surface that's fully dry before you begin sweeping.
If you're pointing a dry-laid flagstone patio with wider joints, consider whether you want a more natural look with regular joint sand (which you'll maintain periodically) or the lower-maintenance polymeric option. For mortar-set stone or tile patios, this whole discussion changes: you're looking at sanded or unsanded grout and pointing mortar rather than loose joint sand. That topic overlaps with what sand to use for patio mortar, which is a separate product category entirely.
How much sand do you actually need
Bedding sand quantity is straightforward to estimate. For a 1-inch-deep layer, you need roughly 0.083 cubic feet per square foot of patio (that's 1 inch divided by 12). For a 200-square-foot patio, that's about 16.6 cubic feet, or just under 0.62 cubic yards. Most landscape supply yards sell sand by the cubic yard, so order 1 cubic yard for a patio up to roughly 320 square feet at 1-inch depth. It's better to have a little left over than to run short mid-screed.
For joint sand, quantity depends on joint width and paver thickness, but a reasonable rule of thumb is 5 to 10 pounds of polymeric sand per 100 square feet for typical 1/4-inch joints with standard-thickness pavers. For example, HowMuchStuff’s polymeric sand calculator uses typical assumptions such as about a 1/4-inch joint width and a common joint depth relationship tied to paver thickness about a 1/4-inch joints. If you have wider joints (3/8 inch or more) or thicker stone, budget 10 to 15 pounds per 100 square feet. Polymeric sand is sold in 40- to 50-pound bags, so for a 200-square-foot patio with average joints, two to three bags is usually sufficient. It's worth buying an extra bag since running out before joints are filled means an unfinished, vulnerable surface.
| Patio Size (sq ft) | Bedding Sand (cubic yards) | Polymeric Sand (lbs, avg joints) | Polymeric Sand (lbs, wide joints) |
|---|---|---|---|
| 100 | 0.31 | 5–10 lbs | 10–15 lbs |
| 200 | 0.62 | 10–20 lbs | 20–30 lbs |
| 300 | 0.93 | 15–30 lbs | 30–45 lbs |
| 400 | 1.24 | 20–40 lbs | 40–60 lbs |
How to install patio sand correctly
Step 1: Build the base first
Before any sand touches the ground, you need a properly compacted crushed-stone base. Excavate 8 to 10 inches below your finished patio surface (accounting for base depth plus stone/paver thickness plus 1 inch of sand). Fill with 3/4-inch minus crushed stone (quarry process or road base) in 2- to 3-inch lifts, compacting each lift with a plate compactor before adding the next. Total compacted base depth should be 4 to 6 inches for a residential patio. Skipping compaction in lifts is one of the most common causes of a patio that settles unevenly after the first winter.
Set your slope during the base stage, not the sand stage. Aim for a 1/8- to 1/4-inch drop per foot of patio width, directing water away from the house. If your base is sloped correctly, the sand layer and the final surface will follow. Trying to correct slope in the sand layer leads to uneven thickness, which leads to instability.
Step 2: Screed the bedding sand
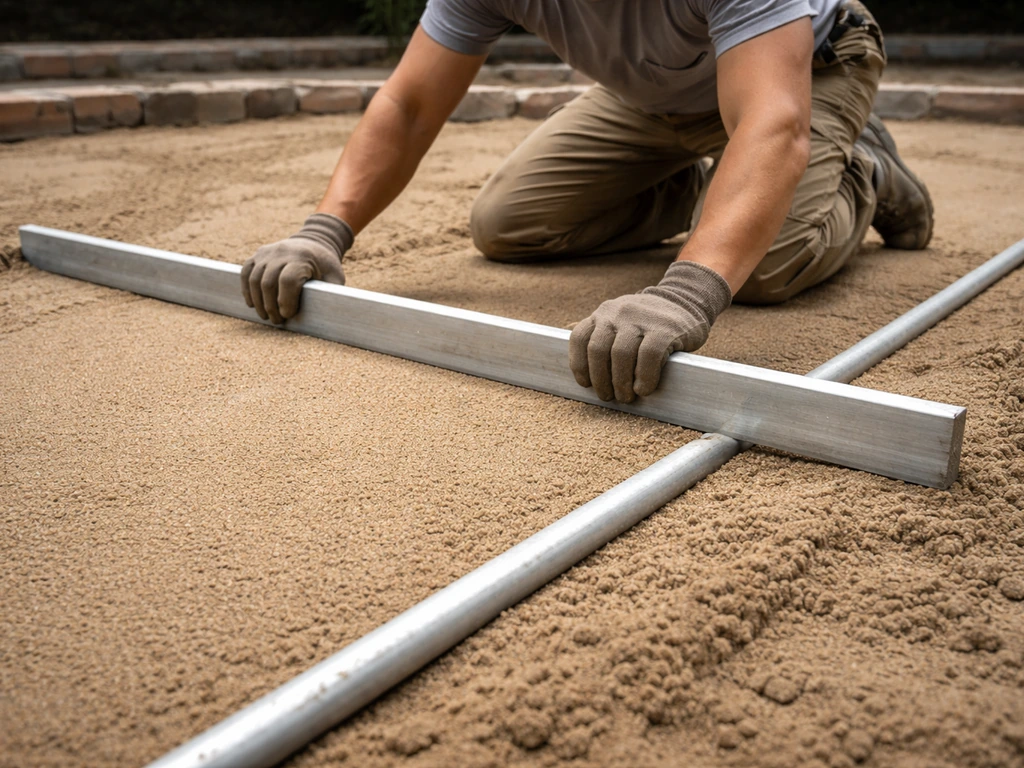
Once your base is compacted and sloped, pour your ASTM C33 concrete sand over the area and screed it to a consistent 1-inch depth. Use metal conduit or screed rails as guides, set to the correct height so your finished paver surface will end up at the right elevation. Pull a straight 2x4 or screed board across the rails to level the sand. Work in manageable sections (6 to 8 feet at a time) and avoid walking on the screeded sand before placing pavers. Any footprints or disturbances in the sand will translate directly to high or low spots in your finished surface.
Step 3: Lay your pavers or stones
Place pavers or stones directly onto the screeded sand, working from one corner outward. Don't slide them into position since that disturbs the sand bed. Set each unit down and tap it into place with a rubber mallet. Maintain consistent joint spacing using plastic spacers or by eye, depending on your material. Once a section is laid, run a plate compactor over the pavers (with a rubber pad attached to protect the surface) to vibrate them into the sand bed and begin interlocking. This vibration step is what actually seats the pavers firmly and brings everything to a consistent finished height.
Step 4: Fill the joints with polymeric sand
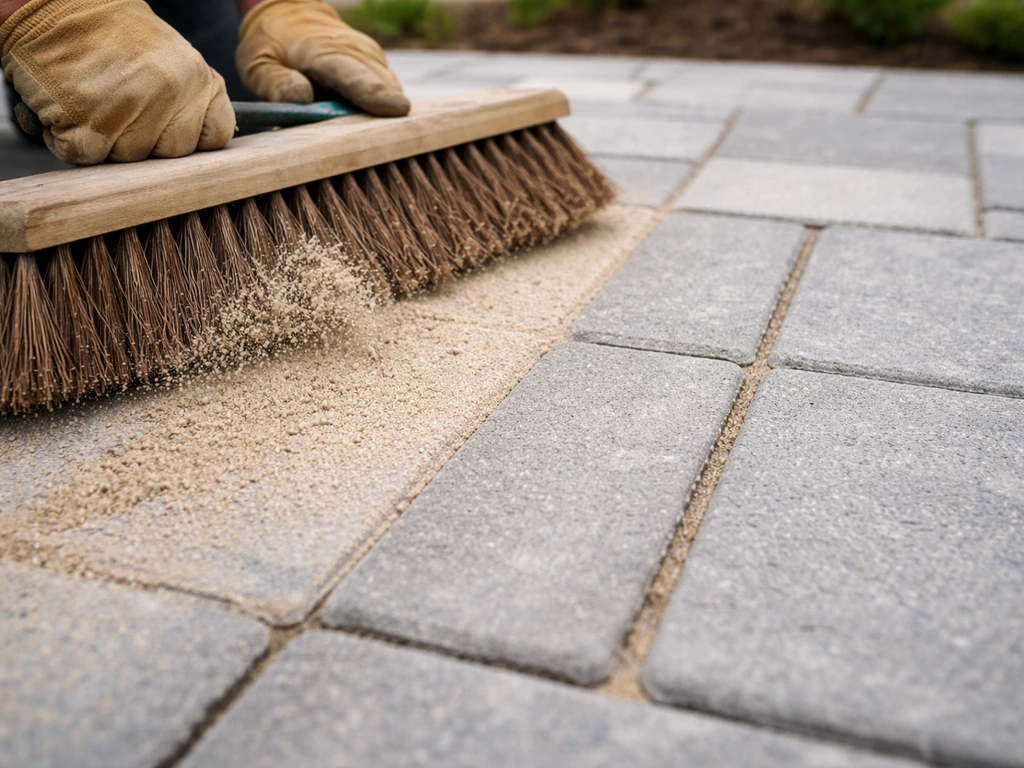
Once all pavers or stones are laid and compacted into the sand bed, sweep polymeric sand across the entire surface with a stiff broom, working it into the joints. For many patios, this is also the key ingredient in finding the best sand for patio joints that stays locked in place after rain polymeric sand. Make multiple passes in different directions. Use a leaf blower on idle (low power) to blow excess dust and fine particles off the paver faces before wetting. This step is critical because polymeric dust left on the surface when you wet it will bond to your pavers and leave a haze. Then mist the surface with a hose using a fine mist setting only, never a strong stream, and never a soaking. Multiple light passes are better than one heavy watering. Pooling water will wash joint sand out of position and ruin the cure.
Mistakes that will cost you time and money
- Using play sand or fine mason's sand as bedding: both are too round and too fine to stay firm under load. Your pavers will rock and settle unevenly within a season.
- Making the bedding sand layer too thick: anything over 1.5 inches pre-compaction creates an unstable base. Sand is not a structural material.
- Skipping base compaction or not compacting in lifts: a loosely placed base will settle unevenly long after the patio is finished, causing dips and rocking pavers.
- Not correcting drainage slope at the base stage: trying to slope the finished surface by varying the sand depth leads to thin and thick spots that behave differently under load.
- Walking on screeded sand before laying pavers: footprints create low spots that show up immediately in the finished surface.
- Soaking polymeric sand when activating it: a hard stream or heavy watering displaces joint sand and causes washout. Use a mist setting only.
- Skipping the leaf blower step with polymeric sand: dust left on the surface when it gets wet bonds to the paver face and leaves a difficult-to-remove haze.
- Installing polymeric sand before rain or in freezing temperatures: below 32°F or with rain within 24 hours, the polymer won't cure properly and you'll need to redo the joints.
- Filling joints flush to the top: joints should be filled to about 1/8 inch below the paver top, not overfilled. Overfilling leads to blowout when the sand swells slightly during curing.
Where to buy sand, what sizes to look for, and how to keep it in place
Where to source bedding sand and polymeric sand
For bedding sand (ASTM C33 concrete sand), your best source is a local landscape supply yard or quarry. They sell by the cubic yard, which is far more economical than bags for any patio over 100 square feet. Ask specifically for 'concrete sand' or 'bedding sand for pavers' and confirm it meets ASTM C33 gradation. If they look at you blankly, ask for their coarsest washed sand. Hardware store bagged sand works in a pinch but gets expensive fast for larger areas.
For polymeric sand, buy from a landscape supply or masonry supply store rather than a big-box home center if you can. The professional-grade products (brands like Techniseal, Pavestone, Pavermate, or StonehengeUS) tend to have more reliable polymer formulations and better installation documentation. Always check the bag for temperature minimums and shelf life, since old or moisture-damaged polymeric sand won't cure properly even if installed correctly.
Keeping sand where it belongs
Even well-installed polymeric sand will need occasional maintenance. After heavy rain seasons or a few years of use, joints can develop gaps from normal freeze-thaw cycling or surface wear. Top them up by sweeping in fresh polymeric sand and re-misting. The existing cured sand provides a good base for the new layer to bond to. Regular maintenance takes 30 minutes for a typical patio and prevents weeds and ants from moving in.
Drainage is the other piece of the puzzle. If water is pooling on or around the patio, it's constantly working against your joint sand and bedding sand. ICPI guidance and common installation practice both emphasize that bedding sand will saturate during rainfall, so the base and subgrade below it must drain. If you're building over clay-heavy soil, consider a geotextile fabric layer between the subgrade and your crushed-stone base to prevent fine soil particles from migrating up into the base over time. It's a small added cost that extends the life of the whole installation significantly.
One safety note worth mentioning: any time you're handling dry sand in bulk, including sweeping polymeric sand across pavers, wear a dust mask rated for fine particles. If you’re planning to keep chickens on or near a sand-set paver patio, double-check that your chosen patio paver sand or joint sand product is labeled safe for animal use and avoid anything treated with harmful additives is patio paver sand safe for chickens. Dry sand contains respirable silica dust, and OSHA sets specific permissible exposure limits for crystalline silica. HealthyChildren.org notes that if you have concerns about contaminants in play sand, you can send a sample to a lab to check for specific issues like crystalline silica and other materials send a sample to a lab to check for specific contaminants like crystalline silica. It's not a reason to avoid the project, but it's a simple precaution that's easy to skip and shouldn't be.
Quick sourcing and sizing reference
- Bedding sand: ASTM C33 concrete sand, sold by the cubic yard at landscape/quarry suppliers. Budget roughly 1 cubic yard per 320 sq ft at 1-inch depth.
- Joint sand: polymeric sand in 40- to 50-lb bags. Budget 5–10 lbs per 100 sq ft for narrow joints, 10–15 lbs for wider joints.
- Base material (not sand): 3/4-inch minus crushed stone, quarry process, or road base. This goes down before any sand and needs to be 4–6 inches compacted.
- Optional: geotextile landscape fabric to separate subgrade from base layer in clay-heavy soils.
- Tools: plate compactor (rent it), screed rails (metal conduit works perfectly), rubber mallet, stiff push broom, and a hose with mist setting for polymeric sand activation.
FAQ
When people say “patio sand,” does that mean the sand under the pavers or the sand in the joints?
For a patio, “patio sand” usually refers to the bedding layer under pavers, not the joint infill. If you want the joints to stay filled and weed resistant, you must also use a polymeric (or a regular joint sand as a fallback) and install it after the pavers are vibrated into place.
Can I use a thicker layer of bedding sand to fix small low spots?
No. Bedding sand is for leveling and seating only, and it should be around 1 inch after compaction. If you pour more sand to fix unevenness, the extra depth can “rock” under foot traffic and becomes harder to compact uniformly, which leads to settlement.
What if it threatens to rain after I sweep in polymeric sand?
Polymeric sand should not be installed on a wet or rainy day window. Plan for a fully dry surface, no rain for about 24 hours, temperatures above 32°F, and misting with light spray only. Strong watering or puddling prevents proper cure and can wash the joints out.
My stones are thin and the joints look shallow, can polymeric sand still work?
If your joints are too shallow, polymeric sand cannot form a stable mass. A practical fix is to verify paver or stone thickness gives at least about 1.5 inches of joint depth, and adjust your base or replacement material if needed rather than assuming you can “make it work” with thin stones.
What’s the difference in maintenance if I choose regular joint sand instead of polymeric sand?
Yes, but expect extra upkeep. Dry-blended non-polymeric joint sand can be topped up after heavy rains because it typically migrates more easily. If you choose that route for a wider-joint, natural look, plan on periodic refilling (and a better sweep-out strategy) instead of one-and-done curing.
I can’t find “ASTM C33” at my local yard, what should I ask for instead?
For bedding sand, you want concrete sand graded for paver bedding (commonly ASTM C33), coarse enough to lock and compact firmly. If you only have access to “washed sand” at the yard, ask for the coarsest option suitable for bedding and confirm particle grading, because too-fine sand behaves like fill that can shift.
How do I know I’m compacting enough, and what tool mistakes cause uneven patios?
Compaction is the control point that prevents settlement, both in the crushed-stone base and during paver seating. Make sure you compact the base in 2- to 3-inch lifts and then vibrate the pavers using a rubber pad, walking only on areas already protected by the placed pavers.
What should I do if water still pools after the patio is finished?
A quick field check is whether water disappears without standing on the surface or collecting along the house side. If water pools, joint sand will fail faster because it repeatedly gets flushed. Fix drainage during the base stage by restoring slope, then rebuild if needed, rather than trying to correct water behavior once sand and pavers are set.
How can I avoid the white haze on pavers after polymeric sand cures?
If polymeric sand joints haze after wetting, it usually means polymeric dust stayed on the paver faces and bonded before it could be brushed away. The cure is typically to wait for full drying, then clean off haze with manufacturer-approved methods, and prevent repeat issues by thoroughly blowing dust off at idle power before misting.
What happens if I accidentally use bedding sand in the joints?
You should avoid mixing bedding and joint purposes. If you use the wrong sand in the joints, weeds and washout become likely, and you may see shifting lines after rain or freeze-thaw. Keep products separate, then sweep joint sand only after the pavers are fully seated and vibrating is complete.
How much extra bedding sand should I order for a large, irregular patio shape?
For a typical patio, most people need about 1 cubic yard of bedding sand per roughly 320 square feet at a 1-inch-after-compaction depth. If your patio has thicker pavers, deeper bedding requirements, or waste from screeding loss, add extra (for example one additional 0.25 to 0.5 cubic yards for larger or irregular projects) to avoid running short mid-install.